Java并发程序设计
上周为业务部门做数据跑批,以为几十万条数据很快就能跑完,程序跑起来就放在那没管,谁知道忙完其他事情回来后发现程序还卡在那里,无奈换多线程重新跑了一遍作罢。把Java并发程序相关的知识做了下归集,希望对大家有所帮助。
一、使用线程的经验
1、启动线程的方式多种多样,举几个例子:
        Thread thread = new Thread("thread name") {
            @Override
            public void run() {
                System.out.println(currentThread().getName() + " run");

            }
        };
        thread.start();
Thread thread = new Thread() {
@Override
public void run() {
System.out.println(currentThread().getName() + " run");
}
};
thread.setName("thread name");
thread.start(); public class MyThread extends Thread {
public MyThread() {
super("thread name");
}
public void run() {
System.out.println(currentThread().getName() + " run");
}
}
Thread thread = new MyThread();
thread.start(); Runnable task = new Runnable() {
@Override
public void run() {
System.out.println(Thread.currentThread().getName() + " run");
}
};
Thread thread = new Thread(task);
thread.setName("thread name");
thread.start();
        Thread thread = new Thread(task, "thread name");
        thread.start();
需要注意的是,无论何种方式,启动一个线程,就要给它一个名字。这对排错诊断系统监控有帮助。否则诊断问题时,无法直观知道某个线程的用途。
2、要响应线程中断
        Thread thread = new Thread("interrupt test") {
            public void run() {
                for (; ; ) {
                    doXXX();
                    if (Thread.interrupted()) {
                        break;
                    }
                }
            }
        };

        thread.start();
public void foo() throws InterruptedException {
if (Thread.interrupted()) {
throw new InterruptedException();
}
} Thread thread = new Thread("interrupt test") {
public void run() {
for (; ; ) {
try {
doXXX();
} catch (InterruptedException e) {
break;
} catch (Exception e) {
}
}
}
};
thread.start();程序应该对线程中断作出恰当的响应。
3、使用ThreadLocal
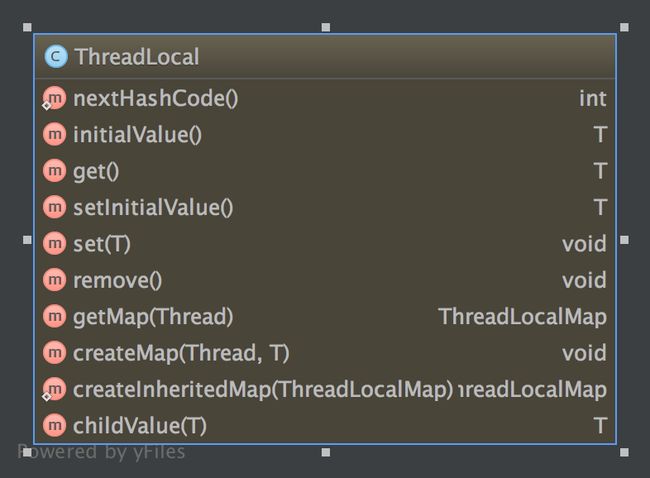
Threadlocal 即local variable(线程局部变量)。它的功用非常简单,就是为每一个使用该变量的线程都提供一个变量值的副本,是每一个线程都可以独立地改变自己的副本,而不会和其它线程的副本冲突。从线程的角度看,就好像每一个线程都完全拥有该变量。
使用场景
1、toTo keep state with a thread (user-id, transaction-id, logging-id)
2、To cache objects which you need frequently
3、隐式传参
2、To cache objects which you need frequently
3、隐式传参
需要注意的是,使用ThreadLocal,一般都是声明在静态变量中,如果不断的创建ThreadLocal而且没有调用其remove方法,将会导致内存泄露。如果是static的ThreadLocal,一般不需要调用remove。
二、JVM线程池Executor
1、任务的提交者和执行者
为了方便并发执行任务,出现了一种专门用来执行任务的实现,也就是Executor。 由此,任务提交者不需要再创建管理线程,使用更方便,也减少了开销。

java.util.concurrent.Executors是Executor的工厂类,通过Executors可以创建你所需要的 Executor。
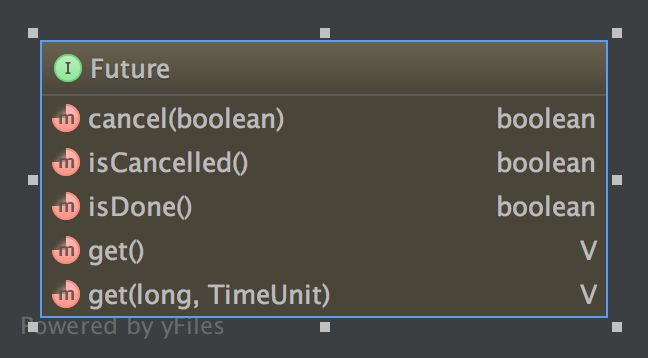
2、任务的提交者和执行者之间的通讯手段
Task Submitter把任务提交给Executor执行,他们之间需要一种通讯手段,这种手段的具体实现,通常叫做Future。Future通常包括get(阻塞至任务完成), cancel,get(timeout)(等待一段时间) 等等。Future也用于异步变同步的场景。
ExecutorService executor = Executors.newSingleThreadExecutor();
Callable三、阻塞队列以及简单实现
1、阻塞队列的用法
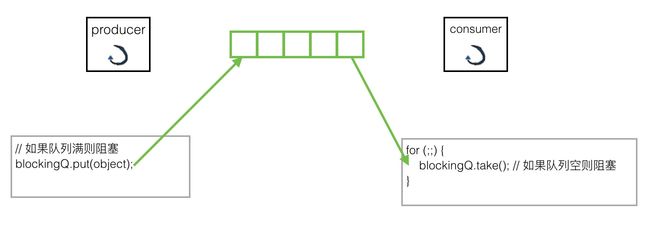
阻塞队列,是一种常用的并发数据结构,常用于生产者-消费者模式。在Java中,有很多种阻塞队列:
ArrayBlockingQueue
LinkedBlockingQueue
SynchronousQueue
PriorityBlockingQueue
CompletionService (BlockingQueue + Executor) TransferQueue (JDK 7中更快的SynchronousQueue)
LinkedBlockingQueue
SynchronousQueue
PriorityBlockingQueue
CompletionService (BlockingQueue + Executor) TransferQueue (JDK 7中更快的SynchronousQueue)
其中ArrayBlockingQueue 最为常用。
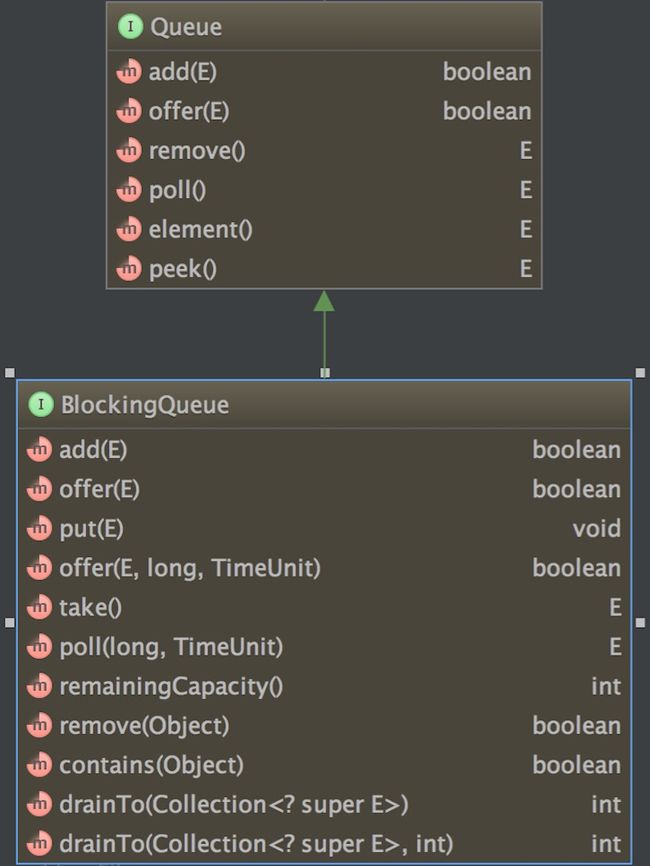
使用BlockingQueue的时候,尽量不要使用从Queue继承下来的方法,否则就失去了Blocking的特性了。在BlockingQueue中,要使用put和take,而非offer和poll。如果 要使用offer和poll,也是要使用带等待时间参数的offer和poll。
//这种方式是错误的,poll接口不会等待队列中有数据就直接返回
final BlockingQueue //正确的方式1
final BlockingQueue //正确的方式2
final BlockingQueue
通过线程间的协调手段实现一个阻塞队列
(1)
public class BlockingQ {
private Object notEmpty = new Object();
private Queuepublic class BlockingQ {
private Object notEmpty = new Object();
private Object notFull = new Object();
private Queuepublic class BlockingQ {
private Lock lock = new ReentrantLock(); // 一个锁可以创建多个Condition
private Condition notEmpty = lock.newCondition();
private Condition notFull = lock.newCondition();
private Queue四、lock free算法与乐观锁
1、atomic
在并发环境下对数字进行原子加操作,需要加锁以保证线程安全执行。
public class Counter {

    private volatile int count = 0;

    public synchronized void increment() {
        count++;
    }

    public int getCount() {
        return count;
    }

}public class Counter {
private AtomicInteger count = new AtomicInteger();
public void increment() {
count.incrementAndGet();
}
public int getCount() {
return count.get();
}
}public final int incrementAndGet() {
for (;;) {
int current = get();
int next = current + 1;
if (compareAndSet(current, next))
return next;
}
}
1 循环
2 CAS (CompareAndSet)
3 回退
AtomicInteger中CompareAndSet调用了jni 的 native方法,具体实现可以参考这篇文章:
http://www.blogjava.net/mstar/archive/2013/04/24/398351.html
lock free的思路可以用户数据库的并发读写操作,也就是我们通常所说的乐观锁,在数据库竞争不是很激烈的情况下,会比 select for update 有更高的效率。
public class SequenceDao extends SqlMapClientDaoSupport {
    public boolean compareAndSet(String name, int value, int expect) {
        Map parameters = new HashMap();
        parameters.put("name", name);
        parameters.put("value", value);
        parameters.put("expect", expect);

        // UPDATE t_sequence SET value = #value# WHERE name = #name# AND value = #expect#
        int updateCount = getSqlMapClientTemplate().update("Sequence.compareAndSet", parameters);
        return updateCount == 1;
    }
}
public class SequenceService {
@Transactional(propagation = Propagation.NOT_SUPPORTED)
public synchronized void increment(String sequenceName) {
for (;;) { // 1、 循环
int value = sequenceDao.getValue(sequenceName);
if (sequenceDao.compareAndSet(sequenceName, value + 1, value)) { // 2、3、 CAS 和 回退
break;
}
}
}
}在 jdk 的java.util.concurrent包中,还有一个经典的并发数据结构ConcurrentHashMap。如果使用普通的HashMap,需要加锁来避免并发的问题:
class BeanManager {
    private Map map = new HashMap();

    public Object getBean(String key) {
        synchronized (map) {
            Object bean = map.get(key);
            if(bean==null)
            {
                map.put(key, createBean());
                bean = map.get(key);
            }
            return bean;
        }
    }
}
使用ConcurrentHashMap,锁由数据结构管理,避免我们直接使用锁。
class BeanManager {
    private ConcurrentMap map = new ConcurrentHashMap();

    public Object getBean(String key) {
        Object bean = map.get(key);
        if (bean == null) {
            map.putIfAbsent(key, createBean());
            bean = map.get(key);
        }
        return bean;
    }
}
https://yq.aliyun.com/articles/38213
3、CopyOnWriteArrayList
COW是一种很古老的技术,CopyOnWrite容器即写时复制的容器。通俗的理解是当我们往一个容器添加元素的时候,不直接往当前容器添加,而是先将当前容器进行Copy,复制出一个新的容器,然后新的容器里添加元素,添加完元素之后,再将原容器的引用指向新的容器。这样做的好处是我们可以对CopyOnWrite容器进行并发的读,而不需要加锁,因为当前容器不会添加任何元素。所以CopyOnWrite容器也是一种读写分离的思想,读和写不同的容器。如果读的时候有多个线程正在向CopyOnWriteArrayList添加数据,读还是会读到旧的数据,因为写的时候不会锁住旧的CopyOnWriteArrayList。
当我们读取一个list的时候,为了避免读的时候list被改变,经常需要这样加锁。
public class Engine {

    private List listeners = new ArrayList();

    public boolean addListener(Listener listener) {
        synchronized (listeners) {
            return listeners.add(listener);
        }
    }

    public void doSomeThing() {
        synchronized (listeners) {
            for (Listener listener : listeners) {
                listener.handle();
            }
        }
    }

}
适当使用CopyOnWriteArrayList,能够提高读操作时的效率。
public class Engine {

    private List listeners = new CopyOnWriteArrayList();

    public boolean addListener(Listener listener) {
        return listeners.add(listener);
    }

    public void doSomeThing() {
        for (Listener listener : listeners) {
            listener.handle();
        }
    }

}
五、锁的使用技巧
1、锁的使用,最重要的一点就是能不使用锁就不要使用锁,多一个锁操作就多一层复杂度,多一层风险。尽量使用第四节中的 atomic, ConcurrentMap,CopyOnWriteArrayList。
2、一定要使用锁的时候,注意获得锁的顺序,相反顺序获得锁,就容易产生死锁。
3、死锁经常是无法完全避免的,鸵鸟策略被很多基础框架所采用。所谓鸵鸟算法就是当死锁不存在,等死锁发生之后重启进程。
4、如果怀疑进程产生了死锁,可以通过Dump线程的StackTrace,例如linux下执行命令 kill -3 ,或者jstack –l ,或 者使用Jconsole连接上去查看线程的StackTrace,由此来诊断死锁问题。
5、通常外部锁经常会导致进程的死锁,如数据库的锁。
六、并发流控制CountDownLatch、CyclicBarrier和Semaphore
提供了一些非常有用的辅助类来帮助我们进行并发编程,比如CountDownLatch,CyclicBarrier和Semaphore
CountDownLatch的简单使用如下:
1、当你启动了一个线程,你需要等它执行结束, 此时CountDownLatch也许是一个很好的选择。
        final int COUNT = 10;
        final CountDownLatch completeLatch = new CountDownLatch(COUNT);
        for (int i = 0; i < COUNT; ++i) {
            Thread thread = new Thread("worker thread " + i) {
                public void run() {
                    //do something
                    completeLatch.countDown(); }
            };
            thread.start(); }
        completeLatch.await();
2、当你启动很多线程,你需要这些线程等到通知后才真正开始,CountDownLatch也许是一个很好的选择。
        final CountDownLatch startLatch = new CountDownLatch(1);
        for (int i = 0; i < 10; ++i) {
            Thread thread = new Thread("worker thread " + i) {
                public void run() {
                    try{
                        startLatch.await();
                    }catch (InterruptedException e){
                        return;
                    }
                    //do something
                }
            };
            thread.start();
        }
        // do something
        startLatch.countDown();
具体的使用可以参考这篇文章,讲的非常详细:http://www.cnblogs.com/dolphin0520/p/3920397.html
后续:
感觉大脑被掏空 ,并发编程的基础知识都总结进来了(但愿吧 )。推荐一些网络资源供大家学习:
维基百科并发控制专题
http://en.wikipedia.org/wiki/Category:Concurrency_control
维基百科并行计算专题
http://en.wikipedia.org/wiki/Parallel_computing
维基百科非阻塞同步专题
http://en.wikipedia.org/wiki/Non-blocking_synchronization
Herb Sutter的个人主页
http://en.wikipedia.org/wiki/Category:Concurrency_control
维基百科并行计算专题
http://en.wikipedia.org/wiki/Parallel_computing
维基百科非阻塞同步专题
http://en.wikipedia.org/wiki/Non-blocking_synchronization
Herb Sutter的个人主页
http://www.gotw.ca
Doug Lea的个人主页
Doug Lea的个人主页
http://g.oswego.edu/
非阻塞同步算法论文
http://www.cs.wisc.edu/trans-memory/biblio/swnbs.html
ACE关于并发和网络的指南
非阻塞同步算法论文
http://www.cs.wisc.edu/trans-memory/biblio/swnbs.html
ACE关于并发和网络的指南
http://www.cs.wustl.edu/~schmidt/tutorials-patterns.html
如果大家在学习中有什么困惑,可以加入小雄老师讲java群一起讨论。进群可获得小雄老师一对一在线指导。进群方式如下:
微信群:

qq群: