【深度学习系列(六)】:RNN系列(4):带注意力机制的seq2seq模型及其实战(2):为图片添加内容描述
这里主要是对前面基于Attention的seq2seq的实战,通过seq2seq来对图片进行描述,废话不多说,一起动手吧
目录
一、数据集
1.1、读取文本标签并存储
1.2、将图片转化为特征数据并存储
1.3、对文本数据进行预处理——过滤、建立字典、对齐和向量化
1.4、创建数据集
二、基于Attention的seq2seq模型搭建
2.1、编码器
2.2、构建Bahdanau类型的注意力机制
2.3、解码器
三、在动态图中训练seq2seq模型
3.1、定义模型
3.2、模型训练
四、模型预测及使用
六、总结
一、数据集
COCO数据集是微软发布的一个可以用来作图像识别的熟练数据集,图像主要从复杂场景中截取。这里我们使用COCO2014的数据集来为图片添加描述,COCO数据集的下载地址:
http://cocodataset.org/#download
该训练集主要包括:训练集图片82783张、验证集40504张、测试集40775张,共分成80个类。并配有目标检测的矩形标注、语义分割的散点标注、基于人体关键点的标注以及对图片的描述标注。
由于COCO2014数据集过多,这里只选取300张图片用于训练演示,其具体的实现步骤如下:
- 读取文本标签并存储
- 将图片转化为特征数据并存储
- 对文本数据进行预处理——过滤、建立字典、对齐和向量化
- 创建Dataset数据集
从上面步骤可知,我们需要将图片进行特征提取并转化为.npy格式的数据,并将该特征向量作为编码器的输入数据,这里我们采用已经定义好的Reset50模型进行提取特征,所以我们还需要下载相关预训练模型:
resnet50_weights_tf_dim_ordering_tf_kernels_notop.h5
这里我们提供了已经训练好的ResNet50预训练模型,以及已经提取特征后的训练数据,方便下载,具体地址为:
链接: https://pan.baidu.com/s/13ne5HuovZKvqvPHwNVrpvw 提取码: deea
1.1、读取文本标签并存储
通过train_caption 、img_filenames 来存储文件名及其描述标签,这里我们需要为图片描述标签的首末加上
with open(annotation_file, 'r') as f:  # 加载标注文件
        annotations = json.load(f)

    train_caption = []  # 存储图片对应的标题
    img_filenames = []  # 存储图片的路径

    # 获取全部文件及对应的标注文本
    for annot in annotations['annotations']:
        caption = ' ' + annot['caption'] + ' '
        img_id = annot['image_id']

        full_coco_image_path = 'COCO_train2014_' + "%012d.jpg" % (img_id)

        img_filenames.append(full_coco_image_path)
        train_caption.append(caption)

        if len(train_caption) >= num_example:
break 1.2、将图片转化为特征数据并存储
在训练模型时,模型每次迭代都需要将图片转化为特征再进行计算,这使得程序需要进行大量的重复操作。这里可以在前期预处理环节直接将图片转化为特征向量并存储起来,这样可以省去大量的重复操作。
这里,我们使用ResNet50作为特征提取的基础模型,将模型的导数第二层的特征作为整个模型的输入,其输入形状为:(batch_size,49,2048)。具体实现过程如下:
def make_numpy_feature(numpyPATH, img_filename, PATH, weights=RESNET50_WEIGHTS):
    '''
    将图片转化为特征数据
    :param numpyPATH:存储提取好特征后的存储文件夹
    :param img_filename:图片文件列表
    :param PATH: 图片所在的文件夹
    :param weights: ResNet50模型的权重
    :return:
    '''
    if os.path.exists(numpyPATH):  # 去除已有文件夹
        shutil.rmtree(numpyPATH, ignore_errors=True)

    os.mkdir(numpyPATH)  # 新建文件夹

    size = [224, 224]  # 设置输出尺寸
    batch_size = 10  # 批量大小

    def load_image(image_path):
        '''输入图片的预处理'''
        img = tf.compat.v1.read_file(PATH + image_path)
        img = tf.image.decode_jpeg(img, channels=3)
        img = tf.image.resize(img, size)
        # 使用Reset模型的统一预处理
        img = tf.keras.applications.resnet50.preprocess_input(img)
        return img, image_path

    # 创建ResNet模型
    image_model = ResNet50(weights=weights, include_top=False)
    new_input = image_model.input
    # 获取ResNet导数第二层(池化前的卷积结果)
    hidden_layer = image_model.layers[-2].output
    image_feature_extract_model = tf.keras.Model(new_input, hidden_layer)
    image_feature_extract_model.summary()

    # 对文件目录去重
    encode_train = sorted(set(img_filename))

    # 图片数据集
    image_dataset = tf.data.Dataset.from_tensor_slices(encode_train).map(load_image).batch(batch_size)

    for img, path in image_dataset:
        batch_feature = image_feature_extract_model(img)
        print(batch_feature.shape)
        batch_feature = tf.reshape(batch_feature, (batch_feature.shape[0], -1, batch_feature.shape[3]))
        print(batch_feature.shape)
        for bf, p in zip(batch_feature, path):
            path_of_feature = p.numpy().decode('utf-8')
np.save(numpyPATH + path_of_feature, bf.numpy())1.3、对文本数据进行预处理——过滤、建立字典、对齐和向量化
在对COCO2014图片数据进行预处理后还需要对每个文本标签进行相关预处理,具体步骤为:
- 过滤文本:去除无效字符
- 建立字典:生成正向和反向的字典
- 向量化文本和对齐操作:将文本按照字典进行向量化,并按照指定长度进行对齐操作
具体代码实现如下:
ef text_preprocessing(train_caption, max_vocab_size):
    '''
    文本标签预处理:(1)文本过滤;(2)建立字典;(3)向量化文本以及文本对齐
    :param train_caption: 文本标签数据集
    :param max_vocab_size: 限制最大字典的大小
    :return:
    '''
    # 文本过滤,去除无效字符
    tokenizer = tf.keras.preprocessing.text.Tokenizer(num_words=max_vocab_size,
                                                      oov_token="",
                                                      filters='!"#$%&()*+.,-/:;=?@[\]^_`{|}~ ')
    tokenizer.fit_on_texts(train_caption)

    # 建立字典,构造正反向字典
    tokenizer.word_index = {key: value for key, value in tokenizer.word_index.items() if value <= max_vocab_size}
    # 向字典中加入字符
    tokenizer.word_index[tokenizer.oov_token] = max_vocab_size + 1
    # 向字典中加入字符
    tokenizer.word_index[''] = 0

    index_word = {value: key for key, value in tokenizer.word_index.items()}

    # 向量化文本和对齐操作,将文本按照字典的数字进行项向量化处理,
    # 并按照指定长度进行对齐操作(多余的截调,不足的进行补零)
    train_seqs = tokenizer.texts_to_sequences(train_caption)
    cap_vector = tf.keras.preprocessing.sequence.pad_sequences(train_seqs, padding='post')
    max_length = len(cap_vector[0])  # 标签最大长度

    return cap_vector, max_length, tokenizer.word_index, index_word
1.4、创建数据集
这里使用tf.data.Dataset接口将特征文件和文本向量组合在一起生成数据集,为训练模型作准备,具体实现如下:
def load_data(annotation_file, PATH, numpyPATH,
              num_example=NUM_EXAMPLE, max_vocab_size=MAX_VOCAB_SIZE):
    '''
    对数据集进行预处理并加载数据集
    :param annotation_file: 训练数据的标注文件
    :param PATH: 图片数据集
    :param numpyPATH: 将图片提取特后的存储的位置
    :param num_example: 这里选择其中300个样本数据(注意为了方便训练演示,你也可以训练全部数据集)
    :param max_vocab_size: 限定字典的最大长度
    :return:
    '''
    with open(annotation_file, 'r') as f:  # 加载标注文件
        annotations = json.load(f)

    train_caption = []  # 存储图片对应的标题
    img_filenames = []  # 存储图片的路径

    # 获取全部文件及对应的标注文本
    for annot in annotations['annotations']:
        caption = ' ' + annot['caption'] + ' '
        img_id = annot['image_id']

        full_coco_image_path = 'COCO_train2014_' + "%012d.jpg" % (img_id)

        img_filenames.append(full_coco_image_path)
        train_caption.append(caption)

        if len(train_caption) >= num_example:
            break

    # 将图片转化为特征数据,并进行存储
    if os.path.exists(numpyPATH):
        make_numpy_feature(numpyPATH, img_filenames, PATH)

    # 文本数据的预处理
    cap_vector, max_length, word_index, index_word = text_preprocessing(train_caption, max_vocab_size)

    # 将数据拆分为训练集和测试集
    img_name_train, img_name_val, cap_train, cap_val = \
        train_test_split(img_filenames, cap_vector, test_size=0.2, random_state=0)

    return img_name_train, cap_train, img_name_val, cap_val, max_length, word_index, index_word


def dataset(annotation_file, PATH, numpyPATH, batch_size):
    '''
    创建数据集
    :param instances_file: 训练数据
    :param annotation_file: 训练数据的标注文件
    :param PATH: 图片数据集
    :param numpyPATH: 将图片提取特后的存储的位置
    :param batch_size: 数据集的batch size
    :return:
    '''
    img_name_train, cap_train, img_name_val, cap_val, max_length, word_index, index_word = \
        load_data(annotation_file, PATH, numpyPATH)

    def map_func(img_name, cap):
        #         print("===========================================",numpyPATH+str(img_name.numpy()).split("\'")[1]+'.npy')
        img_tensor = np.load(numpyPATH + str(img_name.numpy()).split("\'")[1] + '.npy')
        return img_tensor, cap

    train_dataset = tf.data.Dataset.from_tensor_slices((img_name_train, cap_train))

    train_dataset = train_dataset.map(lambda item1, item2: tf.py_function(
        map_func, [item1, item2], [tf.float32, tf.int32]), num_parallel_calls=8)

    train_dataset = train_dataset.shuffle(1000).batch(batch_size).prefetch(1)

    return train_dataset, img_name_val, cap_val, max_length, word_index, index_word
二、基于Attention的seq2seq模型搭建
2.1、编码器
这里编码器比较简单,就以一个全链接层,该全链接层的作用主要是对原始图片特在数据进行转换处理,使图片特在的维度与嵌入层的维度相同,最终输出的形状为(batch_size,49,embeding)。具体代码实现如下:
# 编码器模型
class DNN_Encoder(tf.keras.Model):
    def __init__(self, embedding_dim):
        super(DNN_Encoder, self).__init__()
        # keras的全连接支持多维输入。仅对最后一维进行处理
        self.fc = tf.keras.layers.Dense(embedding_dim)  # (batch_size, 49, embedding_dim)

    def call(self, inputs, training=None, mask=None):
        x = self.fc(inputs)
        x = tf.keras.layers.Activation('relu')(x)

        return x
2.2、构建Bahdanau类型的注意力机制
class BahdanauAttention(tf.keras.Model):
    def __init__(self, units):
        super(BahdanauAttention, self).__init__()
        self.W1 = tf.keras.layers.Dense(units)
        self.W2 = tf.keras.layers.Dense(units)
        self.V = tf.keras.layers.Dense(1)

    def call(self, features,  # features形状(batch_size, 49, embedding_dim)
             hidden):  # hidden(batch_size, hidden_size)

        hidden_with_time_axis = tf.expand_dims(hidden, 1)  # (batch_size, 1, hidden_size)

        score = tf.nn.tanh(self.W1(features) + self.W2(hidden_with_time_axis))  # (batch_size, 49, hidden_size)

        attention_weights = tf.nn.softmax(self.V(score), axis=1)  # (batch_size, 49, 1)

        context_vector = attention_weights * features  # (batch_size, 49, hidden_size)
        context_vector = tf.reduce_sum(context_vector, axis=1)  # (batch_size,  hidden_size)

        return context_vector, attention_weights
2.3、解码器
解码器的主要步骤有:
- 用注意力机制对编码器的输出特征和上一时刻解码器的输出隐藏层进行处理(注意,如果为t=1时刻,这时需要的隐藏层为我们初始化的隐藏层)
- 使用GRU进行RNN模型的搭建
- 使用全链接层处理输出得到输出结果
def gru(units):
    if tf.test.is_gpu_available():
        return tf.keras.layers.CuDNNGRU(units,
                                        return_sequences=True,
                                        return_state=True,
                                        recurrent_initializer='glorot_uniform')
    else:
        return tf.keras.layers.GRU(units,
                                   return_sequences=True,
                                   return_state=True,
                                   recurrent_activation='sigmoid',
                                   recurrent_initializer='glorot_uniform')

# 解码器模型
class RNN_Decoder(tf.keras.Model):
    def __init__(self, embedding_dim, units, vocab_size):
        super(RNN_Decoder, self).__init__()
        self.units = units
        self.embedding = tf.keras.layers.Embedding(vocab_size, embedding_dim)
        self.gru = gru(self.units)
        self.fc1 = tf.keras.layers.Dense(self.units)
        self.fc2 = tf.keras.layers.Dense(vocab_size)

        self.attention = BahdanauAttention(self.units)

    def call(self, inputs, features, hidden, training=None, mask=None):
        # 返回注意力特征向量和注意力权重
        context_vector, attention_weights = self.attention(features, hidden)

        x = self.embedding(inputs)

        x = tf.concat([tf.expand_dims(context_vector, 1), x], axis=-1)  # (batch_size, 1, embedding_dim + hidden_size)
        output, state = self.gru(x)  # 使用循环网络gru进行处理

        x = self.fc1(output)  # (batch_size, max_length, hidden_size)
        x = tf.reshape(x, (-1, x.shape[2]))  # (batch_size * max_length, hidden_size)

        x = self.fc2(x)  # (batch_size * max_length, vocab)

        return x, state, attention_weights

    def reset_state(self, batch_size):
        return tf.zeros((batch_size, self.units))
三、在动态图中训练seq2seq模型
3.1、定义模型
这里我们需要定义模型的损失函数、优化器、模型创建等操作,具体实现如下:
# 加载数据
batch_size = 20
annotation_file = r'annotations/captions_train2014.json'
PATH = r"train2014/"
numpyPATH = './numpyfeature/'
dataset, img_name_val, cap_val, max_length, word_index, index_word = dataset(annotation_file, PATH, numpyPATH,
                                                                             batch_size)

# 模型搭建
embedding_dim = 256
units = 512
vocab_size = len(word_index)  # 字典大小

# 图片特征(47, 2048)
features_shape = 2048
attention_features_shape = 49

# 创建模型对象字典
model_objects = {
    'encoder': DNN_Encoder(embedding_dim),
    'decoder': RNN_Decoder(embedding_dim, units, vocab_size),
    'optimizer': tf.train.AdamOptimizer(),
    'step_counter': tf.train.get_or_create_global_step(),
}

checkpoint_prefix = os.path.join("mytfemodel/", 'ckpt')
checkpoint = tf.train.Checkpoint(**model_objects)
latest_cpkt = tf.train.latest_checkpoint("mytfemodel/")
if latest_cpkt:
    print('Using latest checkpoint at ' + latest_cpkt)
    checkpoint.restore(latest_cpkt)


def loss_mask(real, pred):
    '''使用Softmax屏蔽计算损失'''
    mask = 1 - np.equal(real, 0)  # 批次中被补0的序列不参与计算loss
    loss_ = tf.nn.sparse_softmax_cross_entropy_with_logits(labels=real, logits=pred) * mask
    return tf.reduce_mean(loss_)


def all_loss(encoder, decoder, img_tensor, target):
    loss = 0
    hidden = decoder.reset_state(batch_size=target.shape[0])

    dec_input = tf.expand_dims([word_index['']] * target.shape[0], 1)
    feature = encoder(img_tensor)  # (batch_size,49,256)

    for i in range(1, target.shape[1]):
        predictions, hidden, _ = decoder(dec_input, feature, hidden)
        loss += loss_mask(target[:, i], predictions)

        dec_input = tf.expand_dims(target[:, i], 1)
    return loss


grad = tfe.implicit_gradients(all_loss)
3.2、模型训练
在动态图中训练,主要有以下几步:
- 定义单步训练函数
- for循环迭代嗲用单步训练函数
- 将训练过程中的loss保存下来,并显示
具体实现如下:
grad = tfe.implicit_gradients(all_loss)


# 实现单步训练过程
def train_one_epoch(encoder, decoder, optimizer, step_counter, dataset, epoch):
    total_loss = 0
    for (step, (img_tensor, target)) in enumerate(dataset):
        loss = 0

        optimizer.apply_gradients(grad(encoder, decoder, img_tensor, target), step_counter)
        loss = all_loss(encoder, decoder, img_tensor, target)

        total_loss += (loss / int(target.shape[1]))
        if step % 5 == 0:
            print('Epoch {} Batch {} Loss {:.4f}'.format(epoch + 1,
                                                         step,
                                                         loss.numpy() / int(target.shape[1])))
    print("step", step)
    return total_loss / (step + 1)


# 训练模型
loss_plot = []
EPOCHS = 50

for epoch in range(EPOCHS):
    start = time.time()
    total_loss = train_one_epoch(dataset=dataset, epoch=epoch, **model_objects)  # 训练一次

    loss_plot.append(total_loss)  # 保存loss

    print('Epoch {} Loss {:.6f}'.format(epoch + 1, total_loss))
    checkpoint.save(checkpoint_prefix)
    print('Train time for epoch #%d (step %d): %f' %
          (checkpoint.save_counter.numpy(), checkpoint.step_counter.numpy(), time.time() - start))

#
plt.plot(loss_plot)
plt.xlabel('Epochs')
plt.ylabel('Loss')
plt.title('Loss Plot')
plt.show()
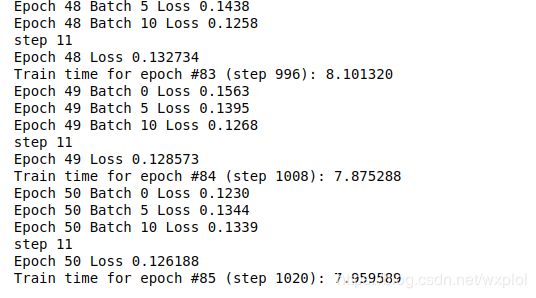
训练过程如下:
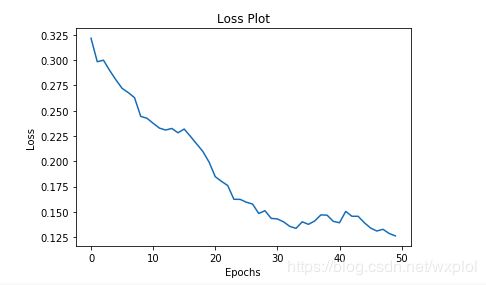
损失曲线为:
四、模型预测及使用
这里使用了我们之前讨论的多项式分布采样的优化技巧,模型预测时的主要步骤如下:
- 构建ResNet50作为图片的特征提取层
- 将提取特征输入编码器中
- 将编码器的结果与中间状态传入解码器中
- 循环进行seq2seq框架的解码,并依次生成文本信息
- 使用多项式分布采样从解码器结果中获取当前序列的文本
- 按照步骤4、5循环进行处理,直到输出为
或超出最长文本信息为止
及具体代码实现如下:
def evaluate(encoder, decoder, optimizer, step_counter, image):
    attention_plot = np.zeros((max_length, attention_features_shape))

    hidden = decoder.reset_state(batch_size=1)
    size = [224, 224]

    def load_image(image_path):
        img = tf.read_file(PATH + image_path)
        img = tf.image.decode_jpeg(img, channels=3)
        img = tf.image.resize(img, size)
        img = tf.keras.applications.resnet50.preprocess_input(img)
        return img, image_path

    from tensorflow.python.keras.applications.resnet import ResNet50

    image_model = ResNet50(weights='resnet50_weights_tf_dim_ordering_tf_kernels_notop.h5'
                           , include_top=False)  # 创建ResNet网络

    new_input = image_model.input
    hidden_layer = image_model.layers[-2].output
    image_features_extract_model = tf.keras.Model(new_input, hidden_layer)

    temp_input = tf.expand_dims(load_image(image)[0], 0)
    img_tensor_val = image_features_extract_model(temp_input)
    img_tensor_val = tf.reshape(img_tensor_val, (img_tensor_val.shape[0], -1, img_tensor_val.shape[3]))

    features = encoder(img_tensor_val)

    #    print(step_counter.numpy())
    dec_input = tf.expand_dims([word_index['']], 0)
    result = []

    for i in range(max_length):
        predictions, hidden, attention_weights = decoder(dec_input, features, hidden)

        attention_plot[i] = tf.reshape(attention_weights, (-1,)).numpy()

        print(predictions.get_shape())

        predicted_id = tf.multinomial(predictions, num_samples=1)[0][0].numpy()
        result.append(index_word[predicted_id])

        print(predicted_id)

        if index_word[predicted_id] == '':
            return result, attention_plot

        dec_input = tf.expand_dims([predicted_id], 0)

    attention_plot = attention_plot[:len(result), :]
    return result, attention_plot


def plot_attention(image, result, attention_plot):
    temp_image = np.array(Image.open(PATH + image))

    fig = plt.figure(figsize=(10, 10))

    len_result = len(result)
    for l in range(len_result):
        # print(len(attention_plot[l]),attention_plot[l])
        temp_att = np.resize(attention_plot[l], (7, 7))
        ax = fig.add_subplot(len_result // 2, len_result // 2 + len_result % 2, l + 1)
        ax.set_title(result[l])
        img = ax.imshow(temp_image)
        ax.imshow(temp_att, cmap='gray', alpha=0.4, extent=img.get_extent())

    plt.tight_layout()
    plt.show()


# captions on the validation set
rid = np.random.randint(0, len(img_name_val))

image = img_name_val[rid]
real_caption = ' '.join([index_word[i] for i in cap_val[rid] if i not in [0]])
result, attention_plot = evaluate(image=image, **model_objects)

print('Real Caption:', real_caption)
print('Prediction Caption:', ' '.join(result))
plot_attention(image, result, attention_plot)
## opening the image
img = Image.open(PATH + img_name_val[rid])
plt.imshow(img)
plt.axis('off')
plt.show()
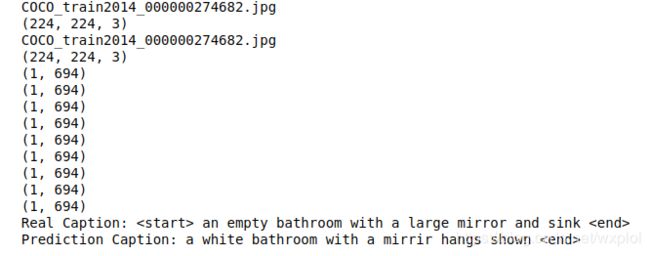
最终的输出结果:
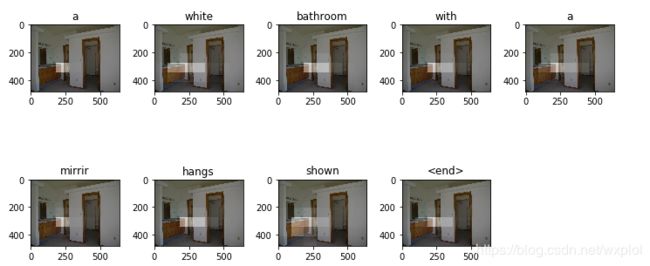
可视化输出结果为:
原始图片为:
当然,完整的代码可以参看我的github,地址为:https://github.com/kingqiuol/learning_tensorflow/tree/master/nlp/seq2seq
六、总结
关于Seq2Seq的模型实践到此为止,注意搞清楚其中的一些数据形状以及如何计算的细节,这样才能更加深入的了解基于注意力机制的Seq2Seq模型


