并发系列之 Future 框架详解
本文将主要讲解 J.U.C 中的 Future 框架,并分析结合源码分析其内部结构逻辑;
一、Future 框架概述
JDK 中的 Future 框架实际就是 Future 模式的实现,通常情况下我们会配合线程池使用,但也可以单独使用;下面我们就单独使用简单举例;
- 应用实例
FutureTask future = new FutureTask<>(() -> {
log.info(“异步任务执行…”);
Thread.sleep(2000);
log.info(“过了很久很久…”);
return “异步任务完成”;
});
log.info(“启动异步任务…”);
new Thread(future).start();
log.info(“继续其他任务…”);
Thread.sleep(1000);
log.info(“获取异步任务结果:{}”, future.get());
打印:
[15:38:03,231 INFO ] [main] - 启动异步任务…
[15:38:03,231 INFO ] [main] - 继续其他任务…
[15:38:03,231 INFO ] [Thread-0] - 异步任务执行…
[15:38:05,232 INFO ] [Thread-0] - 过了很久很久…
[15:38:05,236 INFO ] [main] - 获取异步任务结果:异步任务完成
如上面代码所示,首先我们将要执行的任务包装成 Callable,这里如果不需要返回值也可以使用 Runnable;然后构建 FutureTask 由一个线程启动,最后使用 Future.get() 获取异步任务结果;
- Future 运行逻辑
对于 Future 模式的流程图如下:
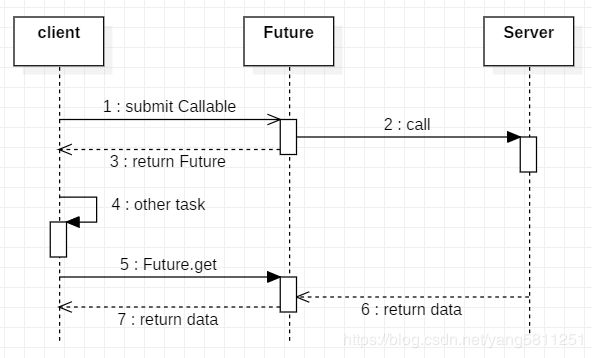
对比上面的实例代码,大家可能会发现有些不一样,因为在 FutureTask 同时继承了 Runnable 和 Future 接口,所以再提交任务后没有返回Future,而是直接使用自身调用 get;下面我们就对源码进行实际分析;
二、源码分析
- FutureTask 主体结构
public interface RunnableFuture extends Runnable, Future {}
public class FutureTask implements RunnableFuture {
private volatile int state; // 任务运行状态
private Callable callable; // 异步任务
private Object outcome; // 返回结果
private volatile Thread runner; // 异步任务执行线程
private volatile WaitNode waiters; // 等待异步结果的线程栈(通过Treiber stack算法实现)
public FutureTask(Callable callable) { // 需要返回值
if (callable == null)
throw new NullPointerException();
this.callable = callable;
this.state = NEW; // ensure visibility of callable
}
public FutureTask(Runnable runnable, V result) {
this.callable = Executors.callable(runnable, result);
this.state = NEW; // ensure visibility of callable
}
…
}
另外在代码中还可以看见有很多地方都是用了 CAS 来更新变量,而 JDK1.6 中甚至使用了 AQS 来实现;其原因就是同一个 FutureTask 可以多个线程同时提交,也可以多个线程同时获取; 所以代码中有很多的状态变量:
// FutureTask.state 取值
private static final int NEW = 0; // 初始化到结果返回前
private static final int COMPLETING = 1; // 结果赋值
private static final int NORMAL = 2; // 执行完毕
private static final int EXCEPTIONAL = 3; // 执行异常
private static final int CANCELLED = 4; // 任务取消
private static final int INTERRUPTING = 5; // 设置中断状态
private static final int INTERRUPTED = 6; // 任务中断
同时源码的注释中也详细给出了可能出现的状态转换:
NEW -> COMPLETING -> NORMAL // 任务正常执行
NEW -> COMPLETING -> EXCEPTION // 任务执行异常
NEW ->CANCELLED // 任务取消
NEW -> INITERRUPTING -> INTERRUPTED // 任务中断
注意这里的 COMPLETING 状态是一个很微妙的状态,正因为有他的存在才能实现无锁赋值;大家先留意这个状态,然后在代码中应该能体会到;另外这里还有一个变量需要注意,WaitNode ;使用 Treiber stack 算法实现的无锁栈;其原理说明可以参考下面第三节;
-
任务执行
public void run() {
if (state != NEW || // 确保任务执行完成后,不再重复执行
!UNSAFE.compareAndSwapObject(this, runnerOffset,
null, Thread.currentThread())) // 确保只有一个线程执行
return;
try {
Callable c = callable;
if (c != null && state == NEW) {
V result;
boolean ran;
try {
result = c.call();
ran = true;
} catch (Throwable ex) {
result = null;
ran = false;
setException(ex); // 设置异常结果
}
if (ran) set(result); // 设置结果
}
} finally {
runner = null;
int s = state;
if (s >= INTERRUPTING) handlePossibleCancellationInterrupt(s); // 确保中断状态已经设置
}
}
// 设置异步任务结果
protected void set(V v) {
if (UNSAFE.compareAndSwapInt(this, stateOffset, NEW, COMPLETING)) { // 保证结果只能设置一次
outcome = v;
UNSAFE.putOrderedInt(this, stateOffset, NORMAL); // final state
finishCompletion(); // 唤醒等待线程
}
}
protected void setException(Throwable t) {
if (UNSAFE.compareAndSwapInt(this, stateOffset, NEW, COMPLETING)) { // 保证结果只能设置一次
outcome = t;
UNSAFE.putOrderedInt(this, stateOffset, EXCEPTIONAL); // final state
finishCompletion();
}
} -
任务取消
public boolean cancel(boolean mayInterruptIfRunning) {
if (!(state == NEW && // 只有在任务执行阶段才能取消
UNSAFE.compareAndSwapInt(this, stateOffset, NEW, // 设置取消状态
mayInterruptIfRunning ? INTERRUPTING : CANCELLED)))
return false;
try { // in case call to interrupt throws exception
if (mayInterruptIfRunning) {
try {
Thread t = runner;
if (t != null)
t.interrupt();
} finally { // final state
UNSAFE.putOrderedInt(this, stateOffset, INTERRUPTED);
}
}
} finally {
finishCompletion();
}
return true;
}
注意 cancel(false) 也就是仅取消,并没有打断;异步任务会继续执行,只是这里首先设置了 FutureTask.state = CANCELLED ,所以最后在设置结果的时候会失败,UNSAFE.compareAndSwapInt(this, stateOffset, NEW, COMPLETING) ; -
获取结果
public V get() throws InterruptedException, ExecutionException {
int s = state;
if (s <= COMPLETING)
s = awaitDone(false, 0L); // 阻塞等待
return report(s);
}
private V report(int s) throws ExecutionException { // 根据最后的状态返回结果
Object x = outcome;
if (s == NORMAL) return (V)x;
if (s >= CANCELLED) throw new CancellationException();
throw new ExecutionException((Throwable)x);
}
private int awaitDone(boolean timed, long nanos)
throws InterruptedException {
final long deadline = timed ? System.nanoTime() + nanos : 0L;
WaitNode q = null;
boolean queued = false;
for (;? {
if (Thread.interrupted()) {
removeWaiter(q); // 移除等待节点
throw new InterruptedException();
}
int s = state;
if (s > COMPLETING) {  // 任务已完成
  if (q != null)
    q.thread = null;
  return s;
}
else if (s == COMPLETING) // 正在赋值,直接先出让线程
  Thread.yield();
else if (q == null)       // 任务还未完成需要等待
  q = new WaitNode();
else if (!queued)
  queued = UNSAFE.compareAndSwapObject(this, waitersOffset,
                     q.next = waiters, q);   // 使用 Treiber stack 算法
else if (timed) {
  nanos = deadline - System.nanoTime();
  if (nanos <= 0L) {
    removeWaiter(q);
    return state;
  }
  LockSupport.parkNanos(this, nanos);
}
else
  LockSupport.park(this);
}
}
三、Treiber stack
在《Java 并发编程实战》中讲了, 创建非阻塞算法的关键在于,找出如何将原子修改的范围缩小到单个变量上,同时还要维护数据的一致性 。
@ThreadSafe public class ConcurrentStack {
AtomicReference
private static class Node {
public final E item;
public Node next;
public Node(E item) {
  this.item = item;
}
}
public void push(E item) {
Node newHead = new Node<>(item);
Node oldHead;
do {
oldHead = top.get();
newHead.next = oldHead;
} while (!top.compareAndSet(oldHead, newHead));
}
public E pop() {
Node oldHead;
Node newHead;
do {
oldHead = top.get();
if (oldHead == null)
return null;
newHead = oldHead.next;
} while (!top.compareAndSet(oldHead, newHead));
return oldHead.item;
}
}
总结
总体来讲源码比较简单,因为其本身只是一个 Future 模式的实现
但是其中的状态量的设置,还有里面很多无锁的处理方式,才是 FutureTask 带给我们的精华!