开发颠覆者SpringBoot实战---------SpringCloud学习
SpringCloud 为开发人员提供了快速构建分布式系统的一些工具,包括配置管理、服务发现、断路器、路由、微代理、事件总线、全局锁、决策竞选、分布式会话等等。SpringCloud 提供了两个基础库:Spring Cloud Context和Spring Cloud Commons。Context用于引导上下文、加密、刷新范围和环境端点,提供实用程序和特殊服务;Commons提供通用的(如Spring Cloud Netflix和Spring Cloud Consul)抽象和常用类。官方推荐SpringCloud使用bootstrap.yml(.properties)来作为它的配置文件。它有以下几个模块:
- Eureka:服务的注册和发现
- Feign:服务的消费
- Ribbon:负载均衡
- Hystrix:断路器
- Hystrix Dashboard:断路器监控
- Zuul:路由网关
- Config:配置中心
本文的springboot版本是2.1.0.RELEASE,springcloud的版本是Greenwich.M1。特别说明一点,早期的版本会有许多坑,网上的许多教程也是老版本的教程,教大家解决这些坑,之前学习springcloud时使用的就是早期版本,惨不忍睹,这次使用最新的版本,发现基本没有出现过问题,项目搭建起来也很容易,建议使用springboot的最新版本。
一、业务场景介绍
假设有一个简易的电商网站,分为用户模块、订单模块、库存模块,流程如下:
- 用户进行相应的操作后(如付款),需要给用户增加购物积分(用户模块)
- 需要创建订单(订单模块)
- 需要减少库存(库存模块)
也就是说,用户模块收到信息反馈后,自身进行相应的操作后需要通知订单和库存两个模块也进行相应的操作。
二、服务注册中心Eureka
需要考虑的问题是,用户模块想要调用订单和库存模块怎么来调用,分布式的业务时,压根不会知道订单和库存模块在哪台机器上,所以就需要一个微服务框架中的注册中心,专门负责服务的注册和发现。
- Eureka Server:就是注册中心,所有服务都会在注册中心注册,上面保留了各个服务的机器和端口号
- Eureka Client:就是各个服务,用户、订单、库存模块分别将自己注册到注册中心上
下面是代码:
新建springboot项目,pom文件:
    4.0.0

    springboot
    springcloud_eureka
    0.0.1-SNAPSHOT
    jar

    springcloud_eureka
    注册中心


        org.springframework.boot
        spring-boot-starter-parent
        2.1.0.RELEASE


        UTF-8
        UTF-8
        1.8
        Greenwich.M1


            org.springframework.cloud
            spring-cloud-starter-netflix-eureka-server


            org.springframework.boot
            spring-boot-starter-test
            test


                org.springframework.cloud
                spring-cloud-dependencies
                ${spring-cloud.version}
                pom
                import


                org.springframework.boot
                spring-boot-maven-plugin


            spring-milestones
            Spring Milestones
            https://repo.spring.io/milestone

                false
新建bootstrap.properties文件:
server.port=8760
#Eureka Server的hostname为localhost
eureka.instance.hostname=localhost
#声明本服务不需要在Eureka Server上注册,本身就是一个Eureka Server
eureka.client.register-with-eureka=false
eureka.client.fetch-registry=false
在启动类中添加@EnableEurekaServer,代表开启EurekaServer的支持,表明自己是一个服务。这样我们就有了一个服务的注册中心,分布式的其他服务都需要在服务中心进行注册。
二、服务消费(客户端)Feign
现在有了注册中心,也知道各个服务在哪台机器哪个端口,就需要一个可以替我们向其他服务发送请求的一个工具,而不是我们自己编写代码去发送http请求了,也就是Feign。
Feign的基本原理是动态代理,当对某个接口使用@FeignClient时,Feign就会创建一个代理对象,根据接口上的@RequestMapping等注解,来动态的构造出你的请求,然后发起请求,拿到相应结果。
下面是代码:
新建两个项目,创建出订单和库存两个系统,引入相同依赖:
            org.springframework.cloud
            spring-cloud-starter-netflix-eureka-server


            org.springframework.boot
            spring-boot-starter-web


            org.projectlombok
            lombok
            1.18.0
            provided


            com.alibaba
            fastjson
            1.2.47
新建bootstrap.properties文件,订单项目spring.application.name使用service-client-order,库存项目spring.application.name使用service-client-stock
#本服务(客户端)的名称,不能使用下划线,只能使用中划线
spring.application.name=service-client-order/service-client-stock
#指向EurekaServer服务的地址
eureka.client.service-url.defaultZone=http://localhost:8760/eureka
启动项中添加@EnableEurekaClient,表明自己是一个客户端。
订单项目添加:
/**
 * @Description:订单实体类
 * @Author:wb
 */
@Data
@NoArgsConstructor
public class Order {
    private String userId;
    private Integer count;
    private String descrpition;
}

/**
 * @Description:订单服务
 * @Author:wb
 */
@RestController
@RequestMapping("orderService")
public class OrderService {
    @Value("${server.port}")
    private String port;
    @RequestMapping(value = "unifiedOrder", method = RequestMethod.POST)
    public Order unifiedOrder(@RequestBody Order order){
        order.setDescrpition("success!this is orderService,my port is " + port);
        return order;
    }
}
库存项目添加:
/**
 * @Description:库存服务
 * @Author:wb
 */
@RestController
@RequestMapping("stockService")
public class StockService {
    @Value("${server.port}")
    private String port;
    @RequestMapping(value = "reduceStock", method = RequestMethod.GET)
    public String reduceStock(@RequestParam Integer count){
        return "this is stockService,my port is " + port + ",count is " + count;
    }
}
再新建一个项目,创建出用户系统,引入依赖:
            org.springframework.cloud
            spring-cloud-starter-netflix-eureka-server


            org.springframework.boot
            spring-boot-starter-web


            org.springframework.cloud
            spring-cloud-starter-openfeign


            org.projectlombok
            lombok
            1.18.0
            provided


            com.alibaba
            fastjson
            1.2.47
新建bootstrap.properties文件:
#本服务(客户端)的名称,不能使用下划线,只能使用中划线
spring.application.name=service-client-user
#指向EurekaServer服务的地址
eureka.client.service-url.defaultZone=http://localhost:8760/eureka
创建FeignClient客户端和调用接口:
/**
 * @Description:Feign客户端
 * @Author:wb
 */
@Component
@FeignClient(name = "service-client-stock")
public interface OrderAndStockFeignClient {
    @RequestMapping(value = "stockService/reduceStock", method = RequestMethod.GET)
    String invokeStock(@RequestParam(value = "count") Integer count);
}

/**
 * @Description:用户服务
 * @Author:wb
 */
@RestController
@RequestMapping("userService")
public class UserService {
    @Autowired
    private OrderAndStockFeignClient orderAndStockFeignClient;
    @RequestMapping(value = "pay", method = RequestMethod.GET)
    public String unifiedOrder(Integer count){
        String invokeStock = orderAndStockFeignClient.invokeStock(count);
        return invokeStock;
    }
}
这样服务的客户端创建好了,(订单项目暂时没有用到,后面会用)我们可以在注册中心查看到已经有服务在注册中心注册了,直接访问http://localhost:8760,可以看到:

接口访问即可看到http://localhost:8769/userService/pay?count=20
三、负载均衡Ribbon
下面问题又来了,如果库存服务部署到5台机器上,如果按照上面的方法,用户模块调用的永远只是一台机器上的接口,换句话说,如果使用负载均衡的话,Feign怎么知道该请求哪台机器呢?所以这时候就需要使用Ribbon作为负载均衡,它的默认配置使用Round Ribbon的轮巡算法,就是所有相同application的机器依次查询,不会出现随机现象。Ribbon的原理是:
- 首先Ribbon会从 Eureka Client里获取到对应的服务注册表,也就知道了所有的服务都部署在了哪些机器上,在监听哪些端口号
- 然后Ribbon就可以使用默认的Round Robin算法,从中选择一台机器
- Feign就会针对这台机器,构造并发起请求
下面是代码:
订单和库存项目各开启两个,可以在idea中进行设置,取消勾选Single instance only,修改端口号后开启多个实例,用于测试使用:

更新用户项目代码:
/**
 * @Description:Feign客户端
 * @Author:wb
 */
@Component
@FeignClient(name = "server-ribbon", fallbackFactory = OrderFeignClientFallBackFactory.class)
//@FeignClient(name = "server-ribbon", fallback = OrderFeignClientFallBack.class)
public interface OrderAndStockFeignClient {
    @RequestMapping(value = "ribbonOrderService/unifiedOrder", method = RequestMethod.POST)
    Order invokeOrder(@RequestBody Order order);
    @RequestMapping(value = "ribbonStockService/reduceStock", method = RequestMethod.GET)
    String invokeStock(@RequestParam(value = "count") Integer count);
}

/**
 * @Description:用户服务
 * @Author:wb
 */
@RestController
@RequestMapping("userService")
public class UserService {
    @Autowired
    private OrderAndStockFeignClient orderAndStockFeignClient;
    @RequestMapping(value = "pay", method = RequestMethod.GET)
    public String unifiedOrder(String userId, Integer count){
        Order order = new Order();
        order.setUserId(userId);
        order.setCount(count);
        Order invokeOrder = orderAndStockFeignClient.invokeOrder(order);
        String invokeStock = orderAndStockFeignClient.invokeStock(count);
        return invokeOrder + "-------------" + invokeStock;
    }
}
新建Ribbon项目,引入依赖:
            org.springframework.cloud
            spring-cloud-starter-netflix-eureka-server


            org.springframework.boot
            spring-boot-starter-web


            org.projectlombok
            lombok
            1.18.0
            provided
新建bootstrap.properties文件:
#本服务(客户端)的名称,不能使用下划线,只能使用中划线
spring.application.name=server-ribbon
#指向EurekaServer服务的地址
eureka.client.service-url.defaultZone=http://localhost:8760/eureka
创建负载均衡客户端:
/**
 * @Description:启动类:负载均衡客户端
 * @Author:wb
 */
@SpringBootApplication
@EnableEurekaClient//ribbon负载均衡客户端
public class SpringcloudRibbonApplication {
    public static void main(String[] args) {
        SpringApplication.run(SpringcloudRibbonApplication.class, args);
    }
    @LoadBalanced//表明这个restRemplate开启负载均衡的功能,注入ioc容器中
    @Bean
    public RestTemplate restTemplate(){
        return new RestTemplate();
    }
}

/**
 * @Description:库存负载均衡服务器
 * @Author:wb
 */
@RestController
@RequestMapping("ribbonStockService")
public class RibbonStockService {
    @Autowired
    private RestTemplate restTemplate;
    @RequestMapping(value = "reduceStock", method = RequestMethod.GET)
    public String reduceStock(@RequestParam Integer count){
        //指定代理的客户端服务名称和方法
        return restTemplate.getForObject("http://service-client-stock/stockService/reduceStock?count=" + count, String.class );
    }
}

/**
 * @Description:订单负载均衡服务器
 * @Author:wb
 */
@RestController
@RequestMapping("ribbonOrderService")
public class RibbonOrderService {
    @Autowired
    private RestTemplate restTemplate;
    @RequestMapping(value = "unifiedOrder", method = RequestMethod.POST)
    public Order reduceStock(@RequestBody Order order){
        //指定代理的客户端服务名称和方法
        return restTemplate.postForObject("http://service-client-order/orderService/unifiedOrder", order, Order.class );
    }
}

再次接口访问http://localhost:8769/userService/pay?count=20&userId=test,即可看到端口号 的变化,实现了负载均衡。
四、断路器
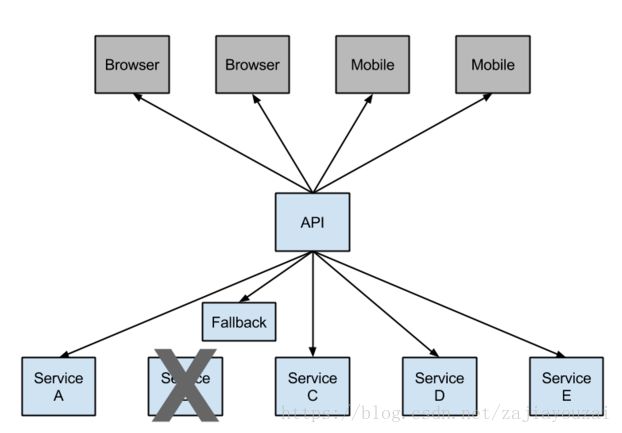
在微服务架构中,根据业务来拆分成一个个的服务,服务与服务之间可以相互调用(RPC),在Spring Cloud可以用RestTemplate+Ribbon和Feign来调用。为了保证其高可用,单个服务通常会集群部署。由于网络原因或者自身的原因,服务并不能保证100%可用,如果单个服务出现问题,调用这个服务就会出现线程阻塞,此时若有大量的请求涌入,Servlet容器的线程资源会被消耗完毕,导致服务瘫痪。服务与服务之间的依赖性,故障会传播,会对整个微服务系统造成灾难性的严重后果,这就是服务故障的“雪崩”效应。
所以提出断路器的概念,较底层的服务如果出现故障,会导致连锁故障。当对特定的服务的调用的不可用达到一个阀值(Hystric 是5秒20次) 断路器将会被打开。断路打开后,可用避免连锁故障,fallback方法可以直接返回一个固定值。

1、Ribbon使用断路器
对server-ribbon项目进行改造,pom文件添加新引入:
	    org.springframework.cloud
	    spring-cloud-starter-netflix-hystrix
启动类添加@EnableHystrix,修改方法:
/**
 * @Description:库存负载均衡服务器
 * @Author:wb
 */
@RestController
@RequestMapping("ribbonStockService")
public class RibbonStockService {
    @Autowired
    private RestTemplate restTemplate;
    @RequestMapping(value = "reduceStock", method = RequestMethod.GET)
    @HystrixCommand(fallbackMethod = "errorMethod")
    public String reduceStock(@RequestParam Integer count){
        //指定代理的客户端服务名称和方法
        return restTemplate.getForObject("http://service-client-stock/stockService/reduceStock?count=" + count, String.class );
    }
    public String errorMethod(Integer count){
        return "this is error,your paramter is " + count;
    }
}
正常启动项目后,可以正常访问;关掉代理的两个服务,再次访问会出现错误提示,而不是导致服务出现异常。
2、Feign使用断路器
对用户项目进行改造,application.properties文件中添加
#设置连接riibon时的超时连接时间
service-ribbon.ribbon.ConnectTimeout=1000
service-ribbon.ribbon.ReadTimeout=5000
#开启feign客户端断路器功能
feign.hystrix.enabled=true
更新代码:
/**
 * @Description:Feign客户端
 * @Author:wb
 */
@Component
@FeignClient(name = "server-ribbon", fallbackFactory = OrderFeignClientFallBackFactory.class)
//@FeignClient(name = "server-ribbon", fallback = OrderFeignClientFallBack.class)
public interface OrderAndStockFeignClient {
    @RequestMapping(value = "ribbonOrderService/unifiedOrder", method = RequestMethod.POST)
    Order invokeOrder(@RequestBody Order order);
    @RequestMapping(value = "ribbonStockService/reduceStock", method = RequestMethod.GET)
    String invokeStock(@RequestParam(value = "count") Integer count);
}
/**
 * @Description:两种方式实现断路器功能
 * @Author:wb
 */
@Component
class OrderAndStockFeignClientFallBack implements OrderAndStockFeignClient {
    @Override
    public Order invokeOrder(Order order) {
        order.setDescrpition("this is error");
        return order;
    }
    @Override
    public String invokeStock(Integer count) {
        return "this is error,paramter is " + count;
    }
}
@Component
class OrderFeignClientFallBackFactory implements FallbackFactory{
    @Override
    public OrderAndStockFeignClient create(Throwable throwable) {
        return new OrderAndStockFeignClient() {
            @Override
            public Order invokeOrder(Order order) {
                order.setDescrpition("this is error,cause is " + throwable.getMessage());
                return order;
            }
            @Override
            public String invokeStock(Integer count) {
                return "this is error,paramter is " + count + ",cause is " + throwable.getMessage();
            }
        };
    }
}
Feign使用断路器,官网文档中给出两种方式,一种只需要实现Feign客户端接口,fallback 指定实现的这个类;另一种继承FallbackFactory,重写方法获得的参数cause可以获得发生熔断的原因,fallbackFactory指定继承的这个类。
3、Hystrix Dashboard断路器监控(仪表盘)
这部分是比较早写的,与本文不匹配,可以忽略,感觉使用的也不多。
Hystrix Dashboard主要目的是监控断路器的情况,具体使用没有研究,现在基于service-ribbon来改造。
pom文件添加:
	    org.springframework.boot
        spring-boot-starter-actuator


	    org.springframework.cloud
        spring-cloud-starter-netflix-hystrix-dashboard
启动类中添加@EnableHystrixDashboard和@EnableCircuitBreaker,增加下面代码:
	@Bean
    public ServletRegistrationBean getServlet(){
        HystrixMetricsStreamServlet streamServlet = new HystrixMetricsStreamServlet();
        ServletRegistrationBean registrationBean = new ServletRegistrationBean(streamServlet);
        registrationBean.setLoadOnStartup(1);
        registrationBean.addUrlMappings("/hystrix.stream");
        registrationBean.setName("HystrixMetricsStreamServlet");
        registrationBean.setName("HystrixMetricsStreamServlet");
        return registrationBean;
    }
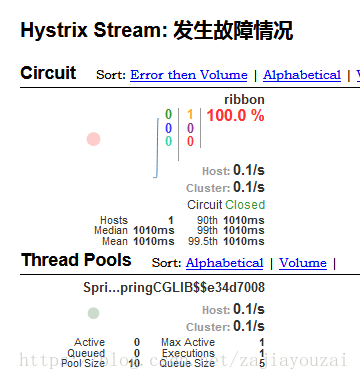
访问http://localhost:8764/hystrix,在参数中输入http://localhost:8764/hystrix.stream,title中随意输入,访问后可以看到仪表盘自动根据http://localhost:8764/ribbon的访问,而时刻跟踪变化,以及发生故障的情况,仪表盘的变化。

五、路由网关Zuul
在Spring Cloud微服务系统中,一种常见的负载均衡方式是,客户端的请求首先经过负载均衡(zuul、Ngnix),再到达服务网关(zuul集群),然后再到具体的服。服务统一注册到高可用的服务注册中心集群,服务的所有的配置文件由配置服务管理,配置服务的配置文件放在git仓库,方便开发人员随时改配置。
路由网关的作用就是处理请求,前端调用后台几百个服务和接口,不需要记住所有服务的名称和地址,只需要根据请求的特征将请求转发给各个服务。路由功能是微服务的一部分,比如/api/user转发到到user服务,/api/shop转发到到shop服务。zuul默认和Ribbon结合实现了负载均衡的功能。
新建Zuul项目,引入依赖:
            org.springframework.cloud
            spring-cloud-starter-netflix-eureka-server


            org.springframework.cloud
            spring-cloud-starter-netflix-zuul


            org.springframework.boot
            spring-boot-starter-test
            test
新建bootstrap.properties文件:
#本服务(客户端)的名称,不能使用下划线,只能使用中划线
spring.application.name=server-zuul
#指向EurekaServer服务的地址
eureka.client.service-url.defaultZone=http://localhost:8760/eureka
zuul.routes.zuul1.path=/stockZuul/**
zuul.routes.zuul1.service-id=SERVER-RIBBON
zuul.routes.zuul2.path=/orderZuul/**
zuul.routes.zuul2.service-id=SERVER-RIBBON
zuul.routes.zuul3.path=/userZuul/**
zuul.routes.zuul3.service-id=SERVICE-CLIENT-USER
注意,zuul.routes后面的一个参数自己命名的(zuul1),但是path和service-id要统一;path是自己设置的访问路径,service-id是对应注册中服务的名称,所以用大写。
在启动类中添加@EnableZuulProxy和@EnableEurekaClient,开启路由功能,访问http://localhost:8760/userZuul/userService/pay?userId=test&count=20,可以看到转发后访问的不同结果。
还可以简单的开启过滤功能:
/**
 * 路由过滤
 * @author think
 */
@Component
public class Myfilter extends ZuulFilter {
    //filterType代表过滤器类型,pre路由之前,routing路由之时,post路由之后,error发生错误调用
    @Override
    public String filterType() {
        return "pre";
    }
    //过滤的顺序
    @Override
    public int filterOrder() {
        return 0;
    }
    //是否过滤,里面可以写逻辑判断
    @Override
    public boolean shouldFilter() {
        return true;//永远过滤
    }
    //过滤的具体逻辑,可以查询sql等
    @Override
    public Object run() throws ZuulException {
        //zuul自带的Request容器,可以获得request
        RequestContext context = RequestContext.getCurrentContext();
        HttpServletRequest request = context.getRequest();
        String token = request.getParameter("token");
        if (token == null) {
            context.setSendZuulResponse(false);//路由不通过
            try {
                context.getResponse().getWriter().write("sorry,token is null");
            }catch (Exception e){
            }
        }
        return null;//通过与不通过都不需要返回值
    }
}
六、配置中心
在分布式系统中,由于服务数量巨多,为了方便服务配置文件统一管理,实时更新,所以需要分布式配置中心组件。在Spring Cloud中,有分布式配置中心组件spring cloud config ,它支持配置服务放在配置服务的内存中(即本地),也支持放在远程Git仓库中。在spring cloud config 组件中,分两个角色,一是config server,二是config client。
1、Config Server配置中心
新建Config Server项目,引入依赖:
        org.springframework.cloud
        spring-cloud-config-server
新建bootstrap.properties文件:
#本服务(客户端)的名称,不能使用下划线,只能使用中划线
spring.application.name=server-config
#指向EurekaServer服务的地址
eureka.client.service-url.defaultZone=http://localhost:8760/eureka
#git地址
spring.cloud.config.server.git.uri=https://gitee.com/zajiayouzai/springboot.git
#仓库路径
spring.cloud.config.server.git.search-paths=/config
#仓库分支
spring.cloud.config.label=master
#git用户名和密码,git为公开仓库,一般不需要密码
#spring.cloud.config.server.git.username=
#spring.cloud.config.server.git.password=
启动类添加@EnableConfigServer,开启配置服务器功能。
关于配置文件的说明,git上面配置文件的命名规则一般是{applicationName}-{profile}.yml/properties,我的配置文件名称为server-config-dev.properties,
使用配置中心服务直接访问http://localhost:8762/server-config/dev即可看到文件的内容,路径规则同样是http://id:port/{applicationName}/{profile}。这种直接访问的方式,不会去区分是否是application.properties配置文件中的search-paths的respo路径,他会扫描整个git仓库,符合命名规则的配置文件都会被扫描出来。
2、Config Client配置文件读取
更新库存项目:
/**
 * @Description:库存服务
 * @Author:wb
 */
@RestController
@RequestMapping("stockService")
public class StockService {
    @Value("${server.port}")
    private String port;
    @Value("${version}")
    private String version;
    @RequestMapping(value = "reduceStock", method = RequestMethod.GET)
    public String reduceStock(@RequestParam Integer count){
        return "this is stockService,my port is " + port + ",my version is " + version + ",count is " + count;
    }
}
更新bootstrap.properties文件:
#本服务(客户端)的名称,不能使用下划线,只能使用中划线
spring.application.name=service-client-stock
#指向EurekaServer服务的地址
eureka.client.service-url.defaultZone=http://localhost:8760/eureka
#指明远程仓库的分支
spring.cloud.config.label=master
#指明配置文件的环境
spring.cloud.config.profile=dev
#指向配置中心
#spring.cloud.config.uri=http://localhost:8888/
#是否从配置中心读取文件
spring.cloud.config.discovery.enabled=true
#配置中心的服务名称
spring.cloud.config.discovery.service-id=server-config
下面是我总结的以前版本的坑,但是新版本其实只要注意第一点就可以了:
- git上面的配置文件名称,一定与客户端的applicationName和profile相对应上
- 配置中心和读取配置文件的客户端pom文件是不一样的,配置中心一定是spring-cloud-config-server,客户端一定是spring-cloud-starter-config,各需要一个即可,不要多不要少,多了少了都会报错。
- 以上两点最为关键,还有一个就是之前提到的版本问题。其他方面都是不重要的,根据网上的教程,端口号只能是固定的8888,在启动类中添加@RefreshScope注解,这些都不是解决问题的关键。
- bootstrap.properties这个名称还是要固定,虽然在本例中使用application.properties同样可用,但是后面讲到的高可用的配置中心时候还是要使用bootstrap.properties。
- 另外说一个配置中心设置仓库路径的问题:spring.cloud.config.server.git.search-paths=/respo,这段配置指定的路径名称在我们实际操作中没有起到什么作用,但是它是必须存在的。如果你的配置文件没有放在git仓库的根目录下,那么你就必须有这段配置,告诉程序需要扫描的路径;否则没有这段配置的话,配置中心只会读取根目录下的文件,而不去扫描其他文件夹下面的配置文件。防止入坑,可以把这段配置设置为:/**,这样不管你配置文件放在什么地方,都不会报错了。
3、读取本地配置文件
读取本地配置文件比较简单,改造service-config-server,在resources下新建一个文件夹config,添加新文件service-config-client-test.properties,这里文件的命名规则与git上面的命名规则一致,修改application.properties:
server.port=8888
spring.application.name=service-config-server
#使用本地配置文件
spring.profiles.active = native
#同样可以指定硬盘的文件位置,注意这里只能填写的是路径,不能具体到文件
spring.cloud.config.server.native.searchLocations=classpath:/config/
修改service-config-client的bootstrap.properties:
server.port=8768
spring.application.name=service-config-client
spring.cloud.config.profile=test
spring.cloud.config.uri= http://localhost:8888/
这样就可以成功访问到项目中或者本地硬盘上面的配置文件。
