Unity3d 周分享(16期 2019.5.1 )
选自过去1~2周 自己所看到外文内容:https://twitter.com/unity3d 和各种其他博客来源吧
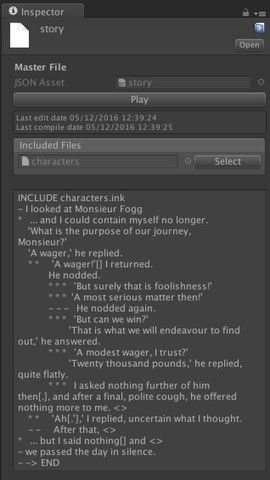
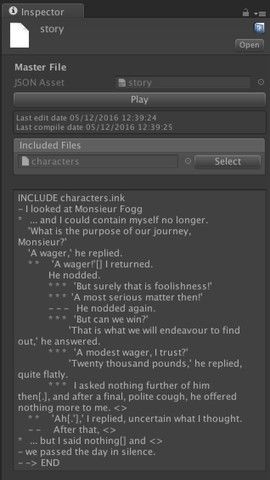
1)、 英国游戏工作室inkle是用于游戏开发的开源发布脚本语言“ink”,
可以在 Unity中工作。
https://www.inklestudios.com/ink/
https://assetstore.unity.com/packages/tools/integration/ink-unity-integration-60055
https://github.com/inkle/ink
https://applech2.com/archives/20180501-ink-the-powerful-scripting-language.html
iDE : https://github.com/inkle/inky/releases
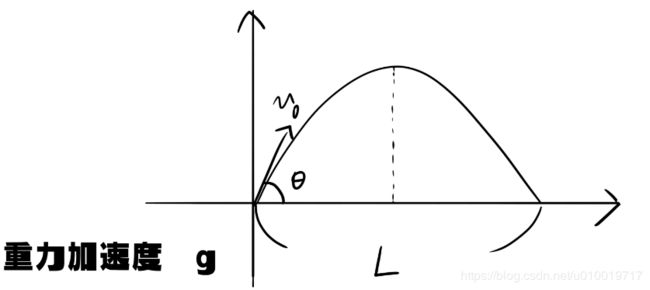
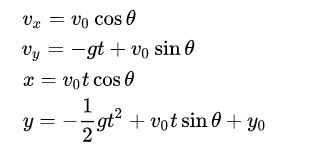
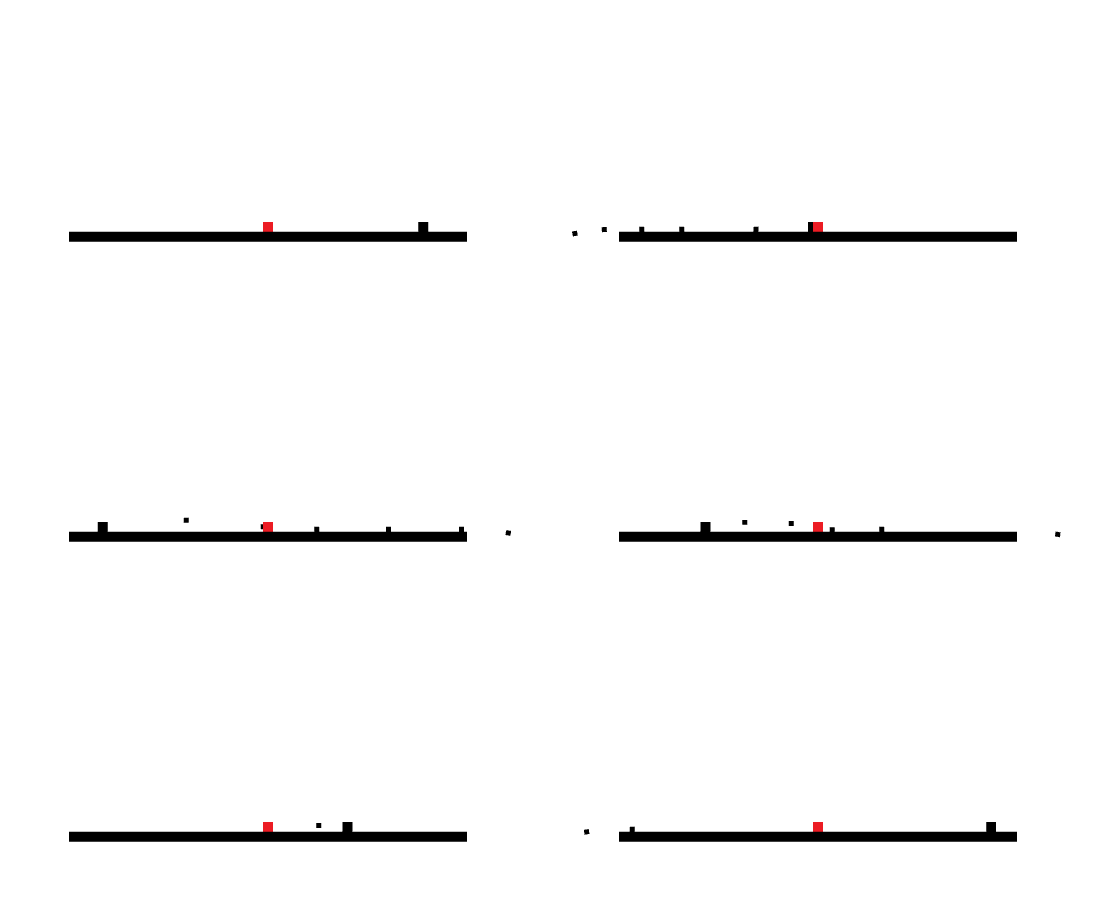
2)、【数据/物理复习】 抛物线 , 根据目标距离,自动调整目标的仰角。
初始速度: V0
投射仰角: θ
距离 : L
https://ja.wikipedia.org/wiki/%E6%96%9C%E6%96%B9%E6%8A%95%E5%B0%84
Luncher.cs
    public GameObject Bullet;
    public float _Velocity_0;

    float _gravity = 9.8f;//重力加速度

    void Update(){
        //================================
        Vector2 pos = transform.position;
        pos.x += 0.1f * Input.GetAxisRaw("Horizontal");
        transform.position = pos;
        //================================================


        //空格发射子弹
        if (Input.GetKeyDown(KeyCode.Space)) {
            //发射位置
            Vector2 LuncherPos = transform.position;
            //目标位置
            Vector2 TargetPos = GameObject.Find("Target").transform.position;
            //获得的距离L
            float L = Vector2.Distance(LuncherPos, TargetPos);

             //Asin 计算
            float AsinX = (L * _gravity) / (_Velocity_0 * _Velocity_0);
            if (AsinX >= 1) AsinX = 1.0f;

            //θ计算
            float _theta = 0.5f * Mathf.Asin(AsinX);
            // 目标可能在自己的反方向
            if (LuncherPos.x > TargetPos.x) _theta = Mathf.PI - 0.5f * Mathf.Asin(AsinX);


           //获取子弹实例,给发射角和初始速度
            GameObject Bullet_obj = (GameObject)Instantiate(Bullet, transform.position, transform.rotation);
            BulletSc bullet_cs = Bullet_obj.GetComponent();
            bullet_cs.Velocity_0 = _Velocity_0;
            bullet_cs.theta = _theta;
        }
    }
BulletSc.cs
public float Velocity_0, theta;
Rigidbody2D rid2d;
void Start() {
//Rigidbody
rid2d = GetComponent();
Vector2 bulletV = rid2d.velocity;
bulletV.x = Velocity_0 * Mathf.Cos(theta);
bulletV.y = Velocity_0 * Mathf.Sin(theta);
rid2d.velocity = bulletV;
}
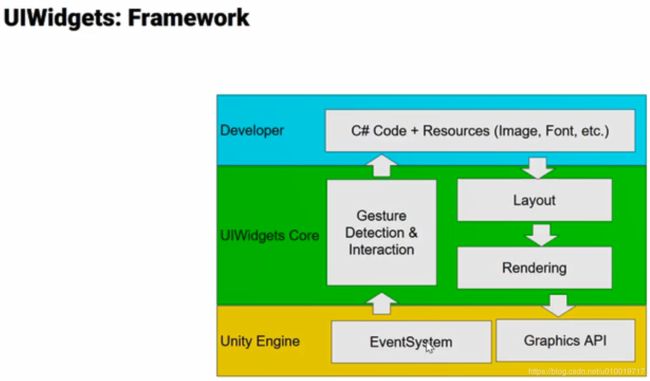
2、 我之前看到过文章介绍 使用Flutter 做游戏。 前端时间看到Unity弄出UIWidgets。
UIWidgets是一个可以独立使用的 Unity Package (https://github.com/UnityTech/UIWidgets)。它将Flutter(https://flutter.io/)的App框架与Unity渲染引擎相结合,让您可以在Unity编辑器中使用一套代码构建出可以同时在PC、网页及移动设备上运行的原生应用。此外,您还可以在您的3D游戏或者Unity编辑器插件中用它来构建复杂的UI层,替换UGUI和IMGUI。
- https://connect-cdn-china2.unity.com/20190328/videos/575ec689-8277-46f4-8097-e37e9773db48_Unity_UIWidgets_20190327.mp4
- https://github.com/UnityTech/UIWidgets/blob/master/README-ZH.md
- https://github.com/UnityTech/UIWidgets
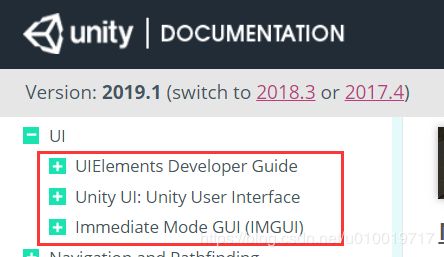
Unity2019 文档中包含三种UI方式的介绍“
3、 Unity 2019.1中添加Denoise 大大减少光照贴图的烘烤时间
http://tsubakit1.hateblo.jp/entry/2019/04/16/233017
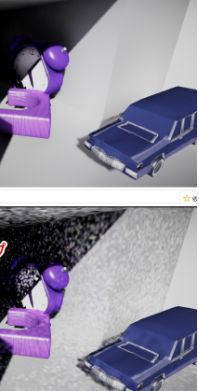
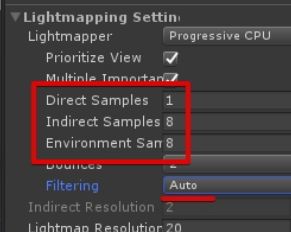
Progressive Lightmapper是一种基于光线跟踪的光照贴图。如果采样率很高,光照贴图将非常正确地烘焙,但需要很长时间。另一方面,减少采样数量将显着改善烘烤时间,但光照图将充满噪音。
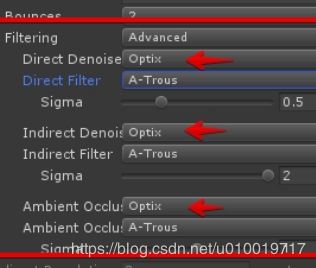
Optix AI Denoiser
Optix公司AI降噪 ,Nvidia的机器学习是像噪声去除系统的基础。论文在这里https://research.nvidia.com/publication/interactive-reconstruction-monte-carlo-image-sequences-using-recurrent-denoising https://developer.nvidia.com/optix-denoiser
尝试使用 :Window > Renderer > Lightmap
在Direct Sample和Indirect Samples,Environment Sample并尝试烤大幅减少的数量。
| 项目 |
改变之前 |
改变之后 |
| 直接样品 |
32 |
1 |
| 间接样本 |
512 |
8 |
| 环境样本 |
256 |
8 |
这将显着减少烘烤时间。
真变得超快 ~~~~~
4、 Unity 2019.1 发布:
https://unity3d.com/cn/unity/beta/2019.1#release-notes
可以查看新特性Features都包含哪些。 例如:
- Android:为Screen.safeArea增加了Android缺口/切入支持
- Android:添加了仅脚本修补功能,其中仅将与脚本相关的更改发送到设备而不是重新打包apk文件。
- 编辑器:将SceneVis控件添加到编辑器层次结构中,以控制GameObjects的场景可见性
- 编辑器:控制台:为控制台条目列表添加了基于文本的过滤
- 时间轴:为轨道级动画添加了API支持
- 时间线:在时间轴上添加了信号和标记
- UI Elements:现在可以使用样式和uss对背景图像进行着色
- UI Elements:UIElements API发布 - 实验性的
- 编辑器:Exposed ProjectWindowUtil.CreateScriptAssetFromTemplateFile,允许编辑器脚本从模板文件创建新的基于文本的资源,其方式与使用内置C#脚本模板的方式类似。
- 编辑:添加GameObjectUtility.GetMonoBehavioursWithMissingScriptCount和GameObjectUtility.RemoveMonoBehavioursWithMissingScript,以便能够从游戏对象中删除缺少脚本的MonoBehaviours。
- 编辑器:添加了CompilationPipeline.compilationStarted和CompilationPipeline.compilationFinished事件,用于编译开始并在编辑器中完成。
- Memory Profiler:添加了UnityEditor.Profiling.Memory.Experimental.PackedMemorySnapshot.Convert来处理从MemoryProfiler.PackedMemorysnapshot对象到UnityEditor.Profiling.Memory.Experimental.PackedMemorySnapshot文件的转换。
- Profiler:Exposed UnityEditor.Profiling.HierarchyFrameDataView API,允许以分层方式访问CPU Profiler数据
- Profiler:用于连接播放器(来自Profiler或控制台窗口)的编辑器GUI现在已公开。它位于UnityEditor.Experimental.Networking.PlayerConnection下,其中EditorGUIUtility.GetAttachToPlayerState(EditorWindow parentWindow)将获得使用EditorGUILayout / EditorGUI.AttachToPlayerDropdown绘制它的连接状态。
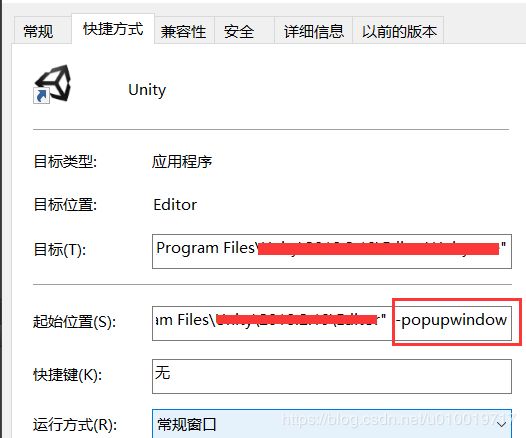
5、 Unity 出的Windows包.exe 会包含 标题栏。
简单的方式是创建快捷方式, 然后属性中添加 一个命令。 -popupwindow
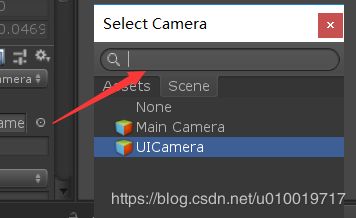
6、 编辑器很多时候需要搜索功能: 最好可以类似于Unity 自带的 Hierarchy 和 Project 面板中自带的搜索功能。
或者是这种点击圆圈弹出的功能。
搜索发现 SearchField 、 SearchWindow
https://docs.unity3d.com/ScriptReference/IMGUI.Controls.SearchField.html 这个帖子就是封装的这个API : https://forum.unity.com/threads/editor-ui-search-field-with-autocomplete-on-github.533252/
https://docs.unity3d.com/ScriptReference/Experimental.GraphView.SearchWindow.html 这个实验API 没有查到如何使用!!!
点击圆圈弹窗口, 可以使用这个API :
https://docs.unity3d.com/ScriptReference/EditorGUIUtility.ShowObjectPicker.html
7、 在不使用VSTU的情况下修改Unity中从Unity生成的sln / csproj文件
https://qiita.com/toRisouP/items/6b0fc5eb97b0d7ce1499
AssetPostprocessor的OnGeneratedSlnSolution使用。 (它没有写在文档中,但是自2016.2以来已添加此事件功能。)
using UnityEditor;

public class SolutionFileFixer : AssetPostprocessor
{
    private static string OnGeneratedSlnSolution(string path, string content)
    {
        var solutionGuid = "solution的GUID";
        var projectGuid = "project的GUID";
        var projectName = "项目名称";
        var projectPath = "csproj路径";
        var add =
            $"Project(\"{solutionGuid}\") = \"{projectName}\", \"{projectPath}\", \"{projectGuid}\",\"{Environment.NewLine}EndProject";

        // 添加到最后
        var newContent = content.Replace($"EndProject{Environment.NewLine}Global",
            $"EndProject{Environment.NewLine}{add}{Environment.NewLine}Global");
        return newContent;
    }
}
让我们试着抹去Boo.Lang。
    private static string OnGeneratedCSProject(string path, string content)
    {
        var document = XDocument.Parse(content);
        document.Root.Descendants()
            .Where(x => x.Name.LocalName == "Reference")
            .Where(x => (string) x.Attribute("Include") == "Boo.Lang")
            .Remove();
        return document.Declaration + Environment.NewLine + document.Root;
    }
8、 【Unity(C#)】方便的ReorderableList, 制作更方便用的snippet代码段功能
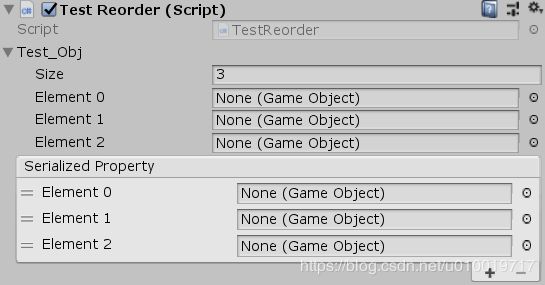
ReorderableList 是Unity早就推出的编辑功能。 顾名思义,您可以在Inspector上创建一个可以自由重新排列的列表。如果您拖动到另一个位置, 列表编号将自动替换。
using UnityEngine;
using UnityEditor;
using UnityEditorInternal;
public class TestReorder : MonoBehaviour
{
    [SerializeField]
    [HideInInspector]
    public GameObject[] test_Obj;

#if UNITY_EDITOR
    [CustomEditor(typeof(TestReorder))]
    public class ExampleInspector : Editor
    {
        ReorderableList reorderableList;
        void OnEnable()
        {
            SerializedProperty prop = serializedObject.FindProperty("test_Obj");
            reorderableList = new ReorderableList(serializedObject, prop);
            reorderableList.drawElementCallback = (rect, index, isActive, isFocused) =>
            {
                SerializedProperty element = prop.GetArrayElementAtIndex(index);
                rect.height -= 4;
                rect.y += 2;
                EditorGUI.PropertyField(rect, element);
            };
        }
        public override void OnInspectorGUI()
        {
            base.OnInspectorGUI();
            serializedObject.Update();
            reorderableList.DoLayoutList();
            serializedObject.ApplyModifiedProperties();
        }
    }
#endif
}

 [SerializeField]
 [HideInInspector]   //防止两次显示属性。   没有它就是这样。
 public GameObject[] test_Obj;
使用Visual Stadio的代码段功能 。 创建方式 :https://qiita.com/crasae/items/a5fcbb52ceaf89d3af33
9、 “Scroll-Mutate-Infinity-ZenUI”简介,可以实现使用[Unity]元素的滚动
UGUI 现在这种东西太多了 , 就看怎么设计的性能更好,使用更方便~
http://baba-s.hatenablog.com/entry/2019/04/18/090000
https://github.com/ToshikiImagawa/Variable-infinite-scroll
10、 [Unity]委托生成112B GC Alloc,但本地功能不生成GC Alloc
using System;
using UnityEngine;
using UnityEngine.Profiling;
public class Test : MonoBehaviour
{
    private void Update()
    {
        var samplerA = CustomSampler.Create( "TEST A" );
        samplerA.Begin();
        Func funcA = n => n + 1;
        funcA( 25 );
        samplerA.End();

        var samplerB = CustomSampler.Create( "TEST B" );
        samplerB.Begin();
        int funcB( int n ) => n + 1;
        funcB( 25 );
        samplerB.End();
    }
}
11、 [Unity]“Unity UI”简介,强制引导的一种实现方式。
https://github.com/asyncrun/GuideMask
12、 【Unity】获取3D对象的多边形数
using System.Linq;
using UnityEngine;

public class Example : MonoBehaviour
{
    private void Awake()
    {
        var meshes =
             GetComponentsInChildren( true )
            .Select( c => c.sharedMesh )
        ;

        var skinnedMeshes =
             GetComponentsInChildren( true )
            .Select( c => c.sharedMesh )
        ;

        var count = meshes
            .Concat( skinnedMeshes )
            .Sum( c => c.triangles.Length / 3 )
        ;

        Debug.Log( count );
    }
}
https://qiita.com/atsushishi/items/ac485826fda4ab7e0990
http://megumisoft.hatenablog.com/entry/2015/09/04/103559
http://baba-s.hatenablog.com/entry/2019/04/21/231000
13、 【Unity】用于获取3D对象的顶点数
using System.Linq;
using UnityEngine;

public class Example : MonoBehaviour
{
    private void Awake()
    {
        var meshes =
             GetComponentsInChildren( true )
            .Select( c => c.sharedMesh )
        ;
        var skinnedMeshes =
             GetComponentsInChildren( true )
            .Select( c => c.sharedMesh )
        ;

        var count = meshes
            .Concat( skinnedMeshes )
            .Sum( c => c.vertices.Length )
        ;
        Debug.Log( count );
    }
}
14、[Unity]尝试使用延迟初始化类“Lazy”
使用例1:
之前写法:
using UnityEngine;
public class Data
{
    private TextAsset m_textAsset;
    public TextAsset TextAsset
    {
        get
        {
            if ( m_textAsset == null )
            {
                m_textAsset = Resources.Load( "hoge" );
            }
            return m_textAsset;
        }
    }
}
public class Example : MonoBehaviour
{
    private void Start()
    {
        var data = new Data();
        Debug.Log( data.TextAsset.text );
    }
}
修改为:
using System;
using UnityEngine;
public class Data
{
    private readonly Lazy m_textAsset =
        new Lazy( () => Resources.Load( "hoge" ) );

    public TextAsset TextAsset => m_textAsset.Value;
}
public class Example : MonoBehaviour
{
    private void Start()
    {
        var data = new Data();
        Debug.Log( data.TextAsset.text );
    }
}
例如,您可以在第一次访问TextAsset属性时使用Resources.Load加载TextAsset。
使用例2:
using System;
using System.Linq;
using UnityEngine;
public class ItemValue
{
    public string m_itemName = "Scrambler";
    public ItemValue()
    {
        Debug.Log( "构造函数已被调用" );
    }
}
public class ItemData : Lazy
{
    public int m_itemId;
}
public class Example : MonoBehaviour
{
    private void Start()
    {
        int count = 100;
        var list = new ItemData[ count ];
        for ( int i = 0; i < count; i++ )
        {
            list[ i ] = new ItemData { m_itemId = i };
        }
        var data = list.FirstOrDefault( c => c.m_itemId == 25 );
        Debug.Log( data.Value.m_itemName );
    }
}
例如,如果您创建100个ItemData并仅访问m_itemId为25的元素,
ItemValue的构造函数只被调用一次 (只调用访问过的m_itemId为25的元素的构造函数)
15、 [Unity]“ImageEffectAllowedInSceneView” 属性,可以反映后期效果对场景视图的影响
using UnityEngine;

[ImageEffectAllowedInSceneView]
public class Example : MonoBehaviour
{
    private void OnRenderImage( RenderTexture source, RenderTexture dest )
    {
        ...
将ImageEffectAllowedInSceneView属性应用于类允许“ 场景视图”反映后期效果的效果
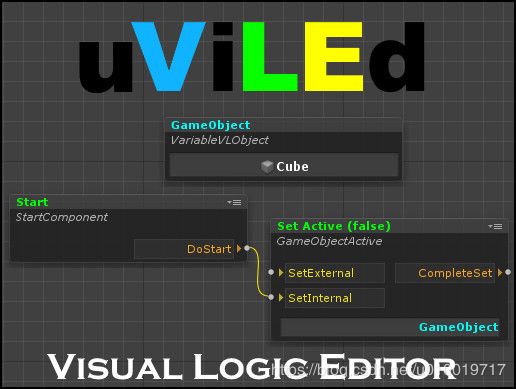
16、 Unity3d的可视逻辑编辑器。第1部分
https://habr.com/ru/post/448190/ 作者做了很多细节介绍, 从收费到免费的过程。
https://assetstore.unity.com/packages/tools/visual-scripting/uviled-visual-logic-editor-137517
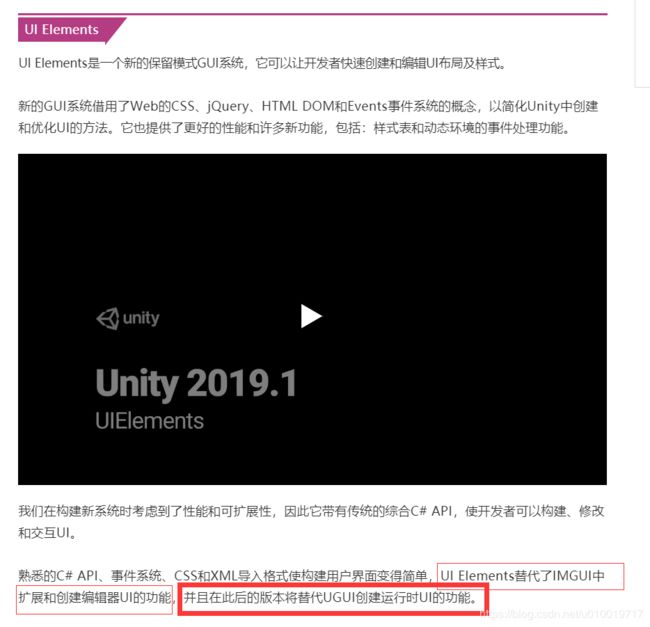
17、 记得的 Unity中国官方支持/开发者团队 介绍 UIWidgets的时候 认为 UIElements 是过时的设计。 从 Unity最新发布的 2019 版本的介绍来看, UIElements 的定位很高呀。 将来要替换UGUI 的 ~~~~
https://mp.weixin.qq.com/s/D0U5R86iceKRVzDG_rQJHg
官方博客 :What’s new with UIElements in 2019.1 https://blogs.unity3d.com/2019/04/23/whats-new-with-uielements-in-2019-1/?utm_source=twitter&utm_medium=social&utm_campaign=engine_global_generalpromo_2019-04-23_2019.1&utm_content=blog_uielements
评论中:
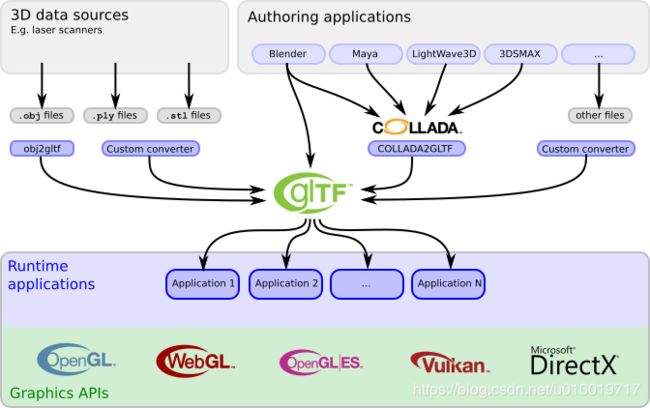
18、 看到 关于 GLTF 的博文:
原文: https://github.com/KhronosGroup/glTF/tree/master/specification/2.0
来自3D世界的JPEG。什么是glTF?
GLTF和GLB格式基础知识,第1部分
GLTF和GLB格式基础知识,第2部分
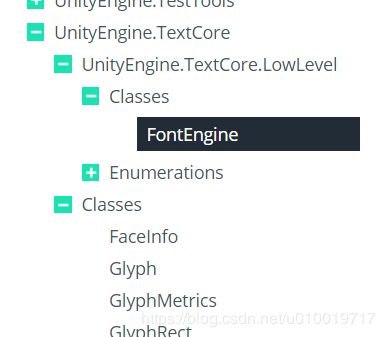
19、 Unity有开放 访问字体 操作 更高级的API .
https://docs.unity3d.com/ScriptReference/TextCore.LowLevel.FontEngine.html
之前只有: https://docs.unity3d.com/ScriptReference/Font.html
20、 在2019.1上运行的LWRP 4预览的修改版本
https://connect.unity.com/p/lwrp-4-preview-wo2019-1dedong-kasuyounigai-zao-shitahua
主要是API发生了比较大的变化 。不仅需要修改LWRP,还需要修改PPSV2和ShaderGraph。
■关于ShaderGraph
■关于PPSV2的变更
■使用LWRP重写
他的另外一篇博文:《关于动态字体和位图字体》 总结了两者的优缺点。
21、[Unity]新的秘密教程“John Lemon's Haunted Jaunt”
有一个面向初学者的 官方教程:
https://learn.unity.com/project/john-lemon-s-haunted-jaunt-3d-beginner
文档式, 非视频
有使用 ToonShader。
重要的是要注意 主角John 不能快速替换模型,因为它是在使用Generic Avatar的RootMotoin的移动。
移动幽灵 使用半透, 外发光的shader
今天看到 应该是作者? 在Connect上关于教程的 扩展文章:
https://connect.unity.com/p/improve-waypoints-for-john-lemon-s-haunted-jaunt
https://connect.unity.com/p/next-improvements
https://connect.unity.com/p/adding-collectible-lemons
22、 官方中文字幕视频介绍新功能:
Unity 2019.1新功能: 增量式垃圾回收(GC)技术概览https://connect.unity.com/p/unity-2019-1xin-gong-neng-zeng-liang-shi-la-ji-hui-shou-gc-ji-zhu-gai-lan
Unity 2019.1 - UIElements功能介绍https://connect.unity.com/p/unity-2019-1-uielementsgong-neng-jie-shao
23、 Builtin和LWRP的功能比较表
当特定功能在LWRP上不起作用时,使用内置渲染在函数比较表中查找技术的原因。
LWRP已经制作或正在制作的几款游戏(如“使命召唤:手机”和“迪士尼魔法师竞技场”)也已宣布。
Internet上提供了名为 Forward Renderer(Builtin和LWRP功能比较)的英文文档(电子表格) https://forum.unity.com/threads/lwrp-4-6-0-preview-18-3-5-2-1-19-1-are-out.562291/page-7#post-4114264
[PUBLIC] Forward Renderer (Builtin and LWRP Feature Comparison)
或者: [官方直播] 详解Unity轻量级渲染管线LWRP【介绍了大概】https://www.bilibili.com/video/av38056528/
| 1 |
Feature |
Built-in |
LWRP |
Goal Release |
Details |
| 2 |
Camera |
||||
| 3 |
HDR |
||||
| 4 |
MSAA |
||||
| 5 |
Physical Camera |
2019.2 |
https://docs.unity3d.com/Manual/PhysicalCameras.html |
||
| 6 |
Dynamic Resolution |
https://docs.unity3d.com/Manual/DynamicResolution.html |
|||
| 7 |
Multi Display |
||||
| 8 |
Stacking |
2019.2 |
|||
| 9 |
Flare Layer |
Deprecated |
https://docs.unity3d.com/Manual/class-FlareLayer.html |
||
| 10 |
Depth Texture |
https://docs.unity3d.com/Packages/[email protected]/manual/lwrp-asset.html |
|||
| 11 |
Depth + Normals Texture |
Not Supported |
|||
| 12 |
Color Texture |
Not Supported |
https://docs.unity3d.com/Packages/[email protected]/manual/lwrp-asset.html |
||
| 13 |
Motion Vectors |
2019.3 |
|||
| 14 |
Realtime Lights |
||||
| 15 |
Light Types |
||||
| 16 |
Directional |
In LWRP only a single directional light is supported. This limit will be increased. |
|||
| 17 |
Spot |
||||
| 18 |
Point |
||||
| 19 |
Area |
Not Supported |
Not Supported |
||
| 20 |
Inner Spot Light Angle |
Not Supported |
2019.2 |
Exposes in light inspector to control both outer and inner spot light angle. |
|
| 21 |
Shading |
Multiple Passes |
Single Pass |
LWRP renders all lights in a single shader pass. This reduces both amount of drawcalls and overdraw compared to Built-in renderer. |
|
| 22 |
Culling |
Per-Object |
Per-Object |
||
| 23 |
Per-Object |
||||
| 24 |
Per-Layer |
||||
| 25 |
Light Limits |
||||
| 26 |
Directional Lights |
Unlimited |
1 |
2019.2 |
Increase limits of Directional lights above 1. |
| 27 |
Per-Object |
Unlimited |
4 |
2019.3 |
Increase limits of Per-Object lights above 4. |
| 28 |
Per-Camera |
Unlimited |
16 |
2019.2 |
Increase limits of visible Per-Camera lights above 16. |
| 29 |
Attenuation |
Legacy |
InverseSquared |
https://docs.unity3d.com/Manual/ProgressiveLightmapper-CustomFallOff.html |
|
| 30 |
Vertex Lights |
Vertex Lights work differently than Builtin. Main Light is always rendered per-pixel. Additional per-object lights can be rendered per-pixel or per-vertex. https://docs.unity3d.com/Packages/[email protected]/manual/lwrp-asset.html |
|||
| 31 |
SH Lights |
In Research |
Add support to baked remaining lights in SH. https://docs.unity3d.com/Manual/RenderTech-ForwardRendering.html |
||
| 32 |
Realtime Shadows |
||||
| 33 |
Light Types |
||||
| 34 |
Directional |
||||
| 35 |
Spot |
||||
| 36 |
Point |
2019.3 |
Add support to point light shadows |
||
| 37 |
Area |
Not Supported |
Not Supported |
||
| 38 |
Shadow Projection |
||||
| 39 |
Stable Fit |
||||
| 40 |
Close Fit |
2019.3 |
Support Close Fit shadow projection. |
||
| 41 |
Shadow Cascades |
||||
| 42 |
Number of Cascades |
1, 2, or 4 |
1, 2, or 4 |
In Research |
Expose option with 3 cascades and additional customization. |
| 43 |
Control by Percentage |
||||
| 44 |
Control by Distance |
Not Supported |
2019.2 |
Allow to controls shadow cascade partition by distance. |
|
| 45 |
Shadow Resolve Type |
||||
| 46 |
Lighting Pass |
LWRP Resolves shadows while shading lights whenever shadow cascades are disabled. |
|||
| 47 |
Screen Space Pass |
||||
| 48 |
Shadow Bias |
Constant clip space offset + normal bias. |
Offsets shadowmap texels in the light direction + normal bias. This gives better shadow bias control given different shadow volume sizes and resolutions. |
||
| 49 |
Batching |
||||
| 50 |
Static Batching (By Shader) |
Not Supported |
Caches materials and batches by shader. (SRP Batcher) |
||
| 51 |
Static Batching (By Material) |
In LWRP batching fallback by material when the shader is not compatible with SRP Batcher. |
|||
| 52 |
Dynamic Batching |
||||
| 53 |
Dynamic Batching (Shadows) |
In Research |
We use SRP batcher we may not want to support this |
||
| 54 |
GPU Instancing |
||||
| 55 |
Color Space |
||||
| 56 |
Linear |
||||
| 57 |
Gamma |
||||
| 58 |
GI (Backing Back End) |
||||
| 59 |
Enlighten |
||||
| 60 |
Enlighten Realtime |
In Research |
Support Realtime GI |
||
| 61 |
Progressive CPU |
||||
| 62 |
Progressive GPU |
||||
| 63 |
Mixed Lighting |
||||
| 64 |
Subtractive |
||||
| 65 |
Baked Indirect |
2019.1 |
Add support for Baked Indirect Mixed Light Mode |
||
| 66 |
Shadow Mask |
2019.3 |
Add support for Shadow Mask Mixed Light Mode |
||
| 67 |
Distance Shadow Mask |
2019.3 |
Add support for Distance Shadow Mask Mixed Light Mode |
||
| 68 |
GI (Light Probes) |
||||
| 69 |
Blending |
||||
| 70 |
Proxy Volume (LPPV) |
In Research |
Add support for LPPV |
||
| 71 |
Custom Provided |
||||
| 72 |
Occlusion Probes |
2019.1 |
Add support Per-Object Occlusion Probes. One interpolated probe per object. |
||
| 73 |
GI (Reflection Probes) |
||||
| 74 |
Realtime |
||||
| 75 |
Baked |
||||
| 76 |
Sampling |
||||
| 77 |
Simple |
Either Reflection Probe or Skybox |
|||
| 78 |
Blend Probes |
2019.3 |
Add support for Blend Light Probes mode |
||
| 79 |
Blend Probes and Skybox |
2019.3 |
Add support for Blend Probe and Skybox Light Probes mode. |
||
| 80 |
Box Projection |
2019.3 |
Add support Box Projection |
||
| 81 |
GI (Lightmap Modes) |
||||
| 82 |
Non-Directional |
||||
| 83 |
Directional |
||||
| 84 |
GI (Environment) |
||||
| 85 |
Source |
||||
| 86 |
Skybox |
||||
| 87 |
Gradient |
||||
| 88 |
Color |
||||
| 89 |
Ambient Mode |
||||
| 90 |
Realtime |
In Research |
Add support Realtime Ambient Mode |
||
| 91 |
Baked |
||||
| 92 |
Skybox |
||||
| 93 |
Procedural |
||||
| 94 |
6 Sided |
||||
| 95 |
Cubemap |
||||
| 96 |
Panoramic |
||||
| 97 |
Fog |
||||
| 98 |
Linear |
||||
| 99 |
Exponential |
||||
| 100 |
Exponential Squared |
||||
| 101 |
Visual Effects Components |
||||
| 102 |
Halo |
Deprecated |
|||
| 103 |
Lens Flare |
Deprecated |
|||
| 104 |
Trail Renderer |
||||
| 105 |
Billboard Renderer |
||||
| 106 |
Projector |
Deprecated |
|||
| 107 |
Forward Decals |
In Research |
|||
| 108 |
Blob Shadows |
In Research |
|||
| 109 |
Shaders (General) |
||||
| 110 |
Shader Graph |
Not Supported |
|||
| 111 |
Surface Shaders |
Deprecated |
|||
| 112 |
Camera Relative Rendering |
Not Supported |
In Research |
||
| 113 |
Builtin Lit Uber Shader |
||||
| 114 |
Metallic Workflow |
||||
| 115 |
Specular Workflow |
||||
| 116 |
Surface Type and Blend Modes |
||||
| 117 |
Opaque |
||||
| 118 |
Faded (Alpha Blend) |
Select Alpha with Transparent |
|||
| 119 |
Transparent |
Select Premultiply blend mode with Transparent |
|||
| 120 |
Cutout |
||||
| 121 |
Additive |
Not Supported |
|||
| 122 |
Multiply |
Not Supported |
|||
| 123 |
Surface Inputs |
||||
| 124 |
Albedo (Base Map) |
||||
| 125 |
Specular |
||||
| 126 |
Metallic |
||||
| 127 |
Smoothness |
||||
| 128 |
Ambient Occlusion |
||||
| 129 |
Normal Map |
||||
| 130 |
Detail Map |
Not Supported |
Use Shadergraph |
||
| 131 |
Detail Normal Map |
Not Supported |
Use Shadergraph |
||
| 132 |
Heightmap |
Not Supported |
Use Shadergraph |
||
| 133 |
Light Cookies |
In Research |
|||
| 134 |
Parallax Mapping |
Not Supported |
Use Shadergraph |
||
| 135 |
Light Distance Fade |
Not Supported |
In Research |
Add support for light distance fade so lights can be culled by distance and fade smoothly. |
|
| 136 |
Shadow Distance Fade |
In Research |
Add support for shadow distance fade so shadows fade out to shadow distance smoothly. |
||
| 137 |
Shadow Cascade Blending |
Not Supported |
In Research |
Add support for shadow cascade blending so shadows fade out smoothly to the next cascade |
|
| 138 |
GPU Instancing |
||||
| 139 |
Double Sided GI |
||||
| 140 |
Two Sided |
Not Supported |
|||
| 141 |
Order In Layer |
Not Supported |
2019.1 |
Expose selecting in the LWRP material's UI layer sorting. |
|
| 142 |
Render Pipeline Hooks |
||||
| 143 |
Camera.RenderWithShader |
Deprecated |
|||
| 144 |
Camera.AddCommandBuffer*/Camera.Remove[All]CommandBuffer* |
Deprecated |
|||
| 145 |
Camera.Render |
Deprecated |
|||
| 146 |
Light.AddCommandBuffer*/LightRemove[All]CommandBuffer* |
Deprecated |
|||
| 147 |
OnPreCull |
Deprecated |
|||
| 148 |
OnPreRender |
Deprecated |
|||
| 149 |
OnPostRender |
Deprecated |
|||
| 150 |
OnRenderImage |
Deprecated |
|||
| 151 |
OnRenderObject |
Deprecated |
|||
| 152 |
OnWillRenderObject |
||||
| 153 |
OnBecameVisible |
||||
| 154 |
OnBecameInvisible |
||||
| 155 |
Camera Replacement Material |
Not Supported |
In Research |
Expose option in the camera to override the material. |
|
| 156 |
RenderPipeline.BeginFrameRendering |
Not Supported |
|||
| 157 |
RenderPipeline.EndFrameRendering |
Not Supported |
2019.1 |
||
| 158 |
RenderPipeline.BeginCameraRendering |
Not Supported |
|||
| 159 |
RenderPipeline.EndCameraRendering |
Not Supported |
2019.1 |
||
| 160 |
LightweightRenderPipeline.RenderSingleCamera |
Not Supported |
Call this instead of Camera.Render |
||
| 161 |
ScriptableRenderPass |
Not Supported |
ScriptableRenderPass can be injected in the renderer and a render context is provided with them. https://docs.unity3d.com/ScriptReference/Experimental.Rendering.ScriptableRenderContext.html This allows CommandBuffer execution but also much more flexibility. |
||
| 162 |
Custom Renderers |
Not Supported |
2019.1 |
In LWRP, one can completely override the renderer. This works by receiving some rendering data and injecting your own render passes. This can be used to create a stylized renderer or a Forward+/Tile/Clustered for instance. |
|
| 163 |
Post Processing |
||||
| 164 |
Ambient Occlusion (MSVO) |
2019.3 |
Add support for MSVO and LWRP. |
||
| 165 |
Auto Exposure |
||||
| 166 |
Bloom |
||||
| 167 |
Chromatic Aberration |
||||
| 168 |
Color Grading |
||||
| 169 |
Depth of Field |
||||
| 170 |
Grain |
||||
| 171 |
Lens Distortion |
||||
| 172 |
Motion Blur |
2019.3 |
|||
| 173 |
Screen Space Reflections |
Not Supported |
|||
| 174 |
Vignette |
||||
| 175 |
Particles |
||||
| 176 |
VFX Graph (GPU) |
Not Supported |
2019.1 |
||
| 177 |
Particles System (CPU) |
||||
| 178 |
Shaders |
||||
| 179 |
Physically Based |
||||
| 180 |
Simple Lighting (Blinn-Phong) |
Not Supported |
|||
| 181 |
Unlit |
||||
| 182 |
Soft Particles |
||||
| 183 |
Distortion |
||||
| 184 |
Flipbook Bleding |
||||
| 185 |
Terrain |
||||
| 186 |
Shaders |
||||
| 187 |
Physically Based |
||||
| 188 |
Simple Lighting (Blinn-Phong) |
In Research |
|||
| 189 |
Unlit |
Not Supported |
In Research |
||
| 190 |
Speed Tree |
2019.2 |
|||
| 191 |
Vegetation |
||||
| 192 |
Detail |
||||
| 193 |
Wind Zone |
||||
| 194 |
Number of Layers |
Unlimited |
4 |
||
| 195 |
GPU Patch Generation |
||||
| 196 |
Surface Mask |
Not Supported |
2019.1 |
||
| 197 |
2D |
||||
| 198 |
Sprite |
||||
| 199 |
Tilemap |
won't work with 2D lighting in 19.2 |
|||
| 200 |
Sprite Shape |
won't work with 2D lighting in 19.2 |
|||
| 201 |
Pixel-Perfect |
2019.2 |
|||
| 202 |
2D Shape Lights |
Not Supported |
2019.2 |
||
| 203 |
2D Point Lights with Normal Map |
Not Supported |
2019.2 |
||
| 204 |
2D Point Lights with Shadows |
Not Supported |
2019.3 |
||
| 205 |
UI (Canvas Renderer) |
||||
| 206 |
Screen Space - Overlay |
||||
| 207 |
Screen Space - Camera |
2019.2 |
|||
| 208 |
World Space |
||||
| 209 |
Text Mesh Pro |
||||
| 210 |
VR |
||||
| 211 |
Multipass |
2019.2 |
|||
| 212 |
Single Pass |
||||
| 213 |
Single Pass Instanced |
||||
| 214 |
Post-Processing |
||||
| 215 |
Oculus Rift |
||||
| 216 |
OpenVR |
||||
| 217 |
Steam VR |
||||
| 218 |
PSVR |
||||
| 219 |
WMR |
||||
| 220 |
GearVR |
In Research |
|||
| 221 |
Cardboard |
In Research |
|||
| 222 |
Oculus Go |
In Research |
|||
| 223 |
Daydream |
In Research |
|||
| 224 |
AR |
||||
| 225 |
AR Toolkit |
||||
| 226 |
Debug |
||||
| 227 |
Scene view modes |
2019.3 |
|||
| 228 |
Docs |
改改善John Lemon的闹鬼短途旅行的路标善John Lemon的闹鬼短途旅行的路标
===================================== 性能分析的文章 =======================
1、 Burst的性能 表现
https://jacksondunstan.com/articles/5211
Unity 2019.1上周发布,Burst编译器现已不在预览版中。它通过生成比IL2CPP更优化的代码来保证卓越的性能。让我们试一试,看看是否是炒作!
要使用Burst编译器,我们需要做三件事。
- 首先,我们必须将C#的使用限制为 “High-Performance C#”子集。这意味着我们不使用任何托管对象,如类和字符串。
- 其次,我们必须将所有代码放在C# job中,例如一个实现IJob或IJobParallelFor。
- 第三,我们必须将[BurstCompile]属性添加到 job中。如果我们已经完成了前两个步骤,那么添加该[BurstCompile]属性对于实现成本而言可以被视为“免费”。
只需添加[BurstCompile]属性,我们就有了一个重要的加速!与IL2CPP编译的代码相比,Burst编译的代码运行时间缩短了35%。为了找出原因,让我们使用Burst Inspector查看它生成的代码:
- Jobs > Burst > Open Inspector...
- Click TestScript.BurstJob on the left
- Check Enhanced Disassembly on the right
- Uncheck Safety Checks on the right
- Click Refresh Disassembly on the right
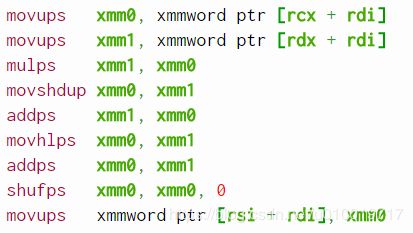
Here is the section for C[i] = math.dot(A[i], B[i]):
这些是SIMD指令,它告诉CPU一次对许多变量执行相同的操作。 在这种情况下,float4的所有四个组件都是模拟操作的,以便添加它们,乘以它们等。
2、尴尬/别扭的对象
https://jacksondunstan.com/articles/5205
作者主要是通过 class Player 常见的类 , 与 单一职责原则(类进行差分) 和 迪米特法则 的冲突(保持最少知道原则) 和解决的想法。
Player 类被拆分为 Player , PlayerCombat , PlayerMovement . Player 依赖于后两个类, 但是外部如果要访问 PlayerCombat , PlayerMovement 的数据/功能怎么办? 由Player作为中介提供接口。
