unity3d Human skin real time rendering 真实模拟人皮实时渲染
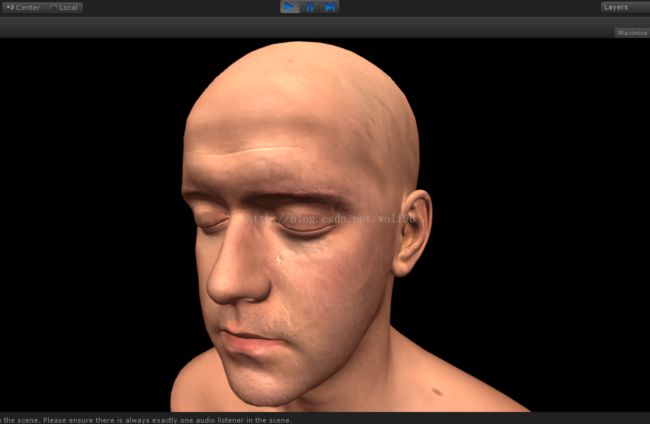
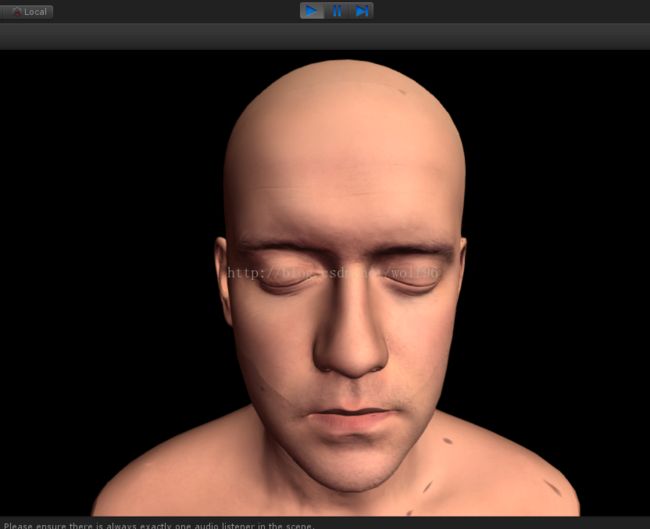
先放出结果图片。。。由于网上下的模型是拼的,所以眼皮,脸颊,嘴唇看起来像存在裂痕,解决方式是加入曲面细分和置换贴图进行一定隆起,但是博主试了一下fragment shader的曲面细分,虽然细分成功了但是着色效果变的很奇怪,这里就不用曲面细分了,大家如果有在fragment shader上用曲面细分的好办法,可以的话请告诉我
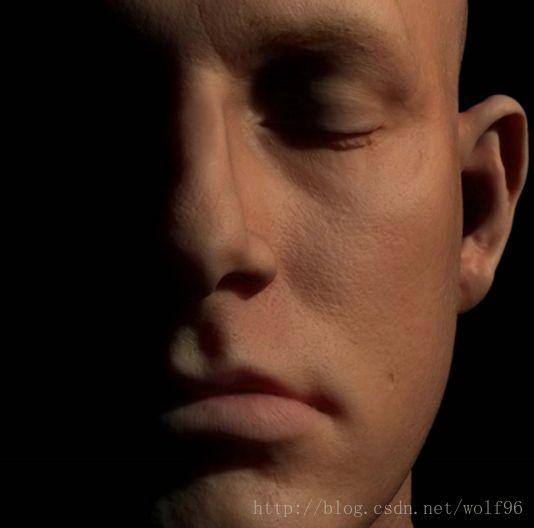
本例做到了以下几点
1. 次表面散射
1. 大多数的漫反射光来自次表面散射
2. 皮肤颜色主要来自上表皮
3. 粉或红色主要为真皮中的血液
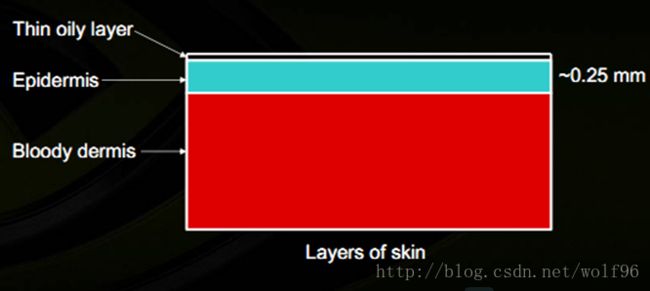
此图为人皮的组成模拟,人有好多层表皮,这就说明在真实情况下要进行数次折射与反射,这就更难达到真实
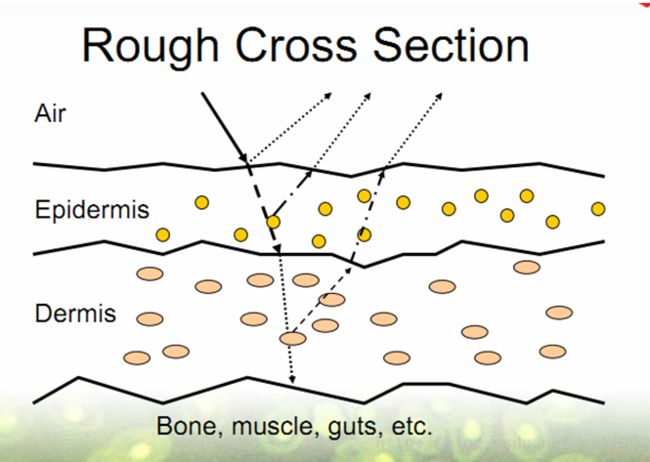
上图直观的表明了光线“被怎么样了”
光线接触到皮肤时,有大约96%被皮肤各层散射了,只有大约4%被反射
再说specular,人的皮肤会出油,所以就会有反射,但是人的皮肤不能像镜子那样反射,因为人的皮肤是粗糙的,在这种情况下用基于物理的(physically based)方法就最好不过了,没了解过physically based的看官们可以先了解下这篇文章和上面的一样

使用了之前试出效果最好的的方法,也就是使命召唤2中用到的的方法,同时试了下beckmann的方法,但是效果并不好,phong等方法也没有试
这里,我们的实现方法是这样的:
又进行了 “智能补光”
也就是常规的求高光的方式,我们在此加入了高光贴图,不让不该高光的地方(如眉毛)产生高光
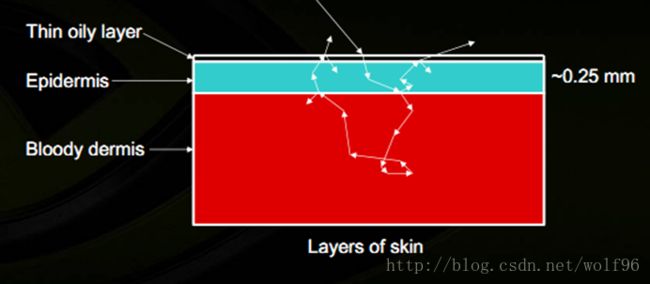
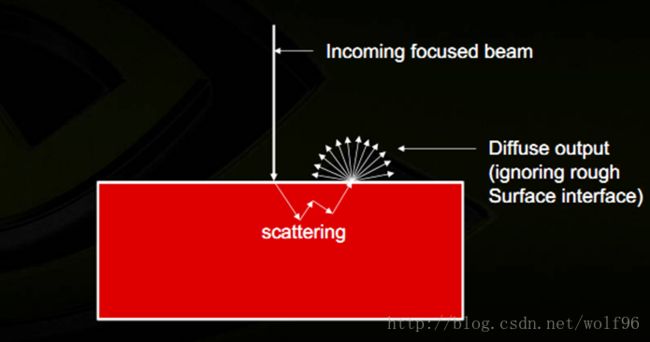
这就产生了次表面散射
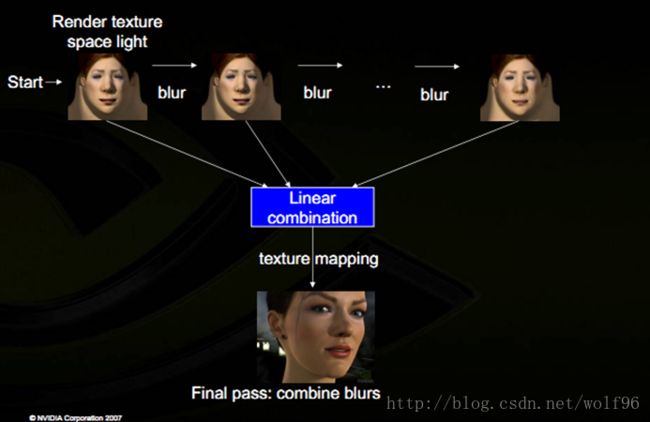
NVIDIA在GDC2007年的演讲中提到把图像blur个六遍达到柔和的次表面散射效果
每次blur都是在不同的颜色通道以不同的范围和程度进行blur
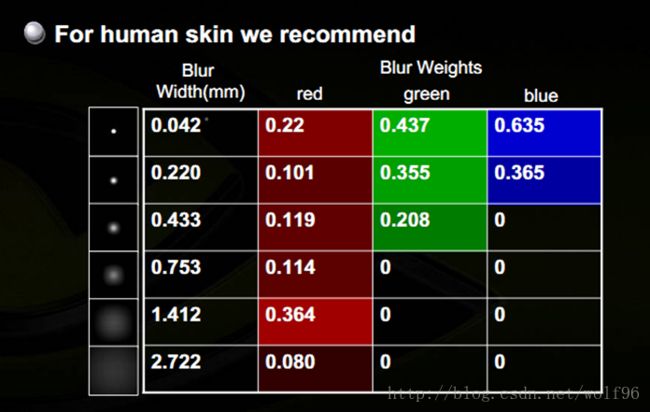
由于我们的贴图是这样的“高配”
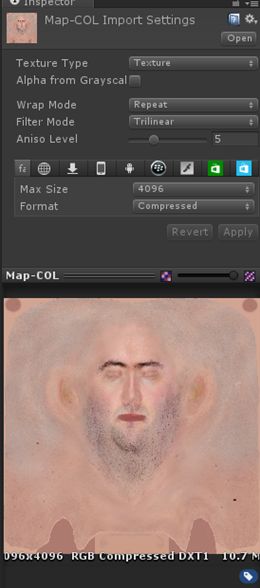
用在本例上会丢失少许本来贴图上的细节,但是确实有一定的次表面散射效果,各位看官自行取舍,而且千万不要只做高斯模糊,这样的话细节会丢失更多,而且没有什么次表面散射的感觉
我们同时也起到重要作用的是边缘光rim和brdf,
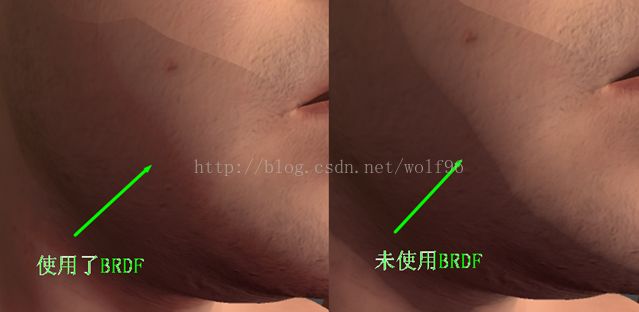
使用了BRDF最明显的好处是,Brdf贴图间接控制了明暗交界线的颜色,可通过曲率控制,模拟了光与阴影交界处光对皮肤的反射与折射,如果全黑的话说明光只是普通的漫反射。
对于rim的话添加了前向rim和后向rim其实本质上还是rim,后向rim使用了白色的图片产生一种玉质的感觉(好吧其实更像羊羹),前向rim使用了红色的图片,相当于添加了光线在血液层的散射,让人的脸蛋有了真实的血色
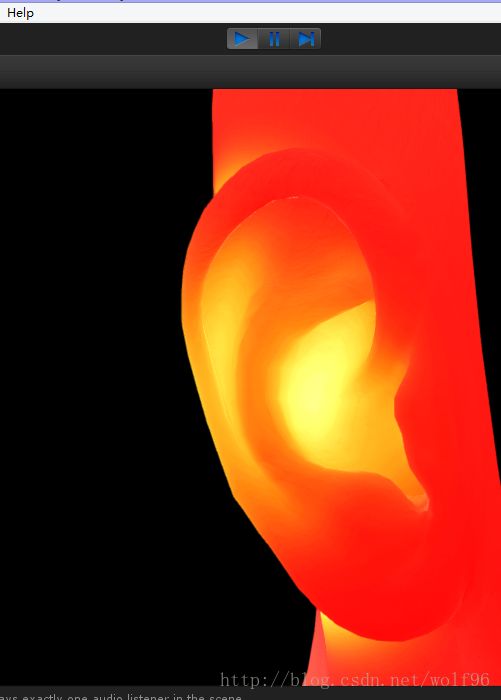
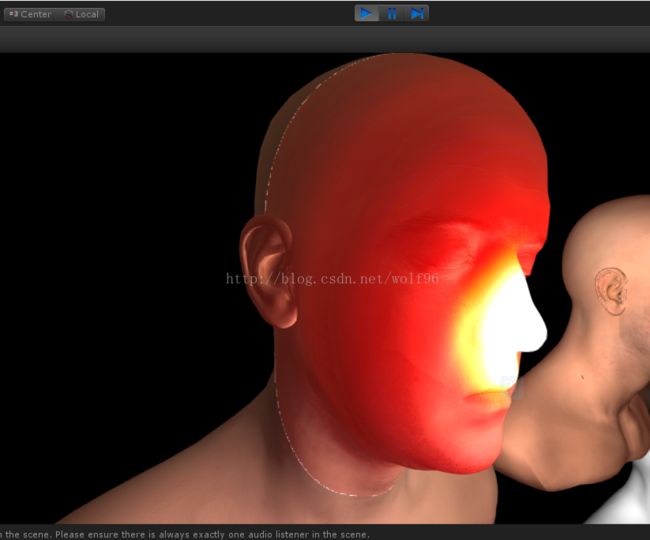
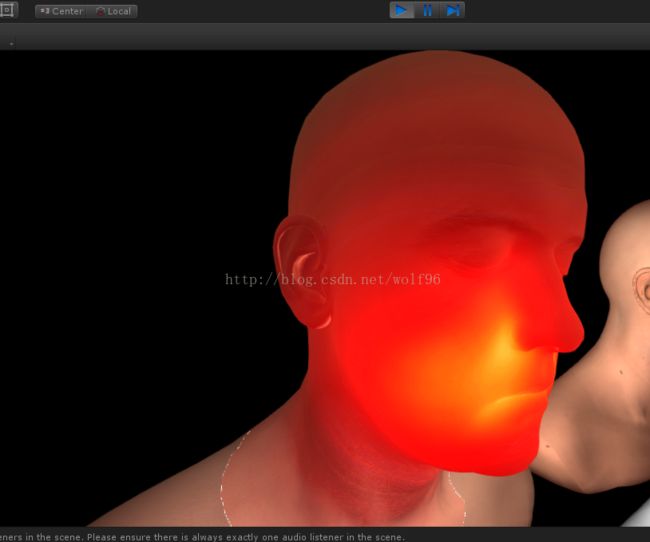
这是次表面散射的结果:
像不像把手指或者耳朵放在手电筒前面的那种效果?那就是次表面散射
需要一张Intense strips贴图来混合原有颜色,方法就是在点光源情况下,求出当前点与点光源的距离,距离越近就越亮
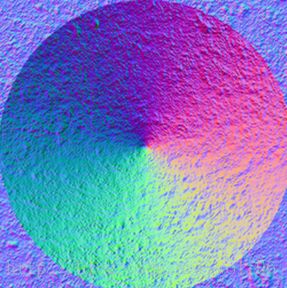
关于法线,
用了一种新的混合方式,这样能保有更多法线细节,
这里简单讲解一下法线混合,
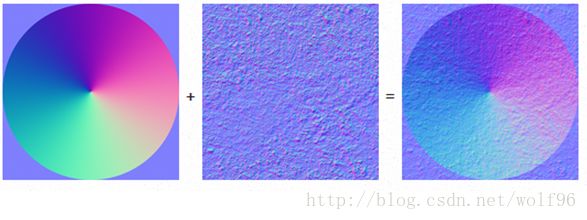
大家可能用过这种方式来混合两个法线贴图,这种线性的方式折中了两个贴图,得到的细节权重是平均的,效果并不好,得到的是这样的结果
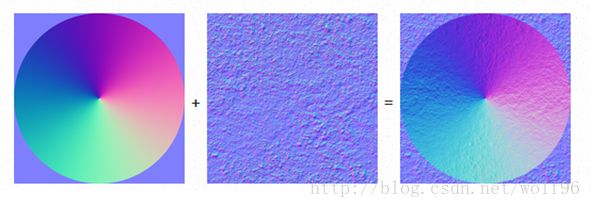
改进了一下,变成了覆盖混合
在GDC2012的Mastering DX11 with unity中讲到了一种官方的办法如下:
用AutoLight.cginc里定义的一个函数LIGHT_ATTENUATION求出光的衰减atten,atten在directional light中固定是1,在点光源中才有衰减效果,因为directional light在unity中是没有位置区别的,在哪里都一样。
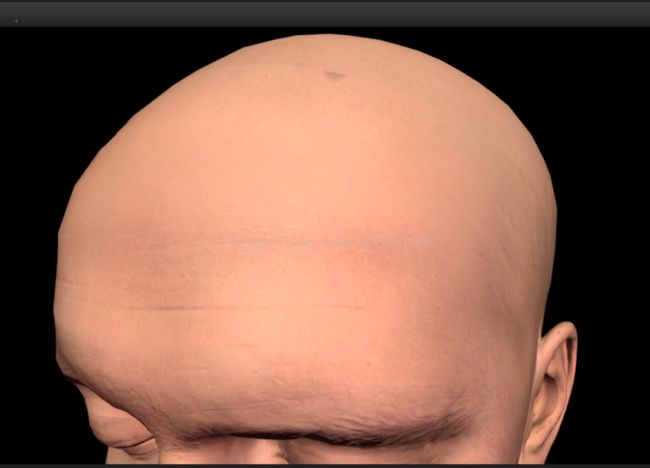
对于细节方面,如毛孔,在本例的贴图和法线贴图都很细致,已经包括毛孔和皮肤的纹路,如果贴图精度低还想要高细节的话,可以再贴上细节
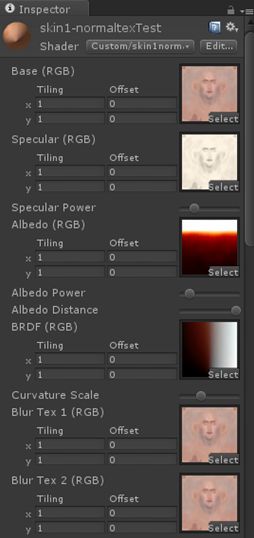
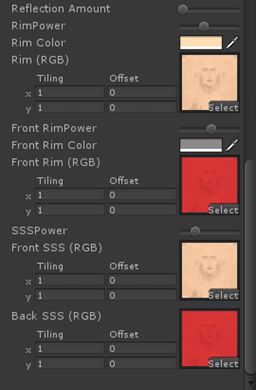
全部可设置变量:
全部代码已共享至GitHub链接
---- by wolf96 http://blog.csdn.net/wolf96
参数设置1
参数设置2
细致到毛孔的高光
次表面散射的耳朵
人皮渲染是十多年的课题了,人们想尽一切办法想让其变得真实可信,大型3A级次时代游戏近来做的又来越真实了如《罗马之子》,他们的皮肤自称已经超过了NVIDIA的例子

这是在2005年SIGGRAPH的多层皮肤渲染,他们的参数都是经过精密的医学上的测量的,而且渲染花费了5分钟的时间。。。
本例做到了以下几点
1. 次表面散射
2. 基于物理的渲染
包括specular和brdf等等,brdf我用了一张贴图调整曲率来代替,specular在之前这篇文章有详细讲解 链接在此3. 法线模糊
等等之类。。。
1. 大多数的漫反射光来自次表面散射
2. 皮肤颜色主要来自上表皮
3. 粉或红色主要为真皮中的血液
此图为人皮的组成模拟,人有好多层表皮,这就说明在真实情况下要进行数次折射与反射,这就更难达到真实

上图直观的表明了光线“被怎么样了”
光线接触到皮肤时,有大约96%被皮肤各层散射了,只有大约4%被反射
再说specular,人的皮肤会出油,所以就会有反射,但是人的皮肤不能像镜子那样反射,因为人的皮肤是粗糙的,在这种情况下用基于物理的(physically based)方法就最好不过了,没了解过physically based的看官们可以先了解下这篇文章和上面的一样

使用了之前试出效果最好的的方法,也就是使命召唤2中用到的的方法,同时试了下beckmann的方法,但是效果并不好,phong等方法也没有试
这里,我们的实现方法是这样的:
            /*
            *this part is compute Physically-Based Rendering
            *the method is in the ppt about "ops2"
            */

            float _SP = pow(8192, _GL);
            float d = (_SP + 2) / (8 * PIE) * pow(dot(n2, H), _SP);
            float f = _SC + (1 - _SC)*pow(2, -10 * dot(H, lightDir));
            float k = min(1, _GL + 0.545);
            float v = 1 / (k* dot(viewDir, H)*dot(viewDir, H) + (1 - k));

            float all = d*f*v;
            float3 refDir = reflect(-viewDir, n2);
float3 ref = texCUBElod(_Cubemap, float4(refDir, _nMips - _GL*_nMips)).rgb;又进行了 “智能补光”
也就是常规的求高光的方式,我们在此加入了高光贴图,不让不该高光的地方(如眉毛)产生高光
			float specBase = max(0, dot(n2, H));
			float spec = pow(specBase, 10) *(_GL + 0.2);
			spec = lerp(0, 1.2, spec);
			float3 spec3 = spec * (tex2D(_SpecularTex, i.uv_MainTex) - 0.1);
			spec3 *= Luminance(diff);
			spec3 = saturate(spec3);
			spec3 *= _SpecularPower;
光经过哪,就带一部分那里的颜色,可以发现光从入射到出射,位置和方向都变了
这就产生了次表面散射


NVIDIA在GDC2007年的演讲中提到把图像blur个六遍达到柔和的次表面散射效果
每次blur都是在不同的颜色通道以不同的范围和程度进行blur

由于我们的贴图是这样的“高配”

用在本例上会丢失少许本来贴图上的细节,但是确实有一定的次表面散射效果,各位看官自行取舍,而且千万不要只做高斯模糊,这样的话细节会丢失更多,而且没有什么次表面散射的感觉
为了节省花销,省去了ppt中的rendering时blur,直接在ps上做了6张高斯模糊的贴图放入material,并线性混合
			float3 c = tex2D(_MainTex, i.uv_MainTex) * 128;
			c += tex2D(_BlurTex1, i.uv_MainTex) * 64;
			c += tex2D(_BlurTex2, i.uv_MainTex) * 32;
			c += tex2D(_BlurTex3, i.uv_MainTex) * 16;
			c += tex2D(_BlurTex4, i.uv_MainTex) * 8;
			c += tex2D(_BlurTex5, i.uv_MainTex) * 4;
			c += tex2D(_BlurTex6, i.uv_MainTex) * 2;
			c /= 256;
我们同时也起到重要作用的是边缘光rim和brdf,
使用了BRDF最明显的好处是,Brdf贴图间接控制了明暗交界线的颜色,可通过曲率控制,模拟了光与阴影交界处光对皮肤的反射与折射,如果全黑的话说明光只是普通的漫反射。
而且使人皮有了次表面散射的质感
			/*
			*this part is to add the sss
			*used front rim,back rim and BRDF
			*/

			float3 rim = (1 - dot(viewDir, n2))*_RimPower * _RimColor *tex2D(_RimTex, i.uv_MainTex);
			float3 frontrim = (dot(viewDir, n2))*_FrontRimPower * _FrontRimColor *tex2D(_FrontRimTex, i.uv_MainTex);

			float3 sss = (1 - dot(viewDir, n2)) / 50 * _SSSPower;
			sss = lerp(tex2D(_SSSFrontTex, i.uv_MainTex), tex2D(_SSSBackTex, i.uv_MainTex), sss * 20)*sss;

			fixed atten = LIGHT_ATTENUATION(i);
			float curvature = length(fwidth(mul(_Object2World, float4(normalize(i.normal), 0)))) /
				length(fwidth(i.worldpos)) * _CurveScale;

			float3 brdf = tex2D(_BRDFTex, float2((dot(normalize(i.normal), lightDir) * 0.5 + 0.5)* atten, curvature)).rgb;
对于rim的话添加了前向rim和后向rim其实本质上还是rim,后向rim使用了白色的图片产生一种玉质的感觉(好吧其实更像羊羹),前向rim使用了红色的图片,相当于添加了光线在血液层的散射,让人的脸蛋有了真实的血色
这是次表面散射的结果:
光源在嘴里
像不像把手指或者耳朵放在手电筒前面的那种效果?那就是次表面散射
需要一张Intense strips贴图来混合原有颜色,方法就是在点光源情况下,求出当前点与点光源的距离,距离越近就越亮
关于法线,
用了一种新的混合方式,这样能保有更多法线细节,
这里简单讲解一下法线混合,
float3 n1 = tex2D(texBase,   uv).xyz*2 - 1;
float3 n2 = tex2D(texDetail, uv).xyz*2 - 1;
float3 r  = normalize(n1 + n2);
return r*0.5 + 0.5;
大家可能用过这种方式来混合两个法线贴图,这种线性的方式折中了两个贴图,得到的细节权重是平均的,效果并不好,得到的是这样的结果

改进了一下,变成了覆盖混合
float3 n1 = tex2D(texBase,   uv).xyz;
float3 n2 = tex2D(texDetail, uv).xyz;
float3 r  = n1 < 0.5 ? 2*n1*n2 : 1 - 2*(1 - n1)*(1 - n2);
r = normalize(r*2 - 1);
return r*0.5 + 0.5;
在GDC2012的Mastering DX11 with unity中讲到了一种官方的办法如下:
float3x3 nBasis = float3x3(
    float3(n1.z, n1.y, -n1.x), //绕着y轴+90度旋转
float3(n1.x, n1.z, -n1.y),// 绕着x轴-90度旋转
float3 (n1.x, n1.y, n1.z ));

 n = normalize (n2.x*nBasis[0] + n2.y*nBasis[1] + n2.z*nBasis[2]);
得到的结果是这样的,是不是好了许多?
双方的细节程度都有很多提升,
他们用了一个basis来变换第二法线。具体可以看 这篇文章—链接用AutoLight.cginc里定义的一个函数LIGHT_ATTENUATION求出光的衰减atten,atten在directional light中固定是1,在点光源中才有衰减效果,因为directional light在unity中是没有位置区别的,在哪里都一样。
fixed atten = LIGHT_ATTENUATION(i);对于细节方面,如毛孔,在本例的贴图和法线贴图都很细致,已经包括毛孔和皮肤的纹路,如果贴图精度低还想要高细节的话,可以再贴上细节

全部可设置变量:
全部代码已共享至GitHub链接
---- by wolf96 http://blog.csdn.net/wolf96
