分别在win10和Linux上用SWIG将c++封装成python动态库
将C++封装成python库的目的是,在兼顾python的开发效率的同时,有提高的python运行效率。
在WIN10上
1.安装 SWIGWIN:https://sourceforge.net/projects/swig/,下载之后解压,并添加环境变量。
2.建立要封装的源文件和头文件
/*hello.cpp*/
#include"stdio.h"
int hello_print(char *str)
{
    printf("Hello>>>%s",str);
    return 0;
}
/*hello.h*/
#ifndef __HELLO_H
#define __HELLO_H

int hello_print(char *str);

#endif // !__HELLO_H
3.接下来就是对C++进行封装,将我们需要的c++函数封装成python能够调用的函数,封装的规则见python帮助,SWIG就是一种封装工具,只要我们告诉它要封装那些函数,就会自动封装。
建立hello_swig.i文件
%module hello //生成的模块为hello.py

%header %{

#include "hello.h"

%} //%{ %}会将里面的内容全部放到生成的.cpp文件开头

%include "hello.h"  //表示要封装的函数,%include 是将头文件内容全部包含

//也可以  int hello_print(char *str);
4.使用SWIG生成封装文件(hello_wrapper.cpp)
swig -c++ -python -o hello_wrapper.cpp hello_swig.i
-c++ 表示要封装的文件是c++,没有默认为c
-python 表示封装成python
-o 后跟封装文件名
hello_swig.i 表示要封装的内容
5.使用 visual stdio生成动态库
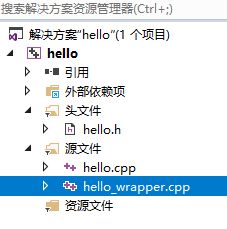
a.建立空的工程,将hello.h 、hello.cpp、hello_wrapper.cpp添加到工程
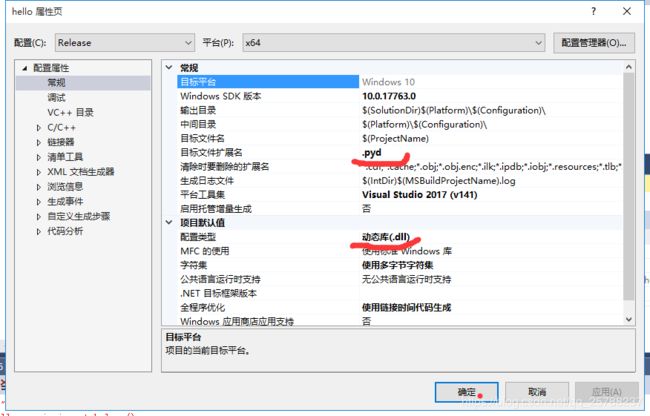
b.配置类型改为动态库(.dll),目标文件扩展名为.pyd(方便python调用)
c.将python中的include和libs分别添加到包含目录和库目录。必要时 并添加依赖项python36.lib;
d.最后在链接器->常规->输出文件设置为 _hello.pyd,因为hello.py是是导入_hello模块的,编译生成_hello.pyd
6.将hello.py和_hello.pyd放入一个文件夹,并测试
>>>import hello
>>>hello.hello_print("niaho")
0
>>>
表明,python将参数传入数据,通过return返回结果
在Linux上
1.安装SWIG
sudo apt-get install swig
2.建立要封装的源文件和头文件
3.建立hello_swig.i文件
4.使用SWIG生成封装文件(hello_wrapper.cpp)
swig -c++ -python -o hello_wrapper.cpp hello_swig.i
5.生成动态库,使用python自带的distutils工具,命名为build.py
from distutils.core import setup,Extension
ext_module = Extension('_hello',
    sources=['hello_wrapper.cpp','hello.cpp'],)
setup(name="hello",
     version = "0.1",
     author = "JiangJihai",
     description = """Simple swig example""",
     ext_modules = [ext_module],
     py_modules = ["hello"],)
编译生成.so文件
python3 build.py build_ext --inplace
将so文件命名成_hello.so或者_hello.pyd
注:win下动态库为.dll(python能直接调用的是.pdy扩展名),linux下动态库为.so(.pdy和.so python都能直接调用)


