企业应用中常定制一些通用的组件,提供统一的用户界面、数据呈现方式等,以便在不同的应用中重复使用。可以将通用组件构建成Angular库,这些库可以在Workspace本地使用,也可以把它们发布成 npm 包,共享给其它项目或其他Angular开发者。
Angular过时了么?
Angular 与 angular.js 不是同一种前端框架,angular.js在2010年10月发布,而 Angular 诞生于2016 年 9 月,比 React 和 Vue都要晚。总体而言,Angular、Vue 与 React 三种框架的运行速度没有太大差异,不会是项目运行快慢的决定因素。
国内华为、阿里、中兴等大厂都开发了Angular企业级组件库,分别为DevUI、NG-ZORRO、Jigsaw。另外,Angular Material是官方Angular组件库。
开源组件库是我们学习Angular库开发的最好教材,也可以在他们的基础上定制我们的组件。
Schematic,Angular中文版译作原理图,我更喜欢称之为脚手架。Schematic是一个基于模板的支持复杂逻辑的代码生成器,可以创建、修改和维护软件项目。Schematic是Angular生态系统的一部分,我们常用的Angular CLI命令ng generate、ng add和ng update,为我们添加/更新库、创建构件提供了便利的工具。
Angular CLI默认调用Schematics集合@schematics/angular,下面两个命令功能是相同的:
ng g component hello-world
ng g @schematics/angular:component hello-world
在库开发中,通常要创建自己的schematics。
本文GitHub源码:https://github.com/sunjc/ng-itrunner
开发Angular库
创建库
用以下命令生成一个新库的骨架:
ng new ng-itrunner --new-project-root --create-application=false
cd ng-itrunner
ng generate library ng-itrunner --prefix ni
这会在工作区中创建 ng-itrunner 文件夹,里面包含 NgModule、一个组件和一个服务。工作区的配置文件 angular.json 中添加了一个 'library' 类型的项目:
"projects": {
  "ng-itrunner": {
    "projectType": "library",
    "root": "ng-itrunner",
    "sourceRoot": "ng-itrunner/src",
    "prefix": "ni",
    "architect": {
      "build": {
        "builder": "@angular-devkit/build-ng-packagr:build",
        "options": {
          "tsConfig": "ng-itrunner/tsconfig.lib.json",
          "project": "ng-itrunner/ng-package.json"
        },
        "configurations": {
          "production": {
            "tsConfig": "ng-itrunner/tsconfig.lib.prod.json"
          }
        }
      }
            ...
库项目文件
| 源文件 | 用途 |
|---|---|
| src/lib | 包含库项目的逻辑和数据。像应用项目一样,库项目也可以包含组件、服务、模块、指令和管道 |
| src/test.ts | 单元测试主入口点,含一些库专属的配置 |
| src/public-api.ts | 指定从库中导出的所有文件 |
| karma.conf.js | Karma 配置 |
| ng-package.json | 构建库时,ng-packagr 用到的配置文件 |
| package.json | 配置库所需的 npm 包依赖 |
| tsconfig.lib.json | 库专属的 TypeScript 配置,包括 TypeScript 和 Angular 模板编译器选项 |
| tsconfig.spec.json | 测试库时用到的 TypeScript 配置 |
| tslint.json | 库专属的 TSLint 配置 |
要让库代码可以复用,必须定义一个公共的 API public-api.ts。当库被导入应用时,从该文件导出的所有内容都会公开。
构建、测试和lint
运行如下命令:
ng build ng-itrunner
ng test ng-itrunner
ng lint ng-itrunner
说明,库与应用的构建器不同:
- 应用程序的构建体系(@angular-devkit/build-angular)基于 webpack,并被包含在所有新的 Angular CLI 项目中。
- 库的构建体系(@angular-devkit/build-ng-packagr)基于 ng-packagr,只有在使用 ng generate library添加库时,才会添加到依赖项中。
库编译后,默认会生成esm5、esm2015、fesm5、fesm2015、es2015几种格式。
增量构建
增量构建功能可以改善库的开发体验,每当文件发生变化时,都会执行局部构建:
ng build ng-itrunner --watch发布库
前面编译时可以看到下面的输出:
******************************************************************************
It is not recommended to publish Ivy libraries to NPM repositories.
Read more here: https://v9.angular.io/guide/ivy#maintaining-library-compatibility
******************************************************************************
Angular 9使用Ivy编译,不建议把 Ivy 格式的库发布到 NPM 仓库。在tsconfig.lib.prod.json文件的配置中禁用了Ivy,会使用老的View Engine编译器和运行时:
{
  "extends": "./tsconfig.lib.json",
  "angularCompilerOptions": {
    "enableIvy": false
  }
}
生产编译时使用--prod选项,然后再发布:
ng build ng-itrunner --prod
cd dist/ng-itrunner
npm publish
默认发布到公共NPM registry https://registry.npmjs.org 。也可以发布到私有Registry,比如Nexus,配置.npmrc如下:
registry=http://localhost:8081/repository/itrunner/
[email protected]
always-auth=true
_auth=YWRtaW46YWRtaW4xMjM=
其中 _auth 项为用户名:密码的Base64编码,生成命令如下:
echo -n 'admin:admin123' | openssl base64也可以发布到指定registry:
npm publish --registry=http://localhost:8081/repository/itrunner/链接库
在开发要发布的库时,可以使用 npm link 把库链接到全局 node_modules 文件夹中,避免每次构建时都重新安装库。
cd dist/ng-itrunner
npm link

or

npm link dist/ng-itrunner
使用自己的库
不必把库发布到 npm 包管理器,也可以在自己的应用中使用它。
Angular 库是一个 Angular 项目,它与应用的不同之处在于它本身是不能运行的。我们先创建一个应用:
ng g application demo在AppModule中导入NgItrunnerModule:
import {NgItrunnerModule} from 'ng-itrunner';

@NgModule({
  declarations: [
    AppComponent
  ],
  imports: [
    BrowserModule,
    AppRoutingModule,
    NgItrunnerModule
  ],
  providers: [],
  bootstrap: [AppComponent]
})
export class AppModule { }
说明:
当在 Angular 应用中从某个库导入东西时,Angular会寻找库名和磁盘某个位置之间的映射关系。当用 npm 包安装库时,映射到 node_modules 目录下。当自己构建库时,就会在 tsconfig 路径中查找这个映射。
用 Angular CLI 生成库时,会自动把它的路径添加到 tsconfig 文件中。 Angular CLI 使用 tsconfig 路径告诉构建系统在哪里寻找这个库。
修改app.component.html,添加我们库中的组件:
Resources
启动Demo,查看效果:
ng serve demo
扩展NG-ZORRO
首先,学习NG-ZORRO的目录结构和命名习惯,调整一下我们的库配置。
重构
- 将库文件夹重命名为components
- 将angular.json中的路径ng-itrunner/替换为components/,将ng-itrunner的root改为components
- 调整目录结构、重命名组件,如下:

- 为支持单独导入某一模块,优化体积,配置次级入口( secondary entry point)。要创建次级入口,仅需添加package.json,内容如下:
{
  "ngPackage": {
    "lib": {
      "entryFile": "public-api.ts"
    }
  }
}- 创建index.ts,内容如下:
export * from './public-api';index.ts文件可以减少import语句,如:
import {NiHelloLibComponent, NiHelloLibService} from '../hello-lib';- 在components根目录创建主入口文件index.ts,导出空内容即可,如下:
export default {};- 修改ng-package.json主入口使用"index.ts":
{
  "$schema": "../node_modules/ng-packagr/ng-package.schema.json",
  "dest": "../dist/ng-itrunner",
  "deleteDestPath": true,
  "lib": {
    "entryFile": "index.ts"
  }
}- 我们将创建多个lib组件,修改workspace根目录的tsconfig.json的paths配置:
"paths": {
  "ng-itrunner/*": [
    "dist/ng-itrunner/*"
  ]
}- 重新编译、测试:
ng build ng-itrunner
ng test ng-itrunner
添加NG-ZORRO
在Workspace执行以下命令,安装ng-zorro-antd:
ng add ng-zorro-antd
Installing packages for tooling via npm.
Installed packages for tooling via npm.
? Enable icon dynamic loading [ Detail: https://ng.ant.design/components/icon/en ] Yes
? Set up custom theme file [ Detail: https://ng.ant.design/docs/customize-theme/en ] Yes
? Choose your locale code: en_US
? Choose template to create project: blank
UPDATE package.json (1311 bytes)
UPDATE demo/src/app/app.component.html (276 bytes)
√ Packages installed successfully.
CREATE demo/src/theme.less (28746 bytes)
UPDATE demo/src/app/app.module.ts (895 bytes)
UPDATE angular.json (3867 bytes)
编辑components/package.json,添加ng-zorro-antd:
"peerDependencies": {
  "@angular/common": "^9.0.0",
  "@angular/core": "^9.0.0",
  "ng-zorro-antd": "^9.0.0",
  "tslib": "^1.10.0"
}
添加@angular/cdk
Angular CDK,组件开发工具包,实现了通用交互模式和核心功能,是库与脚手架开发的必备工具。
在Workspace执行以下命令,安装@angular/cdk:
ng add @angular/cdk编辑components/package.json,添加@angular/cdk:
"peerDependencies": {
  "@angular/cdk": "^9.0.0",
  "@angular/common": "^9.0.0",
  "@angular/core": "^9.0.0",
  "ng-zorro-antd": "^9.0.0",
  "tslib": "^1.10.0"
}
扩展NG-ZORRO
我们简单地封装NG-ZORRO内联登录栏为新组件,演示以NG-ZORRO组件为基础定制自己的组件。
在components目录下创建inline-login-form文件夹,在其下创建以下文件:
index.ts
export * from './public-api';inline-login-form.component.ts
import {Component, EventEmitter, OnInit, Output} from '@angular/core';
import {FormBuilder, FormGroup, Validators} from '@angular/forms';
@Component({
selector: 'ni-inline-login-form',
template: `
`
})
export class NiInlineLoginFormComponent implements OnInit {
@Output()
login: EventEmitter = new EventEmitter();
loginForm: FormGroup;
submitForm(): void {
this.login.emit(this.loginForm.value);
}
constructor(private fb: FormBuilder) {
}
ngOnInit(): void {
this.loginForm = this.fb.group({
username: [null, [Validators.required]],
password: [null, [Validators.required]]
});
}
} inline-login-form.module.ts
import {NgModule} from '@angular/core';
import {NiInlineLoginFormComponent} from './inline-login-form.component';
import {NzButtonModule, NzFormModule, NzInputModule} from 'ng-zorro-antd';
import {ReactiveFormsModule} from '@angular/forms';

@NgModule({
  declarations: [NiInlineLoginFormComponent],
  imports: [
    ReactiveFormsModule,
    NzButtonModule,
    NzFormModule,
    NzInputModule
  ],
  exports: [NiInlineLoginFormComponent]
})
export class NiInlineLoginFormModule {
}
package.json
{
  "ngPackage": {
    "lib": {
      "entryFile": "public-api.ts",
      "umdModuleIds": {
        "ng-zorro-antd": "ng-zorro-antd"
      }
    }
  }
}
我们引入了外部模块ng-zorro-antd,若未配置UMD 标识符映射,编译时则会输出以下信息:
WARNING: No name was provided for external module 'ng-zorro-antd' in output.globals – guessing 'ngZorroAntd'
public-api.ts
export * from './inline-login-form.module';
export * from './inline-login-form.component';
测试组件
重新编译库后,在AppModule中引入NiHelloLibModule、NiInlineLoginFormModule:
...
import {NiInlineLoginFormModule} from 'ng-itrunner/inline-login-form';
...

@NgModule({
  declarations: [
    AppComponent
  ],
  imports: [
    ...
    NiHelloLibModule,
    NiInlineLoginFormModule,
  ],
  providers: [{provide: NZ_I18N, useValue: en_US}],
  bootstrap: [AppComponent]
})
export class AppModule {
}
在app.component.html中引入组件:
在app.component.ts中添加login()方法:
  login(user: { username: string, password: string }) {
    ...
  }
启动demo,效果如下: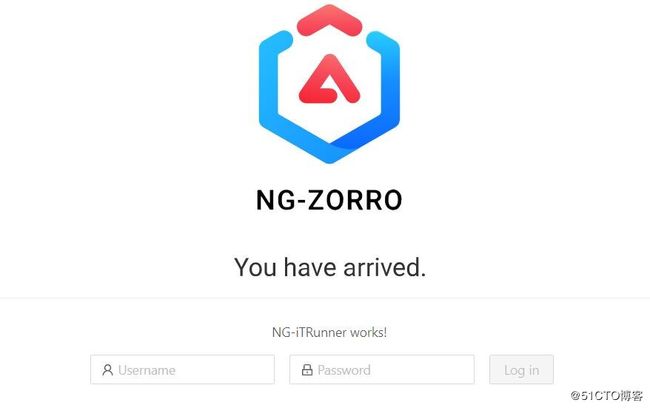
Schematics CLI
Schematics有自己的命令行工具schematics cli,运行以下命令安装:
npm install -g @angular-devkit/schematics-cliSchematics最常见用途是将 Angular 库与 Angular CLI 集成在一起。可以直接在 Angular 工作空间的库项目中创建Schematics文件,而无需使用 Schematics CLI。
下面我们使用 CLI 创建一个Schematics集合,仅为介绍文件和目录结构,以及一些基本概念。
创建Schematics集合
执行如下命令在同名的新项目文件夹中创建一个名为 hello-world 的Schematic:
schematics blank --name=hello-world生成项目的src/ 文件夹包含hello-world子文件夹,以及一个模式文件(collection.json)。
Schematic文件结构
每个schematic一般都有以下主要部分:
| 文件 | 说明 |
|---|---|
| index.ts | 定义schematic中转换逻辑的代码 |
| schema.json | schematic变量定义 |
| schema.ts | schematic变量 |
| files/ | 要复制的可选组件/模板文件 |
src/hello-world中的主文件 index.ts 定义实现Schematic逻辑的规则:
import { Rule, SchematicContext, Tree } from '@angular-devkit/schematics';

// You don't have to export the function as default. You can also have more than one rule factory
// per file.
export function helloWorld(_options: any): Rule {
  return (tree: Tree, _context: SchematicContext) => {
    return tree;
  };
}
入口函数helloWorld是一个规则工厂,可以通过调用外部工具和实现逻辑来修改项目。规则可以利用 @schematics/angular 包提供的实用工具来处理模块、依赖、TypeScript、AST、JSON、Angular CLI 工作空间和项目等等:
import {
  JsonAstObject,
  JsonObject,
  JsonValue,
  Path,
  normalize,
  parseJsonAst,
  strings,
} from '@angular-devkit/core';
collection.json
collection.json是集合中各个schematic的模式定义。每个schematic都是用名称、描述和工厂函数创建的:
{
  "$schema": "../node_modules/@angular-devkit/schematics/collection-schema.json",
  "schematics": {
    "hello-world": {
      "description": "A blank schematic.",
      "factory": "./hello-world/index#helloWorld"
    }
  }
}
还有两个可选属性:schema和aliases。
- schema指定一个 JSON 模式文件,定义schematic可用的命令行参数
- aliases 指定一个或多个可用来调用此schematic的别名。
例如:
...
"ng-add": {
  "description": "Adds Angular Material to the application without affecting any templates",
  "factory": "./ng-add/index",
  "schema": "./ng-add/schema.json",
  "aliases": ["material-shell", "install"]
}
...
schema.ts
定义schematic变量,例如:
export interface Schema {
  /** Name of the project. */
  project: string;

  /** Whether Angular browser animations should be set up. */
  animations: boolean;

  /** Name of pre-built theme to install. */
  theme: 'indigo-pink' | 'deeppurple-amber' | 'pink-bluegrey' | 'purple-green' | 'custom';

  /** Whether to set up global typography styles. */
  typography: boolean;
}
schema.json
定义输入选项及其允许的值和默认值,例如:
{
  "$schema": "http://json-schema.org/schema",
  "id": "angular-material-ng-add",
  "title": "Angular Material ng-add schematic",
  "type": "object",
  "properties": {
    "project": {
      "type": "string",
      "description": "Name of the project.",
      "$default": {
        "$source": "projectName"
      }
    },
    "theme": {
      "description": "The theme to apply",
      "type": "string",
      "default": "indigo-pink",
      "x-prompt": {
        "message": "Choose a prebuilt theme name, or \"custom\" for a custom theme:",
        "type": "list",
        "items": [
          { "value": "indigo-pink",       "label": "Indigo/Pink        [ Preview: https://material.angular.io?theme=indigo-pink ]" },
          { "value": "deeppurple-amber",  "label": "Deep Purple/Amber  [ Preview: https://material.angular.io?theme=deeppurple-amber ]" },
          { "value": "pink-bluegrey",     "label": "Pink/Blue Grey     [ Preview: https://material.angular.io?theme=pink-bluegrey ]" },
          { "value": "purple-green",      "label": "Purple/Green       [ Preview: https://material.angular.io?theme=purple-green ]" },
          { "value": "custom",            "label": "Custom" }
        ]
      }
    },
    "typography": {
      "type": "boolean",
      "default": false,
      "description": "Whether to set up global typography styles.",
      "x-prompt": "Set up global Angular Material typography styles?"
    },
    "animations": {
      "type": "boolean",
      "default": true,
      "description": "Whether Angular browser animations should be set up.",
      "x-prompt": "Set up browser animations for Angular Material?"
    }
  },
  "required": []
}
schema.json语法请查看官方文档。
安装依赖、编译Schematic
cd hello-world
npm install
npm run build
运行Schematic
按以下格式提供项目路径、Schematic名称和所有必选项,使用 schematics 命令运行Schematic:
schematics : --= 路径可以是绝对路径,也可以是执行该命令的当前工作目录的相对路径:
schematics .:hello-world库的Schematics
接下来回到ng-itrunner workspace,创建库的Schematics。作为一名库开发人员,通常要开发add schematic、generation schematic、update schematic,以便把库与 Angular CLI 集成在一起,可以运行ng add来安装库,运行ng generate来修改项目、添加构件等,运行ng update更新库依赖、调整变更等。
Add Schematic
创建Add Schematic
- 在components文件夹中创建schematics/ 文件夹
- 在schematics/文件夹中创建ng-add/ 文件夹,然后在其中创建以下文件:
- 主文件index.ts
import {Rule, SchematicContext, Tree} from '@angular-devkit/schematics';
import {NodePackageInstallTask, RunSchematicTask} from '@angular-devkit/schematics/tasks';
import {addPackageToPackageJson} from '../utils/package-config';
import {angularCdkVersion, zorroVersion} from '../utils/version-names';
import {Schema} from './schema';

/**
 * Schematic factory entry-point for the `ng-add` schematic. The ng-add schematic will be
 * automatically executed if developers run `ng add ng-itrunner`.
 *
 * Since the NG-iTRunner schematics depend on the schematic utility functions from the CDK,
 * we need to install the CDK before loading the schematic files that import from the CDK.
 */
export default function(options: Schema): Rule {
  return (host: Tree, context: SchematicContext) => {
    addPackageToPackageJson(host, '@angular/cdk', angularCdkVersion);
    addPackageToPackageJson(host, 'ng-zorro-antd', zorroVersion);

    const installTaskId = context.addTask(new NodePackageInstallTask());

    context.addTask(new RunSchematicTask('ng-add-setup-project', options), [installTaskId]);
  };
}
在运行ng-add schematic前,CLI会自动添加ng-itrunner到宿主项目的package.json中。我们的schematic会用到CDK工具函数,我们的库依赖ng-zorro-antd,因此首先需要将两者添加到package.json中。接下来,SchematicContext触发安装任务NodePackageInstallTask,将依赖安装到项目的 node_modules 目录下。最后调用另一Schematic任务ng-add-setup-project配置项目。
说明:代码中涉及的utils方法,请查看GitHub源码。
- setup-project.ts(ng-add-setup-project)
在库开发中,一般会定义主题、依赖某些module等,可以在此配置这些项目。前面我们安装了Angular CDK,现在可以使用@angular/cdk的工具函数了。
import {chain, Rule, SchematicContext, Tree} from '@angular-devkit/schematics';
import {RunSchematicTask} from '@angular-devkit/schematics/tasks';
import {getProjectFromWorkspace} from '@angular/cdk/schematics';
import {getWorkspace} from '@schematics/angular/utility/config';
import {getProjectStyle} from '../utils/project-style';
import {Schema} from './schema';

/**
 * Scaffolds the basics of a NG-iTRunner application, this includes:
 *  - Add Template
 */
export default function(options: Schema): Rule {
  return chain([
    addTemplate(options)
  ]);
}

function addTemplate(options: Schema) {
  return (host: Tree, context: SchematicContext) => {
    if (options.template) {
      const workspace = getWorkspace(host);
      const project = getProjectFromWorkspace(workspace, options.project);
      const style = getProjectStyle(project);
      context.addTask(new RunSchematicTask(options.template, {...options, style: style}));
    }
    return host;
  };
}
chain() 方法允许把多个规则组合到一个规则中,这样就可以在一个Schematic中执行多个操作。这里仅为示例,只添加了一个创建模板组件方法。模板组件Schematic将在下一节介绍,为成功运行ng-add可以先暂时注释此部分代码。
- schema.ts
export enum ProjectTemplate {
  Blank = 'blank',
  Login = 'login'
}

export interface Schema {
  /** Name of the project to target. */
  project?: string;
  template?: ProjectTemplate;
}- schema.json
{
  "$schema": "http://json-schema.org/schema",
  "id": "ni-ng-add",
  "title": "NG-iTRunner ng-add schematic",
  "type": "object",
  "properties": {
    "project": {
      "type": "string",
      "description": "Name of the project.",
      "$default": {
        "$source": "projectName"
      }
    },
    "template": {
      "type": "string",
      "default": "blank",
      "description": "Create an Angular project with using preset template.",
      "x-prompt": {
        "message": "Choose template to create project:",
        "type": "list",
        "items": [
          "blank",
          "login"
        ]
      }
    }
  },
  "required": []
}- 在schematics/文件夹中创建 collection.json 文件,内容如下:
{
  "$schema": "./node_modules/@angular-devkit/schematics/collection-schema.json",
  "schematics": {
    "ng-add": {
      "description": "Add NG-iTRunner",
      "factory": "./ng-add/index",
      "schema": "./ng-add/schema.json",
      "hidden": true
    },
    "ng-add-setup-project": {
      "description": "Sets up the specified project after the ng-add dependencies have been installed.",
      "private": true,
      "factory": "./ng-add/setup-project",
      "schema": "./ng-add/schema.json"
    },
    "blank": {
      "description": "Set up boot page",
      "private": true,
      "factory": "./ng-generate/blank/index",
      "schema": "./ng-generate/blank/schema.json"
    },
    "login": {
      "description": "Create a login component",
      "factory": "./ng-generate/login/index",
      "schema": "./ng-generate/login/schema.json"
    }
  }
}- 在库项目的 package.json 文件中,添加 “schematics” 的条目。当 Angular CLI 运行命令时,会据此在集合中查找指定名字的schematic。
...
"schematics": "./schematics/collection.json"
...
构建Schematic
要把Schematic和库打包到一起,必须把库配置成单独构建Schematic,然后再把它们添加到发布包中。因此必须先构建库再构建Schematic,才能把它们放到正确的目录下。
- 在库根目录下创建自定义的 Typescript 配置文件tsconfig.schematics.json,内容如下:
{
  "compilerOptions": {
    "baseUrl": ".",
    "lib": [
      "es2018",
      "dom"
    ],
    "declaration": true,
    "module": "commonjs",
    "moduleResolution": "node",
    "noEmitOnError": true,
    "noFallthroughCasesInSwitch": true,
    "noImplicitAny": false,
    "noImplicitThis": true,
    "noUnusedParameters": true,
    "noUnusedLocals": true,
    "rootDir": "schematics",
    "outDir": "../dist/ng-itrunner/schematics",
    "skipDefaultLibCheck": true,
    "skipLibCheck": true,
    "sourceMap": true,
    "strictNullChecks": true,
    "target": "es6",
    "types": [
      "jasmine",
      "node"
    ]
  },
  "include": [
    "schematics/**/*"
  ],
  "exclude": [
    "schematics/*/files/**/*"
  ]
}- 在库的package.json 文件中添加build scripts,运行build时将Schematic源文件编译进库包:
"scripts": {
    "build": "../node_modules/.bin/tsc -p tsconfig.schematics.json",
    "copy:schemas": "cp --parents schematics/*/schema.json schematics/*/*/schema.json ../dist/ng-itrunner/",
    "copy:files": "cp --parents -r schematics/*/*/files/** ../dist/ng-itrunner/",
    "copy:collection": "cp schematics/collection.json ../dist/ng-itrunner/schematics/collection.json",
    "copy:migration": "cp schematics/migration.json ../dist/ng-itrunner/schematics/migration.json",
    "postbuild": "npm run copy:schemas && npm run copy:files && npm run copy:collection && npm run copy:migration"
  }
说明:上面是本示例中完整的build脚本,需要根据实际情况调整路径、postbuild。后面不再说明。
- 构建库和Schematic
ng build ng-itrunner --prod
cd components
npm run build
运行Schematic
- 发布、链接库
cd dist/ng-itrunner
npm publish
npm link- 运行
ng add ng-itrunner运行ng add ng-itrunner将自动执行ng-add schematic。
Generation Schematic
运行ng generate --help可以查看@schematics/angular提供的默认Schematic:
Available Schematics:
  Collection "@schematics/angular" (default):
    appShell
    application
    class
    component
    directive
    enum
    guard
    interceptor
    interface
    library
    module
    pipe
    service
    serviceWorker
    webWorker
collection.json中未设置"hidden"和"private"属性为true的schematics会显示在Available Schematics列表中。
接下来我们将新建blank和login两个schematic,用于创建初始页面和登录组件,collection.json如下:
{
  "$schema": "./node_modules/@angular-devkit/schematics/collection-schema.json",
  "schematics": {
    "ng-add": {
      "description": "Add NG-iTRunner",
      "factory": "./ng-add/index",
      "schema": "./ng-add/schema.json",
      "hidden": true
    },
    "ng-add-setup-project": {
      "description": "Sets up the specified project after the ng-add dependencies have been installed.",
      "private": true,
      "factory": "./ng-add/setup-project",
      "schema": "./ng-add/schema.json"
    },
    "blank": {
      "description": "Set up boot page",
      "private": true,
      "factory": "./ng-generate/blank/index",
      "schema": "./ng-generate/blank/schema.json"
    },
    "login": {
      "description": "Create a login component",
      "factory": "./ng-generate/login/index",
      "schema": "./ng-generate/login/schema.json"
    }
  }
}
其中ng-add的"hidden"属性为true,ng-add-setup-project和blank的"private"属性为true。"hidden"属性为true则运行ng generate --help时不会显示在Available Schematics列表中;"private"属性为true表明该Schematic仅供内部调用,同时暗示"hidden"属性为true。
当发布我们的库后,因仅login可显示,运行以下命令会直接显示login的帮助:
ng g ng-itrunner: --help
Generates and/or modifies files based on a schematic.
usage: ng generate ng-itrunner:login  [options]

arguments:
  schematic
    The schematic or collection:schematic to generate.

options:
  --defaults
    When true, disables interactive input prompts for options with a default.
  --dry-run (-d)
    When true, runs through and reports activity without writing out results.
  --force (-f)
    When true, forces overwriting of existing files.
  --help
    Shows a help message for this command in the console.
  --interactive
    When false, disables interactive input prompts.

Help for schematic ng-itrunner:login

arguments:
  name
    The name of the component.

options:
  --prefix (-p)
    The prefix to apply to generated selectors.
  --project
    The name of the project.
  --skip-import
    Flag to skip the module import.
  --style
    The file extension to be used for style files.
无论是否设置"hidden"和"private"属性,实际上不会影响运行ng generate,下面的命令可以正常执行:
ng g ng-itrunner:blank
ng g ng-itrunner:ng-add
在schematics/文件夹中创建ng-generate文件夹。
blank schematic
blank schematic将覆盖app.component.html,其内容仅包含一个图片链接和一个ni-hello组件。
在ng-generate文件夹中创建blank文件夹,然后分别创建以下文件:
- index.ts
import {Rule, Tree} from '@angular-devkit/schematics';
import {addModuleImportToRootModule, getProjectFromWorkspace} from '@angular/cdk/schematics';
import {getWorkspace} from '@schematics/angular/utility/config';
import {existsSync, statSync as fsStatSync} from 'fs';
import {Schema} from './schema';
import {itRunnerImage} from '../../utils/image';
const bootPageHTML = `

- schema.ts
export interface Schema {
  /** Name of the project to target. */
  project?: string;
}- schema.json
{
  "$schema": "http://json-schema.org/schema",
  "id": "ni-ng-generate-boot",
  "title": "NG-iTRunner boot page schematic",
  "type": "object",
  "properties": {
    "project": {
      "type": "string",
      "description": "Name of the project.",
      "$default": {
        "$source": "projectName"
      }
    }
  },
  "required": []
}
login schematic
login schematic利用模板文件封装了ni-inline-login-form组件。
在ng-generate文件夹中创建login文件夹,然后创建以下文件:
- 模板文件
在login文件夹中创建下面的目录:
files\__path__\__name@dasherize@if-flat__然后在其下创建四个component模板文件:
__name@dasherize__.component.html.template
__name@dasherize__.component.ts.template
__name@dasherize__.component.spec.ts.template
__name@dasherize__.component.__style__.template
内容分别为:
- component.html.template
- component.ts.template
import { Component } from '@angular/core';

@Component({
  selector: '<%= prefix %>-login',
  templateUrl: './<%= dasherize(name) %>.component.html',
  styleUrls: ['./<%= dasherize(name) %>.component.<%= style %>']
})
export class <%= classify(name) %>Component {

  login(user: { username: string, password: string }) {
      console.log(`{username: ${user.username}, password: ${user.password}}`);
  }

}- component.spec.ts.template
import { async, ComponentFixture, TestBed } from '@angular/core/testing';
import { ReactiveFormsModule } from '@angular/forms';
import { NzButtonModule, NzFormModule, NzInputModule } from 'ng-zorro-antd';

import { <%= classify(name) %>Component } from './<%= dasherize(name) %>.component';

describe('<%= classify(name) %>Component', () => {
  let component: <%= classify(name) %>Component;
  let fixture: ComponentFixture<<%= classify(name) %>Component>;

  beforeEach(async(() => {
    TestBed.configureTestingModule({
      declarations: [<%= classify(name) %>Component],
      imports: [
        ReactiveFormsModule,
        NzButtonModule,
        NzFormModule,
        NzInputModule
      ]
    }).compileComponents();
  }));

  beforeEach(() => {
    fixture = TestBed.createComponent(<%= classify(name) %>Component);
    component = fixture.componentInstance;
    fixture.detectChanges();
  });

  it('should compile', () => {
    expect(component).toBeTruthy();
  });
});- component.style.template内容为空。
- index.ts
import {chain, noop, Rule, Tree} from '@angular-devkit/schematics';
import {addModuleImportToModule, buildComponent, findModuleFromOptions} from '@angular/cdk/schematics';
import {Schema} from './schema';

export default function(options: Schema): Rule {
  return chain([
    buildComponent({...options}, {
      template: './__path__/__name@dasherize@if-flat__/__name@dasherize__.component.html.template',
      stylesheet:
        './__path__/__name@dasherize@if-flat__/__name@dasherize__.component.__style__.template',
    }),
    options.skipImport ? noop() : addRequiredModulesToModule(options)
  ]);
}

/**
 * Adds the required modules to the relative module.
 */
function addRequiredModulesToModule(options: Schema) {
  return (host: Tree) => {
    const modulePath = findModuleFromOptions(host, options)!;
    addModuleImportToModule(host, modulePath, 'NiInlineLoginFormModule', 'ng-itrunner/inline-login-form');
    return host;
  };
}
调用ng generate创建组件时,buildComponent方法将自动替换路径、文件名称、文件内容中的变量,addModuleImportToModule方法添加NiInlineLoginFormModule到指定的module。
- schema.ts
import {Schema as ComponentSchema} from '@schematics/angular/component/schema';

export interface Schema extends ComponentSchema {
}- schema.json
{
  "$schema": "http://json-schema.org/schema",
  "id": "login",
  "title": "Login Component",
  "type": "object",
  "properties": {
    "path": {
      "type": "string",
      "format": "path",
      "description": "The path to create the component.",
      "visible": false
    },
    "project": {
      "type": "string",
      "description": "The name of the project.",
      "$default": {
        "$source": "projectName"
      }
    },
    "name": {
      "type": "string",
      "description": "The name of the component.",
      "$default": {
        "$source": "argv",
        "index": 0
      },
      "x-prompt": "What should be the name of the component?"
    },
    "prefix": {
      "type": "string",
      "format": "html-selector",
      "description": "The prefix to apply to generated selectors.",
      "default": "app",
      "alias": "p"
    },
    "style": {
      "description": "The file extension to be used for style files.",
      "type": "string"
    },
    "skipImport": {
      "type": "boolean",
      "description": "Flag to skip the module import.",
      "default": false
    },
    "module": {
      "type": "string",
      "description": "Allows specification of the declaring module.",
      "alias": "m"
    }
  },
  "required": ["name"]
}
运行Schematic
重新构建Schematic、发布库后即可完整的运行ng add ng-itrunner了:
ng add ng-itrunner
Installing packages for tooling via npm.
Installed packages for tooling via npm.
? Choose template to create project: blank
UPDATE package.json (1614 bytes)
√ Packages installed successfully.
UPDATE src/app/app.component.html (362933 bytes)
启动应用,效果如下:
当然,您也可以运行ng g ng-itrunner:login,创建login组件。
Update Schematic
Update Schematic可以更新库依赖,也可以调整组件库的变更。先看一下@angular/cdk/schematics提供的用于Update Schematic的一个重要函数createUpgradeRule():
/**
 * Creates a Angular schematic rule that runs the upgrade for the
 * specified target version.
 */
export function createUpgradeRule(
    targetVersion: TargetVersion, extraRules: NullableMigrationRule[], upgradeData: RuleUpgradeData,
    onMigrationCompleteFn?: PostMigrationFn): Rule {
        ...
}
其中包含四个参数:
- targetVersion 运行
ng update时可自动升级的Angular版本 - extraRules 额外的规则,可以自定义一些升级规则
- upgradeData 类型为RuleUpgradeData,定义AttributeSelector、ClassName、Constructor、CssSelector、ElementSelector、InputName、Method、OutputName、PropertyName变化时的更新规则。
export interface RuleUpgradeData {
  attributeSelectors: VersionChanges;
  classNames: VersionChanges;
  constructorChecks: VersionChanges;
  cssSelectors: VersionChanges;
  elementSelectors: VersionChanges;
  inputNames: VersionChanges;
  methodCallChecks: VersionChanges;
  outputNames: VersionChanges;
  propertyNames: VersionChanges;
} - onMigrationCompleteFn 升级完成后的回调函数
创建Update Schematic
- 在schematics/文件夹中创建ng-update文件夹
- 在ng-update文件夹中创建data文件夹,在其下创建以下文件用于定义RuleUpgradeData升级规则:
attribute-selectors.ts
class-names.ts
constructor-checks.ts
css-selectors.ts
element-selectors.ts
index.ts
input-names.ts
method-call-checks.ts
output-names.ts
property-names.ts
文件内容如下:
import { AttributeSelectorUpgradeData, VersionChanges } from '@angular/cdk/schematics';

export const attributeSelectors: VersionChanges = {};
import { ClassNameUpgradeData, TargetVersion, VersionChanges } from '@angular/cdk/schematics';
export const classNames: VersionChanges = {
[ TargetVersion.V9 ]: [ ]
}; 这里我们定义了空的规则,升级时不会对项目做出更改。更详细的规则定义方法可以查看NG-ZORRO和Angular Material源码。
- 在ng-update文件夹创建upgrade-data.ts文件,内容如下:
import { RuleUpgradeData } from '@angular/cdk/schematics';
import {
  attributeSelectors,
  classNames,
  constructorChecks,
  cssSelectors,
  elementSelectors,
  inputNames,
  methodCallChecks,
  outputNames,
  propertyNames
} from './data';

/** Upgrade data that will be used for the NG-iTRunner ng-update schematic. */
export const ruleUpgradeData: RuleUpgradeData = {
  attributeSelectors,
  classNames,
  constructorChecks,
  cssSelectors,
  elementSelectors,
  inputNames,
  methodCallChecks,
  outputNames,
  propertyNames
};- 在ng-update文件夹创建主文件index.ts,内容如下:
import {Rule, SchematicContext} from '@angular-devkit/schematics';
import {createUpgradeRule, TargetVersion} from '@angular/cdk/schematics';
import {ruleUpgradeData} from './upgrade-data';

/** Entry point for the migration schematics with target of NG-iTRunner v9 */
export function updateToV9(): Rule {
  return createUpgradeRule(TargetVersion.V9, [], ruleUpgradeData, onMigrationComplete);
}

/** Function that will be called when the migration completed. */
function onMigrationComplete(context: SchematicContext, targetVersion: TargetVersion,
                             hasFailures: boolean) {
  context.logger.info('');
  context.logger.info(`  ✓  Updated NG-iTRunner to ${targetVersion}`);
  context.logger.info('');

  if (hasFailures) {
    context.logger.warn(
      '  ⚠  Some issues were detected but could not be fixed automatically. Please check the ' +
      'output above and fix these issues manually.');
  }
}- 在schematics文件夹创建migration.json文件,内容如下:
{
  "$schema": "./node_modules/@angular-devkit/schematics/collection-schema.json",
  "schematics": {
    "migration-v9": {
      "version": "9.0.0",
      "description": "Updates NG-iTRunner to v9",
      "factory": "./ng-update/index#updateToV9"
    },
    "ng-post-update": {
      "description": "Prints out results after ng-update.",
      "factory": "./ng-update/index#postUpdate",
      "private": true
    }
  }
}- 在package.json中增加以下配置:
"ng-update": {
  "migrations": "./schematics/migration.json",
  "packageGroup": [
    "ng-itrunner"
  ]
}
运行
将库ng-itrunner的版本号改为9.0.0,与Angular主版本号保持一致。然后,重新构建库、schematic,发布库。
运行ng update:
ng update ng-itrunner
Repository is not clean. Update changes will be mixed with pre-existing changes.
Using package manager: 'npm'
Collecting installed dependencies...
Found 34 dependencies.
Fetching dependency metadata from registry...
    Updating package.json with dependency ng-itrunner @ "9.0.0" (was "1.0.0")...
UPDATE package.json (1614 bytes)
√ Packages installed successfully.
** Executing migrations of package 'ng-itrunner' **

> Updates NG-iTRunner to v9

      ✓  Updated NG-iTRunner to version 9

  Migration completed.
总结: 本文主要参考了Angular官方文档与NG-ZORRO和Angular Material源码,介绍了库与Schematic开发的基本过程。您要更深入的学习,可以查看NG-ZORRO、Angular Material源码。
参考文档
Angular 库开发
Top 10 Angular Best Practices You Must Know