【深度学习】 基于Keras的Attention机制代码实现及剖析——LSTM+Attention
说明
- 这是接前面【深度学习】基于Keras的Attention机制代码实现及剖析——Dense+Attention的后续。
参考的代码来源1:Attention mechanism Implementation for Keras.网上大部分代码都源于此,直接使用时注意Keras版本,若版本不对应,在merge处会报错,解决办法为:导入Multiply层并将merge改为Multiply()。
参考的代码来源2:Attention Model(注意力模型)思想初探,这篇也是运行了一下来源1,做对照。 - 在实验之前需要一些预备知识,如RNN、LSTM的基本结构,和Attention的大致原理,快速获得这方面知识可看RNN&Attention机制&LSTM 入门了解。
如果你对本系列感兴趣,可接以下传送门:
【深度学习】 基于Keras的Attention机制代码实现及剖析——Dense+Attention
【深度学习】 基于Keras的Attention机制代码实现及剖析——LSTM+Attention
【深度学习】 Attention机制的几种实现方法总结(基于Keras框架)
目录
- 说明
- 实验目的
- 实验设计
- 数据集生成
- 模型搭建
- Attention层封装
- LSTM之前使用Attention
- LSTM之后使用Attention
- 结果展示
- 注意权重共享+LSTM之前使用注意力
- 注意权重共享+LSTM之后使用注意力
- 注意权重不共享+LSTM之前使用注意力
- 注意权重不共享+LSTM之后使用注意力
- 结果总结
- 完整代码(1个文件)
实验目的
- 现实生活中有很多序列问题,对一个序列而言,其每个元素的“重要性”显然是不同的,即权重不同,这样一来就有使用Attention机制的空间,本次实验将在LSTM基础上实现Attention机制的运用。
- 检验Attention是否真的捕捉到了关键特征,即被Attention分配的关键特征的权重是否更高。
实验设计
- 问题设计:同Dense+Attention一样,我们也设计成二分类问题,给定特征和标签进行训练。
- Attention聚焦测试:将特征的某一列与标签值设置成相同,这样就人为的造了一列关键特征,可视化Attention给每个特征分配的权重,观察关键特征的权重是否更高。
- Attention位置测试:在模型不同地方加上Attention会有不同的含义,那么是否每个地方Attention都能捕捉到关键信息呢?我们将变换Attention层的位置,分别放在整个分类模型的输入层(LSTM之前)和输出层(LSTM之后)进行比较。
数据集生成
数据集要为LSTM的输入做准备,而LSTM里面一个重要的参数就是time_steps,指的就是序列长度,而input_dim则指得是序列每一个单元的维度。
def get_data_recurrent(n, time_steps, input_dim, attention_column=10):
    """
    Data generation. x is purely random except that it's first value equals the target y.
    In practice, the network should learn that the target = x[attention_column].
    Therefore, most of its attention should be focused on the value addressed by attention_column.
    :param n: the number of samples to retrieve.
    :param time_steps: the number of time steps of your series.
    :param input_dim: the number of dimensions of each element in the series.
    :param attention_column: the column linked to the target. Everything else is purely random.
    :return: x: model inputs, y: model targets
    """
    x = np.random.standard_normal(size=(n, time_steps, input_dim)) #标准正态分布随机特征值
    y = np.random.randint(low=0, high=2, size=(n, 1)) #二分类,随机标签值
    x[:, attention_column, :] = np.tile(y[:], (1, input_dim)) #将第attention_column个column的值置为标签值
    return x, y
我们设置input_dim = 2,尝试输出前三个x和y来看看,因为函数参数attention_column=10,所以第10个column的特征和标签值相同。

模型搭建
Attention层封装
上一章我们谈到Attention的实现可直接由一个激活函数为softmax的Dense层实现,Dense层的输出乘以Dense的输入即完成了Attention权重的分配。在这里的实现看上去比较复杂,但本质上仍是那两步操作,只是为了将问题更为泛化,把维度进行了扩展。
def attention_3d_block(inputs):
    # inputs.shape = (batch_size, time_steps, input_dim)
    input_dim = int(inputs.shape[2])
    a = Permute((2, 1))(inputs)
    a = Reshape((input_dim, TIME_STEPS))(a) # this line is not useful. It's just to know which dimension is what.
    a = Dense(TIME_STEPS, activation='softmax')(a)
    if SINGLE_ATTENTION_VECTOR:
        a = Lambda(lambda x: K.mean(x, axis=1), name='dim_reduction')(a)
        a = RepeatVector(input_dim)(a)
    a_probs = Permute((2, 1), name='attention_vec')(a)
    output_attention_mul = Multiply()([inputs, a_probs])
    return output_attention_mul
这里涉及到多个Keras的层,我们一个一个来看看它的功能。
- Permute层:索引从1开始,根据给定的模式(dim)置换输入的维度。(2,1)即置换输入的第1和第2个维度,可以理解成转置。
- Reshape层:将输出调整为特定形状,INPUT_DIM = 2,TIME_STEPS = 20,就将其调整为了2行,20列。
- Lambda层:本函数用以对上一层的输出施以任何Theano/TensorFlow表达式。这里的“表达式”指得就是K.mean,其原型为keras.backend.mean(x, axis=None, keepdims=False),指张量在某一指定轴的均值。
- RepeatVector层:作用为将输入重复n次。
接下来,我们分析下这样设计有什么作用,重点看下SINGLE_ATTENTION_VECTOR分别为True和False时的异同。
先看第一个Permute层,由前面数据集的前三个输出我们知道,输入网络的数据的shape是(time_steps, input_dim),这是方便输入到LSTM层里的输入格式。无论注意力层放在LSTM的前面还是后面,最终输入到注意力层的数据shape仍为(time_steps, input_dim),对于注意力结构里的Dense层而言,(input_dim, time_steps)才是符合的,因此要进行维度变换。
再看第一个Reshape层,可以发现其作用为将数据转化为(input_dim, time_steps)。这个操作不是在第一个Permute层就已经完成了吗?没错,实际上这一步操作物理上是无效的,因为格式已经变换好了,但这样做有一个好处,就是可以清楚的知道此时的数据格式,shape的每一个值分别代表什么含义。
接下来是一个Dense层,这个Dense层的激活函数是softmax,显然就是注意力结构里的Dense层,用于计算每个特征的权重。
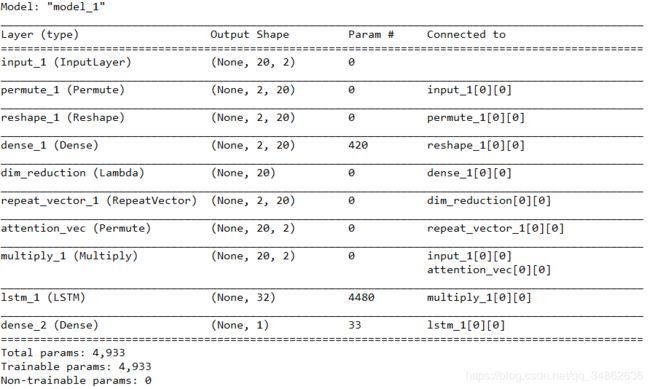
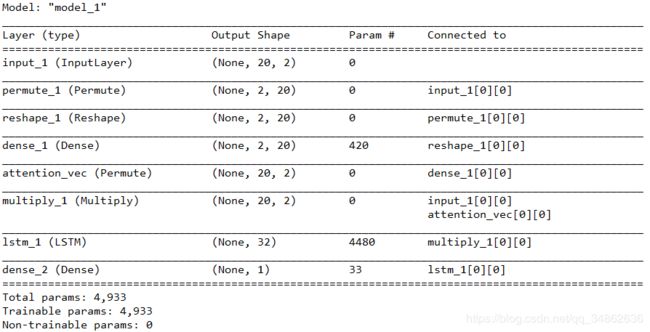
马上就到SINGLE_ATTENTION_VECTOR值的判断了,现在出现了一个问题,我们的特征在一个时间结点上的维度是多维的(input_dim维),即有可能是多个特征随时间变换一起发生了变换,那对应的,我们的注意力算出来也是多维的。此时,我们会想:是多维特征共享一个注意力权重,还是每一维特征单独有一个注意力权重呢? 这就是SINGLE_ATTENTION_VECTOR值的判断的由来了。SINGLE_ATTENTION_VECTOR=True,则共享一个注意力权重,如果=False则每维特征会单独有一个权重,换而言之,注意力权重也变成多维的了。
下面对当SINGLE_ATTENTION_VECTOR=True时,代码进行分析。Lambda层将原本多维的注意力权重取平均,RepeatVector层再按特征维度复制粘贴,那么每一维特征的权重都是一样的了,也就是所说的共享一个注意力。
接下来就是第二个Permute层,到这步就已经是算好的注意力权重了,我们知道Attention的第二个结构就是乘法,而这个乘法要对应元素相乘,因此要再次对维度进行变换。
最后一个Multiply层,权重乘以输入,注意力层就此完工。
LSTM之前使用Attention
如题,在LSTM之前使用Attention与上一篇文章Dense+Attention的结构类似,放一张图上来应该会更清晰。
在输入层(LSTM之前)加Attention的结构图:
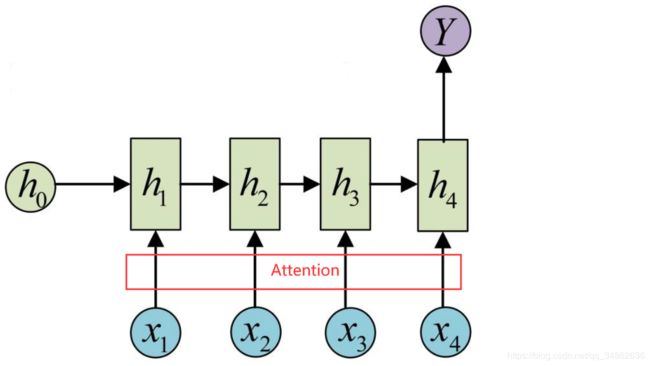
由于封装好了Attention,所以结构看起来清晰明了,只需注意此时LSTM参数里return_sequences=False,也就是N对1结构,才符合我们的问题。
def model_attention_applied_before_lstm():
    K.clear_session() #清除之前的模型,省得压满内存
    inputs = Input(shape=(TIME_STEPS, INPUT_DIM,))
    attention_mul = attention_3d_block(inputs)
    lstm_units = 32
    attention_mul = LSTM(lstm_units, return_sequences=False)(attention_mul)
    output = Dense(1, activation='sigmoid')(attention_mul)
    model = Model(input=[inputs], output=output)
    return model
LSTM之后使用Attention
注意此时LSTM的结构就不是N对1而是N对N了,因为要用Attention,所以输入到Attention里的特征要是多个才有意义。
在输出层(LSTM之后)加Attention的结构图:

再看代码,此时除了各层位置发生变换以外,return_sequences也置为了True,输出也是序列,N对N结构。此外还多加了一个Flatten层,中文叫扁平层,作用是将多维的数据平铺成1维,和输出层做连接。
def model_attention_applied_after_lstm():
    K.clear_session() #清除之前的模型,省得压满内存
    inputs = Input(shape=(TIME_STEPS, INPUT_DIM,))
    lstm_units = 32
    lstm_out = LSTM(lstm_units, return_sequences=True)(inputs)
    attention_mul = attention_3d_block(lstm_out)
    attention_mul = Flatten()(attention_mul)
    output = Dense(1, activation='sigmoid')(attention_mul)
    model = Model(input=[inputs], output=output)
    return model
结果展示
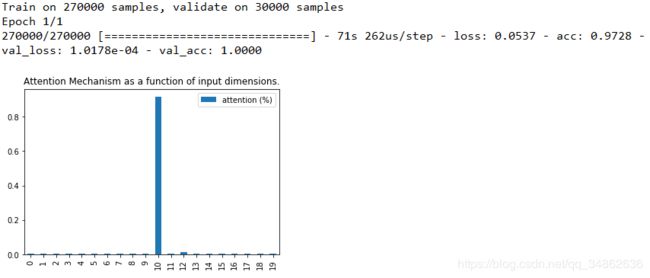
注意权重共享+LSTM之前使用注意力
注意权重共享+LSTM之后使用注意力
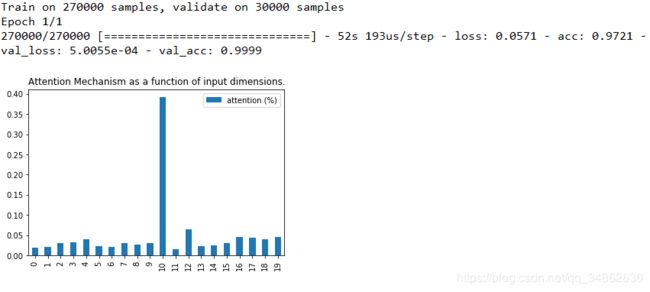
注意权重不共享+LSTM之前使用注意力
注意权重不共享+LSTM之后使用注意力
结果总结
四种情况的模型在验证集上分类准确率都达到了100%,同时人工指定的“关键特征”也被准确的捕捉到了,都是最高。值得注意的是在LSTM之后再用注意力时,会导致有一部分注意力被其他特征分散了,这是因为LSTM之后,特征更为抽象了,更难解释了。
至于注意力层权重共不共享,个人觉得还得具体到问题上来,理论上权重不共享,注意力的刻画就更丰富,但同时参数也变多了,模型速度肯定会受影响,怎样取舍看各自问题。
完整代码(1个文件)
import keras.backend as K
from keras.layers import Multiply
from keras.layers.core import *
from keras.layers.recurrent import LSTM
from keras.models import *
import matplotlib.pyplot as plt
import pandas as pd
import numpy as np

def get_data_recurrent(n, time_steps, input_dim, attention_column=10):
    """
    Data generation. x is purely random except that it's first value equals the target y.
    In practice, the network should learn that the target = x[attention_column].
    Therefore, most of its attention should be focused on the value addressed by attention_column.
    :param n: the number of samples to retrieve.
    :param time_steps: the number of time steps of your series.
    :param input_dim: the number of dimensions of each element in the series.
    :param attention_column: the column linked to the target. Everything else is purely random.
    :return: x: model inputs, y: model targets
    """
    x = np.random.standard_normal(size=(n, time_steps, input_dim)) #标准正态分布随机特征值
    y = np.random.randint(low=0, high=2, size=(n, 1)) #二分类,随机标签值
    x[:, attention_column, :] = np.tile(y[:], (1, input_dim)) #将第attention_column个column的值置为标签值
    return x, y

def get_activations(model, inputs, print_shape_only=False, layer_name=None):
    # Documentation is available online on Github at the address below.
    # From: https://github.com/philipperemy/keras-visualize-activations
#    print('----- activations -----')
    activations = []
    inp = model.input
    if layer_name is None:
        outputs = [layer.output for layer in model.layers]
    else:
        outputs = [layer.output for layer in model.layers if layer.name == layer_name]  # all layer outputs
    funcs = [K.function([inp] + [K.learning_phase()], [out]) for out in outputs]  # evaluation functions
    layer_outputs = [func([inputs, 1.])[0] for func in funcs]
    for layer_activations in layer_outputs:
        activations.append(layer_activations)
#        if print_shape_only:
#            print(layer_activations.shape)
#        else:
#            print(layer_activations)
    return activations

def attention_3d_block(inputs):
    # inputs.shape = (batch_size, time_steps, input_dim)
    input_dim = int(inputs.shape[2])
    a = Permute((2, 1))(inputs)
    a = Reshape((input_dim, TIME_STEPS))(a) # this line is not useful. It's just to know which dimension is what.
    a = Dense(TIME_STEPS, activation='softmax')(a)
    if SINGLE_ATTENTION_VECTOR:
        a = Lambda(lambda x: K.mean(x, axis=1), name='dim_reduction')(a)
        a = RepeatVector(input_dim)(a)
    a_probs = Permute((2, 1), name='attention_vec')(a)
    output_attention_mul = Multiply()([inputs, a_probs])
    return output_attention_mul


def model_attention_applied_after_lstm():
    K.clear_session() #清除之前的模型,省得压满内存
    inputs = Input(shape=(TIME_STEPS, INPUT_DIM,))
    lstm_units = 32
    lstm_out = LSTM(lstm_units, return_sequences=True)(inputs)
    attention_mul = attention_3d_block(lstm_out)
    attention_mul = Flatten()(attention_mul)
    output = Dense(1, activation='sigmoid')(attention_mul)
    model = Model(input=[inputs], output=output)
    return model


def model_attention_applied_before_lstm():
    K.clear_session() #清除之前的模型,省得压满内存
    inputs = Input(shape=(TIME_STEPS, INPUT_DIM,))
    attention_mul = attention_3d_block(inputs)
    lstm_units = 32
    attention_mul = LSTM(lstm_units, return_sequences=False)(attention_mul)
    output = Dense(1, activation='sigmoid')(attention_mul)
    model = Model(input=[inputs], output=output)
    return model

SINGLE_ATTENTION_VECTOR = False
APPLY_ATTENTION_BEFORE_LSTM = True
INPUT_DIM = 2
TIME_STEPS = 20

if __name__ == '__main__':

    np.random.seed(1337)  # for reproducibility

    # if True, the attention vector is shared across the input_dimensions where the attention is applied.


    N = 300000
    # N = 300 -> too few = no training
    inputs_1, outputs = get_data_recurrent(N, TIME_STEPS, INPUT_DIM)
#    for i in range(0,3):
#        print(inputs_1[i])
#        print(outputs[i])
    if APPLY_ATTENTION_BEFORE_LSTM:
        m = model_attention_applied_before_lstm()
    else:
        m = model_attention_applied_after_lstm()

    m.compile(optimizer='adam', loss='binary_crossentropy', metrics=['accuracy'])
    m.summary()

    m.fit([inputs_1], outputs, epochs=1, batch_size=64, validation_split=0.1)

    attention_vectors = []
    for i in range(300):
        testing_inputs_1, testing_outputs = get_data_recurrent(1, TIME_STEPS, INPUT_DIM)
        attention_vector = np.mean(get_activations(m,
                                                   testing_inputs_1,
                                                   print_shape_only=True,
                                                   layer_name='attention_vec')[0], axis=2).squeeze()
#        print('attention =', attention_vector)
        assert (np.sum(attention_vector) - 1.0) < 1e-5
        attention_vectors.append(attention_vector)

    attention_vector_final = np.mean(np.array(attention_vectors), axis=0)
    # plot part.


    pd.DataFrame(attention_vector_final, columns=['attention (%)']).plot(kind='bar',
                                                                         title='Attention Mechanism as '
                                                                               'a function of input'
                                                                               ' dimensions.')
    plt.show()
