继上篇对于Keras的初步探讨之后,我将给出一个例子讲解如何利用Keras用于处理图像分类问题,今天我们先探讨一下识别验证码的问题。
一、探讨内容
1、数据来源
2、模型搭建
3、优化问题
二、数据来源
在本文中,我打算对验证码进行识别,有一个python包——captcha,利用它可生成验证码。当然使用前需要
先导入相关packages。
```import cv2
import numpy as np
from captcha.image import ImageCaptcha
这里可以设置验证码的大小为28*28,字体大小24。比如下面两张图片,第一张是5,第二张是6。干扰相对较大。
下面给出完整代码
import cv2
import numpy as np
from captcha.image import ImageCaptcha

def generate_captcha(text):

    capt= ImageCaptcha(width=28,height=28,font_sizes = [24])
    image = capt.generate_image(text)
    image = np.array(image,dtype=np.uint8)
    return image

if __name__ == '__main__':
    output_dir = './datasets/images/'
    for i in range(5000):
        label = np.random.randint(0,10)
        image = generate_captcha(str(label))
        image_name = 'image{}_{}.jpg'.format(i+1,label)
        output_path = output_dir +image_name
        cv2.imwrite(output_path,image)
保存文件为gendata.py,运行文件后生成5000张验证码图片。这里只是实验性质,所以验证码图片数量较少,大家自己做实验的时候可以适当增加一些图片数量。
三、模型搭建
一开始我们可以搭建一个非常简单的LeNet来进行验证和测试。保存下列文件命名为lenet.py
# import the necessary packages
from keras.models import Sequential
from keras.layers.convolutional import Conv2D
from keras.layers.convolutional import MaxPooling2D
from keras.layers.core import Activation
from keras.layers.core import Flatten
from keras.layers.core import Dense
from keras import backend as K

class LeNet:
    @staticmethod
    def build(width, height, depth, classes):
        # initialize the model
        model = Sequential()
        inputShape = (height, width, depth)
        # if we are using "channels last", update the input shape
        if K.image_data_format() == "channels_first":   #for tensorflow
            inputShape = (depth, height, width)
        # first set of CONV => RELU => POOL layers
        model.add(Conv2D(20, (5, 5),padding="same",input_shape=inputShape))
        model.add(Activation("relu"))
        model.add(MaxPooling2D(pool_size=(2, 2), strides=(2, 2)))
        #second set of CONV => RELU => POOL layers
        model.add(Conv2D(50, (5, 5), padding="same"))
        model.add(Activation("relu"))
        model.add(MaxPooling2D(pool_size=(2, 2), strides=(2, 2)))
        # first (and only) set of FC => RELU layers
        model.add(Flatten())
        model.add(Dense(500))
        model.add(Activation("relu"))

        # softmax classifier
        model.add(Dense(classes))
        model.add(Activation("softmax"))

        # return the constructed network architecture
        return model
接着我们加载数据,每张图片对应的数字是放在文件名'_'之后。
def get_data(images_path):
    if not os.path.exists(images_path):
        raise ValueError('images_path is not exist.')

    images = []
    labels = []
    images_path = os.path.join(images_path,'*.jpg')
    count = 0
    for image_file in glob.glob(images_path):
        count +=1
        if count % 100 == 0:
            print('Load{} images .'.format(count))
        image = cv2.imread(image_file)
        image = cv2.cvtColor(image,cv2.COLOR_BGR2RGB)
        image = cv2.resize(image, (norm_size, norm_size))
        label = int(image_file.split('_')[-1].split('.')[0])
        images.append(image)
        labels.append(label)
    images = np.array(images)
    labels = np.array(labels)

    (trainX, testX, trainY, testY) = train_test_split(images,
            labels, test_size=0.25, random_state=42)

    # convert the labels from integers to vectors
    trainY = to_categorical(trainY, num_classes=CLASS_NUM)
    testY = to_categorical(testY, num_classes=CLASS_NUM)
    return trainX,trainY,testX,testY
经过处理我们得到训练集和测试集。我们先放出来完整代码train.py,然后我们在代码基础上加以修改。运行命令如下
python3 train.py -d images/ -m my.model
其中images/ 为验证码存放目录,my.model为模型保存位置。
import matplotlib
matplotlib.use("Agg")

# import the necessary packages
import glob
from keras.preprocessing.image import ImageDataGenerator
from keras.optimizers import Adam
from sklearn.model_selection import train_test_split
from keras.preprocessing.image import img_to_array
from keras.utils import to_categorical
#from imutils import paths
import matplotlib.pyplot as plt
import numpy as np
import argparse
import random
import cv2
import os
import sys
sys.path.append('..')
from lenet import LeNet


def args_parse():
    # construct the argument parse and parse the arguments
    ap = argparse.ArgumentParser()
    ap.add_argument("-d", "--dataset", required=True,
        help="path to input dataset")
    ap.add_argument("-m", "--model", required=True,
        help="path to output model")
    ap.add_argument("-p", "--plot", type=str, default="plot.png",
        help="path to output accuracy/loss plot")
    args = vars(ap.parse_args())
    return args


args = args_parse()

# initialize the number of epochs to train for, initial learning rate,
# and batch size
EPOCHS = 200
INIT_LR = 1e-2
BS = 128
CLASS_NUM = 10
norm_size = 32
# initialize the data and labels

def get_data(images_path):
    if not os.path.exists(images_path):
        raise ValueError('images_path is not exist.')

    images = []
    labels = []
    images_path = os.path.join(images_path,'*.jpg')
    count = 0
    for image_file in glob.glob(images_path):
        count +=1
        if count % 100 == 0:
            print('Load{} images .'.format(count))
        image = cv2.imread(image_file)
        image = cv2.cvtColor(image,cv2.COLOR_BGR2RGB)
        image = cv2.resize(image, (norm_size, norm_size))
        label = int(image_file.split('_')[-1].split('.')[0])
        images.append(image)
        labels.append(label)
    images = np.array(images)
    labels = np.array(labels)

    (trainX, testX, trainY, testY) = train_test_split(images,
            labels, test_size=0.25, random_state=42)

    # convert the labels from integers to vectors
    trainY = to_categorical(trainY, num_classes=CLASS_NUM)
    testY = to_categorical(testY, num_classes=CLASS_NUM)
    return trainX,trainY,testX,testY

def train(aug,trainX,trainY,testX,testY,args):
    # initialize the model
    print("[INFO] compiling model...")
    model = LeNet.build(width=norm_size, height=norm_size, depth=3, classes=CLASS_NUM)
    opt = Adam(lr=INIT_LR, decay=INIT_LR / EPOCHS)
#    opt = Adam(lr=INIT_LR)
    model.compile(loss="categorical_crossentropy", optimizer=opt,
        metrics=["accuracy"])

    # train the network
    print("[INFO] training network...")
    H = model.fit_generator(aug.flow(trainX, trainY, batch_size=BS),
        validation_data=(testX, testY), steps_per_epoch=len(trainX) // BS,
        epochs=EPOCHS, verbose=1)

    # save the model to disk
    print("[INFO] serializing network...")
    model.save(args["model"])

    # plot the training loss and accuracy
    plt.style.use("ggplot")
    plt.figure()
    N = EPOCHS
    plt.plot(np.arange(0, N), H.history["loss"], label="train_loss")
    plt.plot(np.arange(0, N), H.history["val_loss"], label="val_loss")
    plt.plot(np.arange(0, N), H.history["acc"], label="train_acc")
    plt.plot(np.arange(0, N), H.history["val_acc"], label="val_acc")
    plt.title("Training Loss and Accuracy on Invoice classifier")
    plt.xlabel("Epoch #")
    plt.ylabel("Loss/Accuracy")
    plt.legend(loc="lower left")
    plt.savefig(args["plot"])

#python train.py --dataset ../../invoice_all/train  --model invoice.model
if __name__=='__main__':
    args = args_parse()
    file_path = args["dataset"]
    trainX,trainY,testX,testY = get_data(file_path)
    # construct the image generator for data augmentation
    aug = ImageDataGenerator(rotation_range=30, width_shift_range=0.1,
        height_shift_range=0.1, shear_range=0.2, zoom_range=0.2,
        horizontal_flip=True, fill_mode="nearest")
    train(aug,trainX,trainY,testX,testY,args)
四、优化模型
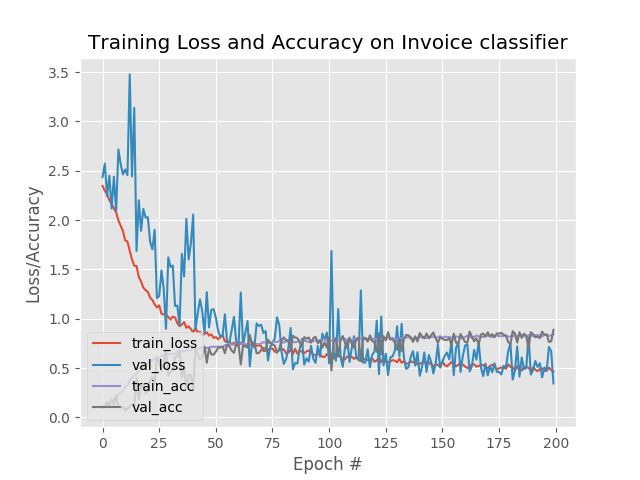
我们可以根据每次生成的图片观察训练效果,这张图是已经经过若干次修改后的结果,正确率大概为0.80,从下图可以看到val_loss的抖动还是比较大,这是由于两个原因:一是初始的学习率比较大,二是因为在本例中我采用了dropout,而dropoutrate设置得太高了(0.25)所以我们需要修改。4.1 采用BatchNormalization
BatchNormalization()真是非常好用,把它放在卷积层和池化层之间能非常有效地提升性能。
model.add(Conv2D(30, (2, 2), padding="same"))
        model.add(BatchNormalization())
        model.add(Activation("relu"))
        model.add(MaxPooling2D(pool_size=(2, 2), strides=(2, 2)))
4.2 学习率衰减策略
其实我们在一开始尝试的时候完全没必要设置学习率衰减策略。我们大可以尝试使用或大或小的学习率观察结果。随后我们可以让学习率随轮数衰减,以达到微调的效果。
    opt = Adam(lr=INIT_LR, decay=INIT_LR / EPOCHS)
#    opt = Adam(lr=INIT_LR)
    model.compile(loss="categorical_crossentropy", optimizer=opt,
        metrics=["accuracy"])
4.3 dropout
使用了batchnormal再使用dropout效果可能不太明显。我们可以在最后的全连接层处使用dropout,在卷积层中间使用dropout会导致结果不可预测。
        model.add(Dense(200))
        model.add(Dropout(droprate))
4.4 数据扩充
我们把图片变形扭曲增加数据源
aug = ImageDataGenerator(rotation_range=30, width_shift_range=0.1,
        height_shift_range=0.1, shear_range=0.2, zoom_range=0.2,
        horizontal_flip=True, fill_mode="nearest")
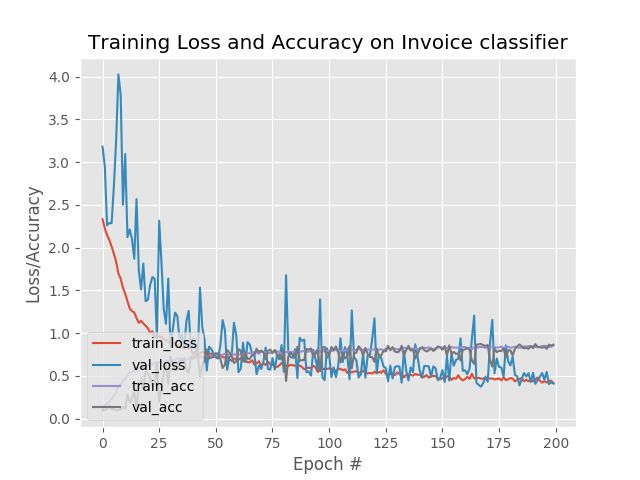
现在的结果如下图所示,由于训练轮数(200)不是特别多,所以效果还不是很好正确率大概在85%。有兴趣的朋友可以在此基础上加以修改一下。
完整代码参见
code

