本来这一篇写的是一个音乐商城的程序的创建,但我啰啰嗦嗦写了三大篇,结果很多业务都没交代清楚,干脆就删了,重写一篇。这一篇重点的地方都有提及,包括会员管理员、文章发布、权限管理,实在是入门最佳教材,遥想入门当年,怎么遇不到这种文章呢?呵呵。由于MVC开发性能卓越,基本上可以在一天之内完成这个开发任务。学了这个,开发个小型商业网站大概也就两三天的功夫。
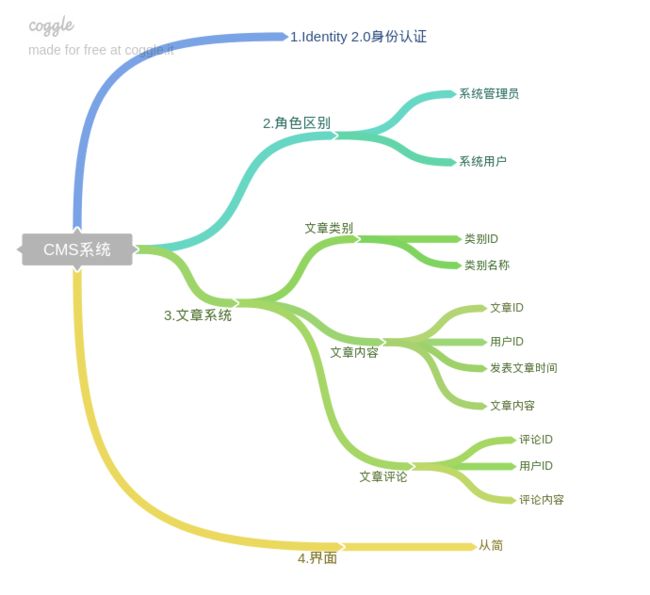
基本的思路先画一个思维导图厘清一下思路:
本例子使用了IDentity进行用户验证,同时也使用了角色,角色设为Admin可以管理用户,也可以管理文章。普通用户除了发表评论外就没有其他功能了。
控制器方面,我用了AxCMSAdmin控制器,作为管理文章用。
数据库设计如下图,这里并不包括IDentity生成的数据库,只包括CMS简单业务。
假设你已经有了一个完整的包含整个IDentity业务的项目,项目名称为Blog,那么我们就从新建模型开始,右击解决方案资源管理器的Models文件夹,在弹出来的菜单上选择新建类:Contents.cs
using System;
using System.Collections.Generic;
using System.Linq;
using System.Web;

namespace AxCMS.Models
{
    public class Contents
    {
        public int ContentsId { get; set; }
        public string User { get; set; }
        public string Title { get; set; }
        public int CategoryId { get; set; }
        public DateTime PublicationDate { get; set; }
        public string Content { get; set; }
        public UserCommments UserCommments { get; set; }
        public Category Category { get; set; }
    }
}
接着,再次新建类:Category.cs
using System;
using System.Collections.Generic;
using System.Linq;
using System.Web;

namespace AxCMS.Models
{
    public class Category
    {
        public int CategoryId { get; set; }
        public string Name { get; set; }
        public List Contentss { get; set; }
    }
}
最后再一次新建类:UserCommments.cs
using System;
using System.Collections.Generic;
using System.Linq;
using System.Web;

namespace AxCMS.Models
{
    public class UserCommments
    {
        public int UserCommmentsId { get; set; }
        public int ContentsId { get; set; }
        public string user { get; set; }
        public string Comments { get; set; }
    }
}
全部保存之后,点击生成菜单里面的生成解决方案。
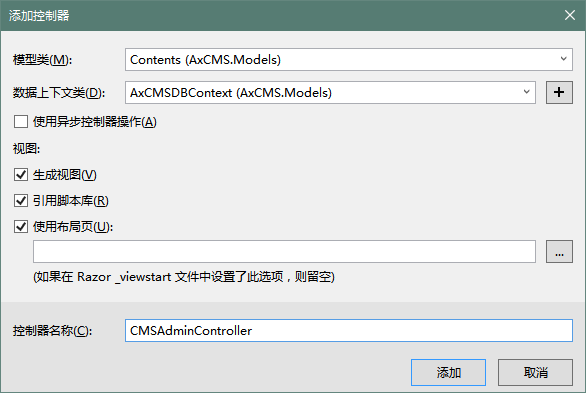
好了,现在我们来完成一个新的控制器,右击解决方案资源管理器的Controllers文件夹,添加新的控制器,选择 "包含视图的MVC 5控制器(使用 Entity Framework)",设置如下图:
using System;
using System.Collections.Generic;
using System.Linq;
using System.Web;
using System.Data.Entity;

namespace CMS.Models
{
    public class testseed:DropCreateDatabaseAlways
    {
        protected override void Seed(CMSDB context)
        {
            context.BlogClases.Add(new BlogClass { ClassName = "经营" });
            context.BlogDetaileds.Add(
                new BlogDetailed
                {
                    User = "null",
                    BlogDate = DateTime.Now,
                    BlogContent="这是一次测试!",
                    BlogClass=new BlogClass { ClassName="管理"}
            });
            base.Seed(context);
        }
    }
}
打开Global.asax.cs,在protected void Application_Start() 下面输入代码:
 protected void Application_Start()
        {
            System.Data.Entity.Database.SetInitializer(new MvcMusicStore.Models.MusicStoreDbInitializer());
            AreaRegistration.RegisterAllAreas();
            FilterConfig.RegisterGlobalFilters(GlobalFilters.Filters);
            RouteConfig.RegisterRoutes(RouteTable.Routes);
            BundleConfig.RegisterBundles(BundleTable.Bundles);
        }
运行程序,我们可以发现数据库已经完成了并且有了一两笔播种数据。
一般我们一个程序都在一个数据库里面,在还没有使用注册的情况下,IDentity并不会给你一个默认的数据库,打开web.config文件,将
现在,我们在启用IDentity的用户管理同时,也启用角色:
第一步:打开IdentityConfig.cs,往里面增加代码
//配置此应用程序中使用的应用程序角色管理器。RoleManager 在 ASP.NET Identity 中定义,并由此应用程序使用。
public class ApplicationRoleManager : RoleManager
    {
        public ApplicationRoleManager(IRoleStore roleStore)
            : base(roleStore)
        {
        }

        public static ApplicationRoleManager Create(IdentityFactoryOptions options, IOwinContext context)
        {
            return new ApplicationRoleManager(new RoleStore(context.Get()));
        }
    }
第二步: 修改Startup.Auth.cs,在 public void ConfigureAuth(IAppBuilder app)中加入代码:
app.CreatePerOwinContext(ApplicationRoleManager.Create); //添加的角色管理器
第三步:创建种子数据,新建ApplicationDbInitializer.cs类,将数据加入
using Microsoft.AspNet.Identity;
using Microsoft.AspNet.Identity.Owin;
using System.Data.Entity;
using Microsoft.AspNet.Identity.EntityFramework;
using System.Web;

namespace AxCMS.Models
{
    public class ApplicationDbInitializer : DropCreateDatabaseIfModelChanges
    {
        protected override void Seed(ApplicationDbContext context)
        {
            InitializeIdentityForEF(context);
            base.Seed(context);
        }


        public static void InitializeIdentityForEF(ApplicationDbContext db)
        {
            var userManager = HttpContext.Current.GetOwinContext().GetUserManager();
            var roleManager = HttpContext.Current.GetOwinContext().Get();
            const string name = "[email protected]";//用户名
            const string password = "Admin123@alexzeng";//密码
            const string roleName = "Admin";//用户要添加到的角色组

            //如果没有Admin用户组则创建该组
            var role = roleManager.FindByName(roleName);
            if (role == null)
            {
                role = new IdentityRole(roleName);
                var roleresult = roleManager.Create(role);
            }

            //如果没有[email protected]用户则创建该用户
            var user = userManager.FindByName(name);
            if (user == null)
            {
                user = new ApplicationUser { UserName = name, Email = name };
                var result = userManager.Create(user, password);
                result = userManager.SetLockoutEnabled(user.Id, false);
            }

            // 把用户[email protected]添加到用户组Admin中
            var rolesForUser = userManager.GetRoles(user.Id);
            if (!rolesForUser.Contains(role.Name))
            {
                var result = userManager.AddToRole(user.Id, role.Name);
            }
        }
    }
}
最后一步:在IdentityModels.cs文件中修改:
 public ApplicationDbContext()

        {
            Database.SetInitializer(new ApplicationDbInitializer());
        }
运行后用[email protected] 进行登录即可。
有了Admin角色,我们可以设置为整个‘CMSAdminController’控制器都需要使用Admin权限才能进入。其实非常简单,打开控制器,在命名空间的下面加入 [Authorize(Roles = "Admin")]就可以啦。
namespace AxCMS.Controllers
{
    [Authorize(Roles = "Admin")]
  ......
由于文章输入依赖于用户的输入,我们需要对用户输入进行一些限制,如果一些无效数据流入到数据库里面,有可能会给我们的网站带来一些麻烦。再回到模型,打开Contents.cs文件。
注:需要加入命名空间using System.ComponentModel.DataAnnotations;
 public class Contents
    {
        public int ContentsId { get; set; }
        public string User { get; set; }
        [Required]
        [StringLength(160,MinimumLength =4)]
        [Display(Name ="标题")]
        public string Title { get; set; }
        [Display(Name = "类别")]
        public int CategoryId { get; set; }
        public DateTime PublicationDate { get; set; }
        [Required]
        [Display(Name = "内容")]
        public string Content { get; set; }
        public UserCommments UserCommments { get; set; }
        [Display(Name = "类别")]
        public Category Category { get; set; }
    }
运行程序,坏了,报错了。不要着急,这是EF发现数据库数据发生变化,重新更新一下就可以了。
打开“程序包管理控制台”,依次输入以下三个命令就可以了。
 Enable-Migrations -ContextTypeName AxCMS.Models.AxCMSDBContext
 add-migration Initial
 update-database
下面对Create视图做一些修改,打开Contents表,有ContentsId,User,Title,CategoryId,PublicationDate,Content等字段,User是获取作者的用户名,这个可以不用用户输入,删除。PublicationDate为当前时间,也不用用户输入。
打开Create.cshtml,修改如下:
@model AxCMS.Models.Contents

@{
    ViewBag.Title = "Create";
}

Create


@using (Html.BeginForm())
{
    @Html.AntiForgeryToken()


        Contents

        @Html.ValidationSummary(true, "", new { @class = "text-danger" })


            @Html.LabelFor(model => model.Title, htmlAttributes: new { @class = "control-label col-md-2" })

                @Html.EditorFor(model => model.Title, new { htmlAttributes = new { @class = "form-control" } })
                @Html.ValidationMessageFor(model => model.Title, "", new { @class = "text-danger" })


            @Html.LabelFor(model => model.CategoryId, "标题", htmlAttributes: new { @class = "control-label col-md-2" })

                @Html.DropDownList("CategoryId", null, htmlAttributes: new { @class = "form-control" })
                @Html.ValidationMessageFor(model => model.CategoryId, "", new { @class = "text-danger" })


            @Html.LabelFor(model => model.Content, htmlAttributes: new { @class = "control-label col-md-2" })

                @Html.TextAreaFor(model => model.Content, htmlAttributes: new {  @class = "form-control", @rows = 10  })
                @Html.ValidationMessageFor(model => model.Content, "", new { @class = "text-danger" })


}


    @Html.ActionLink("Back to List", "Index")


@section Scripts {
    @Scripts.Render("~/bundles/jqueryval")
}
打开控制器,对HttpPost的Create进行如下修改。
 [HttpPost]
        [ValidateAntiForgeryToken]
        public ActionResult Create(FormCollection collection)
        {
            var contents = new Contents();
            if (TryUpdateModel(contents))
            {
                contents.PublicationDate = DateTime.Now;
                contents.User = User.Identity.Name;
                db.Contents.Add(contents);
                db.SaveChanges();
                return RedirectToAction("Index");
            }

            ViewBag.CategoryId = new SelectList(db.Categories, "CategoryId", "Name", contents.CategoryId);
            return View(contents);
        }
Edit也类似,不过对用户名和发布时间,我们可以将其设为只读而不用删除,详细代码如下:
@model AxCMS.Models.Contents

@{
    ViewBag.Title = "Create";
}

Create


@using (Html.BeginForm())
{
    @Html.AntiForgeryToken()


        Contents

        @Html.ValidationSummary(true, "", new { @class = "text-danger" })


            @Html.LabelFor(model => model.Title, htmlAttributes: new { @class = "control-label col-md-2" })

                @Html.EditorFor(model => model.Title, new { htmlAttributes = new { @class = "form-control" } })
                @Html.ValidationMessageFor(model => model.Title, "", new { @class = "text-danger" })


            @Html.LabelFor(model => model.CategoryId, "类别", htmlAttributes: new { @class = "control-label col-md-2" })

                @Html.DropDownList("CategoryId", null, htmlAttributes: new { @class = "form-control" })
                @Html.ValidationMessageFor(model => model.CategoryId, "", new { @class = "text-danger" })


            @Html.LabelFor(model => model.Content, htmlAttributes: new { @class = "control-label col-md-2" })

                @Html.TextAreaFor(model => model.Content, htmlAttributes: new {  @class = "form-control", @rows = 10  })
                @Html.ValidationMessageFor(model => model.Content, "", new { @class = "text-danger" })


}


    @Html.ActionLink("Back to List", "Index")


@section Scripts {
    @Scripts.Render("~/bundles/jqueryval")
}
Edit在控制器中的代码修改如下:
[HttpPost]
        [ValidateAntiForgeryToken]
        public ActionResult Edit(FormCollection collection)
        {
            var contents = new Contents();
            if (TryUpdateModel(contents))
            {
                db.Entry(contents).State = EntityState.Modified;
                db.SaveChanges();
                return RedirectToAction("Index");
            }
            ViewBag.CategoryId = new SelectList(db.Categories, "CategoryId", "Name", contents.CategoryId);
            return View(contents);
        }
好了,文章这里修改得差不多了,那么文章类别管理你会做了吧?
下面我们来看看如何将文章管理的链接接到全站的导航链接上面去。
全站默认模板在视图文件夹里面,打开..\Views\Shared_Layout.cshtml,修改里面的
后面那两个对我们没有用,我们可以添加权限,让拥有权限的用户可以管理文章,管理用户。
这一节最后我们来完成一下首页,将文章数据移到首页来,然后再加一个Details ,参考CMSAdminController的Index和Details,这个真心不难,这里不做讨论。
下一节,我们将完成用户管理控制器:CMSUser,最后再完成用户评论,用户评论将在Details 页面中显示出来,并且对登录用户显示文本框可以输入评论,难度略有提高。
谢谢大家。转帖的时候请把凉风有兴或者AlexZeng.net进行署名。本文版权声明:自由转载-非商用-非衍生-保持署名(创意共享3.0许可证)


