**python使用 opencv2 和udp通信进行两路相机视频的回传,以及使用pygame同时显示两路视频**
下载源代码可参考以下网站:
https://download.csdn.net/download/qq_43790749/11288036
Python使用opencv 和pygame实现两个相机同时实时监控。具体参考如下:
发送端
1.camera.py 实现相机的调用和压缩视频数据
from threading import Thread, Lock
import cv2
import time
class VideoGrabber(Thread):
“”" A threaded video grabber
Attributes:
    encode_params ():
    cap (str):
    attr2 (:obj:`int`, optional): Description of `attr2`.

"""
def __init__(self, jpeg_quality):
    """Constructor.
    Args:
    jpeg_quality (:obj:`int`): Quality of JPEG encoding, in 0, 100.

    """
    Thread.__init__(self)
    self.encode_param = [int(cv2.IMWRITE_JPEG_QUALITY), jpeg_quality]
    self.cap = cv2.VideoCapture(0)
    self.cap1 = cv2.VideoCapture(1)
    self.running = True
    self.buffer = None
    self.buffer1 = None
    self.lock = Lock()

def stop(self):
    self.running = False

def get_buffer(self):
    """Method to access the encoded buffer.
    Returns:
    np.ndarray: the compressed image if one has been acquired.
    None otherwise.
    """
    if self.buffer  is not None:
        self.lock.acquire()
        cpy = self.buffer.copy()
        self.lock.release()
        return cpy   # ndarray

def get_buffer1(self):
    """Method to access the encoded buffer.
    Returns:
    np.ndarray: the compressed image if one has been acquired.
    None otherwise.
    """
    if self.buffer1  is not None:
        self.lock.acquire()
        cpy1 = self.buffer1.copy()
        self.lock.release()
        return cpy1   # ndarray

def run(self):
    # 一直读取
    while self.running:
        time.sleep(0.001)
        success, img = self.cap.read()
        success1,img1 = self.cap1.read()
        #print(success)
        if not success:
            continue
        self.lock.acquire()
        result, self.buffer = cv2.imencode('.jpg', img, self.encode_param)
       # print(self.buffer)
        if not success1:
            continue

        result1,self.buffer1 = cv2.imencode('.jpg',img1,self.encode_param)
        #print(self.buffer1)
        self.lock.release()
2 使用address.ini 文件存储客户端和服务端地址:
[server]
port = 12340
host = 192.168.1.4
[client]
port = 12340
host = 192.168.1.6
[client1]
port = 8080
host = 127.0.0.1
ini,py 获取address.ini 文件记录的地址:
import configparser
import os , sys
def get_address(section):
config = configparser.ConfigParser()
config.read(os.path.join(sys.path[0],r’config.ini’))
return (config.get(section=section, option=‘host’),
int(config.get(section=section, option=‘port’)))
3 send.py 调用上两个文件内的函数,进行数据发送,其中为了区分两路不同的视频信号,使用了struct.pack()函数打包了一个1和0与视频数据一起发送一区分两路不同的数据。在接收端用struct,unpack()函数进行解包,并通过解包出来的数据,判断是哪路数据。代码如下:
import socket
import sys
import time
from init import *
from camera import *
import numpy as np
import struct
jpeg_quality = 80
server_address = get_address(‘server’)
client_address = get_address(‘client’)
client_address1 = get_address(‘client1’)
buffersize = 65507
if name == ‘main’:
grabber1 = VideoGrabber(jpeg_quality)
grabber1.setDaemon(True)
grabber1.start()
running = True

sk = socket.socket(socket.AF_INET, socket.SOCK_DGRAM)
sk.bind(server_address)
tot_frame = 0
time_sta = time.time()
while(running):
    time.sleep(0.001)
    buffer = grabber1.get_buffer()
    #print(buffer)

    if buffer is None:
        continue
    # print(len(buffer))
    buffer1 = grabber1.get_buffer1()
    #print(buffer1)
    if buffer1 is None:
        continue
    if len(buffer) > 655070:
        print("The message is too large to be sent within a single UDP datagram. We do not handle splitting the message in multiple datagrams")
        sk.sendto(b"FAIL",server_address)
        continue

    #发送第0路信号
    # print(buffer1.tobytes())
    sk.sendto(struct.pack("i", 0) + buffer.tobytes(), client_address1)
    sk.sendto(struct.pack("i", 0) + buffer.tobytes(), client_address)
    print('发送第0路信号', 'to', client_address, client_address1)

    # 发送第1路信号
    sk.sendto(struct.pack("i",1) + buffer1.tobytes(),client_address1)
    sk.sendto(struct.pack("i",1) + buffer1.tobytes(),client_address)
    print('发送第1路信号','to',client_address,client_address1)

    tot_frame +=1
    if tot_frame % 100 ==0 :
        print("{:.2f}fps".format(tot_frame/(time.time()-time_sta)))


print("Quitting..")
grabber1.stop()
grabber1.join()
sk.close()
接收端
使用receive.py 进行接收,并使用struct.unpack()函数解包区分数据,使用pygame库进行分屏显示。其中为了原始视频数据正确,需要使用spilit()对得到的数据分割处理,将打包进来的数据切除掉后,再将其余的数据合起来,其中一点要注意spilit() 函数的用法。代码如下:
import socket
import cv2
import numpy as np
import sys
import time
from init import *
import pygame
import struct
from pygame.locals import *
sk = socket.socket(socket.AF_INET, socket.SOCK_DGRAM)
server_address = get_address(‘server’)
client_address = get_address(‘client1’)
buffersize = 4
pygame.init() # 初始化pygame
window_size = (1280, 480) # 设置显示界面大小
screen = pygame.display.set_mode(window_size, 0, 32) # pygame显示设置
pygame.display.set_caption(‘Two Camera Show’) # 设置显示标题
pygame.display.flip()
clock = pygame.time.Clock()
buffersize1 = 52000
sk.bind(client_address)
tot_frame = 0
time_sta = time.time()
ts1 = 0
ts0 = 0
a = []
a1 =b’’
data1 =b’’
flag = 2
def Get_image():
while (True):
    data, addr = sk.recvfrom(buffersize)
    # print(data)
    info = struct.unpack("i", data)
    # print(info)
   # flag = data1[0]  # flag是为了辨别是那一路信号,采用0和1进行区分,详情请见服务器段程序
    global data1
    data1, client1 = sk.recvfrom(buffersize1)
    if data1 == b"FAIL":
        print("buffersize is too small or lose the packet")
        continue

    if ts1 >= ts0 :
        if data1[0] == 1:
            spilt = b'\x01\x00\x00\x00'
            global a
            a = data1.split(spilt)
            # print(len(a))
            b = b'\x01\x00\x00\x00'
            global a1
            a1 = a[1] + b + a[2] + b + a[3]
            global ts0
            ts0 = ts0 + 1
            global flag
            flag = 1
    if ts0>= ts1:
        if data1[0] == 0:
            spilt = b'\x00\x00\x00\x00'
            global a
            a = data1.split(spilt)
            # print(len(a))
            b = b'\x00\x00\x00\x00'
            global a1
            a1 = a[1] + b + a[2] + b + a[3] + b + a[4]
            global ts1
            ts1 = ts1 + 1
            global flag
            flag = 0

    print("接收到第",flag,'路信号','(',len(a),')','from',addr,'(第0路信号共',ts0,'次','第1路信号共',ts1,'次)')
    array = np.frombuffer(a1, dtype=np.uint8)
    img = cv2.imdecode(array, 1)  # 解码
    return img, flag
while(True):
frame, flag = Get_image()
if flag == 0:

    image1 = frame
    #cv2.imshow("test", image1)

    flag1 = flag
    frame1 = cv2.cvtColor(image1, cv2.COLOR_BGR2RGB)  # 将图片转换成RGB格式,Opencv采用的是BGR
    frame1 = np.rot90(frame1)
    frame1 = cv2.flip(frame1, 0, dst=None)
    frame1 = pygame.surfarray.make_surface(frame1)  # 转换成pygame的背景格式
    screen.blit(frame1, (0, 0))  # 进行背景渲染


elif flag == 1:
    image2 = frame
   # cv2.imshow("test1", image2)
    flag2 = flag
    frame2 = cv2.cvtColor(image2, cv2.COLOR_BGR2RGB)
    frame2 = np.rot90(frame2)
    frame2 = pygame.surfarray.make_surface(frame2)
    screen.blit(frame2, (640, 0))
pygame.display.update()  # 刷新背景


tot_frame +=1
if tot_frame % 100 ==0 :
    print("{:.2f}fps".format(tot_frame/(time.time()-time_sta)))

if cv2.waitKey(1) & 0xFF == ord('q'):
    break
print("The server is quitting. ")
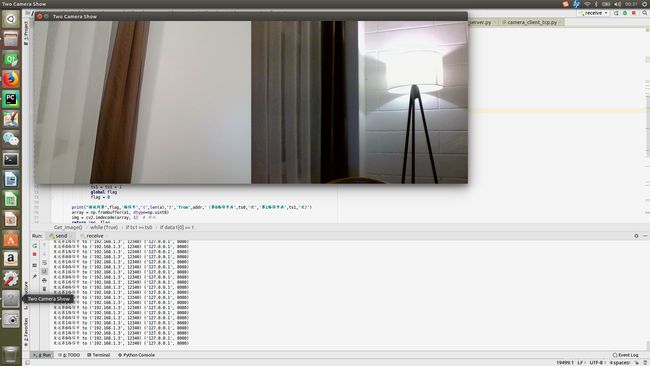
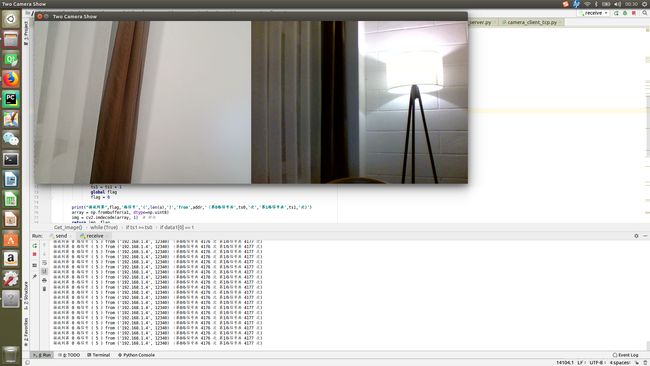
效果如图:
发送端
 接收端
接收端

下载源代码可参考以下网站:
https://download.csdn.net/download/qq_43790749/11288036