十次方项目笔记
项目笔记
1.parent父类pom文件依赖控制
<project xmlns="http://maven.apache.org/POM/4.0.0"
         xmlns:xsi="http://www.w3.org/2001/XMLSchema-instance"
         xsi:schemaLocation="http://maven.apache.org/POM/4.0.0 http://maven.apache.org/xsd/maven-4.0.0.xsd">
    <modelVersion>4.0.0modelVersion>

    <groupId>com.tensquaregroupId>
    <artifactId>tensquare-parentartifactId>
    <packaging>pompackaging>
    <version>1.0-SNAPSHOTversion>
    <description>十次方项目description>
    <modules>
        <module>tensquare-eurekamodule>
        <module>tensquare-gatewaymodule>
        <module>tensquare-commonmodule>
        <module>tensquare-basemodule>
    modules>

    <parent>
        <groupId>org.springframework.bootgroupId>
        <artifactId>spring-boot-starter-parentartifactId>
        <version>2.1.4.RELEASEversion>
        <relativePath />
    parent>

    <properties>
        <project.build.sourceEncoding>UTF-8project.build.sourceEncoding>
        <project.reporting.outputEncoding>UTF-8project.reporting.outputEncoding>
        <java.version>1.8java.version>
        <spring-cloud.version>Greenwich.SR1spring-cloud.version>
    properties>

    <dependencies>
        <dependency>
            <groupId>org.springframework.bootgroupId>
            <artifactId>spring-boot-starter-testartifactId>
            <scope>testscope>
        dependency>
    dependencies>

    <dependencyManagement>
        <dependencies>

            <dependency>
                <groupId>org.springframework.cloudgroupId>
                <artifactId>spring-cloud-dependenciesartifactId>
                <version>${spring-cloud.version}version>
                <type>pomtype>
                <scope>importscope>
            dependency>
        dependencies>
    dependencyManagement>


project>
2.tensquare-eureka 注册中心
依赖
<project xmlns="http://maven.apache.org/POM/4.0.0"
         xmlns:xsi="http://www.w3.org/2001/XMLSchema-instance"
         xsi:schemaLocation="http://maven.apache.org/POM/4.0.0 http://maven.apache.org/xsd/maven-4.0.0.xsd">
    <parent>
        <artifactId>tensquare-parentartifactId>
        <groupId>com.tensquaregroupId>
        <version>1.0-SNAPSHOTversion>
    parent>
    <description>注册中心Eurekadescription>

    <modelVersion>4.0.0modelVersion>

    <groupId>com.tensquaregroupId>

    <artifactId>tensquare-eurekaartifactId>

    <dependencies>
        <dependency>
            <groupId>org.springframework.cloudgroupId>
            <artifactId>spring-cloud-starter-netflix-eureka-serverartifactId>
        dependency>
    dependencies>
project>
package com.tensquare.eureka;

import org.springframework.boot.SpringApplication;
import org.springframework.boot.autoconfigure.SpringBootApplication;
import org.springframework.cloud.netflix.eureka.server.EnableEurekaServer;

/**
 * 注册中心的启动类
 * @author Johnny.Chen
 *
 */
@SpringBootApplication
@EnableEurekaServer//启用注册中心
public class EurekaServerApplication {

	public static void main(String[] args) {
		SpringApplication.run(EurekaServerApplication.class, args);
	}

}
application.yml配置文件
server:
  port: 10086 #端口号
spring:
  application:
    name: eureka-server #微服务id
eureka:
  client: #客户端:自己不用注册自己
    fetch-registry: false
    register-with-eureka: false
    service-url:
      defaultZone: http://localhost:10086/eureka
  server: #服务端:配置
    enable-self-preservation: false # 关闭自我保护
    eviction-interval-timer-in-ms: 5000 # 每隔5秒进行一次服务列表清理
3.tensquare-gateway
依赖
<project xmlns="http://maven.apache.org/POM/4.0.0"
         xmlns:xsi="http://www.w3.org/2001/XMLSchema-instance"
         xsi:schemaLocation="http://maven.apache.org/POM/4.0.0 http://maven.apache.org/xsd/maven-4.0.0.xsd">
    <parent>
        <artifactId>tensquare-parentartifactId>
        <groupId>com.tensquaregroupId>
        <version>1.0-SNAPSHOTversion>
    parent>
    <modelVersion>4.0.0modelVersion>

    <groupId>com.tensquaregroupId>
    <artifactId>tensquare-gatewayartifactId>


    <dependencies>
        <dependency>
            <groupId>org.springframework.cloudgroupId>
            <artifactId>spring-cloud-starter-gatewayartifactId>
        dependency>

        <dependency>
            <groupId>org.springframework.cloudgroupId>
            <artifactId>spring-cloud-starter-netflix-hystrixartifactId>
        dependency>
        <dependency>
            <groupId>org.springframework.cloudgroupId>
            <artifactId>spring-cloud-starter-netflix-eureka-clientartifactId>
        dependency>


        <dependency>
            <groupId>org.springframework.bootgroupId>
            <artifactId>spring-boot-starter-data-redis-reactiveartifactId>
            <version>2.1.3.RELEASEversion>
        dependency>
    dependencies>
project>
注意:不要引入spring-boot-starter-web包,会导致Gateway启动抛出异常,错误如下。因为Spring Cloud Gateway 是使用 netty+webflux实现,webflux与web是冲突的
Consider defining a bean of type 'org.springframework.http.codec.ServerCodecConfigurer' in your configuration.
启动类
package com.tensquare.gateway;

import org.springframework.boot.SpringApplication;
import org.springframework.boot.autoconfigure.SpringBootApplication;
import org.springframework.cloud.gateway.filter.ratelimit.KeyResolver;
import org.springframework.cloud.netflix.eureka.EnableEurekaClient;
import org.springframework.context.annotation.Bean;
import org.springframework.web.server.ServerWebExchange;
import reactor.core.publisher.Mono;

@SpringBootApplication
@EnableEurekaClient
public class GatewayApplication {

    public static void main(String[] args) {
        SpringApplication.run(GatewayApplication.class,args);
    }


    /***
     * IP限流
     * @return
     */
    @Bean(name="ipKeyResolver")
    public KeyResolver userKeyResolver() {
        return new KeyResolver() {
            @Override
            public Mono<String> resolve(ServerWebExchange exchange) {
                //获取远程客户端IP
                String hostName = exchange.getRequest().getRemoteAddress().getAddress().getHostAddress();
                System.out.println("hostName:"+hostName);
                return Mono.just(hostName);
            }
        };
    }
}
application.yml配置
spring:
  application:
    name: gateway-web
  cloud:
    gateway:
      globalcors:
        cors-configurations:
          '[/**]': # 匹配所有请求
            allowedOrigins: "*" #跨域处理 允许所有的域
            allowedMethods: # 支持的方法
              - GET
              - POST
              - PUT
              - DELETE

      routes:
        - id: base_route
          #uri: http://localhost:9001
          uri: lb://tensquare-base
          predicates:
            #- Host=cloud.itheima.com**
            - Path=/base/**
          filters:
            #- PrefixPath=/base
            - StripPrefix=1
            #请求数限流 名字不能随便写 ,使用默认的facatory
            - name: RequestRateLimiter
              args:
                key-resolver: "#{@ipKeyResolver}"
                redis-rate-limiter.replenishRate: 1
                redis-rate-limiter.burstCapacity: 1


  redis:
    host: 192.168.139.128
    port: 6379


server:
  port: 8888
#eureka客户端
eureka:
  client:
    register-with-eureka: true
    fetch-registry: true
    service-url:
      defaultZone: http://localhost:10086/eureka
  instance:
    ip-address: 127.0.0.1
    instance-id: ${eureka.instance.ip-address}:${server.port}
    lease-renewal-interval-in-seconds: 5 #开发阶段改小


#熔断器配置
hystrix:
  command:
    default:
      execution:
        isolation:
          thread:
            timeoutInMillisecond: 10000 # 熔断超时时长:10000ms


management:
  endpoint:
    gateway:
      enabled: true
    web:
      exposure:
        include: true
网关统一解决跨域问题
package com.tensquare.gateway.config;

import org.springframework.context.annotation.Bean;
import org.springframework.context.annotation.Configuration;
import org.springframework.web.cors.CorsConfiguration;
import org.springframework.web.cors.reactive.CorsWebFilter;
import org.springframework.web.cors.reactive.UrlBasedCorsConfigurationSource;
import org.springframework.web.util.pattern.PathPatternParser;

@Configuration
public class CorsConfig {
    @Bean
    public CorsWebFilter corsFilter() {
        CorsConfiguration config = new CorsConfiguration();
        config.addAllowedMethod("*");
        config.addAllowedOrigin("*");
        config.addAllowedHeader("*");

        UrlBasedCorsConfigurationSource source = new UrlBasedCorsConfigurationSource(new PathPatternParser());
        source.registerCorsConfiguration("/**", config);

        return new CorsWebFilter(source);
    }
}
4.tensquare-comom
<project xmlns="http://maven.apache.org/POM/4.0.0"
         xmlns:xsi="http://www.w3.org/2001/XMLSchema-instance"
         xsi:schemaLocation="http://maven.apache.org/POM/4.0.0 http://maven.apache.org/xsd/maven-4.0.0.xsd">
    <parent>
        <artifactId>tensquare-parentartifactId>
        <groupId>com.tensquaregroupId>
        <version>1.0-SNAPSHOTversion>
    parent>
    <modelVersion>4.0.0modelVersion>

    <groupId>com.tensquaregroupId>
    <artifactId>tensquare-commonartifactId>
    <dependencies>
        <dependency>
            <groupId>org.projectlombokgroupId>
            <artifactId>lombokartifactId>
        dependency>
        <dependency>
            <groupId>io.jsonwebtokengroupId>
            <artifactId>jjwtartifactId>
            <version>0.6.0version>
        dependency>


        <dependency>
            <groupId>org.springframework.bootgroupId>
            <artifactId>spring-boot-starter-webartifactId>
        dependency>
    dependencies>

project>
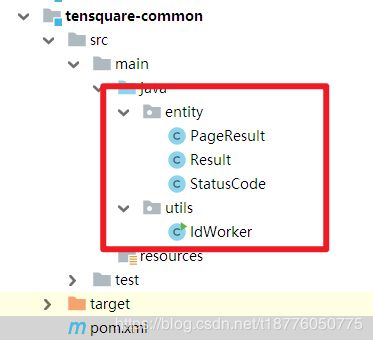
pageResult类
package entity;

import java.util.List;

public class PageResult<T> {

	private Long total;
	private List<T> rows;

	public PageResult(Long total, List<T> rows) {
		super();
		this.total = total;
		this.rows = rows;
	}

	public Long getTotal() {
		return total;
	}
	public void setTotal(Long total) {
		this.total = total;
	}
	public List<T> getRows() {
		return rows;
	}
	public void setRows(List<T> rows) {
		this.rows = rows;
	}


}
Result类
package entity;

/**
 * 响应实体
 * @author Johnny.Chen
 *
 */
public class Result {

	private Integer code;
	private Boolean flag;
	private String message;
	private Object data;

	/**
	 * 无参构造器
	 */
	public Result() {
		super();
	}

	/**
	 * 有参的构造器
	 * @param flag
	 * @param code
	 * @param message
	 */
	public Result(boolean flag, int code, String message) {
		super();
		this.code = code;
		this.flag = flag;
		this.message = message;
	}

	/**
	 * 全参的构造器
	 * @param code
	 * @param flag
	 * @param message
	 * @param data
	 */
	public Result(boolean flag, int code, String message, Object data) {
		super();
		this.code = code;
		this.flag = flag;
		this.message = message;
		this.data = data;
	}


	public int getCode() {
		return code;
	}

	public void setCode(int code) {
		this.code = code;
	}

	public boolean isFlag() {
		return flag;
	}

	public void setFlag(boolean flag) {
		this.flag = flag;
	}

	public String getMessage() {
		return message;
	}

	public void setMessage(String message) {
		this.message = message;
	}

	public Object getData() {
		return data;
	}

	public void setData(Object data) {
		this.data = data;
	}

}
状态码类StatusCode
package entity;

/**
 *  状态
 */
public class StatusCode {

    public static  final int OK=20000;//成功
    public static  final int ERROR=20001;//失败
    public static  final int LONGINERROR=20002;//用户名或者密码错误
    public static  final int ACCESSERROR=20003;//权限不足
    public static  final int REMOTEERROR=20004;//远程调用失败
    public static  final int REPERROR=20005;//重复操作


}
IdWorker id自动生成器(雪花算法)
package utils;

import java.lang.management.ManagementFactory;
import java.net.InetAddress;
import java.net.NetworkInterface;

/**
 * 名称:IdWorker.java
 * 描述:分布式自增长ID
 *
 *     Twitter的 Snowflake JAVA实现方案
 *
 * 核心代码为其IdWorker这个类实现,其原理结构如下,我分别用一个0表示一位,用—分割开部分的作用:
 * 1||0---0000000000 0000000000 0000000000 0000000000 0 --- 00000 ---00000 ---000000000000
 * 在上面的字符串中,第一位为未使用(实际上也可作为long的符号位),接下来的41位为毫秒级时间,
 * 然后5位datacenter标识位,5位机器ID(并不算标识符,实际是为线程标识),
 * 然后12位该毫秒内的当前毫秒内的计数,加起来刚好64位,为一个Long型。
 * 这样的好处是,整体上按照时间自增排序,并且整个分布式系统内不会产生ID碰撞(由datacenter和机器ID作区分),
 * 并且效率较高,经测试,snowflake每秒能够产生26万ID左右,完全满足需要。
 *
 * 64位ID (42(毫秒)+5(机器ID)+5(业务编码)+12(重复累加))
 *
 * @author Polim
 */
public class IdWorker {
    // 时间起始标记点,作为基准,一般取系统的最近时间(一旦确定不能变动)
    private final static long twepoch = 1288834974657L;
    // 机器标识位数
    private final static long workerIdBits = 5L;
    // 数据中心标识位数
    private final static long datacenterIdBits = 5L;
    // 机器ID最大值
    private final static long maxWorkerId = -1L ^ (-1L << workerIdBits);
    // 数据中心ID最大值
    private final static long maxDatacenterId = -1L ^ (-1L << datacenterIdBits);
    // 毫秒内自增位
    private final static long sequenceBits = 12L;
    // 机器ID偏左移12位
    private final static long workerIdShift = sequenceBits;
    // 数据中心ID左移17位
    private final static long datacenterIdShift = sequenceBits + workerIdBits;
    // 时间毫秒左移22位
    private final static long timestampLeftShift = sequenceBits + workerIdBits + datacenterIdBits;

    private final static long sequenceMask = -1L ^ (-1L << sequenceBits);
    /* 上次生产id时间戳 */
    private static long lastTimestamp = -1L;
    // 0,并发控制
    private long sequence = 0L;

    private final long workerId;
    // 数据标识id部分
    private final long datacenterId;

    public IdWorker(){
        this.datacenterId = getDatacenterId(maxDatacenterId);
        this.workerId = getMaxWorkerId(datacenterId, maxWorkerId);
    }
    /**
     * @param workerId
     *            工作机器ID
     * @param datacenterId
     *            序列号
     */
    public IdWorker(long workerId, long datacenterId) {
        if (workerId > maxWorkerId || workerId < 0) {
            throw new IllegalArgumentException(String.format("worker Id can't be greater than %d or less than 0", maxWorkerId));
        }
        if (datacenterId > maxDatacenterId || datacenterId < 0) {
            throw new IllegalArgumentException(String.format("datacenter Id can't be greater than %d or less than 0", maxDatacenterId));
        }
        this.workerId = workerId;
        this.datacenterId = datacenterId;
    }
    /**
     * 获取下一个ID
     *
     * @return
     */
    public synchronized long nextId() {
        long timestamp = timeGen();
        if (timestamp < lastTimestamp) {
            throw new RuntimeException(String.format("Clock moved backwards.  Refusing to generate id for %d milliseconds", lastTimestamp - timestamp));
        }

        if (lastTimestamp == timestamp) {
            // 当前毫秒内,则+1
            sequence = (sequence + 1) & sequenceMask;
            if (sequence == 0) {
                // 当前毫秒内计数满了,则等待下一秒
                timestamp = tilNextMillis(lastTimestamp);
            }
        } else {
            sequence = 0L;
        }
        lastTimestamp = timestamp;
        // ID偏移组合生成最终的ID,并返回ID
        long nextId = ((timestamp - twepoch) << timestampLeftShift)
                | (datacenterId << datacenterIdShift)
                | (workerId << workerIdShift) | sequence;

        return nextId;
    }

    private long tilNextMillis(final long lastTimestamp) {
        long timestamp = this.timeGen();
        while (timestamp <= lastTimestamp) {
            timestamp = this.timeGen();
        }
        return timestamp;
    }

    private long timeGen() {
        return System.currentTimeMillis();
    }

    /**
     *
     * 获取 maxWorkerId
     *
     */
    protected static long getMaxWorkerId(long datacenterId, long maxWorkerId) {
        StringBuffer mpid = new StringBuffer();
        mpid.append(datacenterId);
        String name = ManagementFactory.getRuntimeMXBean().getName();
        if (!name.isEmpty()) {
            /*
             * GET jvmPid
             */
            mpid.append(name.split("@")[0]);
        }
        /*
         * MAC + PID 的 hashcode 获取16个低位
         */
        return (mpid.toString().hashCode() & 0xffff) % (maxWorkerId + 1);
    }

    /**
     *
     * 数据标识id部分
     *
     */
    protected static long getDatacenterId(long maxDatacenterId) {
        long id = 0L;
        try {
            InetAddress ip = InetAddress.getLocalHost();
            NetworkInterface network = NetworkInterface.getByInetAddress(ip);
            if (network == null) {
                id = 1L;
            } else {
                byte[] mac = network.getHardwareAddress();
                id = ((0x000000FF & (long) mac[mac.length - 1])
                        | (0x0000FF00 & (((long) mac[mac.length - 2]) << 8))) >> 6;
                id = id % (maxDatacenterId + 1);
            }
        } catch (Exception e) {
            System.out.println(" getDatacenterId: " + e.getMessage());
        }
        return id;
    }


    public static void main(String[] args) {
        //推特  26万个不重复的ID
        IdWorker idWorker = new IdWorker(0,0);
        for (int i = 0; i <2600 ; i++) {
            System.out.println(idWorker.nextId());
        }
    }

}
5.tensquare-base 基础微服务
依赖
<project xmlns="http://maven.apache.org/POM/4.0.0"
         xmlns:xsi="http://www.w3.org/2001/XMLSchema-instance"
         xsi:schemaLocation="http://maven.apache.org/POM/4.0.0 http://maven.apache.org/xsd/maven-4.0.0.xsd">
    <parent>
        <artifactId>tensquare-parentartifactId>
        <groupId>com.tensquaregroupId>
        <version>1.0-SNAPSHOTversion>
    parent>
    <modelVersion>4.0.0modelVersion>

    <groupId>com.tensquaregroupId>
    <artifactId>tensquare-baseartifactId>
    <dependencies>

        <dependency>
            <groupId>org.springframework.cloudgroupId>
            <artifactId>spring-cloud-starter-netflix-eureka-clientartifactId>
        dependency>

        <dependency>
            <groupId>org.springframework.bootgroupId>
            <artifactId>spring-boot-starter-data-jpaartifactId>
        dependency>
        <dependency>
            <groupId>mysqlgroupId>
            <artifactId>mysql-connector-javaartifactId>
        dependency>

        <dependency>
            <groupId>com.tensquaregroupId>
            <artifactId>tensquare-commonartifactId>
            <version>1.0-SNAPSHOTversion>
        dependency>


    dependencies>

project>
application.yml配置文件
server:
  port: 9001
spring:
  application:
    name: tensquare-base #微服务名称,不能有下划线,在SpringCloud中使用到
  datasource:
    driver-class-name: com.mysql.jdbc.Driver
    url: jdbc:mysql://192.168.139.128:3306/tensquare_base?useUnicode=true&characterEncoding=UTF-8
    username: root
    password: 123456
  jpa:
    show-sql: true
    generate-ddl: false
    database: mysql
#Eureka注册中心
eureka:
  client:
    register-with-eureka: true
    fetch-registry: true
    service-url:
      defaultZone: http://127.0.0.1:10086/eureka
  instance:
    instance-id: ${spring.application.name}:${server.port}
    ip-address: 127.0.0.1
    prefer-ip-address: true
日志的xml文件
<configuration>

    <property name="LOG_HOME" value="d:/logs"/>


    <appender name="CONSOLE" class="ch.qos.logback.core.ConsoleAppender">
        <encoder>

            <pattern>%d{yyyy-MM-dd HH:mm:ss.SSS} [%thread] %-5level %logger{36} - %msg%npattern>
            <charset>utf8charset>
        encoder>
    appender>


    <appender name="FILE" class="ch.qos.logback.core.rolling.RollingFileAppender">
        <rollingPolicy class="ch.qos.logback.core.rolling.TimeBasedRollingPolicy">

            <fileNamePattern>${LOG_HOME}/tensquare-base.%d{yyyy-MM-dd}.logfileNamePattern>
        rollingPolicy>
        <encoder>
            <pattern>%d{yyyy-MM-dd HH:mm:ss.SSS} [%thread] %-5level %logger{36} - %msg%npattern>
        encoder>
    appender>


    <appender name="ASYNC" class="ch.qos.logback.classic.AsyncAppender">

        <discardingThreshold>0discardingThreshold>

        <queueSize>512queueSize>

        <appender-ref ref="FILE"/>
    appender>


    <logger name="org.apache.ibatis.cache.decorators.LoggingCache" level="DEBUG" additivity="false">
        <appender-ref ref="CONSOLE"/>
    logger>
    <logger name="org.springframework.boot" level="DEBUG"/>
    <root level="info">

        <appender-ref ref="FILE"/>
        <appender-ref ref="CONSOLE"/>
    root>
configuration>
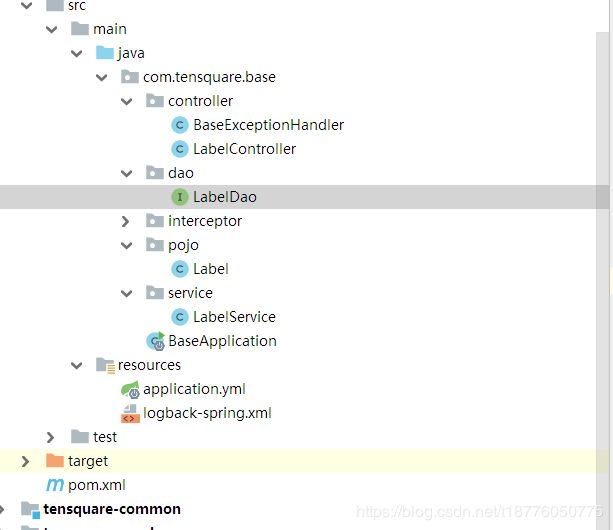
结构
pojo
package com.tensquare.base.pojo;

import lombok.Data;

import javax.persistence.Entity;
import javax.persistence.Id;
import javax.persistence.Table;
import java.io.Serializable;

@Entity
@Table(name="tb_label")
@Data
public class Label implements Serializable {

    @Id
    private Long id;
    private String labelname; //标签名称
    private String state; //状态
    private Long count; //使用数量
    private String recommend; //是否推荐
    @Column(name ="fans") //默认加上了和属性名一样
    private Long fans; //粉丝数

     @Transient   //忽略属性
    private String createUser;//创建时间
}
dao
package com.tensquare.base.pojo;

import lombok.Data;

import javax.persistence.Entity;
import javax.persistence.Id;
import javax.persistence.Table;
import java.io.Serializable;

@Entity
@Table(name="tb_label")
@Data
public class Label implements Serializable {

    @Id
    private Long id;
    private String labelname; //标签名称
    private String state; //状态
    private Long count; //使用数量
    private String recommend; //是否推荐
    private Long fans; //粉丝数
}
service
package com.tensquare.base.service;


import com.tensquare.base.dao.LabelDao;
import com.tensquare.base.pojo.Label;
import org.springframework.beans.factory.annotation.Autowired;
import org.springframework.stereotype.Service;
import utils.IdWorker;

import java.util.List;


@Service
public class LabelService {

    @Autowired
    private LabelDao labelDao;

    @Autowired
    private IdWorker idWorker;

    //查询所有
    public List<Label> findAll(){
        return labelDao.findAll();
    }

    //根据id查询一个
    public Label findById(Long id) {
        return labelDao.findById(id).get();
    }

    //新增一个
    public void add(Label label) {
        //指定id
        label.setId(idWorker.nextId());
        labelDao.save(label);
    }

    //修改一个
    public void update(Label label) {
        labelDao.save(label);
    }

    //删除
    public void deleteById(Long id) {
        labelDao.deleteById(id);
    }
}
controller
package com.tensquare.base.controller;

import com.tensquare.base.pojo.Label;
import com.tensquare.base.service.LabelService;
import entity.Result;
import entity.StatusCode;
import org.springframework.beans.factory.annotation.Autowired;
import org.springframework.web.bind.annotation.*;

@RestController
@RequestMapping("/label")
public class LabelController {

    @Autowired
    private LabelService labelService;

    //查询所有
    @RequestMapping(method = RequestMethod.GET)
    public Result findAll(){
        return new Result(true, StatusCode.OK,"查询成功",labelService.findAll());
    }

    //查询一个
    @RequestMapping(value="/{id}")
    public Result findById(@PathVariable Long id){
        return new Result(true, StatusCode.OK, "查询成功", labelService.findById(id));
    }

    //新增一个
    @RequestMapping(method = RequestMethod.POST)
    public Result add(@RequestBody Label label){
        labelService.add(label);
        return new Result(true, StatusCode.OK, "添加成功");
    }

    //更新一个
    @RequestMapping(value="/{id}",method = RequestMethod.PUT)
    public Result update(@PathVariable Long id, @RequestBody Label label){
        label.setId(id);//以url中的id为主
        labelService.update(label);
        return new Result(true, StatusCode.OK, "修改成功");
    }

    //删除一个
    @RequestMapping(value="/{id}",method = RequestMethod.DELETE)
    public Result deleteById(@PathVariable  Long id){
        labelService.deleteById(id);
        return new Result(true, StatusCode.OK, "删除成功");
    }

}
启动类
package com.tensquare.base;

import org.springframework.boot.SpringApplication;
import org.springframework.boot.autoconfigure.SpringBootApplication;
import org.springframework.cloud.client.discovery.EnableDiscoveryClient;
import org.springframework.context.annotation.Bean;
import org.springframework.context.annotation.ComponentScan;
import utils.IdWorker;
/**
 * @author thh
 * @功能描述 基础微服务
 * @date 2020/01/25 19:21
 * @Param
 * @return
 **/
@SpringBootApplication
@EnableDiscoveryClient
public class BaseApplication {

	public static void main(String[] args) {
		SpringApplication.run(BaseApplication.class, args);
	}

	/**
	 * 把idwork给Spring容器管理
	 */
	@Bean
	public IdWorker idWorker() {
		return new IdWorker();
	}

}
统一异常处理
package com.tensquare.base.controller;

import entity.Result;
import entity.StatusCode;
import org.springframework.web.bind.annotation.ControllerAdvice;
import org.springframework.web.bind.annotation.ExceptionHandler;
import org.springframework.web.bind.annotation.ResponseBody;

/**
 * 全局异常
 */
@ControllerAdvice
public class BaseExceptionHandler {

    @ExceptionHandler(Exception.class)
    @ResponseBody
    public Result error1(Exception e){
        return new Result(false, StatusCode.ERROR,"基础微服务异常:"+e.getMessage());
    }

}
拦截器
package com.tensquare.base.interceptor;


import org.slf4j.Logger;
import org.slf4j.LoggerFactory;
import org.springframework.stereotype.Component;
import org.springframework.web.servlet.handler.HandlerInterceptorAdapter;

import javax.servlet.http.HttpServletRequest;
import javax.servlet.http.HttpServletResponse;

/**
 * @author thh
 * 拦截器  (项目请求数据存入日志)  可以在本类中写入自己定义的逻辑拦截
 */
@Component
public class CustomInterceptor extends HandlerInterceptorAdapter {
    //记录器
    private static final Logger LOGGER = LoggerFactory.getLogger(Exception.class);


    /**
     * @author thh
     * @功能描述 拦截器
     * @date 2020/01/25 21:51
     * @Param [request, response, handler]
     * @return boolean
     **/
    @Override
    public boolean preHandle(HttpServletRequest request, HttpServletResponse response, Object handler) {
        //打印请求
        String method = request.getMethod();
        String uri = request.getRequestURI();//返回请求行中的资源名称
        String url = request.getRequestURL().toString();//获得客户端发送请求的完整url
        String ip = request.getRemoteAddr();//返回发出请求的IP地址
        String params = request.getQueryString();//返回请求行中的参数部分
        String id = null;
        LOGGER.info(String.format("%n请求url: %s%n请求方式: %s%nuri: %s%n请求ip: %s%n请求参数: %s%n请求结果: %s", url, method, uri, ip, params, "通过"));
        return  true;
    }


}
mvc配置文件
package com.tensquare.base.interceptor;

import org.springframework.context.annotation.Configuration;
import org.springframework.web.servlet.config.annotation.EnableWebMvc;
import org.springframework.web.servlet.config.annotation.InterceptorRegistry;
import org.springframework.web.servlet.config.annotation.WebMvcConfigurer;

@Configuration
@EnableWebMvc
public class CustomWebMvcConfigurerAdapter implements WebMvcConfigurer {


    @Override
    public void addInterceptors(InterceptorRegistry registry) {
        registry.addInterceptor(new CustomInterceptor()).addPathPatterns("/**");  //对来自/** 这个链接来的请求进行拦截
    }
}
6.JAP条件查询以及JAP分页查询
1)内置的接口的方法查询
2)JPQL查询: @Query(value=“JPQL语句”) 如果是更新操作加一个注解@Modifying
3)SQL查询:@Query(value=“sql语句”,nativeQuery=true)
4)方法命名规则查询: findBy开头…
5)动态查询: 查询条件不固定,Specification
controller
	/**
	 * 分页条件查询
	 * @param page 当前页
	 * @param size 页大小
	 * @param label 查询条件
	 * @return
	 */
	@PostMapping("/search/{page}/{size}")
	public Result search(@PathVariable("page") int page, @PathVariable("size") int size,@RequestBody Label label) {
		//分页查询
		Page<Label> pageBean = labelService.search(page,size,label);
		//当前页数据
		List<Label> rows = pageBean.getContent();
		//总记录数
		long totalElements = pageBean.getTotalElements();
		//返回分页结果集
		return new Result(true,StatusCode.OK,"分页条件查询成功",new PageResult<Label>(totalElements, rows));
	}
service
/**
* 分页条件查询
* @param page
* @param size
* @param label
* @return
*/
public Page<Label> search(int page, int size, Label label) {
//拼接查询条件
//Specification
//分页条件
//PageRequest pageable = PageRequest.of(page-1, size);
//分页查询
return labelDao.findAll(createSpec(label), PageRequest.of(page-1, size));
}
private Specification<Label> createSpec(Label label) {
return new Specification<Label>() {
/**
* root: 用于获取实体类的属性
* query: 查询顶层接口
* cb: 动态构建查询条件
*/
@Override
public Predicate toPredicate(Root<Label> root, CriteriaQuery<?> query, CriteriaBuilder cb) {
List<Predicate> preList = new ArrayList<Predicate>();
//根据标签名称模糊查询
if(label.getLabelname()!=null && !"".equals(label.getLabelname())) {
//获取类型
Path<String> path = root.get("labelname");
//构建查询条件
Predicate like = cb.like(path, "%"+label.getLabelname()+"%");
//存入查询条件
preList.add(like);
}
//根据状态精确查询
if(label.getState()!=null && !"".equals(label.getState())) {
//获取类型
Path<String> path = root.get("state");
//构建查询条件
Predicate e = cb.equal(path, label.getState());
//存入查询条件
preList.add(e);
}
//===========================
//实例化查询的条件的数组
Predicate[] predicate = new Predicate[preList.size()];
//把list中的Predicate 转存入数组中
predicate = preList.toArray(predicate);
//执行查询
return cb.and(predicate);
}
};
}
小结
JPASpecificationExecutor接口的使用

重点看下base模块中的service类就可以了

findAll(Specification spec):  组合条件查询
Page<> findAll(Specification spec, Pageable pageable): 组合条件+分页查询
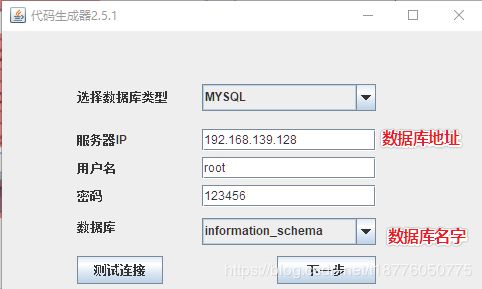
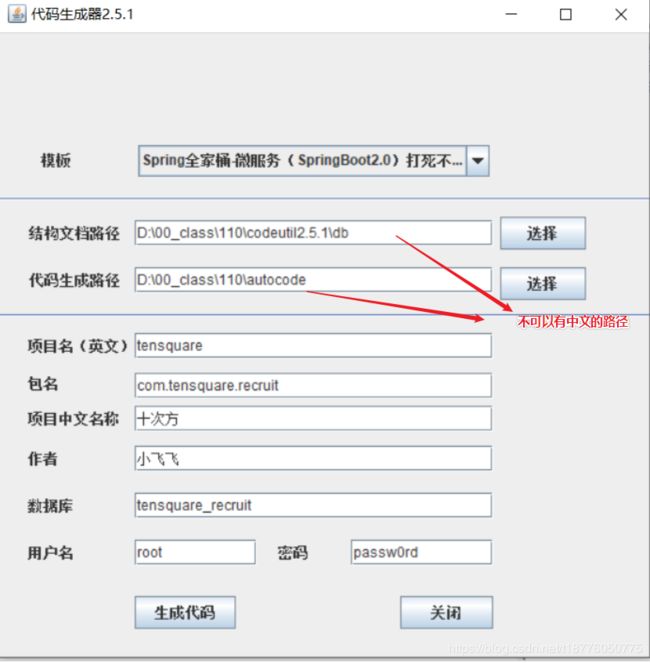
7.代码生成器的使用
直接复制到项目的parent路径下导入
测试成功!
8.tensquare-recruit 招聘微服务
目标:学习jap的mapper的命名法
招聘微服务:热门企业列表
核心代码:
- controller
/**
 * 热门企业
 */
@RequestMapping(value = "/search/hotlist",method = RequestMethod.GET)
public Result hotlist(){
   List<Enterprise> list = enterpriseService.hotlist();
   return new Result(true,StatusCode.OK,"查询成功",list);
}
- service
/**
 * 热门企业
 */
public List<Enterprise> hotlist(){
   /**
    * 查询ishot=1的企业列表
    *  命名查询实现
    */
   return enterpriseDao.findTop9ByIshot("1");
}
- dao
/**
 * 热门企业
 */
public List<Enterprise> findTop9ByIshot(String ishot);
小结 :
使用SpringDataJPA如何查询ishot为1的数据?
声明方法:findByIshot("1")
招聘微服务:推荐职位和最新职位
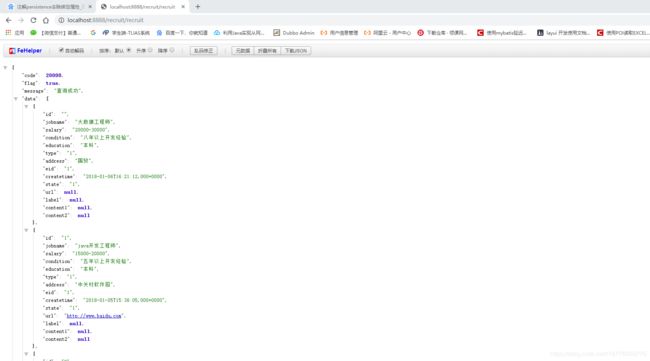
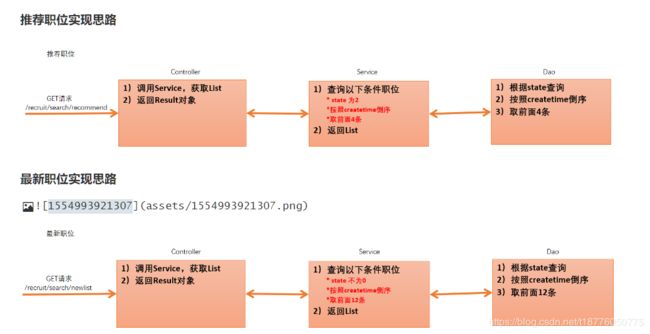
关键步骤和核心代码
1)Controller
/**
 * 推荐职位
 */
@RequestMapping(value = "/search/recommend",method = RequestMethod.GET)
public Result recommend(){
   List<Recruit> list = recruitService.recommend();
   return new Result(true,StatusCode.OK,"查询成功",list);
}

/**
 * 最新职位
 */
@RequestMapping(value = "/search/newlist",method = RequestMethod.GET)
public Result newlist(){
   List<Recruit> list = recruitService.newlist();
   return new Result(true,StatusCode.OK,"查询成功",list);
}
2)Service
/**
 * 推荐职位
 */
public List<Recruit> recommend(){
   /**
    *  state为2 : findByState("2")
       按照createtime倒序: OrderByCreatetimeDesc
       取前面4条:  Top4
    */
   return recruitDao.findTop4ByStateOrderByCreatetimeDesc("2");
}

/**
 * 最新职位
 */
public List<Recruit> newlist(){
   /**
    *   state不为0 : findByStateNot("0")
        按照createtime倒序: OrderByCreatetimeDesc
        取前面12条: Top12
    */
   return recruitDao.findTop12ByStateNotOrderByCreatetimeDesc("0");
}
- dao
/**
 * 推荐职位
 */
public List<Recruit> findTop4ByStateOrderByCreatetimeDesc(String state);

/**
 * 最新职位
 */
public List<Recruit> findTop12ByStateNotOrderByCreatetimeDesc(String state);
小结
使用SpringDataJPA如何取出前几条数据?
Top4: 前4条
OrderByXXXDesc: 排序
总结Spring Data JPA命名查询:
[外链图片转存失败,源站可能有防盗链机制,建议将图片保存下来直接上传(img-x3B89nts-1581138771879)(十次方笔记.assets/ .png)]
9.tensquare-qa:需求分析及代码生成
- 目标
明确问答微服务的需求
最新问答:根据标签id查询问答(多表查询),分页,且按照replytime倒序显示
热门问答:根据标签id查询问答(多表查询),分页,且按照reply倒序显示
等待问答:根据标签id查询问答(多表查询),分页,且查询reply为0的问答
代码生成器生成问答微服务
[外链图片转存失败,源站可能有防盗链机制,建议将图片保存下来直接上传(img-n5OpJ0Y9-1581138771879)(十次方笔记.assets/1580026707361.png)]
- 小结
请问SpirngDataJPA如何实现多表查询?
@Query注解来完成
Query(value=“JPQL语句”): JPQL中出现类名或属性名称
问答微服务:最新问答-Controller和Service和Dao
[外链图片转存失败,源站可能有防盗链机制,建议将图片保存下来直接上传(img-wB1R73br-1581138771879)(十次方笔记.assets/1580028036369.png)]
1)Controller
	@RequestMapping(value="/newlist/{labelid}/{page}/{size}",method= RequestMethod.GET)
	public Result newlist(@PathVariable String labelid ,@PathVariable int page, @PathVariable int size){
		//查询没有标签id的内容
		if("0".equals(labelid)){
			Page<Problem> pageBean =    problemService.findAll(page,size);
			return new Result(true,StatusCode.OK,"查询成功",new PageResult<Problem>(pageBean.getTotalElements(),pageBean.getContent()));
		}
		//多表查询
		Page<Problem> pageBean2 = problemService.newlist(labelid,page,size);
		return new Result(true,StatusCode.OK,"查询成功",new PageResult<Problem>(pageBean2.getTotalElements(),pageBean2.getContent()));
	}
2)Service
/**
	 * 分页查询
	 * @param page
	 * @param size
	 * @return
	 */
	public Page<Problem> findAll(int page, int size) {
		return problemDao.findAll(PageRequest.of(page-1,size));
	}

	//多表查询:  分页条件永远放到参数的最后
	public Page<Problem> newlist(String labelid, int page, int size) {
		return problemDao.newlist(labelid, PageRequest.of(page-1,size));
	}
3)Dao
package com.tensquare.qa.dao;

import org.springframework.data.domain.Page;
import org.springframework.data.domain.PageRequest;
import org.springframework.data.domain.Pageable;
import org.springframework.data.jpa.repository.JpaRepository;
import org.springframework.data.jpa.repository.JpaSpecificationExecutor;

import com.tensquare.qa.pojo.Problem;
import org.springframework.data.jpa.repository.Query;

/**
 * 数据访问接口
 * @author Administrator
 *
 */
public interface ProblemDao extends JpaRepository<Problem,String>,JpaSpecificationExecutor<Problem>{


    /**
     * 最新问答列表
     * @param labelid
     * @param of   : 必须是分页条件的接口,不能写实现类
     * @return
     */
    @Query(value="SELECT * FROM tb_problem,tb_pl WHERE id = problemid AND labelid=?1 ORDER BY replytime DESC",nativeQuery = true)
    public Page<Problem> newlist(String labelid, Pageable of);
}
- 小结
使用SpringDataJPA如何实现分页查询?
无论在JpaSpecification,命名查询,还是@Query注解都统一使用:
Pageable接口实现: PageRequest.of(page-1,size)
热门问答和等待问答
[外链图片转存失败,源站可能有防盗链机制,建议将图片保存下来直接上传(img-fMR9HrE2-1581138771880)(十次方笔记.assets/1580030458708.png)]
1)Controller
	// 查询热门问答
    @RequestMapping(value="/hotlist/{labelid}/{page}/{size}",method= RequestMethod.GET)
    public Result hotlist(@PathVariable String labelid ,@PathVariable Integer page ,@PathVariable Integer size){
        Page<Problem> pageBean = problemService.hotlist(labelid,page,size);
        return new Result(true,StatusCode.OK,"查询热门问答成功",new PageResult<Problem>(pageBean.getTotalElements(),pageBean.getContent()));
    }

    //查询等待问
    @RequestMapping(value="/waitlist/{labelid}/{page}/{size}",method= RequestMethod.GET)
    public Result waitlist(@PathVariable String labelid ,@PathVariable Integer page ,@PathVariable Integer size){
        Page<Problem> pageBean = problemService.waitlist(labelid,page,size);
        return new Result(true,StatusCode.OK,"查询等待问答成功",new PageResult<Problem>(pageBean.getTotalElements(),pageBean.getContent()));
    }
2)Service
public Page<Problem> hotlist(String labelid, Integer page, Integer size) {
		return problemDao.hotlist(labelid,PageRequest.of(page-1,size));
	}

	public Page<Problem> waitlist(String labelid, Integer page, Integer size) {
		return problemDao.waitlist(labelid,PageRequest.of(page-1,size));
	}
3)Dao
// 热门问答
    @Query(value="SELECT * FROM tb_problem,tb_pl WHERE id = problemid AND labelid = ?1  ORDER BY reply DESC",nativeQuery = true)
    public Page<Problem> hotlist(String labelid, Pageable of);

    //等待回答
    @Query(value="SELECT * FROM tb_problem,tb_pl WHERE id = problemid AND labelid = ?1 AND reply=0 ORDER BY createtime DESC",nativeQuery = true)
    public Page<Problem> waitlist(String labelid, Pageable of);
- 小结
热门回答和最新回答的需求差别在哪里?
1)最新问答: 按照replytime(最新回复时间)倒序显示
热门问答: 按照reply (回复数) 倒序显示
10.tensquare-article 文章微服务(redis)
用代码生成器生成代码 修改端口 gateway增加映射
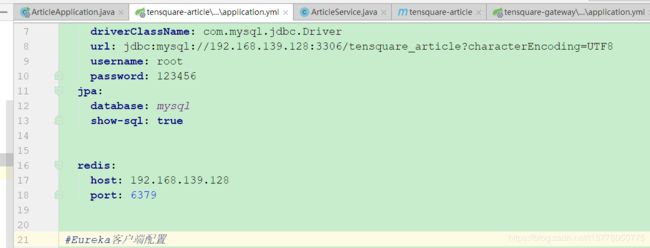
SpringDataRedis:缓存文章详情 在yml增加redis配置
- yml配置
spring:
  redis:
    host: 192.168.139.128
  	port: 6379
- 依赖
	  <dependency>
		  <groupId>org.springframework.bootgroupId>
		  <artifactId>spring-boot-starter-data-redisartifactId>
	  dependency>
- 在需要使用spring-data-redis的地方注入RedisTemplate对象
@Autowired
private RedisTemplate redisTemplate;
使用SpringDataRedis实现对文章详情的缓存
具体效果是:
1)第一次访问新文章的时候,没有缓存,从mysql数据库查询出来,然后放入redis缓存
2)第n次访问的时候,已经有缓存,直接从redis缓存取出
使用SpringDataRedis清除Redis缓存
使用SpringDataRedis设置缓存过期时间
- 关键步骤和核心代码
使用SpringDataRedis实现对文章详情的缓存
/**
 * 根据ID查询实体
 * @param id
 * @return
 */
public Article findById(String id) {
   //1.从redis查询是否有该文章的缓存
   Article article = (Article)redisTemplate.opsForValue().get("article_"+id);

   if(article==null) {
      //1.1 没有,从数据库查询出来,放入redis缓存
      article = articleDao.findById(id).get();

      //放入redis缓存
      redisTemplate.opsForValue().set("article_"+id,article);
   }

   //1.2 有,直接返回即可
   return article;
}
使用SpringDataRedis清除Redis缓存
/**
 * 修改
 * @param article
 */
public void update(Article article) {
   articleDao.save(article);
   //清除缓存
   redisTemplate.delete("article_"+article.getId());
}

/**
 * 删除
 * @param id
 */
public void deleteById(String id) {
   articleDao.deleteById(id);
   //清除缓存
   redisTemplate.delete("article_"+id);
}
使用SpringDataRedis设置缓存过期时间
//设置20秒后缓存过期
redisTemplate.opsForValue().set("article_"+id,article,20, TimeUnit.SECONDS);
- 小结
如何使用SpringDataRedis存入和取出数据?
如何使用SpringDataRedis删除数据?
如何使用SpringDataRedis设置缓存过期时长?
RedisTemplate用法:
[外链图片转存失败,源站可能有防盗链机制,建议将图片保存下来直接上传(img-L6AHNMuj-1581138771881)(十次方笔记.assets/1580033550235.png)]
11.tensquare-gathering 活动微服务
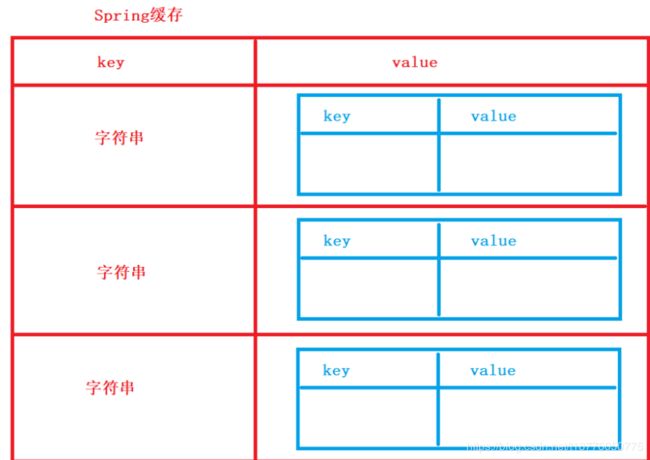
使用SpringCache实现活动详情缓存
具体效果是:
1)第一次访问新活动时候,没有缓存,从mysql数据库查询出来,然后放入springcache缓存
2)第n次访问的时候,已经有缓存,直接从springcache缓存取出
使用SpringCache清除缓存
重点:
Redis 和 SpringCache选择
1)分布式下,可以选择redis ,可以设置过期时间,可以持久化
2)单体系统,可以选择SpringCache,不可以设置过期时间,不可以持久化
虽然说现在是微服务 不过还是需要知道如何使用springcache 当成技术点来学习
- 关键步骤和核心代码
使用SpringCache实现活动详情缓存
1)在启动类开启SpringCache功能
@SpringBootApplication
@EnableCaching // 开启SpringCache功能
public class GatheringApplication {
2)在需要缓存的方法上面加上@Cacheable注解
@Cacheable(value = "gathering",key = "#id")
public Gathering findById(String id) {
   return gatheringDao.findById(id).get();
}
3)可以使用@CacheEvict清除缓存
/**
 * 修改
 * @param gathering
 */
@CacheEvict(value = "gathering",key = "#gathering.id" )
public void update(Gathering gathering) {
   gatheringDao.save(gathering);
}

/**
 * 删除
 * @param id
 */
@CacheEvict(value = "gathering",key = "#id")
public void deleteById(String id) {
   gatheringDao.deleteById(id);
}
12.tensquare_spit吐槽微服务(springdata-mongodb)
- 关键步骤和核心代码
1)建立吐槽微服务模块
2)导入spring-data-mongodb坐标
<project xmlns="http://maven.apache.org/POM/4.0.0"
	xmlns:xsi="http://www.w3.org/2001/XMLSchema-instance"
	xsi:schemaLocation="http://maven.apache.org/POM/4.0.0 http://maven.apache.org/xsd/maven-4.0.0.xsd">
	<modelVersion>4.0.0modelVersion>
	<parent>
		<groupId>com.tensquaregroupId>
		<artifactId>tensquare_parentartifactId>
		<version>1.0-SNAPSHOTversion>
	parent>
	<artifactId>tensquare_spitartifactId>
	<dependencies>
		<dependency>
			<groupId>org.springframework.bootgroupId>
			<artifactId>spring-boot-starter-data-mongodbartifactId>
		dependency>
		<dependency>
			<groupId>com.tensquaregroupId>
			<artifactId>tensquare_commonartifactId>
			<version>1.0-SNAPSHOTversion>
		dependency>

		<dependency>
			<groupId>org.springframework.cloudgroupId>
			<artifactId>spring-cloud-starter-netflix-eureka-clientartifactId>
		dependency>
	dependencies>
project>
3)编写application.yml,连接mongoDB
server:
  port: 9005
spring:
  application:
    name: tensquare-spit
  data:
    mongodb:
      host: 192.168.207.111  # ip或者主机名
      port: 27017 #端口号
      database: spitdb
#Eureka客户端配置
eureka:
  client:
    service-url:
      defaultZone: http://127.0.0.1:10086/eureka
  instance:
    lease-renewal-interval-in-seconds: 5 # 每隔5秒发送一次心跳
    lease-expiration-duration-in-seconds: 10 # 10秒不发送就过期
    prefer-ip-address: true
    ip-address: 127.0.0.1
    instance-id: ${spring.application.name}:${server.port}
- 编写启动类
/**
 * 吐槽微服务
 */
@SpringBootApplication
public class SpitApplication {

    public static void main(String[] args) {
        SpringApplication.run(SpitApplication.class,args);
    }

    @Bean
    public IdWorker idWorker(){
        return new IdWorker();
    }

}
- 小结
总结整合SpringDataMongoDB的过程
1)导入spirng-data-mongodb坐标
2)application.yml连接mongodb
吐槽微服务:实现CRUD操作
使用SpringDataMongoDB实现吐槽的CRUD功能
- 关键步骤和核心代码
1)编写Pojo(*)
/**
 * 吐槽
 */
@Document(collection = "spit") // 映射集合(相当于映射表)
@Data
public class Spit implements Serializable{

    @Id
    private String id;

   // @Field("content")   相当于JPA的@Column
    private String content;
    private Date publishtime;
    private String userid;
    private String nickname;
    private Integer visits;
    private Integer thumbup;
    private Integer share;
    private Integer comment;
    private String state;
    private String parentid;//父id

}
2)编写Dao(*)
/**
 * 吐槽dao接口
 * MongoRepository类似于JpaRepository,拥有CRUD方法
 */
public interface SpitDao extends MongoRepository<Spit,String>{
}
3)编写Service
/**
 * 吐槽service
 */
@Service
public class SpitService {

    @Autowired
    private SpitDao spitDao;

    @Autowired
    private IdWorker idWorker;

    /**
     * 查询所有
     */
    public List<Spit> findAll(){
        return spitDao.findAll();
    }

    /**
     * 查询一个
     */
    public Spit findById(String id){
        return spitDao.findById(id).get();
    }


    /**
     * 添加
     */
    public void add(Spit spit){
        //设置id
        spit.setId(idWorker.nextId()+"");
        spitDao.save(spit);
    }

    /**
     * 修改
     */
    public void update(Spit spit){ // spit必须带有数据库存在的id
        spitDao.save(spit);
    }

    /**
     * 删除
     */
    public void delete(String id){
        spitDao.deleteById(id);
    }

}
4)编写Controller
/**
 * 吐槽Controller
 */
@RequestMapping("/spit")
@RestController  // @RestController = @Controller+@ResponseBody
@CrossOrigin //解决前端跨域请求问题
public class SpitController {

    @Autowired
    private SpitService spitService;

    /**
     * 查询所有
     */
    @RequestMapping(method = RequestMethod.GET)
    public Result findAll(){
        return new Result(true, StatusCode.OK,"查询成功",spitService.findAll());
    }

    /**
     * 查询一个
     */
    @RequestMapping(value = "/{id}" ,method = RequestMethod.GET)
    public Result findById(@PathVariable String id){
        return new Result(true,StatusCode.OK,"查询成功",spitService.findById(id));
    }

    /**
     * 添加
     */
    @RequestMapping(method = RequestMethod.POST)
    public Result add(@RequestBody Spit spit){
        spitService.add(spit);
        return new Result(true,StatusCode.OK,"添加成功");
    }

    /**
     * 修改
     */
    @RequestMapping(value = "/{id}",method = RequestMethod.PUT)
    public Result update(@PathVariable String id,@RequestBody Spit spit){
        spit.setId(id);
        spitService.update(spit);
        return new Result(true,StatusCode.OK,"修改成功");
    }

    /**
     * 删除
     */
    @RequestMapping(value = "/{id}",method = RequestMethod.DELETE)
    public Result delete(@PathVariable String id){
        spitService.delete(id);
        return new Result(true,StatusCode.OK,"删除成功");
    }


}
- 小结
请问如何映射实体与mongoDB集合?
@Document(colletion=“集合名称”)
请问实现CRUD操作,Dao需要继承哪个接口?
MongoRepository
吐槽微服务:根据上级ID查询吐槽数据
- 目标
(根据吐槽ID查询其下面的评论数据)
评论数据
- 关键步骤和核心代码
Controller
/**
 * 根据上级ID查询吐槽
 */
@RequestMapping(value = "/comment/{parentid}/{page}/{size}",method = RequestMethod.GET)
public Result findByParentid(@PathVariable String parentid,@PathVariable int page,@PathVariable int size){
    Page<Spit> pageData = spitService.findByParentid(parentid,page,size);
    return new Result(true,StatusCode.OK,"查询成功",new PageResult<>(pageData.getTotalElements(),pageData.getContent()));
}
Service
/**
 * 根据上级ID查询吐槽
 */
public Page<Spit> findByParentid(String parentid,int page,int size){
    /**
     * 使用命名查询+Pageable
     */
    return spitDao.findByParentid(parentid,PageRequest.of(page-1,size));
}
Dao
public Page<Spit> findByParentid(String parentid, Pageable pageable);
- 小结
请问SpringDataMongoDB可以使用命名查询吗?如何实现分页?
可以使用命名查询!传入Pageable的实现类对象可以实现分页:PageRequest.of(page-1,size)
吐槽微服务:吐槽点赞(第一种方案)
- 目标
吐槽一次,让吐槽集合中的thumbup字段值+1
- 关键步骤和核心代码
Controller
/**
 * 吐槽点赞
 */
@RequestMapping(value = "/thumbup/{id}",method = RequestMethod.PUT)
public Result thumbup(@PathVariable String id){
    spitService.thumbup(id);
    return new Result(true,StatusCode.OK,"点赞成功");
}
Service
/**
 * 吐槽点赞(第一种方案)
 */
public void thumbup(String id){
    //1.先查询出整个吐槽对象
    Spit spit = findById(id);
    //2.对点赞数+1
    spit.setThumbup(spit.getThumbup()+1);
    //3.把点赞数写回到表中去
    update(spit);
}
- 小结
这种方案,需要操作两次mongoDB数据库,效率不高!!!
吐槽微服务:吐槽点赞(第二种方案)
- 目标
- 关键步骤和核心代码
代码:
//mongoTemplate: 封装了MongoDB对集合所有操作的方法
@Autowired
private MongoTemplate mongoTemplate;

 /**
  * 吐槽点赞(第二种方案)--效率更高
  */
 public void thumbup(String id){

     //创建Query对象封装: {"_id":"1086835055109640192"}
     Query query = new Query();
     query.addCriteria(Criteria.where("_id").is(id));

     //创建更新对象:{$inc:{"thumbup":NumberInt(1)}}
     Update update = new Update();
     update.inc("thumbup",1);

     //底层:db.spit.update(  {"_id":"1086835055109640192"},{$inc:{"thumbup":NumberInt(1)}}  )
     mongoTemplate.updateFirst(query,update,"spit");

 }
- 小结
总结mongoTemplate实现列增长步骤
mongoTemplate.updateFirst(query,update,“spit”);
吐槽微服务:控制用户不能重复点赞
- 目标
使用Redis记录用户吐槽点赞记录,实现用户不能重复点赞功能
- 关键步骤和核心代码
1)在Docker启动redis
2)在吐槽微服务引入spring-data-redis坐标
<dependency>
    <groupId>org.springframework.bootgroupId>
    <artifactId>spring-boot-starter-data-redisartifactId>
dependency>
3)配置application.yml连接redis
redis:
  host: 192.168.139.128
4)在需要的位置注入RedisTemplate使用
public Result thumbup(@PathVariable String id){
    //模拟当前登录用户ID
    String userid = "1001";

    //1.从redis查询该用户是否已经点赞
    String flag = (String)redisTemplate.opsForValue().get("thumbup_"+userid+"_"+id);

    //1.1 如果已经点赞,提示用户不能重复点赞
    if(flag!=null && flag.equals("1")){
        return new Result(false,StatusCode.REPEATE_ERROR,"不能重复点赞");
    }

    //1.2 如果没有点赞过,则进行点赞
    spitService.thumbup(id);

    //把用户的点赞保存redis去
    redisTemplate.opsForValue().set("thumbup_"+userid+"_"+id,"1",1, TimeUnit.DAYS);

    return new Result(true,StatusCode.OK,"点赞成功");
}
- 小结
总结控制用户不能重复点赞的过程
吐槽微服务:完善增加吐槽(增加回复数)
- 目标
完善增加吐槽方法,补充吐槽评论后,吐槽的回复数+1的效果
- 关键步骤和核心代码
查询的方法也变了:查询出来的列表的parentid是为空
service:
	//查询所有
	public List<Spit> findAll(){
		//return spitDao.findAll();
		return spitDao.findByParentidIsNull();
	}
dao:
	/**
	 * 查询的是非评论吐槽数据
	 * @return
	 */
	public List<Spit> findByParentidIsNull();
/**
 * 添加
 */
public void add(Spit spit){
    //设置id
    spit.setId(idWorker.nextId()+"");
    spitDao.save(spit);

    //如果该信息为评论,则添加评论对应的吐槽的回复数+1
    if( spit.getParentid()!=null && !spit.getParentid().equals("")){
        Query query = new Query();
        query.addCriteria(Criteria.where("_id").is(spit.getParentid()));

        Update update = new Update();
        update.inc("comment",1);

        mongoTemplate.updateFirst(query,update,"spit");
    }

}
- 小结
总结添加回复数的过程
[外链图片转存失败,源站可能有防盗链机制,建议将图片保存下来直接上传(img-lYNkiCxH-1581138771883)(十次方笔记.assets/1580089711216.png)]
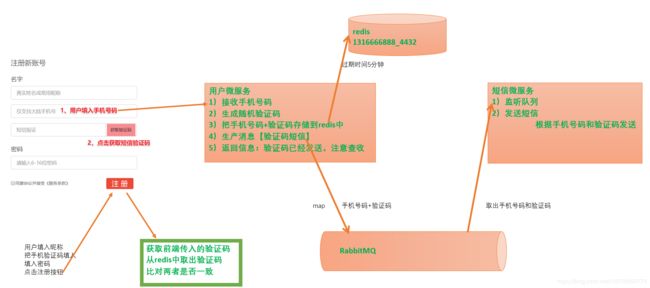
13.tensquare-user 用户微服务 用户注册:分析需求及代码生成
目标:
1、理解短信微服务的需求
2、使用代码生成工具生成代码
分析步骤:
1)用户先填入手机号码
2)点击获取验证码按钮
3)后台接收用户手机号码,生成一个随机数,存储redis中,并且往消息队列中生产一条数据
4)短信微服务监听消息队列短信消息
5)接收到就使用阿里短信给用户手机号码发送验证码
6)用户接收到验证码后填写其他的用户信息,提交注册
7)后台从缓存中查询验证码与用户注册提交的验证码相对比
8)如果一致,则可以注册;否则不能注册
代码生成:
小结:
脑海中要知道消息队列【RabbitMQ】怎么跑的
用户注册:发送手机验证码
目标:
搭建用户微服务
开发思路:
1、获取用户输入的手机号码
2、在系统生成随机数字验证码
3、把验证码存入redis
4、把手机号码和验证码一起发送到RabbitMQ
开发步骤:
1)快速生成用户微服务代码,导入起步依赖
	  <dependency>
		  <groupId>org.springframework.bootgroupId>
		  <artifactId>spring-boot-starter-data-redisartifactId>
	  dependency>
	  <dependency>
		  <groupId>org.springframework.bootgroupId>
		  <artifactId>spring-boot-starter-amqpartifactId>
	  dependency>
2)配置application.yml
  redis:
    host: 192.168.139.128
  rabbitmq:
    host: 192.168.139.128
3)编写Controller
	@RequestMapping(value="/sendsms/{mobile}",method= RequestMethod.POST)
	public Result sendsms(@PathVariable String mobile ){
		userService.sendsms(mobile);
		return new Result(true,StatusCode.OK,"短信发送成功,请注意查收");
	}
4)编写Service
生成随机验证码
	  <dependency>
		  <groupId>commons-langgroupId>
		  <artifactId>commons-langartifactId>
		  <version>2.6version>
	  dependency>
	//redis模板
	@Autowired
	private RedisTemplate redisTemplate;

	//消息队列的模板
	@Autowired
	private RabbitMessagingTemplate rabbitMessagingTemplate;


	/**
	 * 发送短信验证码
	 * @param mobile
	 */
	public void sendsms(String mobile) {
		//判空
		if(mobile==null||"".equals(mobile)){
			throw new RuntimeException("手机号码不能为空");
		}
		//生成随机的字符串
		String numcode = RandomStringUtils.randomNumeric(4);

		//存入redis中,并且设置5分钟的过期时间
		String key = "sendsms_"+mobile;
		redisTemplate.opsForValue().set(key, numcode, 5, TimeUnit.MINUTES);

		//生产消息:把手机号+验证码一起发送到队列中即可
		Map<String, String> map = new HashMap<>();
		map.put("mobile",mobile);
		map.put("code", numcode);
		rabbitMessagingTemplate.convertAndSend("tensquare",map);

	}
小结:
熟读开发思路
用户注册:搭建短信微服务及监听消息
目标:
掌握搭建短信微服务及监听消息
核心 步骤:
1)建立短信微服务
2)导入RabbitMQ坐标
3)编写application.yml
4)编写启动类
5)编写短信监听类
package com.tensquare.sms.consumer;

import java.util.Map;

import org.springframework.amqp.rabbit.annotation.RabbitHandler;
import org.springframework.amqp.rabbit.annotation.RabbitListener;
import org.springframework.stereotype.Component;

@Component
@RabbitListener(queues="tensquare")
public class SmsConsumer {

	@RabbitHandler
	public void sms(Map<String ,String> map) {
		//消费者发送短信
		String mobile = map.get("mobile");//手机号
		String code = map.get("code");//验证码
		System.out.println("发送短信:"+mobile+"====>验证码:"+code);
	}

}
小结:
开发流程记忆一下,细节不用背
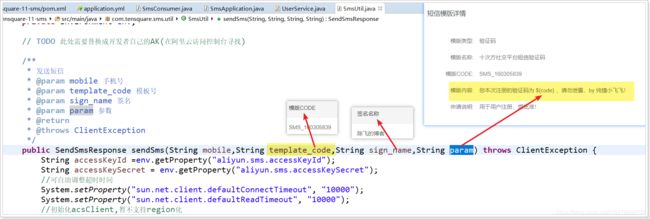
用户注册:阿里大于(短信)发送手机验证码
目标:
掌握使用阿里短信发送手机验证码
核心步骤:
阿里短信介绍:
1)注册和登录阿里云网站
2)找到 控制台->产品-> 短信服务->国内消息
3)添加短信签名和短信模板【需要企业资质或者认证的网站】
4)生成阿里云的accesskey
5)充值
开发步骤:
1)在短信微服务中导入阿里云的短信坐标
<dependency>
    <groupId>com.aliyungroupId>
    <artifactId>aliyun-java-sdk-dysmsapiartifactId>
    <version>1.0.0-SNAPSHOTversion>
dependency>
<dependency>
    <groupId>com.aliyungroupId>
    <artifactId>aliyun-java-sdk-coreartifactId>
    <version>3.2.5version>
dependency>
2)把Demo代码制作成SmsUtil工具类
package com.tensquare.sms.utils;
import com.aliyuncs.DefaultAcsClient;
import com.aliyuncs.IAcsClient;
import com.aliyuncs.dysmsapi.model.v20170525.QuerySendDetailsRequest;
import com.aliyuncs.dysmsapi.model.v20170525.QuerySendDetailsResponse;
import com.aliyuncs.dysmsapi.model.v20170525.SendSmsRequest;
import com.aliyuncs.dysmsapi.model.v20170525.SendSmsResponse;
import com.aliyuncs.exceptions.ClientException;
import com.aliyuncs.profile.DefaultProfile;
import com.aliyuncs.profile.IClientProfile;
import java.text.SimpleDateFormat;
import java.util.Date;
import org.springframework.beans.factory.annotation.Autowired;
import org.springframework.core.env.Environment;
import org.springframework.stereotype.Component;
/**
 * 短信工具类
 * @author Johnny
 *
 */
@Component
public class SmsUtil {

    //产品名称:云通信短信API产品,开发者无需替换
    static final String product = "Dysmsapi";
    //产品域名,开发者无需替换
    static final String domain = "dysmsapi.aliyuncs.com";

    @Autowired
    private Environment env;

    // TODO 此处需要替换成开发者自己的AK(在阿里云访问控制台寻找)

    /**
     * 发送短信
     * @param mobile 手机号
     * @param template_code 模板号
     * @param sign_name 签名
     * @param param 参数
     * @return
     * @throws ClientException
     */
    public SendSmsResponse sendSms(String mobile,String template_code,String sign_name,String param) throws ClientException {
        String accessKeyId =env.getProperty("aliyun.sms.accessKeyId");
        String accessKeySecret = env.getProperty("aliyun.sms.accessKeySecret");
        //可自助调整超时时间
        System.setProperty("sun.net.client.defaultConnectTimeout", "10000");
        System.setProperty("sun.net.client.defaultReadTimeout", "10000");
        //初始化acsClient,暂不支持region化
        IClientProfile profile = DefaultProfile.getProfile("cn-hangzhou", accessKeyId, accessKeySecret);
        DefaultProfile.addEndpoint("cn-hangzhou", "cn-hangzhou", product, domain);
        IAcsClient acsClient = new DefaultAcsClient(profile);
        //组装请求对象-具体描述见控制台-文档部分内容
        SendSmsRequest request = new SendSmsRequest();
        //必填:待发送手机号
        request.setPhoneNumbers(mobile);
        //必填:短信签名-可在短信控制台中找到
        request.setSignName(sign_name);
        //必填:短信模板-可在短信控制台中找到
        request.setTemplateCode(template_code);
        //可选:模板中的变量替换JSON串,如模板内容为"亲爱的${name},您的验证码为${code}"时,此处的值为
        request.setTemplateParam(param);
        //选填-上行短信扩展码(无特殊需求用户请忽略此字段)
        //request.setSmsUpExtendCode("90997");
        //可选:outId为提供给业务方扩展字段,最终在短信回执消息中将此值带回给调用者
        request.setOutId("yourOutId");
        //hint 此处可能会抛出异常,注意catch
        SendSmsResponse sendSmsResponse = acsClient.getAcsResponse(request);
        return sendSmsResponse;
    }

    public  QuerySendDetailsResponse querySendDetails(String mobile,String bizId) throws ClientException {
        String accessKeyId =env.getProperty("accessKeyId");
        String accessKeySecret = env.getProperty("accessKeySecret");
        //可自助调整超时时间
        System.setProperty("sun.net.client.defaultConnectTimeout", "10000");
        System.setProperty("sun.net.client.defaultReadTimeout", "10000");
        //初始化acsClient,暂不支持region化
        IClientProfile profile = DefaultProfile.getProfile("cn-hangzhou", accessKeyId, accessKeySecret);
        DefaultProfile.addEndpoint("cn-hangzhou", "cn-hangzhou", product, domain);
        IAcsClient acsClient = new DefaultAcsClient(profile);
        //组装请求对象
        QuerySendDetailsRequest request = new QuerySendDetailsRequest();
        //必填-号码
        request.setPhoneNumber(mobile);
        //可选-流水号
        request.setBizId(bizId);
        //必填-发送日期 支持30天内记录查询,格式yyyyMMdd
        SimpleDateFormat ft = new SimpleDateFormat("yyyyMMdd");
        request.setSendDate(ft.format(new Date()));
        //必填-页大小
        request.setPageSize(10L);
        //必填-当前页码从1开始计数
        request.setCurrentPage(1L);
        //hint 此处可能会抛出异常,注意catch
        QuerySendDetailsResponse querySendDetailsResponse = acsClient.getAcsResponse(request);
        return querySendDetailsResponse;
    }
}
3)使用SmsUtil发送短信
@Component
@RabbitListener(queues = "itcast")
public class SmsListener {

    @Value("${aliyun.sms.template_code}")
    private String template_code;//模板号

    @Value("${aliyun.sms.sign_name}")
    private String sign_name;//短信签名

    @Autowired
    private SmsUtil smsUtil;

    @RabbitHandler
    public void smsMessage(Map<String,String> msg){
        System.out.println("用户手机号码:"+msg.get("mobile"));
        System.out.println("用户验证码:"+msg.get("code"));
        try {
            smsUtil.sendSms(msg.get("mobile"),template_code,sign_name,"{\"code\":\""+msg.get("code")+"\"}");
        } catch (ClientException e) {
            e.printStackTrace();
        }
    }
}
4)配置application.yml
server:
  port: 9009
spring:
  rabbitmq:
    host: 192.168.207.111
#短信发送
aliyun:
  sms:
    accessKeyId: 用自己的
    accessKeySecret: 用自己的
    template_code: SMS_160305839
    sign_name: 陈飞的博客
小结:
1、能向面试官介绍阿里短信
2、掌握短信发送的业务流程
用户注册:完成注册功能
目标:
完成用户的注册功能
思路:
1、获取验证码和用户注册信息
2、从redis中取出系统生成的验证码
3、对比用户发送过来的和redis中的验证码是否一致
4、如果一致,返回true,并保存用户信息;如果不一致,返回false,并提示用户验证码错误
开发步骤:
1)Controller
	/**
	 * 用户注册
	 * @param code
	 * @return
	 */
	@PostMapping("/register/{code}")
	public Result register(@PathVariable String code,@RequestBody User user) {
		//调用service方法即可
		userService.register(code,user);
		//直接返回成功
		return new Result(true,StatusCode.OK,"恭喜:用户注册成功");
	}
2)Service
	/**
	 * 用户注册
	 * @param code   手机验证码
	 * @param user   用户实体
	 */
	public void register(String code, User user) {
		//从缓存中获取标记
		//if(user.getMobile()==null||"".equals(user.getMobile())) {
		if(StringUtils.isBlank(user.getMobile())) {
			throw new RuntimeException("手机号码不能为空");
		}
		if(StringUtils.isBlank(code)) {
			throw new RuntimeException("手机验证码不能为空");
		}
		//获取标记
		String key = "sendsms_"+user.getMobile();
		String numcode = (String) redisTemplate.opsForValue().get(key);

		//判断是否一致
		if(!code.equals(numcode)) {
			throw new RuntimeException("手机验证码已经过期,请重新获取短信验证码!");
		}

		//可以给用户注册
		user.setId( idWorker.nextId()+"" );
		user.setRegdate(new Date());
		user.setOnline(0L);
		user.setFanscount(0);
		user.setFollowcount(0);
		userDao.save(user);

	}
小结:
能给面试官讲清楚我们的MQ用在十次方系统的那一块
14.加密与权限 BCrypt 与 JWT
核心步骤:
了解BCrypt加密算法
常见的密码算法:
	MD5加密: 破解风险比较大
	MD5+加盐:破解风险相对小
	BCrypt加密:类似于MD5加盐
		hash加密 + 加随机盐(salt)   = 密码(包含盐的值)
在用户微服务导入BCrypt加密工具类
前置:BCryptPasswordEncoder来自于SpringSecurity框架。
1)在用户微服务导入spring-security坐标
<dependency>
 <groupId>org.springframework.bootgroupId>
 <artifactId>spring-boot-starter-securityartifactId>
dependency>
2)编写一个spring-security配置类,放行所有请求
/**
 * 安全配置类
 */
@Configuration
@EnableWebSecurity
public class WebSecurityConfig extends WebSecurityConfigurerAdapter
{
    @Override
    protected void configure(HttpSecurity http) throws Exception {
        http.authorizeRequests()
                .antMatchers("/**").permitAll()
                .anyRequest().authenticated()
                .and().csrf().disable();
    }
}
3)在启动类实例化BCryptPasswordEncoder
@Bean
public BCryptPasswordEncoder bCryptPasswordEncoder(){
   return new BCryptPasswordEncoder();
}
小结:
请问BCrypt加密的盐存储在哪里?
存储最后加密后的密码
$2a 10 10 10MuU0WSDHSIOM9wu0f4MVL.nrs47fXv9RgkSSVs/fi1x2XrHkv9b8m
管理员密码加密与登录
目标:
1)掌握BCrypt工具类对管理员密码加密
2)掌握BCrypt工具类判断密码是否一致
开发思路:
1)管理员登录提交登录名和密码
2)在Controller接收登录名和密码调用service,返回Admin
     如果Admin为空,代表登录失败
     如果Admin不为空,代表登录成功

3)在Service我们需要调用BCryptPasswordEncoder判断密码是否正确
	 如果密码一致,返回Admin对象
	 如果密码不一致,返回null
开发步骤:
1、AdminService类
@Autowired
private BCryptPasswordEncoder encoder;

/**
 * 增加
 * @param admin
 */
public void add(Admin admin) {
   admin.setId( idWorker.nextId()+"" );
   //对密码进行BCrypt加密
   admin.setPassword(encoder.encode(admin.getPassword()));
   adminDao.save(admin);
}

/**
 * 登录
 */
public Admin login(Admin admin){
   //1.判断账户是否存在
   Admin loginAdmin = adminDao.findByLoginname(admin.getLoginname());

   //2.如果账户存在,判断密码是否一致
   /**
    * matches()方法底层:
    * 1)使用数据库存储密码 提取出 盐(salt)
    * 2)使用用户登录时输入的密码 进行 哈希加密,再使用 上一步提取的盐进行 加密,得到新密码
    * 3)把数据库的密码 和 第二步加密的密码进行匹配,如果一致的,返回true,否则,返回false
    */
   if(loginAdmin!=null &&  encoder.matches(admin.getPassword(),loginAdmin.getPassword())  ){
      return loginAdmin;
   }else{
      return null;
   }
}
2、AdminController【添加管理员方法不用变】
/**
 * 登录
 */
@RequestMapping(value = "/login",method = RequestMethod.POST)
public Result login(@RequestBody Admin admin){
   Admin loginAdmin = adminService.login(admin);

   if(loginAdmin==null){
      //登录失败
      return new Result(false,StatusCode.USER_PASS_ERROR,"登录失败:用户名户或密码错误");
   }else{
      //登录成功

      //如何认证,后面再看?

      return new Result(true,StatusCode.OK,"登录成功");
   }
}
3、AdminDao
public interface AdminDao extends JpaRepository<Admin,String>,JpaSpecificationExecutor<Admin>{

    public Admin findByLoginname(String loginname);
}
小结:
请问哪个方法对密码加密?哪个方法判断密码是否一致?

加密:encode()
判断密码一致:matches()
用户密码加密与登录
目标:
1)掌握BCrypt工具类对用户密码加密
2)掌握BCrypt工具类判断用户是否一致
核心步骤:
1、UserService
@Autowired
private BCryptPasswordEncoder encoder;

/**
 * 增加
 * @param user
 */
public void add(User user) {
   user.setId( idWorker.nextId()+"" );
   user.setPassword(encoder.encode(user.getPassword()));
   userDao.save(user);
}

/**
 * 登录
 */
public User login(User user){
   //1.判断用户是否存在
   User loginUser = userDao.findByMobile(user.getMobile());

   //2.如果用户存在,判断密码是否一致
   if(loginUser!=null && encoder.matches(user.getPassword(),loginUser.getPassword()) ){
      return loginUser;
   }else{
      return null;
   }
}
2、UserController【只有登录方法】
/**
 * 登录
 */
@RequestMapping(value = "/login",method = RequestMethod.POST)
public Result login(@RequestBody User user){
   User loginUser = userService.login(user);

   if(loginUser==null){
      return new Result(false,StatusCode.USER_PASS_ERROR,"登录失败;手机号码或密码错误");
   }else{
      return new Result(true,StatusCode.OK,"登录成功");
   }
}
3、UserDao
public interface UserDao extends JpaRepository<User,String>,JpaSpecificationExecutor<User>{

    public User findByMobile(String mobile);
}
小结:
掌握加密和判断密码的逻辑
15.tensquare-spider 爬虫微服务
爬虫的实现技术
java中的爬虫技术:
1)底层技术
HttpClient+Jsoup


2)爬虫框架
Webmagic

官网:http://webmagic.io/
[外链图片转存失败,源站可能有防盗链机制,建议将图片保存下来直接上传(img-g03yIXeD-1581138771885)(十次方笔记.assets/1563264343715.png)]
webmagic的执行流程
WebMagic的结构分为Downloader、PageProcessor、Scheduler、Pipeline四大组件,并由Spider将它们彼此组织起来。这四大组件对应爬虫生命周期中的下载、处理、管理和持久化等功能。
WebMagic的结构分为Downloader、PageProcessor、Scheduler、Pipeline四大组件,并由Spider将它们彼此组织起来
关键画图:
[外链图片转存失败,源站可能有防盗链机制,建议将图片保存下来直接上传(img-HetEFXrk-1581138771886)(十次方笔记.assets/1563264405119.png)]
PageProcessor:爬取整个网页内容
核心代码:
package com.itheima.webmagic;

import us.codecraft.webmagic.Page;
import us.codecraft.webmagic.Site;
import us.codecraft.webmagic.Spider;
import us.codecraft.webmagic.processor.PageProcessor;

public class MyPageProcessor implements PageProcessor {
    /**
     * 解析网页内容
     */
    @Override
    public void process(Page page) {
        //输出整个网页内容
        System.out.println(page.getHtml().toString());
    }

    /**
     * 设置爬取参数
     */
    @Override
    public Site getSite() {
        return Site.me()
                .setSleepTime(100)// 设置爬取间隔时间
                .setTimeOut(3000)// 设置爬取超时时间
                .setRetryTimes(3);// 设置重试次数
    }

    public static void main(String[] args) {
        /**
         * 入口
         */
        Spider.create(new MyPageProcessor()).addUrl("https://blog.csdn.net/").start();
    }
}
PageProcessor:xpath爬取指定内容
xpath语法解析:
<html>
   <head>
      <title>文章标题1title>
  head>
   <title>文章标题2title>
  <body>
     <div id="d1">div1div>
     <div class="c2">div2div>
     <div>div3div>
     <div class="c2">div4div>
  body>
html>


需求:
1)获取title标签:
          /html/head/title
         //title

2)获取div标签
        /html/body/div
       //div

3)获取第二div
      //div[2]

4)获取最后一个div
     //div[last()]

5) 获取有属性的div
     //div[@]

6)获取有id属性的div
     //div[@id]

7)获取id属性值为d1的div
     //div[@id='d1']

8)获取head下所有标签
      //head/*
去讲义的这个地方看语法:
[外链图片转存失败,源站可能有防盗链机制,建议将图片保存下来直接上传(img-ygyaFJwr-1581138771886)(十次方笔记.assets/1563264465692.png)]
//*[@id=“mainScreen”]/div/div/div/div[1]/div[2]/a[6]
通过浏览器获取xpath信息:
[外链图片转存失败,源站可能有防盗链机制,建议将图片保存下来直接上传(img-WnkTskCh-1581138771886)(十次方笔记.assets/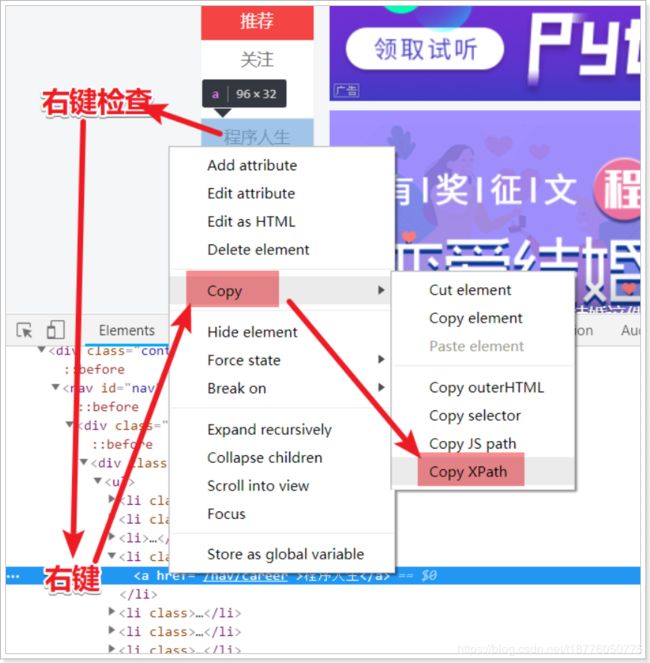 .png)]
核心代码:
package com.itheima.webmagic;

import us.codecraft.webmagic.Page;
import us.codecraft.webmagic.Site;
import us.codecraft.webmagic.Spider;
import us.codecraft.webmagic.processor.PageProcessor;

public class MyPageProcessor implements PageProcessor {
    /**
     * 解析网页内容
     */
    @Override
    public void process(Page page) {
        //爬取指定网页内容(xpath表达式)
        String content = page.getHtml().xpath("//*[@id=\"nav\"]/div/div/ul/li[13]/a").toString();
        String content2 = page.getHtml().xpath("//*[@id=\"nav\"]/div/div/ul/li[13]/a/text()").toString();
        System.out.println(content);
        System.out.println(content2);

    }

    /**
     * 设置爬取参数
     */
    @Override
    public Site getSite() {
        return Site.me()
                .setSleepTime(100)// 设置爬取间隔时间
                .setTimeOut(3000)// 设置爬取超时时间
                .setRetryTimes(3);// 设置重试次数

    }

    public static void main(String[] args) {
        /**
         * 入口
         */
        Spider
                .create(new MyPageProcessor())
                .addUrl("https://blog.csdn.net/")
                .start();
    }
}
PageProcessor:爬取所有目标url与正则表达式过滤
核心代码:
package com.itheima.webmagic;

import us.codecraft.webmagic.Page;
import us.codecraft.webmagic.Site;
import us.codecraft.webmagic.Spider;
import us.codecraft.webmagic.processor.PageProcessor;

public class MyPageProcessor implements PageProcessor {
    /**
     * 解析网页内容
     */
    @Override
    public void process(Page page) {
        //添加当前页面下的其他所有超链接
        //page.addTargetRequests(page.getHtml().links().all());


        //添加指定抓取页面
        page.addTargetRequests(page.getHtml().regex("https://blog.csdn.net/[a-zA-Z0-9_]+/article/details/[0-9]{8}").all());

    }

    /**
     * 设置爬取参数
     */
    @Override
    public Site getSite() {
        return Site.me()
                .setSleepTime(100)// 设置爬取间隔时间
                .setTimeOut(3000)// 设置爬取超时时间
                .setRetryTimes(3);// 设置重试次数

    }

    public static void main(String[] args) {
        /**
         * 入口
         */
        Spider
                .create(new MyPageProcessor())
                .addUrl("https://blog.csdn.net/")
                .start();
    }
}
开源中国
package com.itheima.processer;

import us.codecraft.webmagic.Page;
import us.codecraft.webmagic.Site;
import us.codecraft.webmagic.Spider;
import us.codecraft.webmagic.processor.PageProcessor;

/**
 * 我们自己的处理器
 */
public class MyPageProcesser implements PageProcessor{
    /**
     * 处理,解析页面
     */
    @Override
    public void process(Page page) {
        //1、输出页面的内容
        //System.out.println(page.getHtml().toString());

        //2、通过xpath获取指定的内容
        //System.out.println(page.getHtml().xpath("//*[@id=\"mainScreen\"]/div/div[1]/div/div[1]/div[1]/a[2]").toString());
        //System.out.println(page.getHtml().xpath("//*[@id=\"mainScreen\"]/div/div[1]/div/div[1]/div[1]/a[2]/text()").toString());

        //3、爬取指定的url
        //3.1 所有url
        //System.out.println(page.getHtml().links().all().toString());
        //page.addTargetRequests(page.getHtml().links().all()); //进入所有连接的页面

        //3.2 使用正则表达式解析具体url
        //System.out.println(page.getHtml().regex("https://my.oschina.net/u/[0-9]{7}/blog/[0-9]{7}").all().toString());
        page.addTargetRequests(page.getHtml().regex("https://my.oschina.net/u/[0-9]+/blog/[0-9]+").all());


    }

    /**
     * 站点处理:超时的时间,重试次数等
     */
    @Override
    public Site getSite() {
        return Site.me()
                .setSleepTime(300)//爬取完一次,休眠时间
                .setTimeOut(3000)//设置超时时间
                .setRetryTimes(3)//设置重试次数
                ;
    }

    /**
     * 运行
     */
    public static void main(String[] args) {

        Spider
                .create(new MyPageProcesser())// 创建
                .addUrl("https://www.oschina.net/blog") //加入页面链接
                .start(); //开始爬取
        ;

    }
}
Pipeline:控制台、文件、定制输出
核心代码:
1)MyPageProcessor 类
package com.itheima.processer;

import com.itheima.pipeline.MyDBPipeline;
import us.codecraft.webmagic.Page;
import us.codecraft.webmagic.Site;
import us.codecraft.webmagic.Spider;
import us.codecraft.webmagic.pipeline.ConsolePipeline;
import us.codecraft.webmagic.pipeline.FilePipeline;
import us.codecraft.webmagic.pipeline.JsonFilePipeline;
import us.codecraft.webmagic.processor.PageProcessor;

/**
 * 我们自己的处理器
 */
public class MyPageProcesser implements PageProcessor{
    /**
     * 处理,解析页面
     */
    @Override
    public void process(Page page) {
        //1、输出页面的内容
        //System.out.println(page.getHtml().toString());

        //2、通过xpath获取指定的内容
        //System.out.println(page.getHtml().xpath("//*[@id=\"mainScreen\"]/div/div[1]/div/div[1]/div[1]/a[2]").toString());
        //System.out.println(page.getHtml().xpath("//*[@id=\"mainScreen\"]/div/div[1]/div/div[1]/div[1]/a[2]/text()").toString());

        //3、爬取指定的url
        //3.1 所有url
        //System.out.println(page.getHtml().links().all().toString());
        //page.addTargetRequests(page.getHtml().links().all()); //进入所有连接的页面

        //3.2 使用正则表达式解析具体url
        //System.out.println(page.getHtml().regex("https://my.oschina.net/u/[0-9]{7}/blog/[0-9]{7}").all().toString());
        page.addTargetRequests(page.getHtml().regex("https://my.oschina.net/u/[0-9]+/blog/[0-9]+").all());


        //4、往pipeline传递值
        String title = page.getHtml().xpath("//*[@id=\"mainScreen\"]/div/div[1]/div/div[2]/div[1]/div[2]/h2/text()").toString();
        if(title!=null && title.length()>0){
            page.putField("title",title);
        }else{
            //如果为空跳过
            page.setSkip(true);//跳过当前页面
        }


    }

    /**
     * 站点处理:超时的时间,重试次数等
     */
    @Override
    public Site getSite() {
        return Site.me()
                .setSleepTime(300)//爬取完一次,休眠时间
                .setTimeOut(3000)//设置超时时间
                .setRetryTimes(3)//设置重试次数
                ;
    }

    /**
     * 运行
     */
    public static void main(String[] args) {

        Spider
                .create(new MyPageProcesser())// 创建
                .addUrl("https://www.oschina.net/blog") //加入页面链接
                .addPipeline(new ConsolePipeline()) //输出内容到控制台的
                .addPipeline(new FilePipeline("D:/code/1024/o_ai_day01/file/"))//往文件中输出
                .addPipeline(new JsonFilePipeline("D:/code/1024/o_ai_day01/jsonfile/"))//往文件中输出
                .addPipeline(new MyDBPipeline()) //添加自定义的pipeline
                .start(); //开始爬取
        ;

    }
}
2)定制输出类:MyPipeline
package com.itheima.pipeline;

import us.codecraft.webmagic.ResultItems;
import us.codecraft.webmagic.Task;
import us.codecraft.webmagic.pipeline.Pipeline;

/**
 * 自定义pipeline
 */
public class MyDBPipeline implements Pipeline{
    /**
     * 自定义持久化的策略
     */
    @Override
    public void process(ResultItems resultItems, Task task) {
        //输出内容
        System.out.println("MyDBPipeline 插入数据库。。。。。"+ resultItems.get("title").toString());

        //插入数据库
        //System.out.println("插入数据库。。。。。");

    }
}
Scheduler:URL存储
核心代码:
package com.itheima.webmagic;

import us.codecraft.webmagic.Page;
import us.codecraft.webmagic.Site;
import us.codecraft.webmagic.Spider;
import us.codecraft.webmagic.pipeline.ConsolePipeline;
import us.codecraft.webmagic.pipeline.FilePipeline;
import us.codecraft.webmagic.pipeline.JsonFilePipeline;
import us.codecraft.webmagic.processor.PageProcessor;
import us.codecraft.webmagic.scheduler.FileCacheQueueScheduler;
import us.codecraft.webmagic.scheduler.QueueScheduler;
import us.codecraft.webmagic.scheduler.RedisPriorityScheduler;

public class MyPageProcessor implements PageProcessor {
    /**
     * 解析网页内容
     */
    @Override
    public void process(Page page) {

        //添加指定抓取页面
        page.addTargetRequests(page.getHtml().regex("https://blog.csdn.net/[a-zA-Z0-9_]+/article/details/[0-9]{8}").all());

        //往ResultItem对象添加需要添加的内容
        page.putField("title",page.getHtml().xpath("//*[@id=\"mainBox\"]/main/div[1]/div/div/div[1]/h1/text()").toString());

    }

    /**
     * 设置爬取参数
     */
    @Override
    public Site getSite() {
        return Site.me()
                .setSleepTime(100)// 设置爬取间隔时间
                .setTimeOut(3000)// 设置爬取超时时间
                .setRetryTimes(3);// 设置重试次数

    }

    public static void main(String[] args) {
        /**
         * 入口
         */
        Spider
                .create(new MyPageProcessor())
                .addUrl("https://blog.csdn.net/")
                .addPipeline(new ConsolePipeline())
                .addPipeline(new FilePipeline("D:\\code\\file\\"))
                .addPipeline(new JsonFilePipeline("D:\\code\\jsonfile\\"))
                .addPipeline(new MyPipeline())
                //.setScheduler(new QueueScheduler())
                //.setScheduler(new FileCacheQueueScheduler("D:\\code\\url\\"))
                .setScheduler(new RedisPriorityScheduler("192.168.207.111"))
                .start();
    }
}
1、放入到内存队列: 缺点,重启就没有了
2、存入文件中,它不适合分布式系统
3、存入redis中,它适用于分布式系统

