python+opencv照相机模型与现实增强
一、本次实验需要用到的python库包及遇到的问题
1、pygame和pyOpenGL(pycharm第三方库直接导入or从此处:https://www.lfd.uci.edu/~gohlke/pythonlibs/下载到当前工作目录 site-packages包下)
另,此次调试程序过程中遇到错误如下:(我是用的是pycharm)
# TabError: inconsistent use of tabs and spaces in indentation
# 具体操作是:Code -->Reformat Code

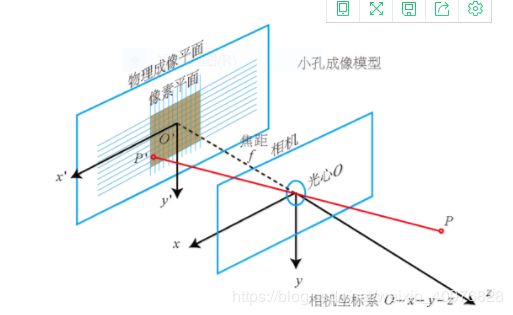
二、针孔照相机模型原理:
针孔相机模型就是把相机简化成小孔成像, 比较基础简单的投影变换有正交变换和透视变换。正交变换就是物体上的点全都平行地投射到投影面,没有远近的区别,即没有透视效果。透视变换正好相反,被投影物体处于一个四棱台区域中,物体被投影到离相机较近的平面上。相机被抽象为一个点,而投影点是物体上的点和相机的连线与投影平面的交点。
针孔相机模型是基于透视变换的相机模型,以字母表示矩阵为:

小孔成像模型为:

三、照相机标定:
.照相机矩阵:P=K[R|t],其中R是描述照相机方向的旋转矩阵,t是描述照相机中心位置的三维平移向量,内标定矩阵K描述 照相机的投影性质,标定矩阵
仅与照相机的自身关系有关。照相机的中心与内标定矩阵无关。
将照相机和标定物体放置在平面上,使得照相机的背面和标定物体平行,同时物体位于照相机图像视图的中心,你可能需要调整照相机或者物体来获得良好的对其效果
·测量标定物体到照相机的距离dZ
·拍摄一副图像来检测该设置是否正确,即标定物体的边要和图像的行和列对齐
·使用像素数来测量标定物体图像的宽度dx和高度dy

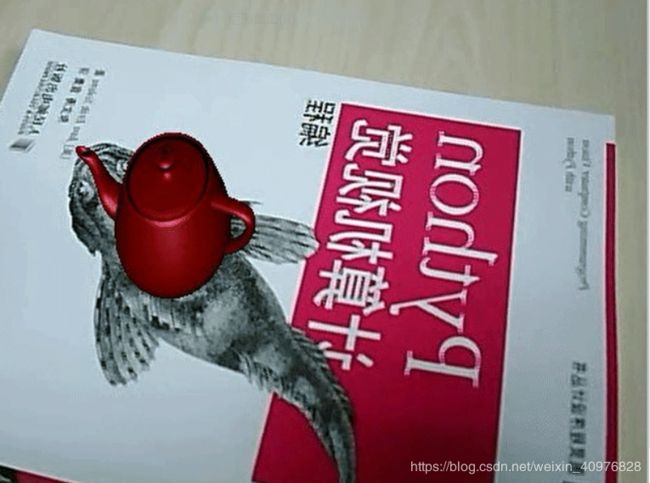
四、增强现实
简言之,增强现实归纳一下就是也就是虚拟数据和现实物体的叠加合成。
实现代码为:
import math
import pickle
from pylab import *
from OpenGL.GL import *
from OpenGL.GLU import *
from OpenGL.GLUT import *
import pygame, pygame.image
from pygame.locals import *
from PCV.geometry import homography, camera
from PCV.localdescriptors import sift
import cv2


def cube_points(c, wid):
    """ Creates a list of points for plotting
        a cube with plot. (the first 5 points are
        the bottom square, some sides repeated). """
    p = []
    # bottom
    p.append([c[0] - wid, c[1] - wid, c[2] - wid])
    p.append([c[0] - wid, c[1] + wid, c[2] - wid])
    p.append([c[0] + wid, c[1] + wid, c[2] - wid])
    p.append([c[0] + wid, c[1] - wid, c[2] - wid])
    p.append([c[0] - wid, c[1] - wid, c[2] - wid])  # same as first to close plot

    # top
    p.append([c[0] - wid, c[1] - wid, c[2] + wid])
    p.append([c[0] - wid, c[1] + wid, c[2] + wid])
    p.append([c[0] + wid, c[1] + wid, c[2] + wid])
    p.append([c[0] + wid, c[1] - wid, c[2] + wid])
    p.append([c[0] - wid, c[1] - wid, c[2] + wid])  # same as first to close plot

    # vertical sides
    p.append([c[0] - wid, c[1] - wid, c[2] + wid])
    p.append([c[0] - wid, c[1] + wid, c[2] + wid])
    p.append([c[0] - wid, c[1] + wid, c[2] - wid])
    p.append([c[0] + wid, c[1] + wid, c[2] - wid])
    p.append([c[0] + wid, c[1] + wid, c[2] + wid])
    p.append([c[0] + wid, c[1] - wid, c[2] + wid])
    p.append([c[0] + wid, c[1] - wid, c[2] - wid])

    return array(p).T
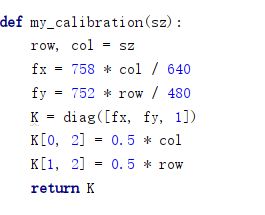
    ############################下面这个要改成自己的,具体格式前面有讲过


def my_calibration(sz):
    row, col = sz
    fx = 758 * col / 640
    fy = 752 * row / 480
    K = diag([fx, fy, 1])
    K[0, 2] = 0.5 * col
    K[1, 2] = 0.5 * row
    return K


def set_projection_from_camera(K):
    glMatrixMode(GL_PROJECTION)
    glLoadIdentity()
    fx = K[0, 0]
    fy = K[1, 1]
    fovy = 2 * math.atan(0.5 * height / fy) * 180 / math.pi
    aspect = (width * fy) / (height * fx)
    near = 0.1
    far = 100.0
    gluPerspective(fovy, aspect, near, far)
    glViewport(0, 0, width, height)


def set_modelview_from_camera(Rt):
    glMatrixMode(GL_MODELVIEW)
    glLoadIdentity()
    Rx = np.array([[1, 0, 0], [0, 0, -1], [0, 1, 0]])
    R = Rt[:, :3]
    U, S, V = np.linalg.svd(R)
    R = np.dot(U, V)
    R[0, :] = -R[0, :]
    t = Rt[:, 3]
    M = np.eye(4)
    M[:3, :3] = np.dot(R, Rx)
    M[:3, 3] = t
    M = M.T
    m = M.flatten()
    glLoadMatrixf(m)


def draw_background(imname):
    bg_image = pygame.image.load(imname).convert()
    bg_data = pygame.image.tostring(bg_image, "RGBX", 1)
    glMatrixMode(GL_MODELVIEW)
    glLoadIdentity()

    glClear(GL_COLOR_BUFFER_BIT | GL_DEPTH_BUFFER_BIT)
    glEnable(GL_TEXTURE_2D)
    glBindTexture(GL_TEXTURE_2D, glGenTextures(1))
    glTexImage2D(GL_TEXTURE_2D, 0, GL_RGBA, width, height, 0, GL_RGBA, GL_UNSIGNED_BYTE, bg_data)
    glTexParameterf(GL_TEXTURE_2D, GL_TEXTURE_MAG_FILTER, GL_NEAREST)
    glTexParameterf(GL_TEXTURE_2D, GL_TEXTURE_MIN_FILTER, GL_NEAREST)
    glBegin(GL_QUADS)
    glTexCoord2f(0.0, 0.0);
    glVertex3f(-1.0, -1.0, -1.0)
    glTexCoord2f(1.0, 0.0);
    glVertex3f(1.0, -1.0, -1.0)
    glTexCoord2f(1.0, 1.0);
    glVertex3f(1.0, 1.0, -1.0)
    glTexCoord2f(0.0, 1.0);
    glVertex3f(-1.0, 1.0, -1.0)
    glEnd()
    glDeleteTextures(1)


def draw_teapot(size):
    glEnable(GL_LIGHTING)
    glEnable(GL_LIGHT0)
    glEnable(GL_DEPTH_TEST)
    glClear(GL_DEPTH_BUFFER_BIT)
    glMaterialfv(GL_FRONT, GL_AMBIENT, [0, 0, 0, 0])
    glMaterialfv(GL_FRONT, GL_DIFFUSE, [0.5, 0.0, 0.0, 0.0])
    glMaterialfv(GL_FRONT, GL_SPECULAR, [0.7, 0.6, 0.6, 0.0])
    glMaterialf(GL_FRONT, GL_SHININESS, 0.25 * 128.0)
    glutSolidTeapot(size)


width, height = 640, 480  ###################这个要改成自己的图片分辨率

l0, d0 = sift.read_features_from_file('im0.sift')

##########################################################################
##########################主函数#######################################
######################################################################
##从这里开始时运行的主函数
mm = 2  ## mm表示进行处理的第n张图片,我是从二张开始的
while mm <= 600:  ## mm<600表示循环执行到第六张图片后就停止,这两个都可以更改为自己想要的数字

    l1, d1 = sift.read_features_from_file('test/im' + str(mm) + '.sift')

    matches = sift.match_twosided(d0, d1)
    if sum(matches) <= 1:
        mm = mm + 1
        continue
    try:
        pygame.init()
        win = pygame.display.set_mode((width, height), OPENGL | DOUBLEBUF)
        pygame.display.set_caption("OpenGL AR demo")
        ndx = matches.nonzero()[0]
        fp = homography.make_homog(l0[ndx, :2].T)
        ndx2 = [int(matches[i]) for i in ndx]
        tp = homography.make_homog(l1[ndx2, :2].T)
        model = homography.RansacModel()
        H, inliers = homography.H_from_ransac(fp, tp, model)
        K = my_calibration((640, 480))
        cam1 = camera.Camera(hstack((K, dot(K, array([[0], [0], [-1]])))))
        box = cube_points([0, 0, 0.1], 0.1)
        box_cam1 = cam1.project(homography.make_homog(box[:, :5]))
        box_trans = homography.normalize(dot(H, box_cam1))
        cam2 = camera.Camera(dot(H, cam1.P))
        A = dot(linalg.inv(K), cam2.P[:, :3])
        A = array([A[:, 0], A[:, 1], cross(A[:, 0], A[:, 1])]).T
        cam2.P[:, :3] = dot(K, A)
        Rt = dot(linalg.inv(K), cam2.P)
        ###################################下面这一串是对图片进行3D模型的绘制
        path = 'test/im' + str(mm) + '.bmp'  #### 这个时读取的.bmp 格式的图片地址,可以改为自己的
        draw_background(path)
        set_projection_from_camera(K)
        set_modelview_from_camera(Rt)
        draw_teapot(0.05)
        ###################################
        pygame.image.save(win, "test2/im" + str(mm) + '.jpg')  #############保存的地址可以自己随意改变
        pygame.display.flip()
        mm = mm + 1
        print ('test/im' + str(mm) + '.sift     ok!!!')
    except ValueError:
        print ('im' + str(mm) + "   Error!!!")
        mm = mm + 1
        continue
