web前端学习笔记
视口
适配设置:
如果任何设置都没有,默认走的就是viewport的默认设置
去设置新的viewport设置,达到适配要求。

标准适配方案:
![]()
meta:vp + tab 快捷方式

设置最大宽度
"max-width: 1024px">
基本样式初始化
*,
*::before,
*::after{
    /*所有的标签,和伪元素都选中*/
    margin: 0;
    padding: 0;
    /*移动端常用布局是非固定像素*/
    /*盒子的width从border开始算*/
    box-sizing: border-box;
    -webkit-box-sizing: border-box;
    /*点击高亮效果的清除*/
    tap-highlight-color: transparent;
    -webkit-tap-highlight-color: transparent;
}
body{
        	font-size:14px;
        	font-family: "Microsoft YaHei",sans-serif;
        }
        ul,ol{
        	list-style: none;
        }
        a{
        	text-decoration:none;
        }
        input,textarea{
        	border: none;
        	/*不允许改变尺寸大小*/
        	outline: none;
        	/*元素的外观为none*/
        	-webkit-appearance: none;
        }
/*版心*/
.container{
		min-width: 320px;
		max-width: 640px;
		width: 100%;
		margin: 0 auto;
	}
取消屏幕点击高亮
transparent为透明,也可设置red等其他颜色
-webkit-tap-highlight-color: transparent;
清除浮动
.clearFix::before,
		.clearFix::after{
		    content:'';
		    display:block;
		    visibility: hidden;
		    height: 0;
		    line-height: 0;
		    clear: both;
		}
决绝图片应基线对齐多出的高度
-
方法1
-
font-size:0px;
-
-
方法2
-
img{
		display: block;
	}
-
-
方法3
-
img{
		vertical-align: middle;
	}
-
事件
touch
-
touch是移动端的触摸事件 而且是一组事件touchstart当手指触摸屏幕的时候触发touchmove当手指在屏幕来回的滑动时候触发
touchend当手指离开屏幕的时候触发touchcancel当被迫终止滑动的时候触发(来电,弹消息)
-
使用touch
-
绑定事件:
-
box.addEventListener('touchstart',function (e) { });
-
-
事件对象:
- 名字:
ouchList------触摸点(一个手指触摸就是一个触发点,和屏幕的接触点的个数)的集合 changedTouches改变后的触摸点集合targetTouches当前元素的触发点集合touches页面上所有触发点集合
- 名字:
-
-
触摸点集合在每个事件触发的时候会不会去记录触摸
changedTouches每个事件都会记录
targetTouches,touches在离开屏幕的时候无法记录触摸点
			var box = document.querySelector('.box')

			box.addEventListener('touchstart',function (e) {
				console.log('触摸')
				console.log(e.[0].pageX)
			})

			box.addEventListener('touchmove',function (e) {
				console.log('移动')
				console.log(e.touches[0].pageX)
			})

			box.addEventListener('touchend',function (e) {
				console.log('离开')
				console.log(e)
			})
全屏滚动插件
-
github下载
-
npm 安装
npm i iscroll -D
- 使用
	/*区域滚动效果*/
    /*条件:一个容器装着一个容器html结构*/
    /*找到大容器*/
    /*子容器大于父容器*/
    new IScroll(document.querySelector('.jd_cateLeft'),{
        scrollX:false,  /*X轴滚动*/
        scrollY:true,	/*Y轴滚动*/
        click:true    /*默认为false禁用了点击事件*/
    });
两栏响应式
<html>
	<head>
		<meta charset="utf-8">
		<title>title>
		<style>
			.box{
				width: 600px;
				height: 150px;
				background-color: #00A1B2;
			}
			.right{
                	/* !!!!!!! */
				float: right;
				width: 80px;
				height: 150px;
				border-left: 3px dashed blue;
				background-color: red;
			}
			.left{
                	/* !!!!!!! */
				overflow: hidden;
				height: 150px;
			}
		style>
	head>
	<body>
		<div class="box">

			<div class="right">div>
			<div class="left">
				内容内容内容内容内容内容内容内容内容内容内容内容内容内容内容内容内容内容内容内容内容内容
			div>
		div>
	body>
html>

伸缩布 Flex(搬运他人博客内容)
基本概念
1、主轴:Flex容器的主轴主要用来配置Flex项目,默认是水平方向
2、侧轴:与主轴垂直的轴称作侧轴,默认是垂直方向的
3、方向:默认主轴从左向右,侧轴默认从上到下
4、主轴和侧轴并不是固定不变的,通过flex-direction可以互换
display: flex;//给父盒子加flex属性,父盒子将具有伸缩属性,子盒子默认平铺
效果特征
1、设置了伸缩属性,在没有设置宽度的情况下是100%
2、设置了伸缩属性,行内元素会转化成块级元素,可以设置宽高,独占一行
主轴方向
flex-direction: row;//水平方向(默认)
flex-direction: row-reverse;//水平翻转
flex-direction: column;//垂直方向
flex-direction: column-reverse;//垂直翻转

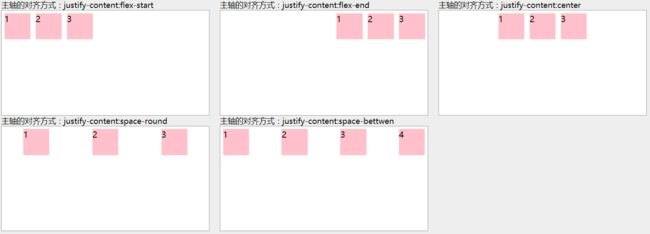
对齐方式
1、justify-content:设置或检索弹性盒子元素在主轴(横轴)方向上的对齐方式。
justify-content: flex-start;//从主轴开始的方向对齐
justify-content: flex-end;//从主轴结束的方向对齐
justify-content: center;//居中对齐
justify-content: space-around;//父盒子中平分
justify-content: space-between;//两端对齐平分
2、align-items:设置或检索弹性盒子元素在主轴(横轴)方向上的对齐方式。
align-items:flex-start;//从侧轴开始的方向对齐
align-items:flex-end;//从侧轴结束的方向对齐
align-items:center;//居中
align-items:baseline;//基线对齐,默认同flex-start
align-items:stretch;//拉伸

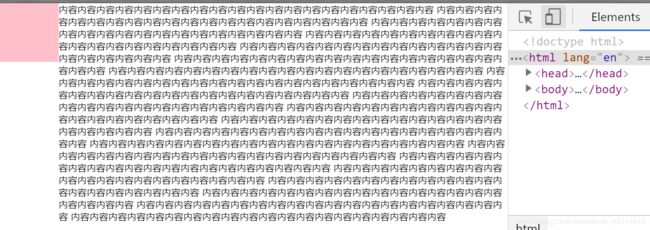
两栏自适应布局
<html lang="en">
<head>
    <meta charset="UTF-8">
    <title>Titletitle>
    <style>
        body{
            margin: 0;
            padding: 0;
        }
        .box1{
            float: left;
            width: 100px;
            height: 100px;
            background: pink;
        }
        .box2{
            /*让这个元素绝对绝缘  bfc*/
            /*不让其他浮动元素影响自己*/
            /*不让自己的浮动去影响别的元素*/
            overflow: hidden;
        }
    style>
head>
<body>


<div class="box1">div>
<div class="box2">
    内容内容内容内容内容内容内容内容内容内容内容内容内容内容内容内容内容内容内容内容
    内容内容内容内容内容内容内容内容内容内容内容内容内容内容内容内容内容内容内容内容
    内容内容内容内容内容内容内容内容内容内容内容内容内容内容内容内容内容内容内容内容
div>
body>
html>
模板引擎art-template
-
模版引擎内不可使用外部变量
-
使用
-
引用文件
<script src="assets/artTemplate/template-native.js">script>- 先写模板
<script type="text/template" id="pointTemplate">
 <% for (var i = 0; i<list.length ;i++) { %>
	<li  data-slide-to="<%=i%>" class="<%= i==0 ? 'active' : ''%>"><%=list.text %></li>
 <% } %>
script>
<script type="text/template" id="historyID">
			<% if(data){ %>
				<% for (var i = 0 ; i<data.length ; i++){%>
					<li><%= data[i] %></li>
				<% } %>
			<%} else {%>
				<li><%= "暂未有记录" %></li>
			<% } %>

		script>
-
html中留坑
-
<ol class="carousel-indicators">

ol>
-
-
js使用
-
获取数据  要以对象的形式传递 {list:data}
var pointHtml = template('pointTemplate',{list:data});
执行渲染
$(".carousel-indicators").html(pointHtml)
-
# less

- 安装

  - ```shell
    npm install -g less
-
cmd使用
-
lessc lessname.less clssName.css
-
-
语法
-
变量
-
必须@前缀,:是等于的以上,必须分号结束;
-
不能以数组开头,不能包含特殊字符,区分大小写
-
/*字符编码防止编译后乱码*/
@charset "UTF-8";

@mainColor:#e92323;

div{
  background: @mainColor;
}
a:hover{
  color: @mainColor;
}
-
-
变量用于字符拼接使用方法
{}-
@className:box;
.a@{className}b{
  color: @mainColor;
}
-
-
-
混入
-
组合样式的例子
-
.w50{
  width: 50%;
}
.f_left{
  float: left;
}
.f_right{
  float: right;
}
/*类混入*/
.w50-f_left{
  .w50();
  .f_left();
}
-
-
函数混入
-
定义函数 函数名不能与其他类名相同
.w50(){ width: 50%; } -
/*
1.定义了参数(没有默认值),调用的时候必须传参
2.怎么定义默认值 和定义变量值是一样的
3.定义了参数(有默认值),可传可不传
*/
 /*定义了形参 :号后为默认值*/
.f(@direction:left){
  float: @direction;
}
.borderRadius(@width:100px){
  border-radius: @width;
  -webkit-border-radius:@width;
  -moz-border-radius:@width;
  -o-border-radius:@width;
  -ms-border-radius:@width;
}
.w50-f_left{
    /*调用*/
  .w50();
     /*调用并传参*/
  .f(right);
  .borderRadius(20px);
}
-
-
-
嵌套
-
@charset "UTF-8"; .wjs_app{ display: block; img{ display: none; } /*需要连接的情况:&*/ &:hover{ img{ display: block; position: absolute; left: 50%; margin-left:-60px; border: 1px solid #ccc; border-top: none; top:40px; z-index: 100000; } } /*wjs_app 子代选择器*/ > div{ display: block; } } -
解析后
@charset "UTF-8";
.wjs_app {
  display: block;
  /*需要连接的情况:&*/
}
.wjs_app img {
  display: none;
}
.wjs_app:hover img {
  display: block;
  position: absolute;
  left: 50%;
  margin-left: -60px;
  border: 1px solid #ccc;
  border-top: none;
  top: 40px;
  z-index: 100000;
}
.wjs_app > div {
  display: block;
}
-
-
@import导入其他less文件-
@charset "UTF-8";

@import "variables";

@import "mixins";

@import "topBar";

@import "banner";
-
-
运算及函数
-
escape(@string); // 通过 URL-encoding 编码字符串
e(@string); // 对字符串转义
%(@string, values…); // 格式化字符串
unit(@dimension, [@unit: “”]); // 移除或替换属性值的单位
color(@string); // 将字符串解析为颜色值
data-uri([mimetype,] url); // * 将资源内嵌到css中,可能回退到url()
ceil(@number); // 向上取整
floor(@number); // 向下取整
percentage(@number); // 将数字转换为百分比,例如 0.5 -> 50%
round(number, [places: 0]); // 四舍五入取整
sqrt(number); // * 计算数字的平方根
abs(number); // * 数字的绝对值
sin(number); // * sin函数
asin(number); // * arcsin函数
cos(number); // * cos函数
acos(number); // * arccos函数
tan(number); // * tan函数
atan(number); // * arctan函数
pi(); // * 返回PI
pow(@base, @exponent); // * 返回@base的@exponent次方
mod(number, number); // * 第一个参数对第二个参数取余
convert(number, units); // * 在数字之间转换
unit(number, units); // * 不转换的情况下替换数字的单位
color(string); // 将字符串或者转义后的值转换成颜色
rgb(@r, @g, @b); // 转换为颜色值
rgba(@r, @g, @b, @a); // 转换为颜色值
argb(@color); // 创建 #AARRGGBB 格式的颜色值
hsl(@hue, @saturation, @lightness); // 创建颜色值
hsla(@hue, @saturation, @lightness, @alpha); // 创建颜色值
hsv(@hue, @saturation, @value); // 创建颜色值
hsva(@hue, @saturation, @value, @alpha); // 创建颜色值
hue(@color); // 从颜色值中提取 hue 值(色相)
saturation(@color); // 从颜色值中提取 saturation 值(饱和度)
lightness(@color); // 从颜色值中提取 ‘lightness’ 值(亮度)
hsvhue(@color); // * 从颜色中提取 hue 值,以HSV色彩空间表示(色相)
hsvsaturation(@color); // * 从颜色中提取 saturation 值,以HSV色彩空间表示(饱和度)
hsvvalue(@color); // * 从颜色中提取 value 值,以HSV色彩空间表示(色调)
red(@color); // 从颜色值中提取 ‘red’ 值(红色)
green(@color); // 从颜色值中提取 ‘green’ 值(绿色)
blue(@color); // 从颜色值中提取 ‘blue’ 值(蓝色)
alpha(@color); // 从颜色值中提取 ‘alpha’ 值(透明度)
luma(@color); // 从颜色值中提取 ‘luma’ 值(亮度的百分比表示法)
saturate(@color, 10%); // 饱和度增加 10%
desaturate(@color, 10%); // 饱和度降低 10%
lighten(@color, 10%); // 亮度增加 10%
darken(@color, 10%); // 亮度降低 10%
fadein(@color, 10%); // 透明度增加 10%
fadeout(@color, 10%); // 透明度降低 10%
fade(@color, 50%); // 设定透明度为 50%
spin(@color, 10); // 色相值增加 10
mix(@color1, @color2, [@weight: 50%]); // 混合两种颜色
greyscale(@color); // 完全移除饱和度,输出灰色
contrast(@color1, [@darkcolor: black], [@lightcolor: white], [@threshold: 43%]); // 如果 @color1 的 luma 值 > 43% 输出 @darkcolor,否则输出 @lightcolor
multiply(@color1, @color2);
screen(@color1, @color2);
overlay(@color1, @color2);
softlight(@color1, @color2);
hardlight(@color1, @color2);
difference(@color1, @color2);
exclusion(@color1, @color2);
average(@color1, @color2);
negation(@color1, @color2);
iscolor(@colorOrAnything); // 判断一个值是否是颜色
isnumber(@numberOrAnything); // 判断一个值是否是数字(可含单位)
isstring(@stringOrAnything); // 判断一个值是否是字符串
iskeyword(@keywordOrAnything); // 判断一个值是否是关键字
isurl(@urlOrAnything); // 判断一个值是否是url
ispixel(@pixelOrAnything); // 判断一个值是否是以px为单位的数值
ispercentage(@percentageOrAnything); // 判断一个值是否是百分数
isem(@emOrAnything); // 判断一个值是否是以em为单位的数值
isunit(@numberOrAnything, “rem”); // * 判断一个值是否是指定单位的数值
-
例子
-
/*运算*/
@num:5;
ul{
  width: 100%*@num;
  li{
    width: 100%/@num;
    color: red+yellow+blue;
    background: gray*0.3;
    /*内置函数*/
    border-color: darken(red,20%);
  }
}
-
-
-
-
less无法在浏览器解析
-
<html lang="en">
<head>
    <meta charset="UTF-8">
    <title>Titletitle>
    <link rel="stylesheet" type="text/less" href="../less/test.less">
    <script src="../lib/less/less.min.js">script>
    <script>less.watch();script>
head>
<body>
<h3>在浏览器端使用lessh3>
<p>1.less无法在浏览器端直接使用p>
<p>2.浏览器不识别p>
<p>3.必须解析成css代码p>
<p>4.通过less解析插件(javascript)p>
<p>5.引入less文件需要加上 type="text/less" p>
<p>6.less.watch(); 无刷新预览样式p>
<p>7.以http形式打开网页预览p>
body>
html>
-
rem
-
rem是相对单位
-
em大小是基于父元素的字体大小*/
-
rem的大小是基于???/
-
浏览器默认的字体大小是16px*/
-
r 意思 root 根元素,html标签 */
-
rem的大小是基于html元素的字体大小/
-
rem换算公式
- 当前rem基准值 = 预设的基准值 / 设计稿宽度 * 当前设备的宽度
less rem 适配
- var.less
@charset "UTF-8";
//声明变量
//rem适配方案不好维护  设备会更新  设计稿尺寸  预设基准值
//适配主流设备十几种
@adapterDeviceList:750px,720px,640px,540px,480px,424px,414px,400px,384px,375px,360px,320px;
//设计稿尺寸(宽度)
@psdWidth:750px;
//预设基准值(HTML:font-size:)
@baseFontSize:100px;
//设备的种类
@len:length(@adapterDeviceList);
- mixins.less
// 定义方法
//遍历使用的是for循环
//less没有循环语法
//使用函数的迭代 死循环
//根据数组的长度去停止当前循环
//给函数的执行附加条件
//需要序号来判断  通过序号遍历 @index 1 开始
//遍历成功
//            (@index)->形参  ( @index > 0)-> 循环终止条件
.adapterMixin(@index) when ( @index > 0){
		//          extract方法  查询数组指定序号对应的内容
  @media (min-width: extract(@adapterDeviceList,@index)){
    html{
		        //换算公式 当前rem基准值 = 预设的基准值 / 设计稿宽度 * 当前设备的宽度
      font-size: @baseFontSize / @psdWidth * extract(@adapterDeviceList,@index);
    }
  }
  //自调用 i--
  .adapterMixin( @index - 1);
}
- daapter.less
// 调用方法
.adapterMixin(@len);
- index.less
@charset "UTF-8";
//输出文件
//变量
@import "var.less";
//混入
@import "mixins.less";
//适配
@import "adapter.less";
//重置样式
@import "reset.less";
- 使用
//模板需求100px 就100rem比上@baseFontSize
height: 100rem/@baseFontSize;
zepto
Zepto 模块
| module | default | description |
|---|---|---|
| zepto | ✔ | 核心模块;包含许多方法 |
| event | ✔ | 通过on()& off()处理事件 |
| ajax | ✔ | XMLHttpRequest 和 JSONP 实用功能 |
| form | ✔ | 序列化 & 提交web表单 |
| ie | ✔ | 增加支持桌面的Internet Explorer 10+和Windows Phone 8。 |
| detect | 提供 $.os和 $.browser消息 |
|
| fx | The animate()方法 |
|
| fx_methods | 以动画形式的 show, hide, toggle, 和 fade*()方法. |
|
| assets | 实验性支持从DOM中移除image元素后清理iOS的内存。 | |
| data | 一个全面的 data()方法, 能够在内存中存储任意对象。 |
|
| deferred | 提供 $.Deferredpromises API. 依赖"callbacks" 模块. 当包含这个模块时候, $.ajax() 支持promise接口链式的回调。 |
|
| callbacks | 为"deferred"模块提供 $.Callbacks。 |
|
| selector | 实验性的支持 jQuery CSS 表达式 实用功能,比如 $('div:first')和el.is(':visible')。 |
|
| touch | 在触摸设备上触发tap– 和 swipe– 相关事件。这适用于所有的touch(iOS, Android)和pointer事件(Windows Phone)。 |
|
| gesture | 在触摸设备上触发 pinch 手势事件。 | |
| stack | 提供 andSelf& end()链式调用方法 |
|
| ios3 | String.prototype.trim 和 Array.prototype.reduce 方法 (如果他们不 |
- touch对应事件
['swipe', 'swipeLeft', 'swipeRight', 'swipeUp', 'swipeDown','doubleTap', 'tap', 'singleTap', 'longTap']
mui
官网
轮播图
- 结构
<div class="mui-slider">
							  <div class="mui-slider-group mui-slider-loop">

								<div class="mui-slider-item mui-slider-item-duplicate"><a href="#"><img src="images/banner4.png" />a>div>
								<div class="mui-slider-item"><a href="#"><img src="images/banner1.png" />a>div>
								<div class="mui-slider-item"><a href="#"><img src="images/banner2.png" />a>div>
								<div class="mui-slider-item"><a href="#"><img src="images/banner3.png" />a>div>
								<div class="mui-slider-item"><a href="#"><img src="images/banner4.png" />a>div>


								<div class="mui-slider-item mui-slider-item-duplicate"><a href="#"><img src="images/banner1.png" />a>div>
							  div>

							  <div class="mui-slider-indicator">
							          <div class="mui-indicator mui-active">div>
							          <div class="mui-indicator ">div>
							          <div class="mui-indicator">div>
							          <div class="mui-indicator">div>
							      div>
							div>
-
初始化
//获得slider插件对象 var gallery = mui('.mui-slider'); gallery.slider({ interval:2000//自动轮播周期,若为0则不自动播放,默认为0; -
mui 类名
mui-ellipsis-2- 文字长度大于盒子时两行显示大于部分显示为”…“
下拉刷新
官方文档
- html结构
<div id="refreshContainer" class="mui-content mui-scroll-wrapper">
  <div class="mui-scroll">

    <ul class="mui-table-view mui-table-view-chevron">

    ul>
  div>
div>
- 初始化
mui.init({
  pullRefresh : {
    container:"#refreshContainer",//下拉刷新容器标识,querySelector能定位的css选择器均可,比如:id、.class等
    down : {
      height:50,//可选,默认50.触发下拉刷新拖动距离,
      auto: true,//可选,默认false.首次加载自动下拉刷新一次
      contentdown : "下拉可以刷新",//可选,在下拉可刷新状态时,下拉刷新控件上显示的标题内容
      contentover : "释放立即刷新",//可选,在释放可刷新状态时,下拉刷新控件上显示的标题内容
      contentrefresh : "正在刷新...",//可选,正在刷新状态时,下拉刷新控件上显示的标题内容
      callback :function () {
				var that = this;  //组件对象
				//必选,刷新函数,根据具体业务来编写,比如通过ajax从服务器获取新数据;
				//处理完ajax数据获取成功后
				//停止下拉刷新 !!!!!!
				that.endPulldownToRefresh();
			 	/*上拉加载重置*/
                that.refresh(true);

		  }
    },
      //上拉刷新
     up:{

  }
  }
});
上拉刷新
概述
mui的上拉加载和下拉刷新类似,都属于pullRefresh插件,使用过程如下:
- 1、页面滚动到底,显示“正在加载…”提示(mui框架提供)
- 2、执行加载业务数据逻辑(开发者提供)
- 3、加载完毕,隐藏"正在加载"提示(mui框架提供)
开发者只需关心业务逻辑,实现加载更多数据即可。
初始化
初始化方法类似下拉刷新,通过mui.init方法中pullRefresh参数配置上拉加载各项参数,如下:
mui.init({
  pullRefresh : {
    container:refreshContainer,//待刷新区域标识,querySelector能定位的css选择器均可,比如:id、.class等
    up : {
      height:50,//可选.默认50.触发上拉加载拖动距离
      auto:true,//可选,默认false.自动上拉加载一次
      contentrefresh : "正在加载...",//可选,正在加载状态时,上拉加载控件上显示的标题内容
      contentnomore:'没有更多数据了',//可选,请求完毕若没有更多数据时显示的提醒内容;
      callback :pullfresh-function //必选,刷新函数,根据具体业务来编写,比如通过ajax从服务器获取新数据;
    }
  }
});
结束上拉加载
加载完新数据后,需要执行endPullupToRefresh()方法,结束转雪花进度条的“正在加载…”过程
-
.endPullupToRefresh( nomore )
-
nomore
Type: Boolean
是否还有更多数据;若还有更多数据,则传入false; 否则传入true,之后滚动条滚动到底时,将不再显示“上拉显示更多”的提示语,而显示“没有更多数据了”的提示语;
-
示例:
function pullfresh-function() {
     //业务逻辑代码,比如通过ajax从服务器获取新数据;
     ......
     //注意:
     //1、加载完新数据后,必须执行如下代码,true表示没有更多数据了:
     //2、若为ajax请求,则需将如下代码放置在处理完ajax响应数据之后
     this.endPullupToRefresh(true|false);
}
重置上拉加载
若部分业务中,有重新触发上拉加载的需求(比如当前类别已无更多数据,但切换到另外一个类别后,应支持继续上拉加载),此时调用.refresh(true)方法,可重置上拉加载控件,如下代码:
//pullup-container为在mui.init方法中配置的pullRefresh节点中的container参数;
//注意:refresh()中需传入true
mui('#pullup-container').pullRefresh().refresh(true);
/*上拉加载重置*/
组件对象.refresh(true);
禁用上拉刷新
在部分场景下希望禁用上拉加载,比如在列表数据过少时,不想显示“上拉显示更多”、“没有更多数据”的提示语,开发者可以通过调用disablePullupToRefresh()方法实现类似需求,代码如下:
//pullup-container为在mui.init方法中配置的pullRefresh节点中的container参数;
mui('#pullup-container').pullRefresh().disablePullupToRefresh();
启用上拉刷新
组件对象.pulldownLoading()
使用disablePullupToRefresh()方法禁用上拉加载后,可通过enablePullupToRefresh()方法再次启用上拉加载,代码如下:
//pullup-container为在mui.init方法中配置的pullRefresh节点中的container参数;
mui('#pullup-container').pullRefresh().pulldownLoading();
提示框
mui.toast('请选择购买数量!')
消息框
			 //mui初始化
			mui.init({
				swipeBack: true //启用右滑关闭功能
			});
			var info = document.getElementById("info");
			document.getElementById("alertBtn").addEventListener('tap', function() {
				mui.alert('欢迎使用Hello MUI', 'Hello MUI', function() {
					info.innerText = '你刚关闭了警告框';
				});
			});
			document.getElementById("confirmBtn").addEventListener('tap', function() {
				var btnArray = ['是', '否'];
				mui.confirm('MUI是个好框架,确认?', 'Hello MUI', btnArray, function(e) {
					if (e.index == 0) {
						info.innerText = '你刚确认MUI是个好框架';
					} else {
						info.innerText = 'MUI没有得到你的认可,继续加油'
					}
				})
			});
			document.getElementById("promptBtn").addEventListener('tap', function(e) {
				e.detail.gesture.preventDefault(); //修复iOS 8.x平台存在的bug,使用plus.nativeUI.prompt会造成输入法闪一下又没了
				var btnArray = ['确定', '取消'];
				mui.prompt('请输入你对MUI的评语:', '性能好', 'Hello MUI', btnArray, function(e) {
					if (e.index == 0) {
						info.innerText = '谢谢你的评语:' + e.value;
					} else {
						info.innerText = '你点了取消按钮';
					}
				})
			});
			document.getElementById("toastBtn").addEventListener('tap', function() {
				mui.toast('欢迎体验Hello MUI');
			});
小知识
-
通常移动端的图片二倍图解决失真问题
- 采用缩放的方式 原图宽高为80的 设置时设置40px
-
背景精灵图(当需求容器大精灵图小的时候 用padding将容器撑大,然后剪切内容以外的 )
-
width: 40px; height: 44px; padding: 12px 10px; position: absolute; top: 0; /*让背景从内容开始平铺*/ background-origin: content-box; /*没有做背景裁剪 背景图默认就是从边框显示*/ /*默认的就是 border-box 边框以外被裁剪掉 padding-box 内边距以外被裁剪掉 content-box 内容以外被裁剪掉 */ background-clip: content-box;![[外链图片转存失败(img-xQeOUmF3-1566286938538)(img/)]](http://img.e-com-net.com/image/info8/0274c30986084e7bb7e86ab96b714029.png)
在移动断调用虚拟键盘的时候 enter键变成 搜索按钮
<form action="#"> <input type="search" placeholder="搜索你喜欢的商品"> form> -
form表单 与 form表单外的submit按钮关联
- 给form 一个id
<form id="form">
	<input type="text" name="name"/>
	<input type="password" name="password"/>
form>
- 对应的
submit按钮添加form="idName"
<div>
	<button type="submit" class="btn btn-primary" form="form">提交button>
div>
表单序列化
<form class="mui-input-group">
    <div class="mui-input-row">
        <label>用户名label>
    <input name="username" type="text" class="mui-input-clear" placeholder="请输入用户名">
    div>
    <div class="mui-input-row">
        <label>密码label>
        <input name="password" type="password" class="mui-input-password" placeholder="请输入密码">
    div>
    <div class="mui-button-row">
        <button type="button" class="mui-btn mui-btn-primary" >确认button>
        <button type="button" class="mui-btn mui-btn-danger" >取消button>
    div>
form>
$(function ($) {
	// form表单中input等 一定要有对应的name
	// form表单序列化转键值对形式的字符串
	var formStr = $("form").serialize();
	console.log(formStr)
    //"username=&password="

    // form表单序列化转数组形式
	var formArr = $("form").serializeArray();
	console.log(formArr)
	// (2) [{…}, {…}]
	// 0: {name: "username", value: ""}
	// 1: {name: "password", value: ""}
	// length: 2
})
将键值对字符串转成对象
//  formStr = "username=&password="
	function getFormData (formStr) {
		var obj = {};
		var oldArr = formStr.split("&");
		oldArr.forEach(function (itme,i) {
			var newArr = itme.split("=");
			obj[newArr[0]] = newArr[1];

		})
		return obj; //{username: "", password: ""}
	}
表单自动校验插件 BootstrapValidator
一.首先引入BootstrapValidator插件
- BootstrapValidator插件需要jQuery和Bootstrap 3
- 引入js和css文件
bootstrap.cssbootstrapValidator.min.cssjquery-1.10.2.min.jsbootstrap.jsbootstrapValidator.min.js
<link rel="stylesheet" href="/path/to/bootstrap/css/bootstrap.css"/>
<link rel="stylesheet" href="/path/to/dist/css/bootstrapValidator.min.css"/>

<script type="text/javascript" src="/path/to/jquery/jquery-1.10.2.min.js"></script>
<script type="text/javascript" src="/path/to/bootstrap/js/bootstrap.min.js"></script>
<!-- 使用压缩过的版本-->
<script type="text/javascript" src="/path/to/dist/js/bootstrapValidator.min.js"></script>
<!-- 使用包含所有验证器的未压缩版本 -->
<script type="text/javascript" src="/path/to/dist/js/bootstrapValidator.js"></script>
二.添加验证规则
1.使用HTML添加简单验证
- 如果想对某一个字段添加验证规则,需要 包裹,input标签必须有name值,此值为验证匹配的字段。其实就是要符合bootstrap表单结构
<form id="login" class="form-horizontal" autocomplete="off">
   <div class="form-group">
       <label for="inputUserName3" class="col-sm-3 control-label">用户名label>
       <div class="col-sm-9">
           <input name="username" type="text" class="form-control" id="inputUserName3" placeholder="请输入用户名">
       div>
   div>
   <div class="form-group">
       <label for="inputPassword3" class="col-sm-3 control-label">密码label>
       <div class="col-sm-9">
           <input name="password" type="password" class="form-control" id="inputPassword3" placeholder="请输入密码">
       div>
   div>
   <div class="form-group">
       <div class="col-sm-offset-3 col-sm-10">
           <button type="reset" class="btn btn-default mr_50">重置button>
           <button type="submit" class="btn btn-primary">登录button>
       div>
   div>form>
2.js校验
$(function () {
    /*初始化校验插件*/
    /*1.是form表单结构 并且有一个提交按钮*/
    /*2.折插件就是jquery插件 样式和bootstrap风格一致*/
    /*默认不去校验的表单元素(包含隐藏)为[] 代表都校验, ["hidden"] 代表	input 不校验*/
	excluded:[],
    /*#login为form表单id*/
    $('#login').bootstrapValidator({
        /*配置校验的不同状态下显示的图标*/
        feedbackIcons: {
            valid: 'glyphicon glyphicon-ok',
            invalid: 'glyphicon glyphicon-remove',
            validating: 'glyphicon glyphicon-refresh'
        },
        /*需要校验的表单元素 通过名称 name*/
        /* 校验中 VALIDATING */
        fields: {
            /*username为对应表单元素的name="username"*/
            username: {
                /*校验规则 多个校验规则*/
                validators: {
                    notEmpty: {
                        message: '请输入用户名'
                    },
                    /*配置一个校验规则*/
                    callback:{
                        message:'用户名不存在'
                    }
                }
            },
            password: {
                validators: {
                    notEmpty: {
                        message: '请输入密码'
                    },
                    stringLength: {
                        min: 6,
                        max: 18,
                        message: '密码必须是6-18个字符'
                    },
                    callback:{
                        message:'密码错误'
                    }
                }
            }
        }
    }).on('success.form.bv', function (e) {
        /*校验成功的时候出发*/
        /*阻止表单的默认提交  使用ajax提交*/
        e.preventDefault();
        /*后台校验用户名和密码 获取form元素*/
        var $form = $(e.target);
        $.ajax({
            type:'post',
            url:'/employee/employeeLogin',
            data:$form.serialize(),
            dataType:'json',
            success:function (data) {
                /*业务成功*/
                if(data.success == true){
                    /*跳转后台的首页*/
                    location.href = '/admin33/';
                }
                /*业务失败*/
                else {
                    if(data.error == 1000){
                        /*用户名错误*/
                        /*设置用户名这个表单元素的校验状态为失败*/
                        /*NOT_VALIDATED 还没校验, VALIDATING 校验中, INVALID 失败 or VALID 成功*/
                        /*自定义提示信息 !!!!!!*/
                        /*1.获取校验组件 name="username"*/
                        /*2.调研更改状态的函数*/
                        /*3.校验的表单,改成什么状态,使用上面定义的哪个校验规则*/
                        $form.data('bootstrapValidator').updateStatus('username','INVALID','callback');
                    }else if(data.error == 1001){
                        /*密码错误*/
                        $form.data('bootstrapValidator').updateStatus('password','INVALID','callback');
                    }
                }
            }
        });
    });
});
- 自定义提示信息
//updateStatus 三个参数 对应表单名,状态,自定义学习
$form.data('bootstrapValidator').updateStatus('password','INVALID','callback');
- js修改校验状态
- 四大状态
NOT_VALIDATED 还没校验, VALIDATING 校验中, INVALID 失败 or VALID 成功
- 四大状态
$("#aa").on("click",function () {                       /*对应表单名  , 状态*/
     $('#form').data('bootstrapValidator').updateStatus('categoryId','VALID')
})
进度条插件
nprogress
官网下载地址:http://ricostacruz.com/nprogress/
1.引用
"stylesheet" href="nprogress/nprogress.css"/>
2.使用
/*在ajax开始请求的时候调用方法进度条显示出来*/
$(window).ajaxStart(function(){
    NProgress.start();
});
/*在ajax结束请求的时候调用方法把进度条完成改变*/
$(window).ajaxStart(function(){
    NProgress.done();
});
文件上传插件 fileupload
- 引用
<script src="assets/jquery/jquery.min.js">script>
<script src="assets/jquery-fileupload/jquery.ui.widget.js">script>
<script src="assets/jquery-fileupload/jquery.fileupload.js">script>
- html结构
<input type="file" name="pic1">
- js使用
	/*初始化上传插件*/
    $('[name="pic1"]').fileupload({
        /*上传地址*/
        url:'/category/addSecondCategoryPic',
        /*返回格式*/
        dataType: 'json',
        /*上传成功*/
        done: function (e, data) {

        }
    });