@Component,@service,@autowired等注解的实现原理
默认情况下bean Name的默认生成策略;
@component @service @Controller @Respository
入口肯定是BeanNameGenerator接口声明的generateBeanName(BeanDefinition,BeanDefinitionRegistry)方法,该方法做了一个分类判断,处理AnnotationBeanDefinition和DefaultBeanNameGenerator两种方式的。这里只看注解方式。
public interface BeanNameGenerator {
    String generateBeanName(BeanDefinition var1, BeanDefinitionRegistry var2);
}
AnnotationBeanDefinition.java
public class AnnotationBeanNameGenerator implements BeanNameGenerator {

	private static final String COMPONENT_ANNOTATION_CLASSNAME = "org.springframework.stereotype.Component";

	@Override
	public String generateBeanName(BeanDefinition definition, BeanDefinitionRegistry registry) {
		// 判断是AnnotatedBeanDefinition的实现,就从annotation获得。
		if (definition instanceof AnnotatedBeanDefinition) {
			String beanName = determineBeanNameFromAnnotation((AnnotatedBeanDefinition) definition);
			// 是文本就返回这个beanName,但是也有可能annotation的value是null,就后从buildDefaultBeanName获得
			if (StringUtils.hasText(beanName)) {
				return beanName;
			}
		}
		return buildDefaultBeanName(definition, registry);
	}

	protected String determineBeanNameFromAnnotation(AnnotatedBeanDefinition annotatedDef) {
		// 获得类或者方法上所有的Annotation
		AnnotationMetadata amd = annotatedDef.getMetadata();
		// 得到所有annotation的类名
		Set types = amd.getAnnotationTypes();
		String beanName = null;
		for (String type : types) {
			// 把annotation里面的字段与value,解读出来成map,字段名是key,value为value
			AnnotationAttributes attributes = AnnotationConfigUtils.attributesFor(amd, type);
			// 判断annotation是否有效,是否存在作为beanName的字段有value
			if (isStereotypeWithNameValue(type, amd.getMetaAnnotationTypes(type), attributes)) {
				// 从注解中获得value字段的值,
				Object value = attributes.get("value");
				if (value instanceof String) {
					String strVal = (String) value;
					if (StringUtils.hasLength(strVal)) {
						if (beanName != null && !strVal.equals(beanName)) {
							throw new IllegalStateException("Stereotype annotations suggest inconsistent " +"component names: '" + beanName + "' versus '" + strVal + "'");
						}
						beanName = strVal;
					}
				}
			}
		}
		return beanName;
	}


	protected boolean isStereotypeWithNameValue(String annotationType,Set metaAnnotationTypes, Map attributes) {
		// 判断annotation的类型是否是这三种.
		// org.springframework.stereotype.Component
		// javax.annotation.ManagedBean
		// javax.inject.Named

		boolean isStereotype = annotationType.equals(COMPONENT_ANNOTATION_CLASSNAME) ||
				(metaAnnotationTypes != null && metaAnnotationTypes.contains(COMPONENT_ANNOTATION_CLASSNAME)) ||
				annotationType.equals("javax.annotation.ManagedBean") ||
				annotationType.equals("javax.inject.Named");
		// 并且value存在值。才会返回true
		return (isStereotype && attributes != null && attributes.containsKey("value"));
	}


	protected String buildDefaultBeanName(BeanDefinition definition, BeanDefinitionRegistry registry) {
		return buildDefaultBeanName(definition);
	}


	protected String buildDefaultBeanName(BeanDefinition definition) {
		// 获得类名
		String shortClassName = ClassUtils.getShortName(definition.getBeanClassName());
		// 把类名第一个字母大写转小写
		return Introspector.decapitalize(shortClassName);
	}

}
debug测试:容器启动就开始注册bean
然后进入到红色箭头指向的地方
这里MconfiAop转为mconfiAop
以后注册进入容器中的beanName
默认的都是类名第一个字母小写,
不是默认策略就是value;里面的值value作为beanName
-------------------------------------------------- -------------------------------------------------- -----------
包扫描注册豆的原理分析
![]()
@service @Controller @Respository注解上面都标注了@Component注解它们之间是等效的
只是为了分层标注
@Component的实现原理:
我们知道它们是向IOC容器中注册beanDefiniton,而背景是自定义标签根据之前讲解的自定义标签解析
我们知道自定义标签的解析为如下方法DefaultBeanDefinitionDocumentReader.java
![]()
解析自定义标签的时候首先需要获得XML中名称空间BeanDefinitionParserDelegate.java
String namespaceUri = this.getNamespaceURI(ele);//xmlns:context="http://www.springframework.org/schema/context"然后根据名称空间找到对应的找到对应的NameSpaceHandler来进行处理
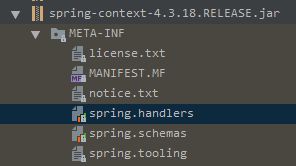
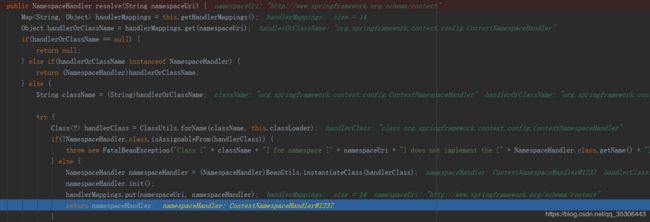
NamespaceHandler handler = this.readerContext.getNamespaceHandlerResolver().resolve(namespaceUri);默认在/ META-INF下spring.handler
![]()
我们最终找到了ContextNamespaceHandler
public class ContextNamespaceHandler extends NamespaceHandlerSupport {

    public void init() {
        this.registerBeanDefinitionParser("property-placeholder", new PropertyPlaceholderBeanDefinitionParser());
        this.registerBeanDefinitionParser("property-override", new PropertyOverrideBeanDefinitionParser());
        this.registerBeanDefinitionParser("annotation-config", new AnnotationConfigBeanDefinitionParser());
        this.registerBeanDefinitionParser("component-scan", new ComponentScanBeanDefinitionParser());
   。。。。。。。
}
这段代码中注册了许多解析器,我们重点关注ComponentScanBeanDefinitionParser
锁定解析()方法
public BeanDefinition parse(Element element, ParserContext parserContext) {
    String basePackage = element.getAttribute(BASE_PACKAGE_ATTRIBUTE); // 获取base-package属性
    basePackage = parserContext.getReaderContext().getEnvironment().resolvePlaceholders(basePackage); // 处理包路径        中的特殊符号,如${}
    // 分割
    String[] basePackages = StringUtils.tokenizeToStringArray(basePackage,
            ConfigurableApplicationContext.CONFIG_LOCATION_DELIMITERS);
            /* 配置Scanner */
    ClassPathBeanDefinitionScanner scanner = configureScanner(parserContext, element);
    /* 扫描 */
    Set beanDefinitions = scanner.doScan(basePackages);
    /* 注册一些注解相关的PostProcessor,将BeanDefinition注册完成的事件通知给相关监听器 */
    registerComponents(parserContext.getReaderContext(), beanDefinitions, element);
    return null;
} ![]()
 protected ClassPathBeanDefinitionScanner createScanner(XmlReaderContext readerContext, boolean useDefaultFilters) {
        return new ClassPathBeanDefinitionScanner(readerContext.getRegistry(), useDefaultFilters, readerContext.getEnvironment(), readerContext.getResourceLoader());
    }
直到 ClassPathScanningCandidateComponentProvider.java![]()
protected void registerDefaultFilters(){
//添加默认的组件注解的过滤器
this.includeFilters.add(new AnnotationTypeFilter(Component.class));
ClassLoader cl = ClassPathScanningCandidateComponentProvider.class.getClassLoader();
}
我们看到了默认的@Component注解过滤器的添加,而我们常用的@服务,@控制器等注解都使用了@Component注解,所以同样会匹配这个过滤器。
protected Set
Assert.notEmpty(basePackages,“必须至少指定一个基本包”);
设置
for(String basePackage:basePackages){
/ *获取候选的BeanDefinition * /
Set
for(BeanDefinition candidate:candidate){
/ *处理@Scope注解元数据* /
ScopeMetadata scopeMetadata = this.scopeMetadataResolver.resolveScopeMetadata(candidate);
candidate.setScope(scopeMetadata.getScopeName());
//生成beanName
String beanName = this.beanNameGenerator.generateBeanName(candidate,this.registry);
if(候选instanceof AbstractBeanDefinition){
postProcessBeanDefinition((AbstractBeanDefinition)candidate,beanName);
}
如果(候选的instanceof AnnotatedBeanDefinition){
//其他注解的处理
AnnotationConfigUtils.processCommonDefinitionAnnotations((AnnotatedBeanDefinition)候选);
}
//检查BeanDefinition
if(checkCandidate(beanName,candidate)){
BeanDefinitionHolder definitionHolder = new BeanDefinitionHolder(candidate,beanName);
definitionHolder =
AnnotationConfigUtils.applyScopedProxyMode(scopeMetadata,definitionHolder,this.registry);
beanDefinitions.add(definitionHolder);
//注册BeanDefinition
registerBeanDefinition(definitionHolder,this.registry);
}
}
}
返回的BeanDefinitions;
findCandidateComponents()方法会获取basePackage的值
![]() 里面的isCandidateComponent()方法用来过滤之前添加的过滤器过滤资源
里面的isCandidateComponent()方法用来过滤之前添加的过滤器过滤资源
protected boolean isCandidateComponent(MetadataReader metadataReader)throws IOException {
// excludeFilter过滤
for(TypeFilter tf:this.excludeFilters){
if(tf.match(metadataReader,this.metadataReaderFactory)){
return false;
}
}
//
includeFilter 过滤for(TypeFilter tf:this.includeFilters){
if(tf.match(metadataReader,this.metadataReaderFactory)){
// @Conditional注解解析和判断
return isConditionMatch(metadataReader);
}
}
返回false;
}
默认情况excludeFilters是空的,includeFilters包含之前添加的@Component注解的AnnotationTypeFilter,所以这里会过滤掉不包含@Component注解的类。然后就是生成beanDifiniton和注册beanDefinition
@Autowired
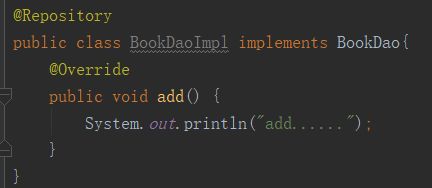
我们知道在整合SSM项目中我们一般是在实现类上加上@Component等组件,但是我们使用@Autowired注解注入的时候其实注入得是类型的接口下面看看演示:
如果使用@resource需要改变注入到beanName ---按名称装配
在@Autowired的定义中有下面一段话:链接
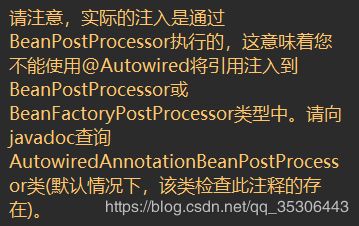
Note that actual injection is performed through a BeanPostProcessor
which in turn means that you cannot use @Autowired to inject references into BeanPostProcessor
or BeanFactoryPostProcessor types.
Please consult the javadoc for the AutowiredAnnotationBeanPostProcessor class
(which, by default, checks for the presence of this annotation).
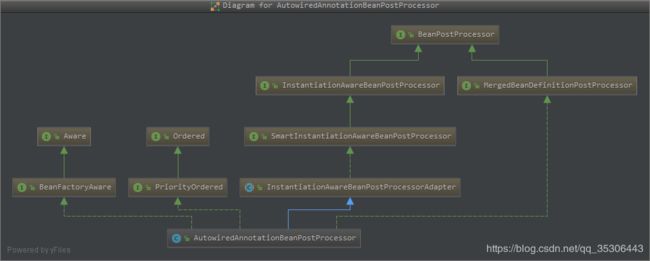
有图可知AutowiredAnnotationBeanPostProcessor实现了BeanPostProcessor的,IOC容器启动时候@Autowired注解会工作
@autowired注释会自动装配按类型
这种类型有多个则会按照注册的属相值作为id注入:容器中有两个UserDao类型userdao1 userdao2,@ UserDao userdao2
则注入的userdao2类型加上@Qualifier( “userdao1”):使用@Qualifier指定需要装配的组件的ID,而不是使用属性名,明确指定使用userdao1自动装配默认一定要将属性赋值好,没有就会报错;可以使用@Autowired(required = false);
@Primary:让春天进行自动装配的时候,默认使用首选的豆;
下面看看原理:我们知道AutowiredAnnotationBeanPostProcessor实现的,查看该类的源码会发现它实现了MergedBeanDefinitionPostProcessor接口,进而实现了接口中的postProcessMergedBeanDefinition方法。
来源
根据对Spring源码的分析我们知道BeanPostProcessor原理在对豆的实例化和初始化时AbstractAutowireCapableBeanFactory.java中的doCreateBean方法中有这样一段代码
 synchronized(mbd.postProcessingLock) {
            if(!mbd.postProcessed) {
                try {
                    this.applyMergedBeanDefinitionPostProcessors(mbd, beanType, beanName);
                } catch (Throwable var17) {
                    throw new BeanCreationException(mbd.getResourceDescription(), beanName, "Post-processing of merged bean definition failed", var17);
                }

                mbd.postProcessed = true;
            }
        }
在这段代码中会执行applyMergedBeanDefinitionPostProcessors(mbd,beanType,beanName),深入这段代码又会执行postProcessMergedBeanDefinition
  protected void applyMergedBeanDefinitionPostProcessors(RootBeanDefinition mbd, Class beanType, String beanName) {
        Iterator var4 = this.getBeanPostProcessors().iterator();

        while(var4.hasNext()) {
            BeanPostProcessor bp = (BeanPostProcessor)var4.next();
            if(bp instanceof MergedBeanDefinitionPostProcessor) {
                MergedBeanDefinitionPostProcessor bdp = (MergedBeanDefinitionPostProcessor)bp;
                bdp.postProcessMergedBeanDefinition(mbd, beanType, beanName);
            }
        }

    }
接口
public interface MergedBeanDefinitionPostProcessor extends BeanPostProcessor {
    void postProcessMergedBeanDefinition(RootBeanDefinition var1, Class var2, String var3);
}
实现类
public class AutowiredAnnotationBeanPostProcessor extends InstantiationAwareBeanPostProcessorAdapter implements MergedBeanDefinitionPostProcessor, PriorityOrdered, BeanFactoryAware {
。。。。。。
  public void postProcessMergedBeanDefinition(RootBeanDefinition beanDefinition, Class beanType, String beanName) {
        if(beanType != null) {
//找到@autowired注解

            InjectionMetadata metadata = this.findAutowiringMetadata(beanName, beanType, (PropertyValues)null);
   metadata.checkConfigMembers(beanDefinition);
        }

    }
。。。。。。。

}
上述信息:找到beanName(也重要)
如何找到策略有疑惑
![]()
![]()
AnnotationAttributes ann = AutowiredAnnotationBeanPostProcessor.this.findAutowiredAnnotation(bridgedMethod);
//找到所有的注解方法

 private AnnotationAttributes findAutowiredAnnotation(AccessibleObject ao) {
        if(ao.getAnnotations().length > 0) {
//遍历所有的@autowired注解类型
            Iterator var2 = this.autowiredAnnotationTypes.iterator();

            while(var2.hasNext()) {
                Class type = (Class)var2.next();
                AnnotationAttributes attributes = AnnotatedElementUtils.getMergedAnnotationAttributes(ao, type);
                if(attributes != null) {
                    return attributes;
                }
            }
        }
同样,在doCreateBean方法中执行populateBean方法实现对属性的注入。
这段代码中会遍历所有注册过的BeanPostProcessor的接口实现类的实例,如果实例属于InstantiationAwareBeanPostProcessor类型的,则执行实例类的postProcessPropertyValues方法.AutowiredAnnotationBeanPostProcessor继承了InstantiationAwareBeanPostProcessorAdapter,而AutowiredAnnotationBeanPostProcessor间接实现了InstantiationAwareBeanPostProcessor接口,所以这里会执行到AutowiredAnnotationBeanPostProcessor类的postProcessPropertyValues方法,具体代码如下。
findAutowiringMetadata方法获取该bean的InjectionMetadata实例(也就是有哪些属性需要被自动装配,也就是查找被@Autowired注解标记的元素)
metadata.inject(bean,beanName,pvs)代码的执行会进入如下注入方法中,在这里完成依赖的注入。
AutowiredAnnotationBeanPostProcessor.java
 protected void inject(Object bean, String beanName, PropertyValues pvs) throws Throwable {
            Field field = (Field)this.member;//bookDao1
            Object value;
            if(this.cached) {
                value = AutowiredAnnotationBeanPostProcessor.this.resolvedCachedArgument(beanName, this.cachedFieldValue);
            } else {
                DependencyDescriptor desc = new DependencyDescriptor(field, this.required);
                desc.setContainingClass(bean.getClass());
                Set autowiredBeanNames = new LinkedHashSet(1);
                TypeConverter typeConverter = AutowiredAnnotationBeanPostProcessor.this.beanFactory.getTypeConverter();

                try {
                    value = AutowiredAnnotationBeanPostProcessor.this.beanFactory.resolveDependency(desc, beanName, autowiredBeanNames, typeConverter);
                } catch (BeansException var12) {
                    throw new UnsatisfiedDependencyException((String)null, beanName, new InjectionPoint(field), var12);
                }

                synchronized(this) {
                    if(!this.cached) {
                        if(value == null && !this.required) {
                            this.cachedFieldValue = null;
                        } else {
                            this.cachedFieldValue = desc;
                            AutowiredAnnotationBeanPostProcessor.this.registerDependentBeans(beanName, autowiredBeanNames);
                            if(autowiredBeanNames.size() == 1) {
                                String autowiredBeanName = (String)autowiredBeanNames.iterator().next();
                                if(AutowiredAnnotationBeanPostProcessor.this.beanFactory.containsBean(autowiredBeanName) && AutowiredAnnotationBeanPostProcessor.this.beanFactory.isTypeMatch(autowiredBeanName, field.getType())) {
                                    this.cachedFieldValue = new AutowiredAnnotationBeanPostProcessor.ShortcutDependencyDescriptor(desc, autowiredBeanName, field.getType());
                                }
                            }
                        }

                        this.cached = true;
                    }
                }
            }

            if(value != null) {
                ReflectionUtils.makeAccessible(field);
                field.set(bean, value);
            }

        }
} ![]()
![]()
![]()
嗯关键的一步是BookDaoImpl怎么找到的,我看看。调试了三个小时终于找到真正得到BookDaoimpl的地方,非常精彩
使用spring特有的通过getBean方法传入beanName和接口类型得到然后放到map中,之后从map中的到key和value
最后实现上面的注册。
直接从注入的缓存中那个通过BeanName得到对象(实现类)
上述的bean当于XML
![]()
protected void inject(Object bean, String beanName, PropertyValues pvs) throws Throwable {value = AutowiredAnnotationBeanPostProcessor.this.beanFactory.resolveDependency(desc, beanName, autowiredBeanNames, typeConverter);//这个方法会返回BookDaoimpl
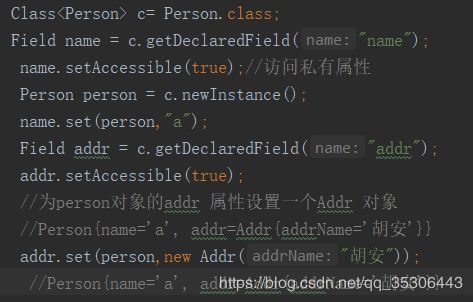
}意思为:BookDao1字段设置一个BookDaoImpl对象的值,相似代码如下:
流程1读取所有bean,2实例化bean,3为字段设置值
原理总结:就是给BookServeimpl(实现类)中的属性bookDao1注入一个实现类(相当于new对象实例化)
在setter方法注入原理相当于调用method.invoke(bean,value)方法
bean相当于BookServiceImpl对象,值表示BookService类里面BookDao对象的属性
666666666完结撒花
----------------------------------
链接拓展
Spring Import三种用法与源码解读
继续:
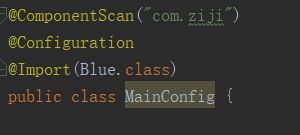
我们知道可以通过@import注解导入组件,只能加载类上
(1)注册了蓝组件
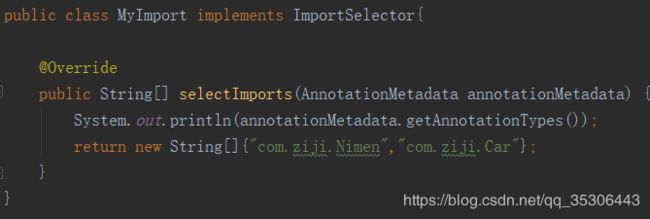
还可以通过ImportSelector注入组件和使用ImportBeanDefinitionRegistrar注册
(2)注册了Nimen和Car组件
(3)注册了黄色这个组件
(2),(3)需要使用进口标签
我们知道进口标签是朝春容器中注册组件,春季注册豆是在初始化之前
ConfigurationClassPostProcessor实现了BeanDefinitionRegistryPostProcessor,BeanDefinitionRegistryPostProcessor
继承了BeanFactoryPostProcessorpublic interface BeanDefinitionRegistryPostProcessor extends BeanFactoryPostProcessor {
void postProcessBeanDefinitionRegistry(BeanDefinitionRegistry var1) throws BeansException;
}源码分析
 public void postProcessBeanDefinitionRegistry(BeanDefinitionRegistry registry) {
        int registryId = System.identityHashCode(registry);
        if(this.registriesPostProcessed.contains(Integer.valueOf(registryId))) {
            throw new IllegalStateException("postProcessBeanDefinitionRegistry already called on this post-processor against " + registry);
        } else if(this.factoriesPostProcessed.contains(Integer.valueOf(registryId))) {
            throw new IllegalStateException("postProcessBeanFactory already called on this post-processor against " + registry);
        } else {
            this.registriesPostProcessed.add(Integer.valueOf(registryId));
            this.processConfigBeanDefinitions(registry);
        }
    }
this.processConfigBeanDefinitions()方法:处理配置配置
ConfigurationClassParser.java解析@import标签


