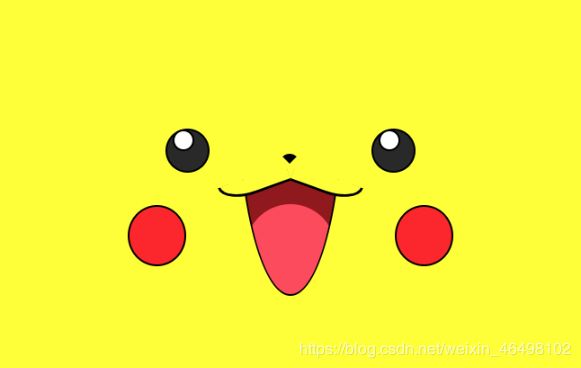
实现的皮卡丘样式如下图:
本篇内容List:
tip1--全局样式初始化,配置
tip2--实现鼻子
tip3--实现眼睛
tip4--实现脸颊
tip5--嘴巴实现

1.先进行页面整体的样式配置
这里我们要在手机端展示,所以我们尽量整个图形的宽度要小于手机屏幕的最小宽度,代码如下:
   * {
      margin: 0;
      padding: 0;
      box-sizing: border-box;
    }
    *::before {
      margin: 0;
      padding: 0;
      box-sizing: border-box;
    }
    *::after {
      margin: 0;
      padding: 0;
      box-sizing: border-box;
    }
    //设置body样式使内容居中等
    body {
      width: 100%;
      height: 100vh;
      background-color: yellow;
      border: 1px solid green;
      display: flex;
      justify-content: center;
      align-items: center;
    }
    //为我们需要画图的主体区域
    .wrapper {
      width: 100%;
      height: 220px;
      position: relative;
    }
2.鼻子的绘画
利用一个div盒子宽高等于0,然后给予边宽来撑大盒子,再取消不需要的边框,就可以实现一个圆饼的效果,代码如下
.nose {
      width: 0;
      height: 0;
      border: 11px solid red;
      border-radius: 12px;
      border-color: black transparent transparent transparent;
      position: absolute;
      left: 50%;
      top: 28px;
      transform: translate(-12px);
    }
3.眼睛的绘画
我们把相同的眼睛代码写在一个class中,左右眼不同的样式分别写类名来控制,在测量的时候我们可以以最中间的鼻子基准来写代码,代码如下;
 .eye {
      width: 49px;
      height: 49px;
      background-color: #2E2E2E;
      border-radius: 50%;
      position: absolute;
      border: 2px solid #000;
    }
    .eye::before {
      content: '';
      display: block;
      width: 24px;
      height: 24px;
      background-color: white;
      position: absolute;
      border-radius: 50%;
      left: 6px;
      top: -1px;
      border: 2px solid #000;
    }
    .eye.left {
      right: 50%;
      margin-right: 90px
    }
    .eye.right {
      left: 50%;
      margin-left: 90px
    }
3.脸颊的绘画
脸颊的绘画不难,我们需要准确测量位置,代码如下:
    .face {
      width: 65px;
      height: 68px;
      background-color: #f92726;
      border: 2px solid black;
      border-radius: 50%;
      position: absolute;
      top: 85px;
    }
    .face.left {
      right: 50%;
      margin-right: 116px;
    }
    .face.right {
      left: 50%;
      margin-left: 116px;
    }
4.嘴的绘画
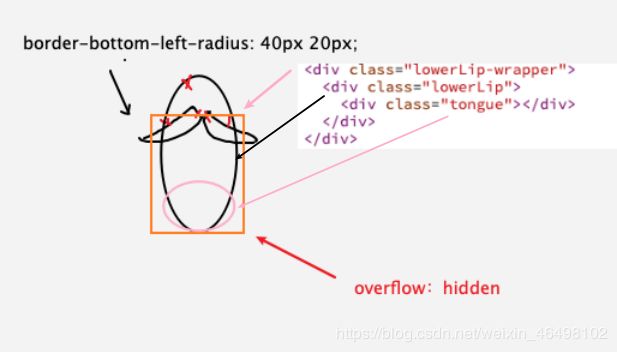
为了实现舌头,结构图如下;

代码如下:
.upperLip {
      height: 20px;
      width: 80px;
      border: 3px solid black;
      position: absolute;
      top: 52px;
      background-color: yellow;
      z-index: 1;
    }
  .upperLip.left {

      border-bottom-left-radius: 40px 20px;
      border-top: none;
      border-right: none;
      transform: rotate(-20deg);
      right: 50%;
  }
  .upperLip.right {
      left: 50%;
      border-bottom-right-radius: 40px 20px;
      border-top: none;
      border-left: none;
      transform: rotate(20deg);
  }
  .lowerLip-wrapper {
      width: 120px;
      height: 130px;

      position: absolute;
      left: 50%;
      margin-left: -60px;
      margin-top: 56px;
      overflow: hidden;
  }
  .lowerLip {
      height: 1000px;
      width: 120px;
      border-radius: 200px/800px;
      border: 2px solid black;
      background-color: #971818;
      position: absolute;
      bottom: 0;
      overflow: hidden
  }
  .tongue {
      width: 100px;
      height: 100px;
      border-radius: 50px;
      left: 8px;
      background-color: #f95364;
      position: absolute;
      bottom: 0;
      z-index: 2;
  }
以上就可实现一个皮卡丘了,现附上整个静态皮卡丘代码:
JS Bin

