10小时完成AI入门级项目复盘:使用Tesenflow建立CNN模型进行自动驾驶模拟
首先庆幸一下发现了一个非常好的python人工智能项目的入门网站MURTAZA’S WORKSHOP,上面的教程涵盖了opencv、self-drivng、robotics、arduino、raspberry pi等多个现在非常流行的主题。大约花了两天的时间跟着网站的教程走完了自动驾驶模拟(self-drivng simulation)这个课程,并且完成了从数据采集、数据预处理、数据训练到模型部署推理的全过程,下面进行复盘。
一、预备知识
完成这个项目,需要预备一下知识:
- python的基础知识,主要是程序流程控制、模块函数调用、生成器、numpy、装饰器等基础知识。如果基础不牢固,可以参考python-basics进行学习;
- anadonda和pycharm的使用,主要是使用anadonda建立虚拟环境,并且在pycharm中在建立的环境中搭建工程项目。
- 图像处理的基本知识,主要是opencv的一些基本操作。如果对opencv不了解,可以参考learn opencv in 3 hours进行学习;
- 深度学习(Deep Learning)、卷积神经网络(CNN)相关的基础知识,主要知道网络的结构和工作原理即可,内部的数学推导细节可以暂时不了解(因为确实很难)。这一块在b站上有很多视频教程,当然在MURTAZA’s Workshop的网站中也可以找到相关介绍。
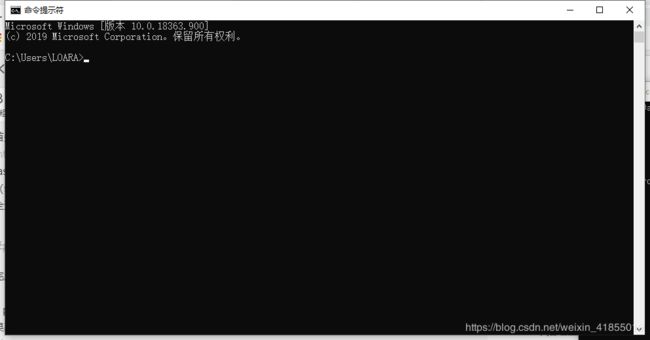
- 命令行(cmd)界面的使用,因为安装python模块命令行中比较方便,所以推荐使用。在windows中,可以使用cmd,操作方法是win+R,然后输入cmd进入,在mac中,则运行terminal即可。windows的操作详见windows下打开命令提示符的方式 。最后我们将进入以下界面。
二、预装环境
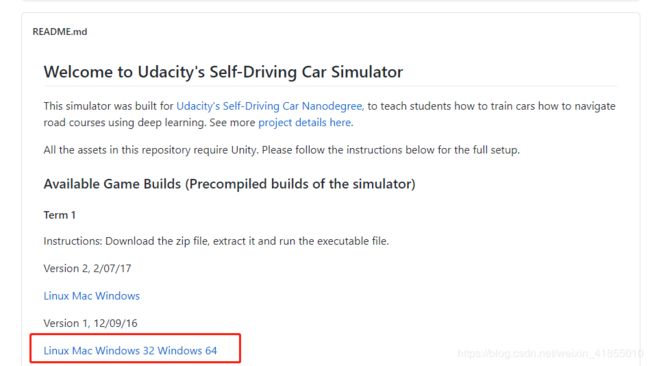
- Udacity的self-driving-car-sim模拟器,点击链接可以进入github下载界面,根据自己的操作系统来选择对应的下载。
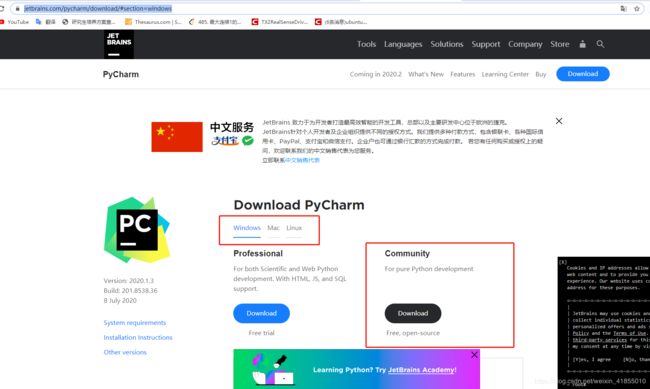
- Pycharm点击可以根据自己的操作系统下载对应的pycharm,pycharm是目前公认的最适合python变成的编辑器,可以选择社区版本(community)和专业版(professional),社区版是免费的。具体界面如下所示:
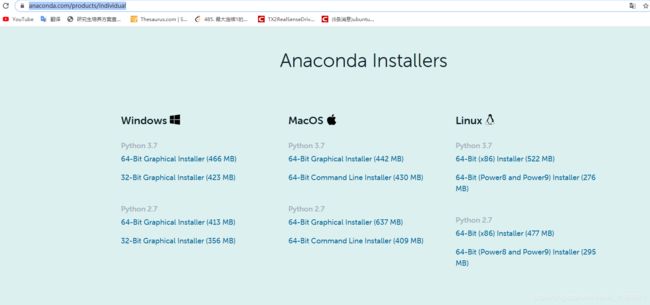
- Anaconda,点击进入anaconda官网个人版下载界面,根据自己的操作系统进行下载,推荐下载3.7版本的,在安装的时候,会自动安装python3.7,但让要注意一定要把path的√点上。 我们可以使用conda命令来进行虚拟环境的搭建,这样比较适合做项目管理。使得不同的项目之间隔离开来。
三、预装模块
在做这个项目的时候,我们需要预装一些模块,如在数据预处理阶段和训练阶段,我们需要安装以下模块:
- opencv-python (python图像处理模块)
- pandas (python数据处理模块)
- numpy (python数组数据处理模块)
- matplotlib (python科学作图模块)
- sklearn (python机器学习模块)
- tensorflow (深度学习框架,如果有Nvidia显卡的话,可以下载gpu版本tensorflow-gpu,这样可以快很多)
- imgaug(python图像增强模块)
在测试和验证阶段,我们需要安装以下模块: - socketio
- eventlet
- flask
- base64
- tensorlow
首先,我们使用以下指令建立虚拟环境,如我们建立一个名为py3.7,指定python版本为3.7的虚拟环境,可以这样操作:
conda creat --name py3.7 python=python3.7
然后,我们可以使用conda的激活方法来进入这个虚拟环境:
conda activate py3.7
这样我们可以看到在cmd中,
我们可以在建立好的虚拟环境中使用pip install或者conda install进行下载,比如我们下载opencv-python,就可以使用以下指令:
pip install opencv-python
我们也可以使用空格作为分隔符,把多个模块名字罗列在命令后面,这样就可以实现批量下载,如
pip install pandas numpy sklearn
四、驾驶数据的采集
我们打开模拟器软件beta_simulator.exe,在过场动画之后可以进入初始化界面如下:


我们在训练阶段,使用Training Mode
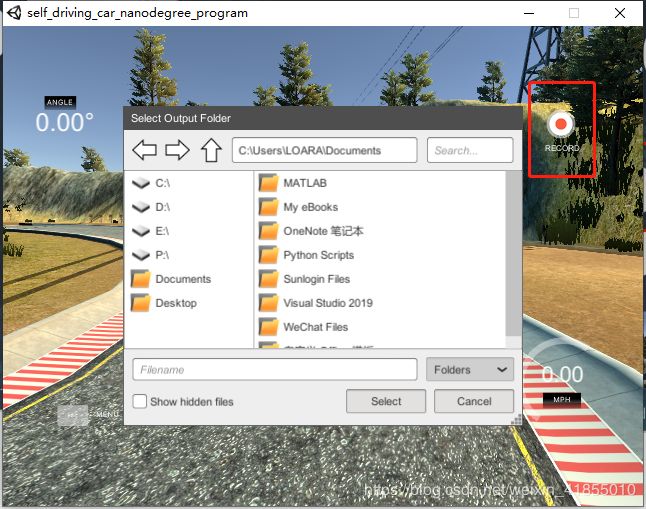
进入之后,点击Record按钮,可以选择采集数据存放的路径。
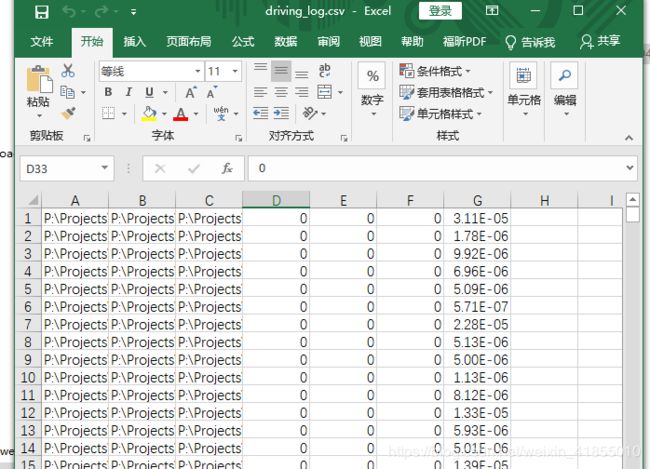
小车会自动前行,我们只需要通过箭头方向键来控制方向,就可以让小车在道路上行驶,模拟器会以一定的频率采集图像和小车的状态数据,每次都会有左中右三张照片拍摄,并且记录方向盘的角度、油门、刹车、行车速度等等,存在一个名为“driving_log.csv"的文件当中,我们会在后面的程序中处理这些数据。

五、代码编写
5.1. 训练阶段的代码
本教程中,将训练阶段分成了十个步骤,分别下载了程序的注释中(Step1-Step10),然后保存到TrainingSimulation.py文件中,注意到,为了代码的可读性,十个步骤中使用了函数调用的方法,函数具体的流程算法在utlis.py模块实现。
TrainingSimulation.py
##print some infomation for remind
print('Setting Up')
##ignore some warnings from tensorflow
import os
os.environ['TF_CPP_MIN_LOG_LEVEL'] = '3'
from utlis import *
from sklearn.model_selection import train_test_split
###Step 1:ReadData
path = "myData"
data = importDataInfo(path)
###Step 2:Visualization the balanced data, remove the redundent data
data = balanceData(data, display=False)
###Step 3:Create the numpy data that contain the images and its steering info
imagesPath, steerings = loadData(path, data)
###Step 4:Separate the data into training and validation data using sklearn
# xTrain, xVal, yTrain, yVal = train_test_split(imagesPath, steerings, test_size=0.2, random_state=10)
# print('Total training Images:', len(xTrain))
# print('Total validation Images', len(xVal))
xTrain, xVal, yTrain, yVal = train_test_split(imagesPath, steerings, test_size=0.2,random_state=10)
print('Total Training Images: ',len(xTrain))
print('Total Validation Images: ',len(xVal))
###Step 5:Augument the images to create more pictures for training
# imgRe = preProcess(mpimg.imread('test.jpg'))
# plt.imshow(imgRe)
# plt.show()
###Step 6:Pre-process adding Flip, pan, zoom and so on
###Step 7:generate more images as training samples
###Step 8:create model using keras
model = createModel()
model.summary()
###Step 9:train the model
# model.fit(batchGen(xTrain,yTrain,10,1),steps_per_epoch=20,epochs=2,\
# 		  validation_data=batchGen(xVal,yVal,10,0),validation_steps=20)
history = model.fit(batchGen(xTrain, yTrain, 100, 1),
					steps_per_epoch=300,
					epochs=10,
					validation_data=batchGen(xVal, yVal, 100, 0),
					validation_steps=200)
# Step 10: Saving & Plotting
model.save('model.h5')
print('Model Saved')
plt.plot(history.history['loss'])
plt.plot(history.history['val_loss'])
plt.legend(['Training','Validation'])
plt.ylim([0,1])
plt.title('Loss')
plt.xlabel('Epoch')
plt.show()
utlils.py
import pandas as pd
import numpy as np
import cv2
import os
import random
from matplotlib import pyplot as plt
from sklearn.utils import shuffle
import matplotlib.image as mpimg
from imgaug import augmenters as iaa
from tensorflow.keras.models import Sequential
from tensorflow.keras.layers import Convolution2D,Flatten,Dense
from tensorflow.keras.optimizers import Adam

def getName(filePath):
	return filePath.split('\\')[-1]

def importDataInfo(path):
	colums = ['Center','Left','Right','Steering','Throttle','Brake','Speed']
	data = pd.read_csv(os.path.join(path,'driving_log.csv'),names = colums, skipinitialspace=True, skiprows=1, engine="python")
	# print(data.head())
	# print(data['Center'][0])
	# print(getName(data['Center'][0]))
	data['Center']=data['Center'].apply(getName)
	# print(data.head())
	print(data.shape[0])
	return data

def balanceData(data,display=True):
	# the number of bins ploted
	nBins = 15
	samplesPerBin = 500
	hist,bins = np.histogram(data['Steering'],nBins)
	#hist is the numbers of the points that lie in each range
	#bins is the array that stores each range
	# print(bins)
	if display:
		center = (bins[:-1] + bins[1:])*0.5
		# transform bins into center
		# little technique that creates the original as zero
		# for the bins array is symmetrical
		# print(center)
		# notice that if we want to visualize the data using bar, we need to get their centers
		plt.bar(center,hist,width = 0.06)
		# draw a line that starts from point (-1,samplesPerBin) to the point (1,samplesPerBin)
		plt.plot((-1,1),(samplesPerBin,samplesPerBin))
		plt.show()
	removeIndexList = []
	for j in range(nBins):
		binDataList = []
		for i in range(len(data['Steering'])):
			if data['Steering'][i] >= bins[j] and data['Steering'][i] <= bins[j+1]:
				binDataList.append(i)
		binDataList = shuffle(binDataList)
		binDataList = binDataList[samplesPerBin:]
		removeIndexList.extend(binDataList)
	print('Removed Images: ', len(removeIndexList))
	data.drop(data.index[removeIndexList],inplace = True)
	print('Remaining Images: ', len(data))
	if display:
		hist, _ = np.histogram(data['Steering'],nBins)
		plt.bar(center,hist,width = 0.06)
		plt.plot((-1,1),(samplesPerBin,samplesPerBin))
		plt.show()
	return data


def loadData(path,data):
	imagesPath = []
	steering = []
	for i in range(len(data)):
		indexed_data = data.iloc[i]
		imagesPath.append(f'{path}/IMG/{indexed_data[0]}')
		steering.append(indexed_data[3])
	imagesPath = np.asarray(imagesPath)
	steering = np.asarray(steering)
	return imagesPath,steering

def augmentImage(imgPath,steering):
	img =  mpimg.imread(imgPath)
	if np.random.rand() < 0.5:
		pan = iaa.Affine(translate_percent={"x": (-0.1, 0.1), "y": (-0.1, 0.1)})
		img = pan.augment_image(img)
	if np.random.rand() < 0.5:
		zoom = iaa.Affine(scale=(1, 1.2))
		img = zoom.augment_image(img)
	if np.random.rand() < 0.5:
		brightness = iaa.Multiply((0.2, 1.2))
		img = brightness.augment_image(img)
	if np.random.rand() < 0.5:
		img = cv2.flip(img, 1)
		steering = - steering
	return img, steering

def preProcess(img):
	img = img[60:135,:,:]
	img = cv2.cvtColor(img,cv2.COLOR_RGB2YUV)
	img = cv2.GaussianBlur(img,(3,3),0)
	img = cv2.resize(img,(200,66))
	img = img/255
	return img

def batchGen(imagesPath, steeringList, batchSize, trainFlag):
	while True:
		imgBatch = []
		steeringBatch = []

		for i in range(batchSize):
			index = random.randint(0, len(imagesPath) - 1)
			if trainFlag:
				img, steering = augmentImage(imagesPath[index], steeringList[index])
			else:
				img = mpimg.imread(imagesPath[index])
				steering = steeringList[index]
			img = preProcess(img)
			imgBatch.append(img)
			steeringBatch.append(steering)
			print(steering)
		yield np.asarray(imgBatch), np.asarray(steeringBatch)


def createModel():
	model = Sequential()
	model.add(Convolution2D(24,(5,5),(2,2),input_shape=(66,200,3),activation='elu'))
	model.add(Convolution2D(36,(5,5),(2,2),activation='elu'))
	model.add(Convolution2D(48,(5,5),(2,2),activation='elu'))
	model.add(Convolution2D(64,(3,3),activation='elu'))
	model.add(Convolution2D(64,(3,3),activation='elu'))

	model.add(Flatten())
	model.add(Dense(100,activation='elu'))
	model.add(Dense(50,activation='elu'))
	model.add(Dense(10,activation='elu'))
	model.add(Dense(1))

	model.compile(Adam(lr=0.0001),loss='mse')

	return model

# imgRe = prePrecess(mpimg.imread('test.jpg'))
# plt.imshow(imgRe)
# plt.show()
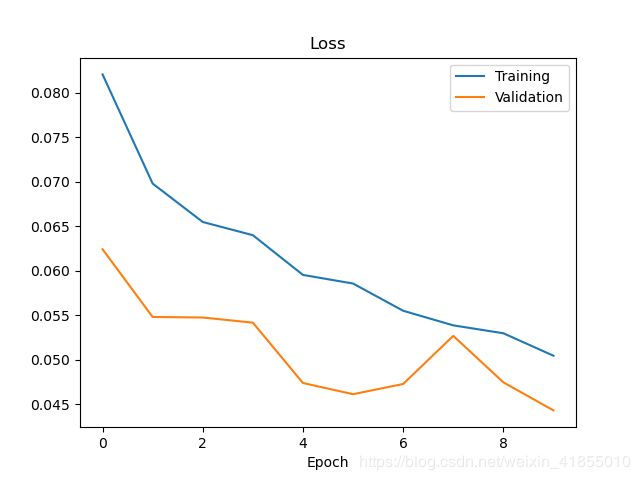
运行之后,我们可以得到神经网络训练的loss曲线和模型文件"model.h5"

5.2 测试阶段
测试阶段,我们需要编写测试文件test.py配合模拟器软件加载训练好的模型文件进行仿真测试。测试代码如下:
Test.py
print('Setting UP')
import os

os.environ['TF_CPP_MIN_LOG_LEVEL'] = '3'
import socketio
import eventlet
import numpy as np
from flask import Flask
from tensorflow.keras.models import load_model
import base64
from io import BytesIO
from PIL import Image
import cv2

#### FOR REAL TIME COMMUNICATION BETWEEN CLIENT AND SERVER
sio = socketio.Server()
#### FLASK IS A MICRO WEB FRAMEWORK WRITTEN IN PYTHON
app = Flask(__name__)  # '__main__'

maxSpeed = 10


def preProcess(img):
	img = img[60:135, :, :]
	img = cv2.cvtColor(img, cv2.COLOR_RGB2YUV)
	img = cv2.GaussianBlur(img, (3, 3), 0)
	img = cv2.resize(img, (200, 66))
	img = img / 255
	return img


@sio.on('telemetry')
def telemetry(sid, data):
	speed = float(data['speed'])
	image = Image.open(BytesIO(base64.b64decode(data['image'])))
	image = np.asarray(image)
	image = preProcess(image)
	image = np.array([image])
	steering = float(model.predict(image))
	throttle = 1.0 - speed / maxSpeed
	print(f'{steering}, {throttle}, {speed}')
	sendControl(steering, throttle)


@sio.on('connect')
def connect(sid, environ):
	print('Connected')
	sendControl(0, 0)


def sendControl(steering, throttle):
	sio.emit('steer', data={
		'steering_angle': steering.__str__(),
		'throttle': throttle.__str__()
	})


if __name__ == '__main__':
	model = load_model('model.h5')
	app = socketio.Middleware(sio, app)
	### LISTEN TO PORT 4567
	eventlet.wsgi.server(eventlet.listen(('', 4567)), app)
特备要注意的是,在测试阶段,tensorflow可能会报错,这个时候,可以考虑使用以下指令重装tensorflow:
conda remove tensorflow
conda install -c conda-forge tensorflow
运行成功过之后,我们看到在pycharm中会出现这样的提醒:

这个时候,我们就可以再次打开模拟器软件,选择Autonomous Mode,从而用模型进行自动驾驶了。
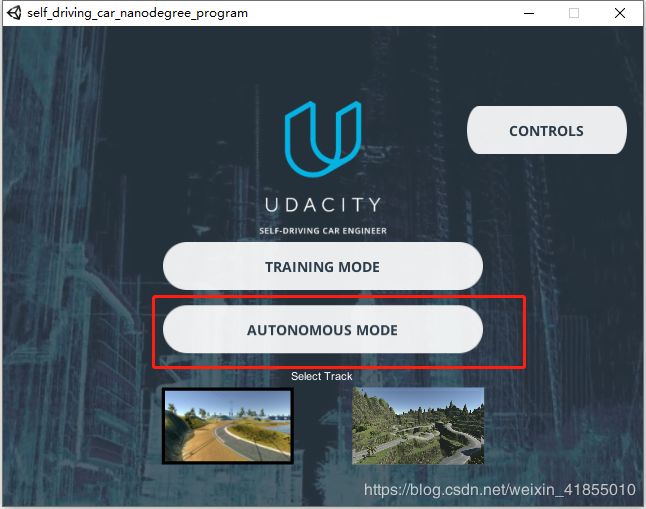
我们可以看到,在模拟器中,汽车可以良好的运行,达到了自动驾驶的效果

但是,在一些边界,出现了卡出的情况,那是因为在训练的时候基本上是在大马路中间行驶的,如果我们需要处理这些边界情况,需要多进行边界环境的训练。

这样,我们就完成了“使用Tesenflow建立CNN模型进行自动驾驶模拟”这个入门级的AI项目,希望对大家有帮助,如果有纰漏,也请大家指出。