最新laravel版本,laravel7安装jwt-auth,用户认证
laravel构建api服务,安装laravel,根据官网(laravel中文官网)进行安装。
安装
通过shell进入项目根目录,运行以下命令进行安装jwt-auth
$ composer require tymon/jwt-auth
配置
将下面这行添加至 config/app.php 文件 providers 数组中:
app.php
'providers' => [

    ...

    Tymon\JWTAuth\Providers\LaravelServiceProvider::class,
]
发布配置文件
在shell中运行以下命令,在config目录下会生成jwt.php配置文件。
$ php artisan vendor:publish --provider="Tymon\JWTAuth\Providers\LaravelServiceProvider"
生成密钥
运行以下命令,会生成密钥,在.env文件中可以看到新增JWT_SECRET=secret。
$ php artisan jwt:secret
配置Auth.php
在config/auth.php文件中,将guards/driver更新为jwt,如下:
auth.php
'guards' => [
    'api' => [
        'driver' => 'jwt',
        'provider' => 'users',
    ],
],
修改Model
如果使用jwt-auth作为用户认证,则需要修改User模型。在app/User.php
User.php
namespace App;

use Tymon\JWTAuth\Contracts\JWTSubject;
use Illuminate\Notifications\Notifiable;
use Illuminate\Foundation\Auth\User as Authenticatable;

class User extends Authenticatable implements JWTSubject
{
    use Notifiable;

    // Rest omitted for brevity

    /**
     * Get the identifier that will be stored in the subject claim of the JWT.
     *
     * @return mixed
     */
    public function getJWTIdentifier()
    {
        return $this->getKey();
    }

    /**
     * Return a key value array, containing any custom claims to be added to the JWT.
     *
     * @return array
     */
    public function getJWTCustomClaims()
    {
        return [];
    }
}
自定义认证中间件
先来说明一下我想要达成的效果,我希望用户提供账号密码前来登录。如果登录成功,那么我会给前端颁发一个 access _token ,设置在 header 中以请求需要用户认证的路由。
同时我希望如果用户的令牌如果过期了,可以暂时通过此次请求,并在此次请求中刷新该用户的 access _token,最后在响应头中将新的 access _token 返回给前端,这样子可以无痛的刷新 access _token ,用户可以获得一个很良好的体验,所以开始动手写代码。
执行如下命令以新建一个中间件:
$ php artisan make:middleware RefreshToken
运行后,会在app/http/middleware中看到RefreshToken.php文件,需要注意的是记得在app/http/Kernel.php添加如下代码:
protected $routeMiddleware = [
       	...
        'refreshtoken' => \App\Http\Middleware\RefreshToken::class,
    ];
中间件代码如下:
RefreshToken.php
namespace App\Http\Middleware;

use Auth;
use Closure;
use Tymon\JWTAuth\Exceptions\JWTException;
use Tymon\JWTAuth\Http\Middleware\BaseMiddleware;
use Tymon\JWTAuth\Exceptions\TokenExpiredException;
use Symfony\Component\HttpKernel\Exception\UnauthorizedHttpException;

// 注意,我们要继承的是 jwt 的 BaseMiddleware
class RefreshToken extends BaseMiddleware
{
    /**
     * Handle an incoming request.
     *
     * @param  \Illuminate\Http\Request $request
     * @param  \Closure $next
     *
     * @throws \Symfony\Component\HttpKernel\Exception\UnauthorizedHttpException
     *
     * @return mixed
     */
    public function handle($request, Closure $next)
    {
        // 检查此次请求中是否带有 token,如果没有则抛出异常。
        $this->checkForToken($request);

       // 使用 try 包裹,以捕捉 token 过期所抛出的 TokenExpiredException  异常
        try {
            // 检测用户的登录状态,如果正常则通过
            if ($this->auth->parseToken()->authenticate()) {
                return $next($request);
            }
            throw new UnauthorizedHttpException('jwt-auth', '未登录');
        } catch (TokenExpiredException $exception) {
          // 此处捕获到了 token 过期所抛出的 TokenExpiredException 异常,我们在这里需要做的是刷新该用户的 token 并将它添加到响应头中
            try {
                // 刷新用户的 token
                $token = $this->auth->refresh();
               // 使用一次性登录以保证此次请求的成功
                Auth::guard('api')->onceUsingId($this->auth->manager()->getPayloadFactory()->buildClaimsCollection()->toPlainArray()['sub']);
            } catch (JWTException $exception) {
               // 如果捕获到此异常,即代表 refresh 也过期了,用户无法刷新令牌,需要重新登录。
                throw new UnauthorizedHttpException('jwt-auth', $exception->getMessage());
            }
        }

        // 在响应头中返回新的 token
        return $this->setAuthenticationHeader($next($request), $token);
    }
}
更新异常处理的 Handler
由于我们构建的是 api 服务,所以我们需要更新一下 app/Exceptions/Handler.php 中的 render
方法,自定义处理一些异常。
Handler.php
namespace App\Exceptions;

use Illuminate\Foundation\Exceptions\Handler as ExceptionHandler;
use Throwable;
use Symfony\Component\HttpKernel\Exception\UnauthorizedHttpException;
use Illuminate\Validation\ValidationException;

class Handler extends ExceptionHandler
{
    /**
     * A list of the exception types that are not reported.
     *
     * @var array
     */
    protected $dontReport = [
        //
    ];

    /**
     * A list of the inputs that are never flashed for validation exceptions.
     *
     * @var array
     */
    protected $dontFlash = [
        'password',
        'password_confirmation',
    ];

    /**
     * Report or log an exception.
     *
     * @param  \Throwable  $exception
     * @return void
     *
     * @throws \Exception
     */
    public function report(Throwable $exception)
    {
        parent::report($exception);
    }

    /**
     * Render an exception into an HTTP response.
     *
     * @param  \Illuminate\Http\Request  $request
     * @param  \Throwable  $exception
     * @return \Symfony\Component\HttpFoundation\Response
     *
     * @throws \Throwable
     */
    public function render($request, Throwable $exception)
    {
        // 参数验证错误的异常,我们需要返回 400 的 http code 和一句错误信息
        if ($exception instanceof ValidationException) {
            return response(['error' => array_first(array_collapse($exception->errors()))], 400);
        }
        if ($exception instanceof UnauthorizedHttpException) {
            $preException = $exception->getPrevious();
            if ($preException instanceof
                \Tymon\JWTAuth\Exceptions\TokenExpiredException) {
                return response()->json(['error' => 'TOKEN已过期!','code' => 406]);
            } else if ($preException instanceof
                \Tymon\JWTAuth\Exceptions\TokenInvalidException) {
                return response()->json(['error' => 'TOKEN无效!','code' => 406]);
            } else if ($preException instanceof
                \Tymon\JWTAuth\Exceptions\TokenBlacklistedException) {
                return response()->json(['error' => 'TOKEN已退出!','code' => 406]);
            }
            if ($exception->getMessage() === 'Token not provided') {
                return response()->json(['error' => 'Token为空!','code' => 406]);
            }
        }

        if ($exception instanceof
            \Tymon\JWTAuth\Exceptions\TokenExpiredException) {
            return response()->json(['error' => 'TOKEN已过期!','code' => 406]);
        } else if ($exception instanceof
            \Tymon\JWTAuth\Exceptions\TokenInvalidException) {
            return response()->json(['error' => 'TOKEN无效!','code' => 406]);
        } else if ($exception instanceof
            \Tymon\JWTAuth\Exceptions\TokenBlacklistedException) {
            return response()->json(['error' => 'TOKEN已退出!','code' => 406]);
        }
        if ($exception->getMessage() === 'Token not provided') {
            return response()->json(['error' => 'Token为空!','code' => 406]);
        }

    }
}
使用
现在,我们可以在我们的 routes/v1/api.php 路由文件中新增几条路由来测试一下了:
大家可以参考一下我上一篇laravel多版本控制
Route::prefix('auth')->group(function($router) {
    $router->post('login', 'AuthController@login');
    $router->post('logout', 'AuthController@logout');
    $router->post('test', 'AuthController@test');


});


Route::group(['namespace'=>'Api'],function () {//做版本控制
    Route::group(['prefix'=>'v1','namespace'=>'V1'],function () {//第一版本

        Route::middleware('refreshtoken')->group(function($router) {
            //访问地址 api/v1/profile
            $router->get('/profile','UserController@profile')->name('api.v1.profile');
        });
    });
});
在你的 shell 中运行如下命令以新增一个控制器:
$ php artisan make:controller AuthController
在app/http/controllers下,修改代码,如下:
namespace App\Http\Controllers;

class AuthController extends Controller
{

    /**
     * Create a new AuthController instance.
     * 要求附带email和password(数据来源users表)
     *
     * @return void
     */
    public function __construct()
    {
        $this->middleware('jwt.auth', ['except' => ['login']]);
        // 另外关于上面的中间件,官方文档写的是『auth:api』
        // 但是我推荐用 『jwt.auth』,效果是一样的,但是有更加丰富的报错信息返回
    }

    /**
     * Get a JWT via given credentials.
     *
     * @return \Illuminate\Http\JsonResponse
     */
    public function login()
    {
        $credentials = request(['mobile', 'password']);

        if (! $token = auth('api')->attempt($credentials)) {
            return response()->json(['error' => 'Unauthorized'], 401);
        }

        return $this->respondWithToken($token);
    }

    /**
     * Log the user out (Invalidate the token).
     *
     * @return \Illuminate\Http\JsonResponse
     */
    public function logout()
    {
        auth('api')->logout();

        return response()->json(['message' => '退出成功!']);
    }

    /**
     * Refresh a token.
     * 刷新token,如果开启黑名单,以前的token便会失效。
     * 值得注意的是用上面的getToken再获取一次Token并不算做刷新,两次获得的Token是并行的,即两个都可用。
     * @return \Illuminate\Http\JsonResponse
     */
    public function refresh()
    {
        return $this->respondWithToken(auth('api')->refresh());
    }

    /**
     * Get the token array structure.
     *
     * @param  string $token
     *
     * @return \Illuminate\Http\JsonResponse
     */
    protected function respondWithToken($token)
    {
        return response()->json([
            'access_token' => $token,
            'token_type' => 'bearer',
        ]);
    }

}
添加用户
运行命令,生成表。注意运行前确保连接数据库以及在迁移users表中添加
$table->string('mobile')->unique();
shell
$ php artisan migrate
在数据库下会看到生成的表。
在users表中添加用户进行测试。
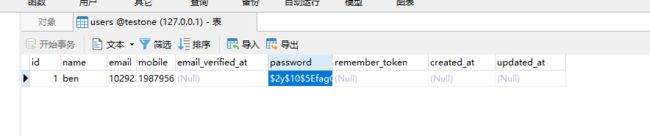
添加用户有两种:
第一种:在数据库中直接添加数据,密码是通过bcrypt加密,如 bcrypt(‘123456’),将加密的数据添加到表中。
第二种:进入 tinker
$ php artisan tinker
>>> namespace App\Models;
>>> User::create(['name' => 'Test','mobile' => 17623239881,'password' => bcrypt('123456')]);
正确执行结果如下图:

打开 Postman 来进行 api 测试
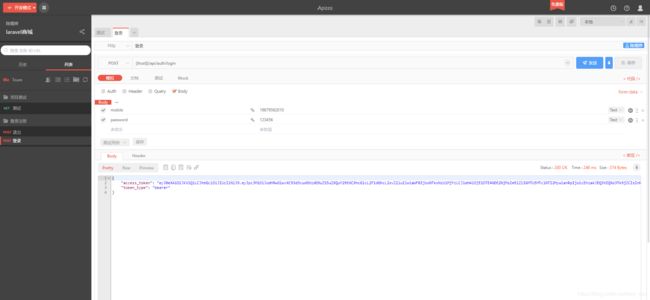
可以看到access_token成功输出了!!!