Kotlin学习之路(三) kotlin实现简单的MVP模式
Kotlin学习之路(三) kotlin实现简单的MVP模式
本文参考自: https://blog.csdn.net/swust_zeng_zhuo_k/article/details/78760947
前言:由于工作中接触到的新项目中用的是MVP框架,而博主这个刚刚毕业的菜鸟虽然以前也听过这个模式,但是从来没有理清过这个模式M V P之间的关系,所以“事到临头”,只得硬着头皮从小demo开始,找找搭建mvp框架的感觉 。本文作为学习记录。
首先上一张MVP框架的结构图:
M - Model V - View P - Presenter
MVP模式的核心思想:
MVP把Activity中的UI逻辑抽象成View接口,把业务逻辑抽象成Presenter接口,Model类还是原来的Model。
理论的东西,说实话我还是不太明白,暂时只明白了这三个模块间如何进行交互,大家可以去看原文。所以就直奔主题,用Kotlin来实现简单的mvp模式。
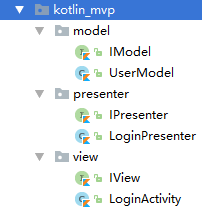
(链接原文) 项目结构看起来像是这个样子的,MVP的分层还是很清晰的。我的习惯是先按模块分Package,在模块下面再去创建model、view、presenter的子Package,当然也可以用model、view、presenter作为顶级的Package,然后把所有的模块的model、view、presenter类都到这三个顶级Package中,就好像有人喜欢把项目里所有的Activity、Fragment、Adapter都放在一起一样。
model包下的文件:
IModel.kt (Model层的接口文件)
package com.example.liu.myapplication.kotlin_mvp.model

interface IModel {

    /**
     * 判断用户输入的用户名密码是否正确
     */
    fun checkUserValidity(name: String,password: String): Int
}
UserModel.kt (Model层接口的实现类)
package com.example.liu.myapplication.kotlin_mvp.model

class UserModel(var mName: String,var mPwd: String): IModel {
    override fun checkUserValidity(name: String, password: String): Int {
        if (mName == name && mPwd == password) {
            return 0       //用户名密码正确返回0
        }
        return 1
    }
}
presenter包下的文件:
IPresenter.kt (Presenter层的接口)
package com.example.liu.myapplication.kotlin_mvp.presenter

interface IPresenter {

    /**
     * 通知View层清空输入框
     */
    fun clearText()

    /**
     * 将登录结果传递给View层
     */
    fun login(name: String, pwd: String)

    /**
     * 通知view层控制ProgressBar的可见性
     */
    fun setProgressVisibility(visibility: Int)

}
LoginPresenter.kt (Presenter层接口的实现类,处理业务逻辑)
package com.example.liu.myapplication.kotlin_mvp.presenter

import android.os.Handler
import android.os.Looper
import com.example.liu.myapplication.kotlin_mvp.model.IModel
import com.example.liu.myapplication.kotlin_mvp.model.UserModel
import com.example.liu.myapplication.kotlin_mvp.view.IView

class LoginPresenter(private var loginView: IView): IPresenter {
    private var handler: Handler
    private lateinit var user: IModel

    init {
        initUser()
        handler = Handler(Looper.getMainLooper())
    }

    private fun initUser() {
    	//创建一个用户
        user = UserModel("mvp","mvp")
    }

    override fun clearText() {
        loginView.onClearText()
    }

    override fun login(name: String, pwd: String) {
        var isLoginSuccess = true
        //判断用户输入的用户名密码是否正确
        val code = user.checkUserValidity(name,pwd)
        if (code != 0) isLoginSuccess = false
        val result = isLoginSuccess
        //模拟网络耗时操作
        handler.postDelayed({ loginView.onLoginResult(result,code) },1000)
    }

    override fun setProgressVisibility(visibility: Int) {
        loginView.onSetProgressVisibility(visibility)
    }
}
这个地方要说下IPresenter的实现类,我个人的理解是,presenter作为 Model层和 View层的桥梁,要同时持有这两个接口的引用(不知道这么说对不对,如有不对敬请指出)。
view包下的文件:
IView.kt(View层的接口文件)
package com.example.liu.myapplication.kotlin_mvp.view

interface IView {

    /**
     * 清空输入框
     */
    fun onClearText()

    /**
     * 登录后的处理
     */
    fun onLoginResult(result: Boolean, code: Int)

    /**
     * 设置进度条的可见性
     */
    fun onSetProgressVisibility(visibility: Int)

}
LoginActivity.kt (View层接口的实现类,仅控制视图相关的处理)
package com.example.liu.myapplication.kotlin_mvp.view

import android.os.Bundle
import android.support.v7.app.AppCompatActivity
import android.view.View
import android.widget.ProgressBar
import android.widget.Toast
import com.example.liu.myapplication.R
import com.example.liu.myapplication.kotlin_mvp.presenter.IPresenter
import com.example.liu.myapplication.kotlin_mvp.presenter.LoginPresenter
import kotlinx.android.synthetic.main.activity_my_mvp.*

class LoginActivity : AppCompatActivity(), IView, View.OnClickListener {
    private lateinit var loginPresenter: IPresenter

    override fun onCreate(savedInstanceState: Bundle?) {
        super.onCreate(savedInstanceState)
        setContentView(R.layout.activity_my_mvp)

        loginPresenter = LoginPresenter(this)
        progress_bar.visibility = View.INVISIBLE

        btn_login.setOnClickListener(this)
        btn_clear.setOnClickListener(this)
    }

    override fun onClearText() {
        et_name.setText("")
        et_pwd.setText("")
    }

    override fun onLoginResult(result: Boolean, code: Int) {
        btn_login.isEnabled = true
        btn_clear.isEnabled = true
        loginPresenter.setProgressVisibility(View.INVISIBLE)
        if (result) {
            Toast.makeText(this@LoginActivity, "LoginSuccess code:$code", Toast.LENGTH_SHORT).show()
        } else {
            Toast.makeText(this@LoginActivity, "LoginFailed code:$code", Toast.LENGTH_SHORT).show()
        }
    }

    override fun onSetProgressVisibility(visibility: Int) {
        progress_bar.visibility = visibility
    }

    override fun onClick(v: View?) {
        when (v?.id) {
            //登录按钮
            R.id.btn_login -> {
                btn_login.isEnabled = false
                btn_clear.isEnabled = false
                progress_bar.visibility = View.VISIBLE
                loginPresenter.login(et_name.text.toString(), et_pwd.text.toString())
            }
            //清空按钮
            R.id.btn_clear -> loginPresenter.clearText()
            else -> { }
        }
    }
}
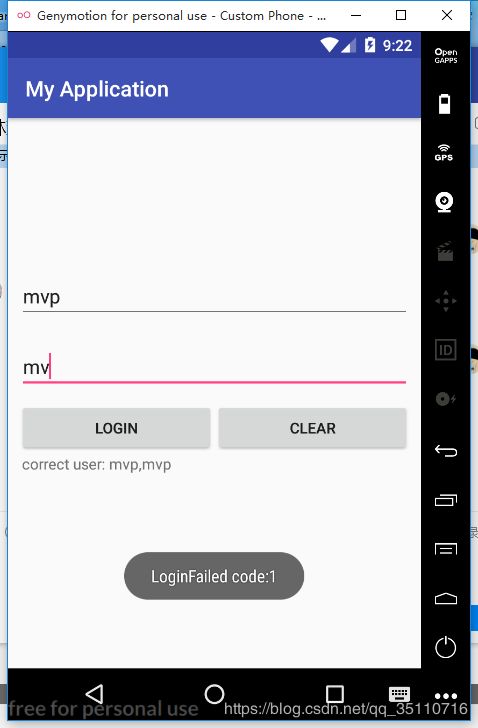
差点把布局文件忘记了,不过这个布局文件写的很简单:
activity_my_mvp.xml :
<LinearLayout xmlns:android="http://schemas.android.com/apk/res/android"
    xmlns:app="http://schemas.android.com/apk/res-auto"
    xmlns:tools="http://schemas.android.com/tools"
    android:layout_width="match_parent"
    android:layout_height="match_parent"
    android:orientation="vertical"
    android:gravity="center"
    tools:context="com.example.liu.myapplication.view.MyMvpActivity">


    <EditText
        android:id="@+id/et_name"
        android:layout_width="match_parent"
        android:layout_height="wrap_content"
        android:layout_margin="10dp"
        android:hint="type username"/>

    <EditText
        android:id="@+id/et_pwd"
        android:layout_width="match_parent"
        android:layout_height="wrap_content"
        android:layout_margin="10dp"
        android:hint="type password"/>

    <LinearLayout
        android:layout_width="match_parent"
        android:layout_height="wrap_content"
        android:layout_marginLeft="10dp"
        android:layout_marginRight="10dp">

        <Button
            android:id="@+id/btn_login"
            android:layout_weight="1"
            android:layout_width="0dp"
            android:layout_height="wrap_content"
            android:text="login"/>

        <Button
            android:id="@+id/btn_clear"
            android:layout_weight="1"
            android:layout_width="0dp"
            android:layout_height="wrap_content"
            android:text="clear"/>
    LinearLayout>

    <TextView
        android:layout_gravity="left"
        android:layout_marginLeft="13dp"
        android:layout_width="wrap_content"
        android:layout_height="wrap_content"
        android:text="correct user: mvp,mvp"/>

    <ProgressBar
        android:id="@+id/progress_bar"
        android:layout_width="wrap_content"
        android:layout_height="wrap_content" />
LinearLayout>
总结: 个人觉得,mvp模式刚开始写感觉,啊好复杂啊,这么多代码。但是在用 java 和 kotlin 反复敲过几遍以后,发现,啊,这个模式这么清晰的吗,我以后一定要把这个理解的更加透彻一些… 好吧,感觉自己写博客的逻辑太混乱了,希望慢慢可以进步。
如果这篇博客哪里有错误的地方,希望各位可以指出,谢谢。


