机器学习python入门(二)
机器学习python入门(二)
- Missing values
- Three Approaches
- 1) 一个简单的选项: 删除缺少值的列
- 2) 一个更好的选择: 填充Imputation
- 3) 对填充的延伸
- Example
- 方法1(删除缺少值的列)的得分
- 方法2 (填充)的得分
- 方法3(填充的延申)的得分
- 为什么填充法比直接删除这些列的效果更好呢?
- 总结
- 分类变量categorical variable
- Three Approaches
- 1)删除分类变量
- 2) 标签编码Label Encoding
- 3) 独热编码One-Hot Encoding
- Example
- 定义函数来度量每种方法的质量
- 方法1(去掉分类变量)的得分
- 方法2(标签编码)的得分
- 方法3(独热编码)得分
- 哪种方法是最好的?
- 结论
- Pipelines
- Example
- 步骤1:定义预处理步骤
- 步骤2:定义模型
- 步骤3:创建和评估管道
- 结论
- Cross-Validation
- 交叉验证是什么?
- 什么时候应该使用交叉验证?
- Example
- 结论
- Gradient boosting
- Example
- 参数调整
- n_estimators
- early_stopping_rounds
- learning_rate
- n_jobs
- 结论
- Data leakage
- Target leakage
- Train-Test Contamination
- Example
- 结论
接下来我们将加速您的机器学习专业知识,学习如何:
- 处理经常在真实数据集中发现的数据类型(缺失值missing values,分类变量categorical variables)。
- 设计管道pipelines来提高机器学习代码的质量。
- 使用高级技术进行模型验证(交叉验证cross-validation)。
- 建立最先进的模型,广泛用于赢得Kaggle竞赛(XGBoost)。
- 避免常见和重要的数据科学错误(泄漏leakage)。
在此过程中,您将通过使用每个新主题的真实数据完成实际操作来巩固您的知识。实际操作使用来自Kaggle Learn用户的房价竞争数据,你将使用79个不同的解释变量(比如屋顶的类型,卧室的数量,浴室的数量)来预测房价。
Missing values
下面我们将学习三种处理缺失值的方法。然后我们将比较这些方法在真实数据集上的有效性。
数据缺失值的方式有很多种。例如,
- 两间卧室的房子不包括第三间卧室的大小。
- 被调查者可以选择不分享他的收入。
如果试图使用缺失值的数据构建模型,那么大多数机器学习库(包括scikit-learn)都会出错。所以你需要选择下面的策略之一。
Three Approaches
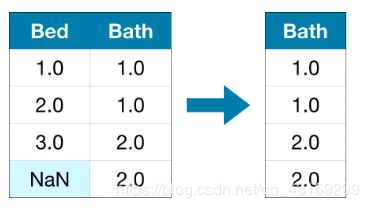
1) 一个简单的选项: 删除缺少值的列
最简单的选择是删除缺少值的列。

除非删除列中的大多数值丢失,否则使用这种方法模型将失去对大量(可能有用的!)信息。作为一个极端的例子,假设一个数据集有10,000行,其中一个重要的列缺少一个条目。这种方法将完全删除该列!
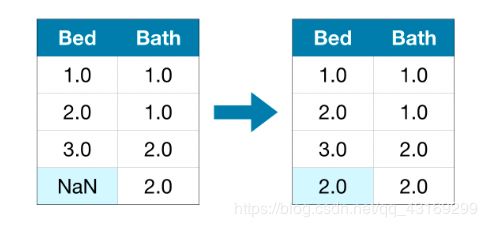
2) 一个更好的选择: 填充Imputation
填充法Imputation用某个数字填充缺失的值。例如,我们可以沿每一列填充平均值。

在大多数情况下,填充的值并不完全正确,但它通常会产生比完全删除列更准确的模型。
3) 对填充的延伸
填充法是标准的方法,而且通常效果很好。然而,填充值可能系统地高于或低于它们的实际值(数据集中没有收集到这些值)。或者缺失值的行在其他方面可能是惟一的。在这种情况下,我们的模型可以通过考虑最初丢失了哪些值来做出更好的预测。

在这种方法中,我们像前面一样填充缺失的值。此外,对于原始数据集中缺失记录的每一列,我们添加一个新列,显示填充记录的位置。
在某些情况下,这将有意义地改善结果。在其他情况下,它完全没有帮助。
Example
在本例中,我们将使用Melbourne Housing数据集。我们的模型将使用房间数量和土地面积等信息来预测房价。
我们不会关注数据加载步骤。相反,我们可以想象我们已经拥有了X_train、X_valid、y_train和y_valid中的训练和验证数据。
import pandas as pd
from sklearn.model_selection import train_test_split

# Load the data
data = pd.read_csv('../input/melbourne-housing-snapshot/melb_data.csv')

# Select target
y = data.Price

# To keep things simple, we'll use only numerical predictors
melb_predictors = data.drop(['Price'], axis=1)
X = melb_predictors.select_dtypes(exclude=['object'])

# Divide data into training and validation subsets
X_train, X_valid, y_train, y_valid = train_test_split(X, y, train_size=0.8, test_size=0.2,
                                                      random_state=0)
我们定义了一个函数score_dataset()来比较处理缺失值的不同方法。这个函数报告随机森林模型的平均绝对误差(MAE)
from sklearn.ensemble import RandomForestRegressor
from sklearn.metrics import mean_absolute_error

# Function for comparing different approaches
def score_dataset(X_train, X_valid, y_train, y_valid):
    model = RandomForestRegressor(n_estimators=10, random_state=0)
    model.fit(X_train, y_train)
    preds = model.predict(X_valid)
    return mean_absolute_error(y_valid, preds)
方法1(删除缺少值的列)的得分
由于我们同时使用训练集和验证集,所以我们仔细地删除两个dataframes中的相同列。
# Get names of columns with missing values
cols_with_missing = [col for col in X_train.columns
                     if X_train[col].isnull().any()]

# Drop columns in training and validation data
reduced_X_train = X_train.drop(cols_with_missing, axis=1)
reduced_X_valid = X_valid.drop(cols_with_missing, axis=1)

print("MAE from Approach 1 (Drop columns with missing values):")
print(score_dataset(reduced_X_train, reduced_X_valid, y_train, y_valid))
output:
MAE from Approach 1 (Drop columns with missing values):
183550.22137772635
方法2 (填充)的得分
接下来,我们使用SimpleImputer将缺失的值替换为每一列的平均值
虽然很简单,但填充平均值通常执行得很好(但这因数据集而异)。虽然统计学家已经尝试过更复杂的方法来确定填充值(比如回归填充regression imputation),但一旦将结果插入复杂的机器学习模型,这些复杂的策略通常不会带来额外的好处。
from sklearn.impute import SimpleImputer

# Imputation
my_imputer = SimpleImputer()
imputed_X_train = pd.DataFrame(my_imputer.fit_transform(X_train))
imputed_X_valid = pd.DataFrame(my_imputer.transform(X_valid))

# Imputation removed column names; put them back
imputed_X_train.columns = X_train.columns
imputed_X_valid.columns = X_valid.columns

print("MAE from Approach 2 (Imputation):")
print(score_dataset(imputed_X_train, imputed_X_valid, y_train, y_valid))
output:
MAE from Approach 2 (Imputation):
178166.46269899711
我们看到方法2比方法1具有更低的MAE,因此方法2在这个数据集上表现更好。
方法3(填充的延申)的得分
接下来,我们填充缺失的值,同时跟踪被填充的值
# Make copy to avoid changing original data (when imputing)
X_train_plus = X_train.copy()
X_valid_plus = X_valid.copy()

# Make new columns indicating what will be imputed
for col in cols_with_missing:
    X_train_plus[col + '_was_missing'] = X_train_plus[col].isnull()
    X_valid_plus[col + '_was_missing'] = X_valid_plus[col].isnull()

# Imputation
my_imputer = SimpleImputer()
imputed_X_train_plus = pd.DataFrame(my_imputer.fit_transform(X_train_plus))
imputed_X_valid_plus = pd.DataFrame(my_imputer.transform(X_valid_plus))

# Imputation removed column names; put them back
imputed_X_train_plus.columns = X_train_plus.columns
imputed_X_valid_plus.columns = X_valid_plus.columns

print("MAE from Approach 3 (An Extension to Imputation):")
print(score_dataset(imputed_X_train_plus, imputed_X_valid_plus, y_train, y_valid))
output:
MAE from Approach 3 (An Extension to Imputation):
178927.503183954
正如我们所看到的,方法3的性能略逊于方法2。
为什么填充法比直接删除这些列的效果更好呢?
训练数据有10864行和12列,其中3列包含缺失的数据。对于每一列,少于一半的记录被遗漏。因此,删除这些列删除了大量有用的信息,因此,填充法将表现得更好是有道理的。
# Shape of training data (num_rows, num_columns)
print(X_train.shape)

# Number of missing values in each column of training data
missing_val_count_by_column = (X_train.isnull().sum())
print(missing_val_count_by_column[missing_val_count_by_column > 0])
output:
(10864, 12)
Car               49
BuildingArea    5156
YearBuilt       4307
dtype: int64
总结
与简单地删除有缺失值的列(在方法1中)相比,填充缺失值(在方法2和方法3中)通常会产生更好的结果。
分类变量categorical variable
分类变量只接受有限数量的值。
- 考虑一个调查,问你多久吃一次早餐,并提供四种选择:“从不”,“很少”,“大部分时间”,或“每天”。在这种情况下,数据是分类的,因为响应于一组固定的类别。
- 如果人们回答一项关于他们拥有什么品牌的汽车的调查,他们的回答会分成像“本田”、“丰田”和“福特”这样的类别。在这种情况下,数据也是分类的。
如果您试图将这些变量插入到Python中的大多数机器学习模型中而不首先对它们进行预处理,那么将会出现错误。在本教程中,我们将比较用于准备分类数据的三种方法。
Three Approaches
1)删除分类变量
处理分类变量最简单的方法是将它们从数据集中移除。这种方法只有在列不包含有用信息时才有效。
2) 标签编码Label Encoding
标签编码将每个唯一值分配给一个不同的整数。

这种方法假定类别的顺序为:“Never”(0)<“Rarely”(1)<“Most days”(2)<“Every day”(3)。
这个假设在这个例子中是有意义的,因为类别有一个无可争辩的排名。并不是所有的分类变量的值都有一个明确的顺序,但我们把那些做顺序变量。对于基于树的模型(如决策树和随机森林),您可以期望标签编码能够很好地处理顺序变量。
3) 独热编码One-Hot Encoding
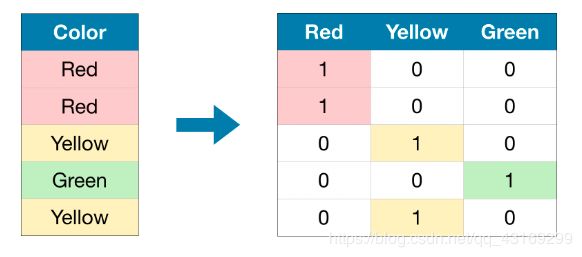
独热编码创建新列,指示原始数据中每个可能值的存在(或不存在)。为了理解这一点,我们将通过一个示例。

在原始数据集中,“Color”是一个分类变量,有“Red”、“Yellow”、“Green”三个类别。对应的one-hot编码为每个可能的值包含一列,为原始数据集中的每一行包含一行。当原始值为“Red”时,我们在“Red”一栏中写上1;如果原始值是“Yellow”,我们在“Yellow”列中输入1,以此类推。
与标签编码相比,独热编码不假定类别的顺序。因此,如果分类数据中没有明确的排序(例如,“Red”既不多于也不少于“Yellow”),那么你可以期望这种方法特别有效。我们把没有内在等级的分类变量称为名义变量nominal variables.。
如果分类变量具有大量的值,独热编码通常表现得不好(例如:,一般不会将其用于包含超过15个不同值的变量)。
Example
我们将使用墨尔本房屋数据集 Melbourne Housing dataset。
我们不会关注数据加载步骤。相反,您可以想象您已经拥有了X_train、X_valid、y_train和y_valid中的训练和验证数据。
import pandas as pd
from sklearn.model_selection import train_test_split

# Read the data
data = pd.read_csv('../input/melbourne-housing-snapshot/melb_data.csv')

# Separate target from predictors
y = data.Price
X = data.drop(['Price'], axis=1)

# Divide data into training and validation subsets
X_train_full, X_valid_full, y_train, y_valid = train_test_split(X, y, train_size=0.8, test_size=0.2,
                                                                random_state=0)

# Drop columns with missing values (simplest approach)
cols_with_missing = [col for col in X_train_full.columns if X_train_full[col].isnull().any()]
X_train_full.drop(cols_with_missing, axis=1, inplace=True)
X_valid_full.drop(cols_with_missing, axis=1, inplace=True)

# "Cardinality" means the number of unique values in a column
# Select categorical columns with relatively low cardinality (convenient but arbitrary)
low_cardinality_cols = [cname for cname in X_train_full.columns if X_train_full[cname].nunique() < 10 and
                        X_train_full[cname].dtype == "object"]

# Select numerical columns
numerical_cols = [cname for cname in X_train_full.columns if X_train_full[cname].dtype in ['int64', 'float64']]

# Keep selected columns only
my_cols = low_cardinality_cols + numerical_cols
X_train = X_train_full[my_cols].copy()
X_valid = X_valid_full[my_cols].copy()
用下面的head()方法看一下训练数据。
X_train.head()
	   Type	 Method 	Regionname	      Rooms	Distance	Postcode   Bedroom2	Bathroom	Landsize	Lattitude	Longtitude	Propertycount
12167	u	  S	    Southern Metropolitan	1	 5.0	    3182.0	     1.0	 1.0	     0.0	    -37.85984	 144.9867	  13240.0
6524	h	  SA	Western Metropolitan	2	 8.0	    3016.0	     2.0	 2.0	    193.0	    -37.85800	 144.9005	  6380.0
8413	h	  S 	Western Metropolitan	3	 12.6	    3020.0	     3.0	 1.0	    555.0	    -37.79880	 144.8220	  3755.0
2919	u	  SP	Northern Metropolitan	3	 13.0	    3046.0	     3.0	 1.0	    265.0	    -37.70830	 144.9158	  8870.0
6043	h	  S	    Western Metropolitan	3	 13.3	    3020.0       3.0	 1.0	    673.0	    -37.76230	 144.8272	  4217.0
接下来,我们获得训练数据中所有分类变量的列表。
我们通过检查每个列的数据类型(或dtype)来实现这一点。对象object dtype表示列具有文本(理论上还可以是其他内容,但这对我们的目的不重要)。对于这个数据集,带有文本的列表示分类变量。
# Get list of categorical variables
s = (X_train.dtypes == 'object')
object_cols = list(s[s].index)

print("Categorical variables:")
print(object_cols)
output:
Categorical variables:
['Type', 'Method', 'Regionname']
定义函数来度量每种方法的质量
我们定义函数score_dataset()来比较处理分类变量的三种不同方法。这个函数报告随机森林模型的平均绝对误差(MAE)。一般来说,我们希望MAE尽可能低!
from sklearn.ensemble import RandomForestRegressor
from sklearn.metrics import mean_absolute_error

# Function for comparing different approaches
def score_dataset(X_train, X_valid, y_train, y_valid):
    model = RandomForestRegressor(n_estimators=100, random_state=0)
    model.fit(X_train, y_train)
    preds = model.predict(X_valid)
    return mean_absolute_error(y_valid, preds)
方法1(去掉分类变量)的得分
我们使用select_dtypes()方法删除对象列。
drop_X_train = X_train.select_dtypes(exclude=['object'])
drop_X_valid = X_valid.select_dtypes(exclude=['object'])

print("MAE from Approach 1 (Drop categorical variables):")
print(score_dataset(drop_X_train, drop_X_valid, y_train, y_valid))
output:
MAE from Approach 1 (Drop categorical variables):
175703.48185157913
方法2(标签编码)的得分
在进入标签编码之前,我们将研究数据集。
是否有一些值出现在验证数据中而训练数据中没有?
这是在实际数据中会遇到的常见问题,有很多方法可以解决这个问题。例如,您可以编写一个自定义标签编码器来处理新的类别。然而,最简单的方法是删除有问题的分类列。
运行下面的代码单元格,将有问题的列保存到Python列表bad_label_cols中。同样,可以安全地进行标签编码的列存储在good_label_cols中。
# All categorical columns
object_cols = [col for col in X_train.columns if X_train[col].dtype == "object"]

# Columns that can be safely label encoded
good_label_cols = [col for col in object_cols if
                   set(X_train[col]) == set(X_valid[col])]

# Problematic columns that will be dropped from the dataset
bad_label_cols = list(set(object_cols)-set(good_label_cols))

print('Categorical columns that will be label encoded:', good_label_cols)
print('\nCategorical columns that will be dropped from the dataset:', bad_label_cols)
Scikit-learn有一个LabelEncoder类,可以用来获取标签编码。我们循环遍历分类变量,并将标签编码器分别应用到每一列。
from sklearn.preprocessing import LabelEncoder

# Make copy to avoid changing original data
label_X_train = X_train.drop(bad_label_cols, axis=1)
label_X_valid = X_valid.drop(bad_label_cols, axis=1)

# Apply label encoder to each column with categorical data
label_encoder = LabelEncoder()
for col in good_label_cols:
    label_X_train[col] = label_encoder.fit_transform(X_train[col])
    label_X_valid[col] = label_encoder.transform(X_valid[col])

print("MAE from Approach 2 (Label Encoding):")
print(score_dataset(label_X_train, label_X_valid, y_train, y_valid))
output:
MAE from Approach 2 (Label Encoding):
165936.40548390493
在上面的代码单元格中,对于每个列,我们将每个唯一值随机分配给一个不同的整数。这是一种常见的方法,比提供自定义标签更简单;但是,如果我们为所有序号变量提供更好的标签,我们可以期待性能的额外提升。
方法3(独热编码)得分
首先我们来查看基数cardinality:
对于具有分类数据的每一列,该列中惟一值的数量。例如,训练数据中的’Street’列有两个惟一的值:‘Grvl’和’Pave’,分别对应于一条砾石路和一条铺好的路。我们将一个类别变量的唯一条目的数量称为该类别变量的基数。例如,'Street’变量的基数为2。
#练习里面的数据Housing Prices Competition for Kaggle Learn Users.
# Get number of unique entries in each column with categorical data
object_nunique = list(map(lambda col: X_train[col].nunique(), object_cols))
d = dict(zip(object_cols, object_nunique))

# Print number of unique entries by column, in ascending order
sorted(d.items(), key=lambda x: x[1])
[('Street', 2),
 ('Utilities', 2),
 ('CentralAir', 2),
 ('LandSlope', 3),
 ('PavedDrive', 3),
 ('LotShape', 4),
 ('LandContour', 4),
 ('ExterQual', 4),
 ('KitchenQual', 4),
 ('MSZoning', 5),
 ('LotConfig', 5),
 ('BldgType', 5),
 ('ExterCond', 5),
 ('HeatingQC', 5),
 ('Condition2', 6),
 ('RoofStyle', 6),
 ('Foundation', 6),
 ('Heating', 6),
 ('Functional', 6),
 ('SaleCondition', 6),
 ('RoofMatl', 7),
 ('HouseStyle', 8),
 ('Condition1', 9),
 ('SaleType', 9),
 ('Exterior1st', 15),
 ('Exterior2nd', 16),
 ('Neighborhood', 25)]
对于多行大型数据集,独热编码可以极大地扩展数据集的大小。因此,我们通常只使用基数较低的独热编码列。然后,可以从数据集中删除高基数列,或者我们可以使用标签编码。
下面,我们将只为基数小于10的列创建一个独热编码,而不是对数据集中的所有分类变量进行编码。
# Columns that will be one-hot encoded
low_cardinality_cols = [col for col in object_cols if X_train[col].nunique() < 10]

# Columns that will be dropped from the dataset
high_cardinality_cols = list(set(object_cols)-set(low_cardinality_cols))
我们使用scikitl -learn中的OneHotEncoder类来获得一次性编码。有许多参数可以用于定制其行为。
- 我们设置handle_unknown=‘ignore’,以避免在验证数据包含训练数据中没有表示的类时出现错误。
- 设置sparse=False可以确保以numpy数组(而不是稀疏矩阵)的形式返回已编码的列。
要使用编码器,我们只提供我们希望进行独热编码的分类列。例如,为了编码训练数据,我们提供X_train[object_cols]。(下面代码单元中的object_cols是带有分类数据的列名称列表,因此X_train[object_cols]包含训练集中的所有分类数据。)
from sklearn.preprocessing import OneHotEncoder

# Apply one-hot encoder to each column with categorical data
OH_encoder = OneHotEncoder(handle_unknown='ignore', sparse=False)
OH_cols_train = pd.DataFrame(OH_encoder.fit_transform(X_train[low_cardinality_cols]))
OH_cols_valid = pd.DataFrame(OH_encoder.transform(X_valid[low_cardinality_cols]))

# One-hot encoding removed index; put it back
OH_cols_train.index = X_train.index
OH_cols_valid.index = X_valid.index

# Remove categorical columns (will replace with one-hot encoding)
num_X_train = X_train.drop(object_cols, axis=1)
num_X_valid = X_valid.drop(object_cols, axis=1)

# Add one-hot encoded columns to numerical features
OH_X_train = pd.concat([num_X_train, OH_cols_train], axis=1)
OH_X_valid = pd.concat([num_X_valid, OH_cols_valid], axis=1)

print("MAE from Approach 3 (One-Hot Encoding):")
print(score_dataset(OH_X_train, OH_X_valid, y_train, y_valid))
output:
MAE from Approach 3 (One-Hot Encoding):
166089.4893009678
哪种方法是最好的?
在这种情况下,删除分类列(方法1)表现最差,因为它拥有最高的MAE得分。至于其他两种方法,由于归还的MAE得分值非常接近,两者之间似乎没有任何有意义的优势。
通常,独热编码(方法3)的性能最好,而删除分类列(方法1)的性能最差,但具体情况会有所不同。
结论
这个世界充满了分类数据。如果你知道如何使用这种通用数据类型,你将成为一名更有效的数据科学家!
Pipelines
管道Pipelines是保持数据预处理和建模代码有组织的一种简单方法。具体来说,管道捆绑了预处理和建模步骤,因此您可以像使用单个步骤一样使用整个捆绑包。
许多数据科学家在没有流水线的情况下拼凑模型,但是管道有一些重要的好处。这些包括:
- 更干净的代码Cleaner Code: 在预处理的每一步计算数据可能会变得很混乱。通过管道,你将不需要在每一步手动跟踪你的训练和验证数据。
- 错误更少Fewer Bugs: 错误应用步骤或忘记预处理步骤的机会更少。
- 易于生产化Easier to Productionize: 将模型从原型转换为可大规模部署的东西可能会异常困难。这里我们不会深入讨论许多相关问题,但是管道可能会有所帮助。
- 模型验证的更多选项More Options for Model Validation: 我们将在下一个节中看到一个示例,其中介绍了交叉验证。
Example
下面,我们将使用墨尔本房屋数据集Melbourne Housing dataset。
X_train、X_valid、y_train和y_valid中的训练和验证数据。
import pandas as pd
from sklearn.model_selection import train_test_split

# Read the data
data = pd.read_csv('../input/melbourne-housing-snapshot/melb_data.csv')

# Separate target from predictors
y = data.Price
X = data.drop(['Price'], axis=1)

# Divide data into training and validation subsets
X_train_full, X_valid_full, y_train, y_valid = train_test_split(X, y, train_size=0.8, test_size=0.2,
                                                                random_state=0)

# "Cardinality" means the number of unique values in a column
# Select categorical columns with relatively low cardinality (convenient but arbitrary)
categorical_cols = [cname for cname in X_train_full.columns if X_train_full[cname].nunique() < 10 and
                        X_train_full[cname].dtype == "object"]

# Select numerical columns
numerical_cols = [cname for cname in X_train_full.columns if X_train_full[cname].dtype in ['int64', 'float64']]

# Keep selected columns only
my_cols = categorical_cols + numerical_cols
X_train = X_train_full[my_cols].copy()
X_valid = X_valid_full[my_cols].copy()
我们分三步构建整个管道。
步骤1:定义预处理步骤
类似于管道如何将预处理和建模步骤捆绑在一起,我们使用ColumnTransformer类将不同的预处理步骤捆绑在一起。下面的代码:
- 填充数值数据中的缺失值;
-填充缺失值并对分类数据采用独热编码。
from sklearn.compose import ColumnTransformer
from sklearn.pipeline import Pipeline
from sklearn.impute import SimpleImputer
from sklearn.preprocessing import OneHotEncoder

# Preprocessing for numerical data
numerical_transformer = SimpleImputer(strategy='constant')

# Preprocessing for categorical data
categorical_transformer = Pipeline(steps=[
    ('imputer', SimpleImputer(strategy='most_frequent')),
    ('onehot', OneHotEncoder(handle_unknown='ignore'))
])

# Bundle preprocessing for numerical and categorical data
preprocessor = ColumnTransformer(
    transformers=[
        ('num', numerical_transformer, numerical_cols),
        ('cat', categorical_transformer, categorical_cols)
    ])
步骤2:定义模型
接下来,我们用熟悉的RandomForestRegressor类定义一个随机森林模型。
from sklearn.ensemble import RandomForestRegressor

model = RandomForestRegressor(n_estimators=100, random_state=0)
步骤3:创建和评估管道
最后,我们使用Pipeline类来定义绑定预处理和建模步骤的管道。有几件重要的事情需要注意:
- 通过管道,我们对训练数据进行预处理,并用一行代码拟合模型。(相比之下,如果没有管道,我们就必须在单独的步骤中进行注入、单热编码和模型训练。如果我们必须同时处理数字变量和分类变量,这就变得特别混乱!)
- 通过管道,我们将X_valid中未处理的特征提供给predict()命令,管道在生成预测之前自动预处理这些特性。(但是,如果没有管道,我们必须记住在进行预测之前对验证数据进行预处理。)
from sklearn.metrics import mean_absolute_error

# Bundle preprocessing and modeling code in a pipeline
my_pipeline = Pipeline(steps=[('preprocessor', preprocessor),
                              ('model', model)
                             ])

# Preprocessing of training data, fit model
my_pipeline.fit(X_train, y_train)

# Preprocessing of validation data, get predictions
preds = my_pipeline.predict(X_valid)

# Evaluate the model
score = mean_absolute_error(y_valid, preds)
print('MAE:', score)
output:
MAE: 160679.18917034855
结论
管道对于清理机器学习代码和避免错误很有价值,对于具有复杂数据预处理的工作流尤其有用。
Cross-Validation
机器学习是一个迭代的过程。
你将面临选择使用什么预测变量,使用什么类型的模型,为这些模型提供什么论据,等等。到目前为止,通过使用验证(或坚持)集度量模型质量,你已经以数据驱动的方式做出了这些选择。
但是这种方法也有一些缺点。要了解这一点,假设您有一个包含5000行的数据集。您通常会保留大约20%的数据作为验证数据集,即1000行。但这在决定模型得分时留下了一些随机机会。也就是说,一个模型可能在一个1000行的集合上运行得很好,即使它在不同的1000行的集合上可能不准确。
在极端情况下,你可以想象验证集中只有一行数据。如果你比较其他模型,哪一个模型在单个数据点上做出了最好的预测将主要是运气问题!
一般来说,验证集越大,我们衡量模型质量的随机性(又名“噪音”)就越少,也就越可靠。不幸的是,我们只能通过从训练数据中删除行来获得一个大的验证集,而更小的训练数据集意味着更糟糕的模型!
交叉验证是什么?
在交叉验证中,我们在数据的不同子集上运行我们的建模过程,以获得模型质量的多种度量。
例如,我们可以将数据分成5个部分,每个部分占整个数据集的20%。在这种情况下,我们说我们已经把数据分成5个“折叠”。
然后,我们对每一次折叠进行一个实验:
- 在实验1中,我们使用第一个折fold 作为验证(或holdout)集,其他的作为训练数据。这为我们提供了一个基于20%验证集的模型质量的度量。
- 在实验2中,我们拿出来自第二次折fold 的数据(并且使用除第二次折叠之外的所有数据来训练模型)。然后使用验证集得到模型质量的第二次估计。
- 我们重复这个过程,使用每一个折fold 一次来作为验证。把这个放一起,100%的数据被用作验证在某种程度上,我们最终得到的模型质量,是基于所有的行数据集(即使我们不同时使用所有行)。
什么时候应该使用交叉验证?
交叉验证为模型质量提供了更准确的度量,如果您要做大量的建模决策,这一点尤其重要。但是,它可能需要更长的时间运行,因为它估计多个模型(每个折叠一个模型)。
因此,考虑到这些权衡,什么时候应该使用每种方法?
- 对于小型数据集,额外的计算负担不是什么大问题,您应该运行交叉验证。
- 对于较大的数据集,单个验证集就足够了。你的代码将运行得更快,并且你可能有足够的数据,因此几乎不需要为验证重用其中的一些数据。
对于什么是大数据集和什么是小数据集,没有简单的阈值。但是如果你的模型需要几分钟或更短的时间运行,那么切换到交叉验证可能是值得的。
或者,你可以运行交叉验证,看看每个实验的得分是否接近。如果每个实验都产生相同的结果,那么单个验证集可能就足够了。
Example
我们将使用与上一节相同的数据。我们在X中加载输入数据,在y中加载输出数据。
# Read the data
data = pd.read_csv('../input/melbourne-housing-snapshot/melb_data.csv')

# Select subset of predictors
cols_to_use = ['Rooms', 'Distance', 'Landsize', 'BuildingArea', 'YearBuilt']
X = data[cols_to_use]

# Select target
y = data.Price
然后,我们定义了一个管道,它使用一个imputer来填充缺失值,以及一个随机森林模型来进行预测。
虽然可以在不使用管道的情况下进行交叉验证,但这是相当困难的!使用管道将使代码非常简单。
from sklearn.ensemble import RandomForestRegressor
from sklearn.pipeline import Pipeline
from sklearn.impute import SimpleImputer

my_pipeline = Pipeline(steps=[('preprocessor', SimpleImputer()),
                              ('model', RandomForestRegressor(n_estimators=50,
                                                              random_state=0))
                             ])
我们使用scikit-learn中的cross_val_score()函数获得交叉验证分数。我们使用cv参数设置折叠数。
from sklearn.model_selection import cross_val_score

# Multiply by -1 since sklearn calculates *negative* MAE
scores = -1 * cross_val_score(my_pipeline, X, y,
                              cv=5,
                              scoring='neg_mean_absolute_error')

print("MAE scores:\n", scores)
output:
MAE scores:
 [301628.7893587  303164.4782723  287298.331666   236061.84754543
 260383.45111427]
scoring参数选择一个模型质量的度量来报告:在这种情况下,我们选择了负平均绝对误差(MAE)。scikit学习的文档显示了一个选项列表。
让人有点惊讶的是,我们指定的是负的MAE。Scikit-learn有一个惯例,即所有指标都被定义为较高的数字更好。虽然在其他地方几乎没有听说过负的MAE,但在这里使用负数可以使他们与这种惯例保持一致。
我们通常需要一个模型质量的单一度量来比较其他模型。我们取实验平均值。
print("Average MAE score (across experiments):")
print(scores.mean())
output:
Average MAE score (across experiments):
277707.3795913405
结论
使用交叉验证可以更好地度量模型质量,同时还可以清理代码:注意,我们不再需要跟踪单独的训练集和验证集。所以,特别是对于小型数据集,这是一个很好的改进!
Gradient boosting
下面,你将学习如何建立和优化梯度提升Gradient boosting模型。这种方法主导了许多Kaggle竞赛,并在各种数据集上获得了达到最高水准的结果。
对于本节的大部分内容,你已经使用随机森林方法进行了预测,该方法通过平均许多决策树的预测,比单一决策树获得了更好的性能。
我们将随机森林方法称为“集成方法ensemble methods”。根据定义,集成方法结合了几个模型的预测(例如,在随机森林的情况下,是几棵树)。
接下来,我们将学习另一种称为梯度增强的集成方法。、
梯度提升是一种通过循环迭代地将模型添加到集成中的方法。
它首先用一个模型初始化集合,这个模型的预测可能非常简单。(即使它的预测是非常不准确的,后续的添加将解决这些错误。)
然后,我们开始循环:
- 首先,我们使用当前集合为数据集中的每个观察结果生成预测。为了做出预测,我们将来自所有模型的预测添加到集合中。
- 这些预测被用来计算一个损失函数(比如平均平方误差)。
- 然后,我们使用损失函数拟合一个新的模型,将被添加到整体。具体地说,我们确定了模型的参数,以便将这个新模型加入到整体中可以减少损失。(旁注:“gradient boosting”中的“gradient”是指我们将对损耗函数使用梯度下降来确定新模型中的参数。)
- 最后,我们将新模型添加到集成ensemble中,并且…
- …重复!
Example
我们首先用X_train、X_valid、y_train和y_valid加载训练和验证数据。
mport pandas as pd
from sklearn.model_selection import train_test_split

# Read the data
data = pd.read_csv('../input/melbourne-housing-snapshot/melb_data.csv')

# Select subset of predictors
cols_to_use = ['Rooms', 'Distance', 'Landsize', 'BuildingArea', 'YearBuilt']
X = data[cols_to_use]

# Select target
y = data.Price

# Separate data into training and validation sets
X_train, X_valid, y_train, y_valid = train_test_split(X, y)
在本例中,我们将使用XGBoost库。XGBoost是极端梯度提升的缩写,它是梯度提升的一个实现,带有几个侧重于性能和速度的附加特性。(Scikit-learn有另一个版本的梯度提升,但XGBoost有一些技术优势。)
在下一个代码单元中,我们为XGBoost导入scikit-learn API (XGBoost . xgbregressor)。这使我们能够像在scikiti学习中一样建立并适合一个模型。正如你将在输出中看到的,XGBRegressor类有许多可调参数——你很快就会了解到这些参数!
from xgboost import XGBRegressor

my_model = XGBRegressor()
my_model.fit(X_train, y_train)
我们还对模型进行了预测和评估。
from sklearn.metrics import mean_absolute_error

predictions = my_model.predict(X_valid)
print("Mean Absolute Error: " + str(mean_absolute_error(predictions, y_valid)))
output:
Mean Absolute Error: 280355.04334039026
参数调整
XGBoost有几个参数可以极大地影响精度和训练速度。你应该了解的第一个参数是:
n_estimators
n_estimators指定经过上面描述的建模周期的次数。它等于我们在集合中包含的模型的数量。
- 过低的值会导致拟合不足,导致对训练数据和测试数据的预测都不准确。
- 过高的值会导致过拟合,这会导致对训练数据的准确预测,但对测试数据的预测不准确(这是我们所关心的)。
典型的值范围在100-1000之间,不过这很大程度上取决于下面讨论的learning_rate参数。
下面是用于设置集合中模型数量的代码:
my_model = XGBRegressor(n_estimators=500)
my_model.fit(X_train, y_train)
output:
[13:37:05] WARNING: /workspace/src/objective/regression_obj.cu:152: reg:linear is now deprecated in favor of reg:squarederror.
/opt/conda/lib/python3.6/site-packages/xgboost/core.py:587: FutureWarning: Series.base is deprecated and will be removed in a future version
  if getattr(data, 'base', None) is not None and \
XGBRegressor(base_score=0.5, booster='gbtree', colsample_bylevel=1,
             colsample_bynode=1, colsample_bytree=1, gamma=0,
             importance_type='gain', learning_rate=0.1, max_delta_step=0,
             max_depth=3, min_child_weight=1, missing=None, n_estimators=500,
             n_jobs=1, nthread=None, objective='reg:linear', random_state=0,
             reg_alpha=0, reg_lambda=1, scale_pos_weight=1, seed=None,
             silent=None, subsample=1, verbosity=1)
early_stopping_rounds
early_stopping_rounds提供了一种自动查找n_estimators的理想值的方法。当验证分数停止改进时,早期停止会导致模型停止迭代,即使对于n_estimators,我们并没有处于硬停止状态。明智的做法是为n_estimators设置一个较高的值,然后使用early_stopping_rounds来查找停止迭代的最佳时间。
由于偶然的机会有时会导致一轮验证分数没有提高,因此您需要指定一个数字,说明在停止之前允许多少轮直线恶化。设置early_stopping_rounds=5是一个合理的选择。在这种情况下,我们在连续5轮验证分数恶化后停止。
在使用early_stopping_rounds时,还需要留出一些数据来计算验证分数——这可以通过设置eval_set参数来完成。
我们可以修改上面的例子来包括早期停止:
my_model = XGBRegressor(n_estimators=500)
my_model.fit(X_train, y_train,
             early_stopping_rounds=5,
             eval_set=[(X_valid, y_valid)],
             verbose=False)
output:
[13:37:07] WARNING: /workspace/src/objective/regression_obj.cu:152: reg:linear is now deprecated in favor of reg:squarederror.
XGBRegressor(base_score=0.5, booster='gbtree', colsample_bylevel=1,
             colsample_bynode=1, colsample_bytree=1, gamma=0,
             importance_type='gain', learning_rate=0.1, max_delta_step=0,
             max_depth=3, min_child_weight=1, missing=None, n_estimators=500,
             n_jobs=1, nthread=None, objective='reg:linear', random_state=0,
             reg_alpha=0, reg_lambda=1, scale_pos_weight=1, seed=None,
             silent=None, subsample=1, verbosity=1)
如果你稍后希望用您的所有数据拟合一个模型,请将n_estimators设置为您在运行早期停止时发现的最优值。
learning_rate
我们可以将每个模型的预测乘以一个小的数字(称为学习率 learning rate),然后再将它们相加,而不是简单地将每个组件模型的预测相加。
这意味着我们添加到集合中的每棵树帮助我们的都更少。因此,我们可以在不过拟合的情况下为n_estimators设置一个更高的值。如果我们使用早期停止,适当的树的数量将被自动确定。
一般来说,较小的学习率和大量的estimators将产生更准确的XGBoost模型,尽管它也将花费模型更长的时间来训练,因为它在周期中进行了更多的迭代。默认情况下,XGBoost设置learning_rate=0.1。
修改上面的例子来改变学习速率,会产生以下代码:
my_model = XGBRegressor(n_estimators=1000, learning_rate=0.05)
my_model.fit(X_train, y_train,
             early_stopping_rounds=5,
             eval_set=[(X_valid, y_valid)],
             verbose=False)
output:
[13:37:08] WARNING: /workspace/src/objective/regression_obj.cu:152: reg:linear is now deprecated in favor of reg:squarederror.
XGBRegressor(base_score=0.5, booster='gbtree', colsample_bylevel=1,
             colsample_bynode=1, colsample_bytree=1, gamma=0,
             importance_type='gain', learning_rate=0.05, max_delta_step=0,
             max_depth=3, min_child_weight=1, missing=None, n_estimators=1000,
             n_jobs=1, nthread=None, objective='reg:linear', random_state=0,
             reg_alpha=0, reg_lambda=1, scale_pos_weight=1, seed=None,
             silent=None, subsample=1, verbosity=1)
n_jobs
在需要考虑运行时的大型数据集上,可以使用并行性更快地构建模型。通常将参数n_jobs设置为机器上的核数。在较小的数据集上,这是没有帮助的。
最终的模型不会更好,所以对拟合时间的微优化通常只是分散注意力。但是,它在大型数据集中非常有用,否则在执行fit命令期间,你将花费很长时间等待。
下面是修改后的例子:
my_model = XGBRegressor(n_estimators=1000, learning_rate=0.05, n_jobs=4)
my_model.fit(X_train, y_train,
             early_stopping_rounds=5,
             eval_set=[(X_valid, y_valid)],
             verbose=False)
结论
XGBoost是处理标准列表数据tabular data(存储在panda DataFrames中的数据类型,而不是图像和视频等更独特的数据类型)的领先软件库。通过仔细的参数调整,你可以训练高精度的模型。
Data leakage
在本节中,我们将了解什么是数据泄漏Data leakage(也就是因果关系的纰漏)以及如何防止它。如果你不知道如何防止它,leakage将经常出现,它会以一种敏感而危险的方式毁掉你的模型。这是数据科学家最重要的概念之一。
当训练数据包含有关目标的信息时,就会发生数据泄漏Data leakage(或泄漏leakage),但当使用模型进行预测时,将无法获得类似的数据。这导致了训练集(甚至验证数据)的高性能,但是模型在生产中表现不佳。
换句话说,泄漏leakage导致模型看起来很准确,直到你开始使用该模型做出决策,然后该模型变得非常不准确。
泄漏leakage主要有两种类型:目标泄漏target leakage 和 训练-检验污染train-test contamination.。
Target leakage
当预测器包含在进行预测时不可用的数据时,就会发生目标泄漏。从数据可用的时间或时间顺序来考虑目标泄漏是很重要的,而不仅仅是考虑某个特性是否有助于做出良好的预测。
举个例子会很有帮助。假设你想预测谁会患上肺炎。原始数据的前几行是这样的:
| got_pneumonia | age | weight | male | took_antibiotic_medicine | … |
|---|---|---|---|---|---|
| False | 65 | 100 | False | False | … |
| False | 72 | 130 | True | False | … |
| True | 58 | 100 | False | True | … |
人们在肺炎后服用抗生素药物以恢复健康。原始数据显示,这些列之间存在很强的关系,但在got_pneumonia的值确定后,took_antibiotic tic_medicine经常会被更改。这就是目标泄漏。
这个模型会发现,抗生素药物值为假的人没有患肺炎。由于验证数据与训练数据来自相同的来源,因此模式将在验证中重复,并且模型将获得很好的验证(或交叉验证)分数。
但是这个模型在随后的实际应用中会非常不准确,因为当我们需要预测他们未来的健康状况时,即使是那些会得肺炎的病人也不会接受抗生素治疗。
为了防止这种类型的数据泄漏,应该排除目标值实现后更新(或创建)的任何变量。

Train-Test Contamination
如果不小心区分培训数据和验证数据,则会发生另一种类型的泄漏。
回想一下,验证是对模型如何处理之前没有考虑到的数据的一种度量。如果验证数据影响预处理行为,就可能以微妙的方式破坏这个过程。这有时被称为Train-Test Contamination
例如,假设您在调用train_test_split()之前运行预处理(比如为缺失的值匹配imputer)。你的模型可能获得良好的验证分数,这给了你很大的信心,但是当你部署它来做决策时,它的表现很差。
毕竟,你将来自验证或测试数据的数据合并到进行预测的方式中,所以即使不能泛化到新数据,也可以很好地处理特定数据。当你进行更复杂的特性工程时,这个问题会变得更加敏感(也更加危险)。
如果你的验证是基于简单的train_test_split,请从任何类型的拟合fitting中排除验证数据,包括预处理步骤的拟合fitting。如果你使用scikit-learn pipelines,这将更容易。在使用交叉验证时,更重要的是在管道中进行预处理!
Example
在这个示例中,我们将学习一种检测和消除目标泄漏的方法。
我们将使用关于信用卡应用程序的数据集,并跳过基本的数据设置代码。最终结果是,关于每个信用卡应用程序的信息存储在一个DataFrame X 中。我们将使用它来预测哪些应用程序在系列y中被接受。
import pandas as pd

# Read the data
data = pd.read_csv('../input/aer-credit-card-data/AER_credit_card_data.csv',
                   true_values = ['yes'], false_values = ['no'])

# Select target
y = data.card

# Select predictors
X = data.drop(['card'], axis=1)

print("Number of rows in the dataset:", X.shape[0])
X.head()
output:
Number of rows in the dataset: 1319
  reports	age	    income	 share	    expenditure	owner  selfemp	dependents	months	majorcards	active
0	0	  37.66667	4.5200	0.033270	124.983300	True	False	   3	     54     	1	     12
1	0	  33.25000	2.4200	0.005217	9.854167	False	False	   3	     34	        1	     13
2	0	  33.66667	4.5000	0.004156	15.000000	True	False	   4	     58      	1        5
3	0	  30.50000	2.5400	0.065214	137.869200	False	False	   0	     25      	1	     7
4	0	  32.16667	9.7867	0.067051	546.503300  True	False	   2	     64	        1	     5
由于这是一个小数据集,我们将使用交叉验证来确保模型质量的准确度量。
from sklearn.pipeline import make_pipeline
from sklearn.ensemble import RandomForestClassifier
from sklearn.model_selection import cross_val_score

# Since there is no preprocessing, we don't need a pipeline (used anyway as best practice!)
my_pipeline = make_pipeline(RandomForestClassifier(n_estimators=100))
cv_scores = cross_val_score(my_pipeline, X, y,
                            cv=5,
                            scoring='accuracy')

print("Cross-validation accuracy: %f" % cv_scores.mean())
outpu:
Cross-validation accuracy: 0.979525
根据经验,你会发现很难找到准确率达到98%的模型。这种情况时有发生,但并不常见,所以我们应该更仔细地检查数据,以防目标泄漏。
这里是数据的summary,你也可以在data选项卡下找到:
- card: 1 if credit card application accepted, 0 if not如接受信用卡申请,请填写1,如不接受,请填写0
- reports: Number of major derogatory reports主要贬损报告的数目
- age: Age n years plus twelfths of a year年龄n岁加上一年的十二分之一
- income: Yearly income (divided by 10,000)年收入(除以10000)
- share: Ratio of monthly credit card expenditure to yearly income每月信用卡支出与年收入的比率
- expenditure: Average monthly credit card expenditure平均每月信用卡支出
- owner: 1 if owns home, 0 if rents拥有房屋为1,出租房屋为0
- selfempl: 1 if self-employed, 0 if not个体户1个,不个体户0个
- dependents: 1 + number of dependents 1+受抚养人数
- months: Months living at current address住在当前地址的几个月
- majorcards: Number of major credit cards held持有的主要信用卡数量
- active: Number of active credit accounts有效信用帐户数目
一些变量看起来可疑。例如,支出expenditur是指在这张卡上的支出,还是在申请前使用的卡上的支出?
在这一点上,基本的数据比较是非常有用的:
expenditures_cardholders = X.expenditure[y]
expenditures_noncardholders = X.expenditure[~y]

print('Fraction of those who did not receive a card and had no expenditures: %.2f' \
      %((expenditures_noncardholders == 0).mean()))
print('Fraction of those who received a card and had no expenditures: %.2f' \
      %(( expenditures_cardholders == 0).mean()))
outpu:
Fraction of those who did not receive a card and had no expenditures: 1.00
Fraction of those who received a card and had no expenditures: 0.02
如上所示,没有收到信用卡的人没有支出,而收到信用卡的人中只有2%没有支出。我们的模型似乎具有很高的准确性,这并不奇怪。但这似乎也是一个目标泄漏的案例,其中支出可能意味着支出在他们申请的卡上。
由于share部分由expenditure决定,因此也应将其排除在外。变量active和majorcard不太清楚,但从描述来看,它们听起来有关。在大多数情况下,如果你不能追踪到创建数据的人来找出更多信息,安全总比遗憾好。
我们将运行一个没有目标泄漏的模型如下:
# Drop leaky predictors from dataset
potential_leaks = ['expenditure', 'share', 'active', 'majorcards']
X2 = X.drop(potential_leaks, axis=1)

# Evaluate the model with leaky predictors removed
cv_scores = cross_val_score(my_pipeline, X2, y,
                            cv=5,
                            scoring='accuracy')

print("Cross-val accuracy: %f" % cv_scores.mean())
output:
Cross-val accuracy: 0.830924
这个准确度要低得多,可能会让人失望。然而,在新应用程序上使用时,我们可以期望它在80%的情况下是正确的,而泄露的模型可能会做得更糟(尽管它在交叉验证方面的明显得分更高)。
结论
在许多数据科学应用程序中,数据泄漏可能造成数百万美元的损失。将培训数据和验证数据仔细地分离可以防止 train-test contamination,管道可以帮助实现这种分离。同样,谨慎、常识和数据探索的结合可以帮助识别目标泄漏。