Logstash:使用 mutate 过滤器
如果你对 Logstash 还没有了解的话,请参阅我之前的文章 “Logstash:Data转换,分析,提取,丰富及核心操作”。在今天的文章中,我们将介绍 Logstash 中的 mutate 过滤器插件。
在数据管道中使用 Logstash 的好处之一是能够根据系统和组织的需求将数据转换为所需的格式。 在 Logstash 中有多种转换数据的方法,其中一种是使用 mutate 过滤器插件。
这个 Logstash 过滤器插件允许您将字段强制为特定的数据类型,并添加,复制和更新特定的字段以使其在整个环境中兼容。 这是一个使用过滤器重命名 IP 字段 HOST_IP 的简单示例。
mutate {
  rename => { “IP” => “HOST_IP” }
}
在本文中,我将通过三个示例说明如何设置和使用mutate过滤器,这些示例说明了可以执行的字段更改的类型。
基础知识
在之前的文章 “Logstash:Data转换,分析,提取,丰富及核心操作” 中,我介绍了如何获得 Logstash 的 filter :
./bin/logstash-plugin list | grep -i mutate我们在 Logstash 的安装目录中打入如上的命令。查询结果显示:
logstash-filter-mutatemutate 过滤器及其不同的配置选项在 Logstash 配置文件的过滤器(filter)部分中定义。 可用的配置选项将在本文后面介绍。 不过,在深入探讨这些内容之前,让我们简要了解一下 Logstash 配置文件的布局。
通常,Logstash 配置文件包含三个主要部分:
- 输入(input)–这是识别要处理的数据源的地方。
- 过滤器(filter)-可以在此处转换和处理传入事件日志的字段。
- 输出(output)–这是将解析的数据转发到的位置。
可以在链接找到有关格式化 Logstash 配置文件的更多信息。
按照目前的官方文档中所描述的,配置文件中的 mutate 按以下顺序执行:
- coerce
- rename
- update
- replace
- convert
- gsub
- uppercase
- capitalize
- lowercase
- strip
- remove
- split
- join
- merge
- copy
但是你可以通过使用不同的 mutate 块来控制这个顺序,比如:
filter {
    mutate {
        split => ["hostname", "."]
        add_field => { "shortHostname" => "%{hostname[0]}" }
    }

    mutate {
        rename => ["shortHostname", "hostname" ]
    }
}
在上面,按理 rename 的优先级是比较高的,如果我们把它放入到第一个 multate 块中,那么它就会被先执行,但是在它执行时,hostname 可能还没有存在。在这种情况下,我们可以使用另外一个 mutate 的块来重新定义这种执行的顺序。
在下面的示例中,我们将标签(Apache Web服务器)添加到传入的 apache 访问日志中,条件是源路径包含术语 “apache”。 请注意在 Logstash 配置文件的 filter 部分中添加的 mutate 过滤器:
input {
  file {
    path => "/var/log/apache/apache_access.log"
    start_position => "beginning"
    sincedb_path => "NULL" }
}
filter {
  if [ source ] =~ /apache/ {
    mutate {
      add_tag => [ "Apache Web Server" ]
    }
  }
}

output {
  elasticsearch { hosts => ["localhost:9200"] }
}
Mutate 过滤器配置选项
mutate 过滤器可以使用许多配置选项,例如copy,rename,replace,join, uppercase 及 lowercase。
下表概述了它们:
| 配置选项 | 用途 |
|---|---|
| add_field | 向事件添加新字段 |
| remove_field | 从事件中删除任意字段 |
| add_tag | 向事件添加任意标签 |
| remove_tag | 从事件中删除标签(如果存在) |
| convert | 将字段值转换为另一种数据类型 |
| id | 向现场事件添加唯一的ID |
| lowercase | 将字符串字段转换为其小写形式 |
| replace | 用新值替换字段 |
| strip | 删除开头和结尾的空格 |
| uppercase | 将字符串字段转换为等效的大写字母 |
| update | 用新值更新现有字段 |
| rename | 重命名事件中的字段 |
| gsub | 用于查找和替换字符串中的替换 |
| merge | 合并数组或 hash 事件 |
用例
简单的有条件的删除
我们可以仿照我之前的教程 “导入zipcode CSV文件和Geo Search体验)”。我们使用如下的 Logstash 的配置文件:
logstash_zipcodes.conf
input {
	file {
		path => "/Users/liuxg/data/zipcodes/zipcodes.csv"
		start_position => "beginning"
		sincedb_path => "/dev/null"
	}
}

filter {
	csv {
		separator => ","
		columns => ["Id", "Code", "AreaCode", "Name", "ShortName", "Longitude", "Latitude", "Sort", "Memo", "Disabled"]
	}

	mutate {
		convert => {"Longitude" => "float"}
		convert => {"Latitude" => "float"}
		add_field => ["location", "%{Latitude},%{Longitude}"]
		rename => ["Code", "zipcode"]
	}

	mutate {
		remove_field => [ "Disabled", "Memo" ]
	}
}


output {
	stdout {codec => rubydebug}

	elasticsearch {
		index => "zipcodes"
		hosts => ["http://localhost:9200"]
	}
}
在上面,我们使用了:
	mutate {
		remove_field => [ "Disabled", ”Memo“ ]
	}
它将会把 Disabled 及 Memo 这两个字段删除掉。在上面,我们也同时展示了 convert, add_field 及 rename 配置选项。
当我们执行像在文章 “导入zipcode CSV文件和Geo Search体验)”描述的那样:
sudo ./bin/logstash -f ~/data/zipcodes/logstash_zipcodes.conf请注意根据自己的环境修改上面的配置文件的路径,那么在屏幕上,我们可以看到:
{
      "AreaCode" => "522730",
     "ShortName" => "麻芝乡",
     "Longitude" => 107.035835,
      "location" => "26.457184,107.035835",
          "host" => "liuxg",
       "message" => "35373,522730201,522730,麻芝乡,麻芝乡,107.035835,26.457184,7,,false",
          "Name" => "麻芝乡",
      "Latitude" => 26.457184,
       "zipcode" => "522730201",
            "Id" => "35373",
          "path" => "/Users/liuxg/data/zipcodes/zipcodes.csv",
          "Sort" => "7",
    "@timestamp" => 2020-06-01T03:38:38.308Z,
      "@version" => "1"
}
在上面的输出中,我们没有看到字段 “Disabled” 及 “Memo” 字段。它们都被删除了。
除了上面,我们无条件的删除之外,我们也可以进行有条件的删除,比如:
logstash_zipcodes.conf
input {
	file {
		path => "/Users/liuxg/data/zipcodes/zipcodes.csv"
		start_position => "beginning"
		sincedb_path => "/dev/null"
	}
}

filter {
	csv {
		separator => ","
		columns => ["Id", "Code", "AreaCode", "Name", "ShortName", "Longitude", "Latitude", "Sort", "Memo", "Disabled"]
	}

	mutate {
		convert => {"Longitude" => "float"}
		convert => {"Latitude" => "float"}
		add_field => ["location", "%{Latitude},%{Longitude}"]
		rename => ["Code", "zipcode"]
	}

	if[AreaCode] == "522730" {
		mutate {
			remove_field => [ "Disabled", "Memo" ]
		}
	}
}


output {
	stdout {codec => rubydebug}

	elasticsearch {
		index => "zipcodes"
		hosts => ["http://localhost:9200"]
	}
}
在上面,我们只针对 AreaCode 为 522730 地区的一些相关字段进行删除,也许我们认为这些是一些敏感的地区,并不需要有些字段被人搜索到。
合并字段
在此示例中,我们将使用 mutate 过滤器通过 merge 选项合并“AreaCode” 和 “ ShortName” 两个字段。
合并两者后,“ShortName”字段将具有数组格式的合并数据。 另外,为了使内容更清楚,我们还将重命名该字段,如下面的代码所示:
logstash_zipcodes.conf
input {
	file {
		path => "/Users/liuxg/data/zipcodes/zipcodes.csv"
		start_position => "beginning"
		sincedb_path => "/dev/null"
	}
}

filter {
	csv {
		separator => ","
		columns => ["Id", "Code", "AreaCode", "Name", "ShortName", "Longitude", "Latitude", "Sort", "Memo", "Disabled"]
	}

	mutate {
		convert => {"Longitude" => "float"}
		convert => {"Latitude" => "float"}
		add_field => ["location", "%{Latitude},%{Longitude}"]
		rename => ["Code", "zipcode"]
	}

	mutate {
		merge =>  { "ShortName" => "AreaCode" }
	}

	mutate {
		rename => [ "ShortName", "Name-Area" ]
	}
}


output {
	stdout {codec => rubydebug}

	elasticsearch {
		index => "zipcodes"
		hosts => ["http://localhost:9200"]
	}
}
我们重新使用上面的配置进行运行 Logstash,我们可以看到:
{
          "Memo" => nil,
      "@version" => "1",
    "@timestamp" => 2020-06-01T04:01:13.353Z,
       "zipcode" => "210114001",
          "path" => "/Users/liuxg/data/zipcodes/zipcodes.csv",
       "message" => "5748,210114001,210114,迎宾路街道,迎宾路街道,123.310829,41.795834,13,,false",
      "Latitude" => 41.795834,
      "AreaCode" => "210114",
          "host" => "liuxg",
            "Id" => "5748",
     "Name-Area" => [
        [0] "迎宾路街道",
        [1] "210114"
    ],
          "Sort" => "13",
      "Disabled" => "false",
          "Name" => "迎宾路街道",
     "Longitude" => 123.310829,
      "location" => "41.795834,123.310829"
}
我们可以看到之前的 AreaCode 及 ShortName 两个字段都不见了。取而代之的是一个崭新的字段 Name-Area,它含有 AreaCode 及 ShortName 两个字段的内容。这个有点类似于我们之前介绍的文章 “如何使用Elasticsearch中的copy_to来提高搜索效率”。我们把不同的字段集中到一个字段,这样可以更方便地进行查询。
添加空格
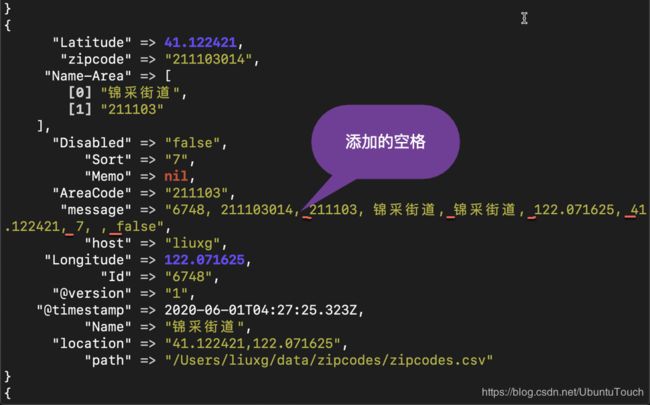
接下来,我们将使用 mutate 过滤器在传入事件的 “message” 字段中添加空格。 当前,“message”字段的值中没有空格。 我们将使用 mutate 过滤器的“GSUB”选项,如以下代码所示:
logstash_zipcodes.conf
input {
	file {
		path => "/Users/liuxg/data/zipcodes/zipcodes.csv"
		start_position => "beginning"
		sincedb_path => "/dev/null"
	}
}

filter {
	csv {
		separator => ","
		columns => ["Id", "Code", "AreaCode", "Name", "ShortName", "Longitude", "Latitude", "Sort", "Memo", "Disabled"]
	}

	mutate {
		convert => {"Longitude" => "float"}
		convert => {"Latitude" => "float"}
		add_field => ["location", "%{Latitude},%{Longitude}"]
		rename => ["Code", "zipcode"]
	}

	mutate {
		merge =>  { "ShortName" => "AreaCode" }
	}

	mutate {
		rename => [ "ShortName", "Name-Area" ]
	}

 	mutate {
	 	gsub => [ "message", "," , ", " ]
	}
}


output {
	stdout {codec => rubydebug}

	elasticsearch {
		index => "zipcodes"
		hosts => ["http://localhost:9200"]
	}
}
重新运行 Logstash, 我们可以看到:
总结
本文已经说明了 mutate 过滤器如何在数据集中创建新字段以及替换和重命名现有字段。 Logstash 中还有许多其他重要的过滤器插件,它们在解析或创建可视化效果时也很有用。
