服务计算——简单web服务与客户端开发
文章目录
- 任务概述
- 任务目标
- API风格
- 使用API生成原型
- 后端框架
- API实现
- 注册实现
- 登陆实现
- JWT认证
任务概述
利用 web 客户端调用远端服务是服务开发本实验的重要内容。其中,要点建立 API First 的开发理念,实现前后端分离,使得团队协作变得更有效率。
任务目标
- 选择合适的 API 风格,实现从接口或资源(领域)建模,到 API 设计的过程
- 使用 API 工具,编制 API 描述文件,编译生成服务器、客户端原型
- 使用 Github 建立一个组织,通过 API 文档,实现 客户端项目 与 RESTful 服务项目同步开发
- 使用 API 设计工具提供 Mock 服务,两个团队独立测试 API
使用 travis 测试相关模块
API风格
我们的API设计遵循了项目文档中的api.yaml
{
    "ArticlePost": "/openapi101/users/{username}/article",
   	"ArticleArticleIdGet":"/openapi101/users/{username}/article/{article_id}",
    "CreateComment":"/openapi101/users/{username}/article/{article_id}/comment",
    "GetCommentsOfArticle":"/openapi101/users/{username}/article/{article_id}/comment",
    "AuthSigninPost":"/openapi101/auth/signin",
    "AuthSignupPost": "/openapi101/auth/signup"
}
使用API生成原型
使用Swagger Edit工具自动生成框架:
API文档如下:
swagger: "2.0"
info:
  description: "A simple API to learn how to write OpenAPI Specification"
  version: "1.0.0"
  title: "Simple API"
host: "simple.api"
basePath: "/openapi101"
schemes:
- "https"
paths:
  /auth/signin:
    post:
      summary: "sign in"
      parameters:
      - name: "username"
        in: "path"
        required: true
        type: "string"
        x-exportParamName: "Username"
      responses:
        "200":
          description: "A list of Person"
          schema:
            required:
            - "username"
            properties:
              username:
                type: "string"
        "404":
          description: "The user does not exists"
  /auth/signup:
    post:
      summary: "sign up a user"
      description: "sign up a user"
      parameters:
      - in: "body"
        name: "user"
        required: false
        schema:
          $ref: "#/definitions/user"
        x-exportParamName: "User"
      responses:
        "204":
          description: "OK"
        "400":
          description: "Wrong"
  /article/{article_id}:
    get:
      summary: "get post"
      parameters:
      - name: "article_id"
        in: "path"
        description: "article id"
        required: true
        type: "string"
        x-exportParamName: "ArticleId"
      responses:
        "200":
          description: "A post"
          schema:
            properties:
              name:
                type: "string"
              data:
                type: "string"
  /article:
    post:
      summary: "Create article"
      parameters:
      - in: "body"
        name: "content"
        required: true
        schema:
          $ref: "#/definitions/content"
        x-exportParamName: "Content"
      responses:
        "204":
          description: "A post"
definitions:
  user:
    required:
    - "password"
    - "username"
    properties:
      username:
        type: "string"
      password:
        type: "string"
  content:
    required:
    - "article_content"
    properties:
      article_content:
        type: "string"
      author:
        type: "string"
后端框架
在Swagger Edit编辑器中点击go-server生成后端框架,结构如下:
- go-server
	- .swagger-codegen
		- VERSION
	- api
		- swagger.yaml  #api设计
	- go
		- routers.go  #路由匹配
		- logger.go   #日志
		- api_default.go  #api框架
		- user.go
		- user_api.go
		- ...
		- README.md
	- main.go
API实现
框架搭建好后,就需要关注实现部分
注册实现
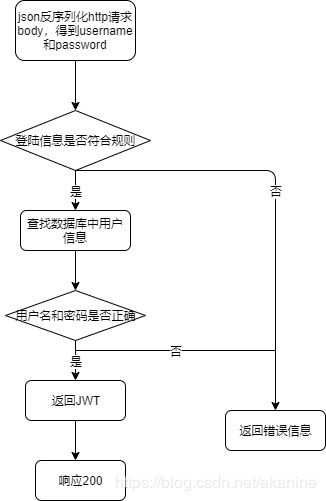
登陆实现
	db, err := bolt.Open("my.db", 0600, nil)
    if err != nil {
        log.Fatal(err)
    }
	defer db.Close()
数据库的读操作:
	err = db.View(func(tx *bolt.Tx) error {
		b := tx.Bucket([]byte("User"))
		if b != nil {
			v := b.Get([]byte(user.Username))
			if ByteSliceEqual(v, []byte(user.Password)) {
				return nil
			} else {
				return errors.New("Wrong Username or Password")
			}
		} else {
			return errors.New("Wrong Username or Password")
		}
	})
写操作:
	err = db.Update(func(tx *bolt.Tx) error {
		b, err := tx.CreateBucketIfNotExists([]byte("User"))
		if err != nil {
			return err
		}
		return b.Put([]byte(user.Username), []byte(user.Password))
	})
json的序列化和反序列化:
当服务端收到请求后,需要使用json解析器反序列化为结构体
当服务端发送响应时,需要将结构体序列化为字符串
- json反序列化:
comment := &Comment{
	Date:  time.Now().Format("2006-01-02 15:04:05"),
	Content: "",
	Author: "",
	ArticleId: Id,
}
err = json.NewDecoder(r.Body).Decode(&comment)
JWT认证
JWT是Json Web Token的缩写
token的意思是“令牌”,是用户身份的验证方式,最简单的token组成:
- uid(用户唯一的身份标识)
- time(当前时间的时间戳)
- sign(签名,由token的前几位+用哈希算法压缩成一定长的十六进制字符串,可以防止恶意第三方拼接token请求服务器)。
还可以把不变的参数也放进token,避免多次查库time(当前时间的时间戳)
JWT认证:
用户注册之后, 服务器生成一个 JWT token返回给浏览器, 浏览器向服务器请求数据时将 JWT token 发给服务器, 服务器用 signature 中定义的方式解码 JWT 获取用户信息.
一个JWT token包含3部分:
- header: 告诉我们使用的算法和 token 类型
- Payload:必须使用 sub key 来指定用户 ID, 还可以包括其他信息比如 email, username 等.
- Signature: 用来保证 JWT 的真实性. 可以使用不同算法

