turtlebot3(一)之Ubuntu16.04上realsenceR200的使用
前言
最近实验室买了turtlebot3,捣鼓了1个月,先是跑通了激光雷达demo,现在又跑realsenseR200的 demo,现在将realsense demo的跑通过程记录下来。
设备:turtlebot3
平台:Ubuntu16.04.3
内核:4.4.14(17.12月之前最新的内核)
安装过程主要参考了intel的github项目,在该网址上可以看到说明这个包适用于深度摄像机D400系列和SR300,而实验室的摄像头信号是R200,需要到另一个适用R200的网址安装,如下所示:
在这个网址安装时,由于当时使用git clone下载,后来发现下载的文件就是并非使用于R200,所以建议直接下载zip文件,现在之后根据页面的安装手册,可以比较轻松的完成。
3rd-party
首先,需要安装3rd-party依赖
1.保证apt-get的更新
sudo apt-get update && sudo apt-get upgrade2.安装libusb-1.0和pkg-config
sudo apt-get install libusb-1.0-0-dev pkg-config3.安装glfw3,Ubuntu14.04需要用脚本安装(详见英文文档),Ubuntu16.04可以直接用apt-get方式安装
sudo apt-get install libglfw3-dev4.官方提供了qt和cmake来编译文件,这里选择使用cmake方式编译
mkdir build
cd build
这里将例程程序的编译也打开,方便安装完成后直接查看视频。
cmake .. -DBUILD_EXAMPLES:BOOL=true安装路径在/usr/local/lib ,头文件在/usr/local/include
make && sudo make instal例程的执行程序在build/examples下
Video4Linux backend安装
1.确保没有摄像头插上系统,注意拔出所有摄像头。
2.安装udve rules
返回源码目录,运行
sudo cp config/99-realsense-libusb.rules /etc/udev/rules.d/
sudo udevadm control --reload-rules && udevadm trigger
3.根据自己系统选择相应的方式选择安装版本。
由于我的系统是Ubuntu16.04,内核为4.4(uname –a命令查看系统和内核版本)
./scripts/patch-uvcvideo-16.04.simple.sh这一步要经过漫长的安装。。。
4.重载uvcvideo驱动
sudo modprobe uvcvideo5.查看安装信息的最后50行,应该可以看到一个新的uvcvideo驱动被安装
sudo dmesg | tail -n 50运行后提示:(部分)
Bluetooth: BNEP (Ethernet Emulation) ver 1.3
[ 34.033878] Bluetooth: BNEP filters: protocol multicast
[ 34.033885] Bluetooth: BNEP socket layer initialized
[ 39.136255] IPv6: ADDRCONF(NETDEV_UP): wlp1s0: link is not ready
[ 39.136424] iwlwifi 0000:01:00.0: L1 Disabled - LTR Disabled
[ 39.136685] iwlwifi 0000:01:00.0: L1 Disabled - LTR Disabled
[ 39.272219] iwlwifi 0000:01:00.0: L1 Disabled - LTR Disabled
[ 39.272483] iwlwifi 0000:01:00.0: L1 Disabled - LTR Disabled
[ 39.279661] mmc0: Got data interrupt 0x00000002 even though no data operation was in progress.
[ 39.341626] IPv6: ADDRCONF(NETDEV_UP): wlp1s0: link is not ready
[ 43.965760] IPv6: ADDRCONF(NETDEV_UP): wlp1s0: link is not ready
[ 48.638656] wlp1s0: authenticate with b0:95:8e:89:3a:0f
[ 48.640376] wlp1s0: send auth to b0:95:8e:89:3a:0f (try 1/3)
[ 48.756518] wlp1s0: send auth to b0:95:8e:89:3a:0f (try 2/3)
[ 48.758473] wlp1s0: authenticated
[ 48.761946] wlp1s0: associate with b0:95:8e:89:3a:0f (try 1/3)
[ 48.766951] wlp1s0: RX AssocResp from b0:95:8e:89:3a:0f (capab=0x431 status=0 aid=8)
[ 48.768057] wlp1s0: associated
[ 48.768117] IPv6: ADDRCONF(NETDEV_CHANGE): wlp1s0: link becomes ready
[ 49.063317] iwlwifi 0000:01:00.0: No association and the time event is over already…
[ 49.064030] wlp1s0: Connection to AP b0:95:8e:89:3a:0f lost
[ 64.507052] Bluetooth: RFCOMM TTY layer initialized
[ 64.507067] Bluetooth: RFCOMM socket layer initialized
[ 64.507076] Bluetooth: RFCOMM ver 1.11
[ 73.308219] wlp1s0: authenticate with b0:95:8e:89:3a:0f
[ 73.309839] wlp1s0: send auth to b0:95:8e:89:3a:0f (try 1/3)
[ 73.312326] wlp1s0: authenticated
[ 73.313219] wlp1s0: associate with b0:95:8e:89:3a:0f (try 1/3)
[ 73.319809] wlp1s0: RX AssocResp from b0:95:8e:89:3a:0f (capab=0x431 status=0 aid=8)
[ 73.321144] wlp1s0: associated
[ 75.552939] EXT4-fs (mmcblk1p3): recovery complete
[ 75.552950] EXT4-fs (mmcblk1p3): mounted filesystem with ordered data mode. Opts: (null)
[ 251.938597] media: Linux media interface: v0.10
[ 251.962588] Linux video capture interface: v2.00
[ 252.051084] usbcore: registered new interface driver uvcvideo
[ 252.051089] USB Video Class driver (1.1.1)
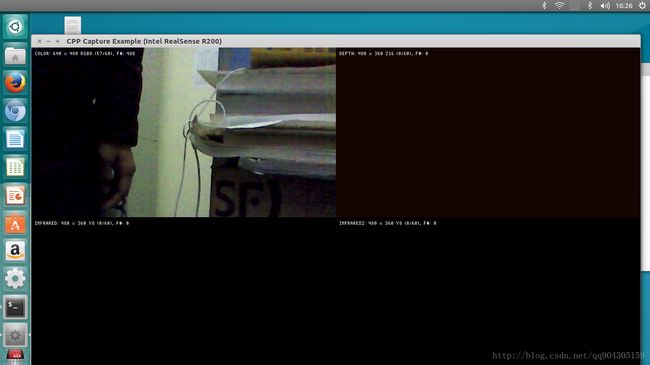
到此为止,安装驱动过程已经全部完成,插上摄像头,运行build/examples下的文件即可看到效果
./cpp-capture尝试运行其他程序得到相应的结果:
遇到的问题
安装完成后,使用PC上的虚拟机远程连接turtlebot3运行例子并不管用,即使开启了使用虚拟机桌面的权限也没法运行起来,而且有时出现找不到设备的情况,然后当使用turtlebot3插上mirco HDMI线,使用显示屏开机时,发现一切正常,欣喜若狂啊,猜测它应该是要求系统加载桌面才能跑通demo,因为即使说turtlebot3开机了,但是在开机的时候没有连接HDMI线,开机完成才连接,也没法完整运行例子程序,老是显示找不到设备。除此之外,turtlebor3无缘无故”死机”的问题还没解决.
思考
现在仅仅是实现了一个demo,能否用它来实现一个小小的项目或者一些有意思的事情呢,目前因为对摄像头还不是很了解,也不知道其具体的应用方向,在想能否在turtlebot3上用它来实现vslam,实现真正的自主导航!
下一步
用ROS启动摄像头
参考网站
CSDN blog
intel github
intel installation guide


