前言
为什么写了一个这个自定义的相机(拍照, 录视频), 因为一直使用QQ,微信等发现这个录制小视频的相机, 还有就是一些相机软件的界面和系统的是不一样的, 明显是自定义后实现的, 也想要实现一个. 不过看了看是AVFoundation里面的东西, 平时很少用到, 也就没有怎么去研究这个东西. 但是最近了, 正好研究直播相关的东西, 这不是不得不研究了AVFoundation, 然后写了这么一个自定义的相机. 初步写完之后, 其实发现基于AVFoundation还是很好实现自己写一个相机的. Demo地址
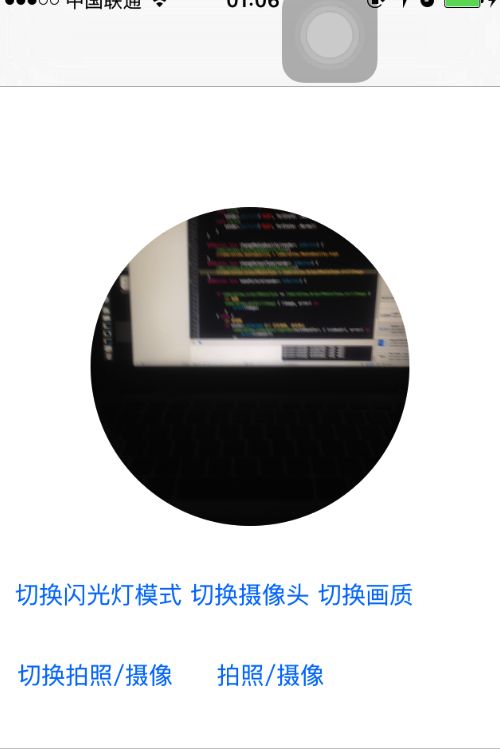
最终使用的效果之一
一, 使用AVFoundation自定义相机的时候, 你需要首先掌握这些东西, 幸运的是: 不是很多, 下面依次介绍一下
- 了解AVCaptureSession
AVCaptureSession可以被称作一个资源调度者(自我理解的!!), 他是用来增加或移除输入和输出设备(真实的物理设备被抽象成的虚拟设备)的, 同时他负责开始和停止资源文件的输入, 同时需要注意的是, 当你需要配置AVCaptureSession的其他的时候, 你需要使用
[session beginConfiguration];, 然后配置完成之后 调用[session commitConfiguration];, 只有当commit之后配置才会生效
另外一点是当你需要开始的时候[session startRunning];这是一个耗时的操作, 你应该另开线程来开启
[session beginConfiguration];

移除原来的输入/输出设备
// 在切换设备之前, 需要先移除原来的在添加新的
self.session.removeInput(self.videoDeviceInput)
self.session.removeOutput(movieFileOutput)
增加新的输入/输出设备
        // 需要首先判断是否能够添加相应的设备
        // 添加输入设备
        if self.session.canAddInput(inputDevice) {
            self.session.addInput(inputDevice)
        } else {
            print("can not add the input devices-- \(String(inputDevice))")
        }
        // 添加输出(图片/视频)
        if self.session.canAddOutput(stillImageOutput) {
            self.session.addOutput(stillImageOutput)
        } else {
            print("can not add stillImageOutput !!")

        }
设置画质(low, medium, high, photo,...)
        let preset = AVCaptureSessionPresetMedium
        }
        //判断是否能够设置
        if session.canSetSessionPreset(preset) {
            session.sessionPreset = preset
        }
[session commitConfiguration];
- 了解 AVCaptureDevice
一个AVCaptureDevice对象相应的代表一个输入物理设备, 比如iPhone上会有, 前后摄像头设备, 音频输入设备, 都被抽象成一个AVCaptureDevice, 通常情况下你会使用AVCaptureDevice提供的一些方法获取到当前支持所有的设备, 然后通过AVCaptureDevicePositionBack或者AVCaptureDevicePositionFront来区分前后的摄像头. 例如, 如下方式获取到后面的相机
        let devices = AVCaptureDevice.devicesWithMediaType(AVMediaTypeVideo) as![AVCaptureDevice]
        for device in devices {
            if device.position == AVCaptureDevicePosition.Back {
                 return device
            }
        }
- 了解AVCaptureDeviceInput
AVCaptureDevice并不是直接添加到AVCaptureSession中的, 而是通过一个AVCaptureDevice初始化一个AVCaptureDeviceInput, 这个时候才相当于是AVCaptureSession中的一个输入设备, 需要注意的是, 这是一个抛出异常的操作
        let devices = AVCaptureDevice.devicesWithMediaType(AVMediaTypeVideo) as![AVCaptureDevice]
        var deviceInput: AVCaptureDeviceInput? = nil
        for device in devices {
            if device.position == position {
                deviceInput = try? AVCaptureDeviceInput(device: device)
                break
            }
        }
- 了解 AVCaptureVideoPreviewLayer
从后缀名
previewLayer就可以猜到, 他是一个CALayer的子类, 适用于你将当前的AVCaptureSession输入设备采集到的内容展示到屏幕上, 所以你可以自定义他的一些属性, 比如 frame可以自定义位置, videoGravity可以设置画面的显示方式...
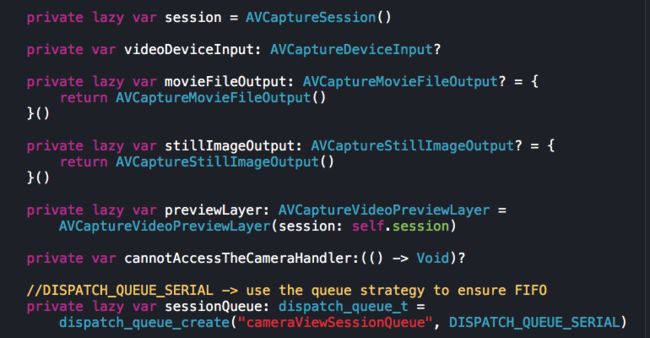
    private lazy var previewLayer: AVCaptureVideoPreviewLayer = AVCaptureVideoPreviewLayer(session: self.session)

        // set the resize model
        previewLayer.videoGravity = AVLayerVideoGravityResizeAspectFill
        // add the previewLayer
        layer.addSublayer(previewLayer)
        clipsToBounds = true
- 了解AVCaptureOutput
这个适用于我们管理输出文件的类型, 比如可以选择是 stillImageOutput, movieFileOutput, 决定我们是要输出图片还是视频, 当然同样需要注意的是, 切换输出类型的时候需要先移除之前的再添加新的.
    private func change(mediaType mediaType: OutputMediaType) {
        if mediaType == .stillImage {
            self.session.removeOutput(movieFileOutput)
            self.session.addOutput(stillImageOutput)
        } else {
            self.session.removeOutput(stillImageOutput)
            self.session.addOutput(movieFileOutput)

        }
    }
下面介绍一些相机的配置的操作, 例如闪光灯, 聚焦模式, 曝光模式, 画面画质... 需要注意的是: 配置之前需要首先申请lockForConfiguration(), 成功之后才开始配置, 配置完成之后应该unlockForConfiguration(), 不然可能会影响到其他的设备lockForConfiguration()
- 改变 聚焦模式(自动聚焦, 持续聚焦...), 曝光模式(自动, 持续...),
    private func change(focusModel focusModel: AVCaptureFocusMode, exposureModel: AVCaptureExposureMode, at point: CGPoint, isMonitor: Bool) {
        if let device = videoDeviceInput?.device {
            do {
                // must lock it or it may causes crashing
                try device.lockForConfiguration()

                if device.focusPointOfInterestSupported && device.isFocusModeSupported(focusModel) {
                    // 设置聚焦的点,注意(0,0)代表屏幕左上角 (1,1)代表屏幕右下角,同时设置点之后需要设置聚焦模式才会生效
                    device.focusPointOfInterest = point
                    device.focusMode = focusModel
                }

                if device.exposurePointOfInterestSupported && device.isExposureModeSupported(exposureModel) {
                    // only when setting the exposureMode after setting exposurePointOFInterest can be successful
                    // 设置曝光的点,注意(0,0)代表屏幕左上角 (1,1)代表屏幕右下角,同时设置点之后需要设置曝光模式才会生效
                    device.exposurePointOfInterest = point
                    device.exposureMode = exposureModel
                }
                // only when set it true can we receive the AVCaptureDeviceSubjectAreaDidChangeNotification
                device.subjectAreaChangeMonitoringEnabled = isMonitor
                device.unlockForConfiguration()


            } catch {
                print("cannot change the focusModel")

            }
        }
    }
- 改变闪光灯, 注意并不是所有的设备都有闪光灯, 所以, 设置之前必须要判断是否有闪光灯(hasFlash), 并且要判断是否能支持将要设置的闪光灯模式(isFlashModeSupported)
    private func change(flashModel flashModel: FlashModel) {
        let avFlashModel = flashModel.changeToAvFlashModel()
        //要判断是否有闪光灯(hasFlash), 并且要判断是否能支持将要设置的闪光灯模式(isFlashModeSupported)
        if let trueVideoDevice = videoDeviceInput?.device where trueVideoDevice.hasFlash && trueVideoDevice.isFlashModeSupported(avFlashModel) {

            do {
                try trueVideoDevice.lockForConfiguration()
                trueVideoDevice.flashMode = avFlashModel
                trueVideoDevice.unlockForConfiguration()
            } catch {
                print("can not lock the device for configuration!! ---\(error)")
            }

        }
    }
- 改变画质, 当然需要注意的是需要判断当前的设备是否支持所指定的画质, 同时不同的画质,是影响当前设备的最大缩放倍数的device.activeFormat.videoMaxZoomFactor(当为1的时候代表不能缩放, 同时操作最大的倍数时候会crash)
public let AVCaptureSessionPresetPhoto: String
public let AVCaptureSessionPresetHigh: String
public let AVCaptureSessionPresetMedium: String
public let AVCaptureSessionPresetLow: String
public let AVCaptureSessionPreset352x288: String
public let AVCaptureSessionPreset640x480: String
public let AVCaptureSessionPreset1280x720: String
public let AVCaptureSessionPreset1920x1080: String
public let AVCaptureSessionPreset3840x2160: String
public let AVCaptureSessionPresetiFrame960x540: String
public let AVCaptureSessionPresetiFrame1280x720: String
    private func change(mediaQuality mediaQuality: MediaQuality) {

        if session.canSetSessionPreset(AVCaptureSessionPresetHigh) {
            session.sessionPreset = AVCaptureSessionPresetHigh
        }
    }
最后当然需要知道怎么开始采集数据和得到采集的数据
- 拍照 需要使用添加到当前AVCaptureSession的stillImageOutput来异步开始拍照并且获得数据(格式为CMSampleBuffer, 需要转换为自己需要的格式
self.stillImageOutput?.captureStillImageAsynchronouslyFromConnection(connection, completionHandler: { (buffer, error) in
                // 这是采集到的数据
                if buffer != nil {

                    // 转换为NSData
                    let imageData = AVCaptureStillImageOutput.jpegStillImageNSDataRepresentation(buffer)
                    //转换为UIImage
                    let image = UIImage(data: imageData)
                }
}
- 录视频, 录制视频是需要首先指定视频的保存位置的, 同时指定的位置不能是已经存在的文件的额位置, 否则将会失败(下面示例将文件存到沙盒文件的NSTemporaryDirectory文件夹下面), 同时需要设置代理, 代理方法会有响应开始录制的代理方法和结束录制的代理方法(可以判断是否录制成功...)
        let tempFileName = "\(NSProcessInfo().globallyUniqueString).mov"
        let tempFilePath = (NSTemporaryDirectory() as NSString).stringByAppendingPathComponent(tempFileName)
        let tempVideoURL = NSURL(fileURLWithPath: tempFilePath)
        // 开始录制, 这里会调用开始录制的代理
        movieFileOutput?.startRecordingToOutputFileURL(tempVideoURL, recordingDelegate: self)
结束录制, 之后会调用结束录制的代理方法
movieFileOutput?.stopRecording()
AVCaptureFileOutputRecordingDelegate代理方法
// MARK:- public AVCaptureFileOutputRecordingDelegate
extension CameraView: AVCaptureFileOutputRecordingDelegate {
// 开始录制
    public func captureOutput(captureOutput: AVCaptureFileOutput!, didStartRecordingToOutputFileAtURL fileURL: NSURL!, fromConnections connections: [AnyObject]!) {
    }

// 完成录制
    public func captureOutput(captureOutput: AVCaptureFileOutput!, didFinishRecordingToOutputFileAtURL outputFileURL: NSURL!, fromConnections connections: [AnyObject]!, error: NSError!) {

        var success = true
// 需要注意的是, 有时候视频录制成功, 这个error仍然不会为nil, 所以通过如下方式需要判断是否真的录制成功
        if error != nil {// sometimes there may be error but the video is caputed successfully
            success = error.userInfo[AVErrorRecordingSuccessfullyFinishedKey] as! Bool
        }
        // 录制成功
        if (success) {
        // 可以把相应的文件转到其他的位置

 }
}
到目前为止, 就将自定义相机所需要的基本的东西介绍完毕了, 你可以参考官方文档的介绍了解更多的知识. 这里提供一个笔者已经写好的一个自定义相机的,Demo地址 如果有帮助,欢迎star, 欢迎关注