1.DecorView视图结构
通过android studio -> tools -> Layout InSpector 分析得到下图结构。
- StatusBarBackGround是叠加在LinearLayout上
- ActionBarContainer是叠加在ContentFlameLayout上
- DecorView是PhoneWindow的内部类,继承FrameLayout,整个应用窗口的顶层图,然后在 DecorView 容器中添加根布局,根布局中包含一个 id 为 contnet 的 ContentFrameLayout 内容布局,我们的 Activity 加载的布局 xml 最后通过LayoutInflater 将 xml 内容布局解析成 View 树形结构
- 一般我们关心的setContent(View)这个层。
2.绘制整体流程
绘制View的入口。ViewRoot 对应的实现类是 ViewRootImpl 类,他是连接 WindowManager 和DecorView 的纽带,view 的三大流程(measure,layout,draw)均是通过 ViewRoot 来完成的。在 ActivityThread 中,当 activity 对象被创建完毕后,会将 DecorView 添加到Window 中,同时会创建 ViewRootImpl 对象,并将 ViewRootImpl 对象和 DecorView 建立关联。
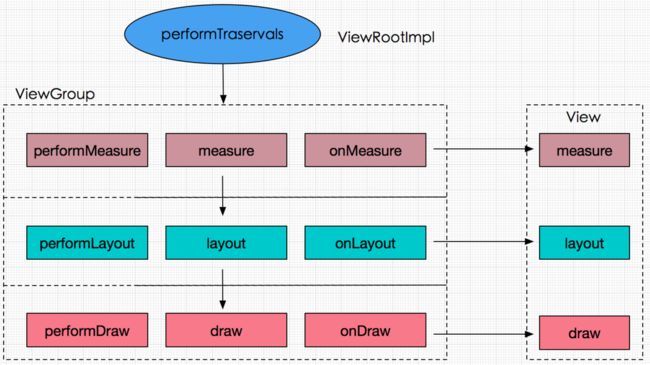
绘制会从根视图从ViewRootImpl的performTraversals()方法开始,从上到下遍历整个视图树,每个View控件负责绘制自己,而ViewGroup还需要负责通知自己的子View进行绘制操作。performTraversals()的核心代码如下。
private void performTraversals() {
    ...
    //mWitdh、mHeight 是屏幕的宽高尺寸,
   // lp 是 WindowManager的LayoutParams,默认是match_parent
   // childWidthMeasureSpec 和 childHeightMeasureSpec 是
   //DecorView的测量规格
    int childWidthMeasureSpec = getRootMeasureSpec(mWidth, lp.width);
    int childHeightMeasureSpec = getRootMeasureSpec(mHeight, lp.height);
    ...
    //执行测量流程
    performMeasure(childWidthMeasureSpec, childHeightMeasureSpec);
    ...
    //执行布局流程
    performLayout(lp, desiredWindowWidth, desiredWindowHeight);
    ...
    //执行绘制流程
    performDraw();
}
performTraversals的大致工作流程图如下所示:
3.理解MeasureSpec
- MeasureSpec代表一个32为的int值,高2位代表View测量模式(mode),后30位View代表大小(size)
- 简单的理解公式 meaureSpec = mode + size
- mode 有三种模式
1.UNSPECIFIED 父容器不对 View 有任何的限制,要多大给多大,这种情况下一般用于系统内部,表示一种测量的状态。
2.EXACTLY 父容器已经检测出 View 所需要的精确大小,这个时候 View 的最终大小就是 SpecSize 所指定的值,它对应于LayoutParams 中的 match_parent 和具体的数值这两种模式
3.AT_MOST 父容器指定了一个可用大小即 SpecSize,View 的大小不能大于这个值,具体是什么值要看不同 View 的具体实现。它对应于 LayoutParams 中的 wrap_content。 -
一般是父view的measureSpec 和 子View LayoutParams 共同决定子View的measureSpec。
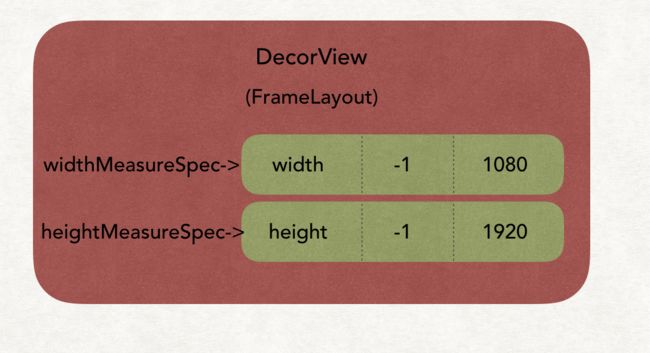
例如DecorView的MeasureSpec可以如图示表示。
1、-1 代表的是EXACTLY,-2 是AT_MOST
2、由于屏幕的像素是1080x1920,所以DecorView 的MeasureSpec的size 对应于这两个值。
4.MeasureSpec简单示意图(-1 代表的是EXACTLY,-2 是AT_MOST)。
1.rootView为屏幕大小,所以rootView的MeasureSpec为:
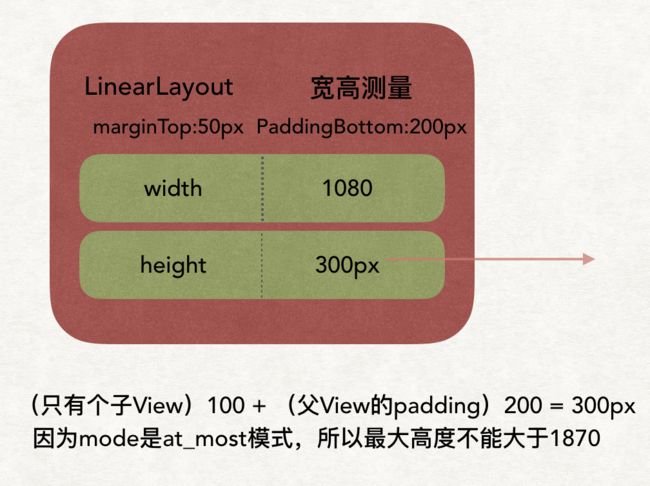
2.rootView遍历出子View ->LinearLayout,根据父View的MeasureSpec + 子View的LayoutParams共同决定LinearLayout的MeasureSpec:
子View的大小 = 父View的大小 - 父View的padding - 子View的margin
所以LinearLayout :
3.LinearLayout遍历出子View -> View,根据计算规则:
4.以为LineayLayout的mode = -2 也就是mode=at_most 还不能确定具体高度,LinearLayout 的子View的高度都计算完毕了,所有子View的测量结果计算自己的高宽,所有它的高度计算简单理解就是子View的高度的累积+自己的Padding
5.根据示意图 + 源码分析,可以得出普通View的创建规则(截图来自android艺术开发探索)。
总结:
- 当 View 采用固定宽高时,不管父容器的 MeasureSpec 是什么,View 的 MeasureSpec 都是精确模式,并且大小是LayoutParams 中的大小。
- 当 View 的宽高是 match_parent 时,如果父容器的模式是精确模式,那么 View 也是精确模式,并且大小是父容器的剩余空间;如果父容器是最大模式,那么 View 也是最大模式,并且大小是不会超过父容器的剩余空间。
- 当 View 的宽高是 wrap_content 时,不管父容器的模式是精确模式还是最大模式,View 的模式总是最大模式,并且大小不超过父容器的剩余空间。
6.在Activity中获取某个View的宽高
由于View的measure过程和Activity的生命周期方法不是同步执行的,如果View还没有测量完毕,那么获得的宽/高就是0。所以在onCreate、onStart、onResume中均无法正确得到某个View的宽高信息。解决方式如下:
- Activity/View#onWindowFocusChanged
// 此时View已经初始化完毕
// 当Activity的窗口得到焦点和失去焦点时均会被调用一次
// 如果频繁地进行onResume和onPause,那么onWindowFocusChanged也会被频繁地调用
public void onWindowFocusChanged(boolean hasFocus) {
    super.onWindowFocusChanged(hasFocus);
    if (hasFocus) {
        int width = view.getMeasureWidth();
        int height = view.getMeasuredHeight();
    }
}
- view.post(runnable)
// 通过post可以将一个runnable投递到消息队列的尾部,// 然后等待Looper调用次runnable的时候,View也已经初
// 始化好了
protected void onStart() {
    super.onStart();
    view.post(new Runnable() {

        @Override
        public void run() {
            int width = view.getMeasuredWidth();
            int height = view.getMeasuredHeight();
        }
    });
}
- ViewTreeObserver
// 当View树的状态发生改变或者View树内部的View的可见// 性发生改变时,onGlobalLayout方法将被回调
protected void onStart() {
    super.onStart();

    ViewTreeObserver observer = view.getViewTreeObserver();
    observer.addOnGlobalLayoutListener(new OnGlobalLayoutListener() {

        @SuppressWarnings("deprecation")
        @Override
        public void onGlobalLayout() {
            view.getViewTreeObserver().removeGlobalOnLayoutListener(this);
            int width = view.getMeasuredWidth();
            int height = view.getMeasuredHeight();
        }
    });
}
- View.measure(int widthMeasureSpec, int heightMeasureSpec)
设置具体值(一般不推荐)
5.View的绘制流程之Layout
1.Layout的基本流程
// ViewRootImpl.java
private void performLayout(WindowManager.LayoutParams lp, int desiredWindowWidth, int desiredWindowHeight) {
    ...
    host.layout(0, 0, host.getMeasuredWidth(), host.getMeasuredHeight());
    ...
}

// View.java
public void layout(int l, int t, int r, int b) {
    ...
    // 通过setFrame方法来设定View的四个顶点的位置,即View在父容器中的位置
    boolean changed = isLayoutModeOptical(mParent) ?
    set OpticalFrame(l, t, r, b) : setFrame(l, t, r, b);

    ...
    onLayout(changed, l, t, r, b);
    ...
}

// 空方法,子类如果是ViewGroup类型,则重写这个方法,实现ViewGroup
// 中所有View控件布局流程
protected void onLayout(boolean changed, int left, int top, int right, int bottom) {

}
2.LinearLayout的onLayout方法实现解析
protected void onlayout(boolean changed, int l, int t, int r, int b) {
    if (mOrientation == VERTICAL) {
        layoutVertical(l, t, r, b);
    } else {
        layoutHorizontal(l,)
    }
}

// layoutVertical核心源码
void layoutVertical(int left, int top, int right, int bottom) {
    ...
    final int count = getVirtualChildCount();
    for (int i = 0; i < count; i++) {
        final View child = getVirtualChildAt(i);
        if (child == null) {
            childTop += measureNullChild(i);
        } else if (child.getVisibility() != GONE) {
            final int childWidth = child.getMeasureWidth();
            final int childHeight = child.getMeasuredHeight();

            final LinearLayout.LayoutParams lp =
                    (LinearLayout.LayoutParams) child.getLayoutParams();
            ...
            if (hasDividerBeforeChildAt(i)) {
                childTop += mDividerHeight;
            }

            childTop += lp.topMargin;
            // 为子元素确定对应的位置
            setChildFrame(child, childLeft, childTop + getLocationOffset(child), childWidth, childHeight);
            // childTop会逐渐增大,意味着后面的子元素会被
            // 放置在靠下的位置
            childTop += childHeight + lp.bottomMargin + getNextLocationOffset(child);

            i += getChildrenSkipCount(child,i)
        }
    }
}

private void setChildFrame(View child, int left, int top, int width, int height) {
    child.layout(left, top, left + width, top + height);
}
注意:在View的默认实现中,View的测量宽/高和最终宽/高是相等的,只不过测量宽/高形成于View的measure过程,而最终宽/高形成于View的layout过程,即两者的赋值时机不同,测量宽/高的赋值时机稍微早一些。在一些特殊的情况下则两者不相等:
- 重写View的layout方法,使最终宽度总是比测量宽/高大100px
public void layout(int l, int t, int r, int b) {
    super.layout(l, t, r + 100, b + 100);
}
6.View的绘制流程之Draw
绘制基本上可以分为六个步骤
// 绘制基本上可以分为六个步骤
public void draw(Canvas canvas) {
    ...
    // 步骤一:绘制View的背景
    drawBackground(canvas);

    ...
    // 步骤二:如果需要的话,保持canvas的图层,为fading做准备
    saveCount = canvas.getSaveCount();
    ...
    canvas.saveLayer(left, top, right, top + length, null, flags);

    ...
    // 步骤三:绘制View的内容
    onDraw(canvas);

    ...
    // 步骤四:绘制View的子View
    dispatchDraw(canvas);

    ...
    // 步骤五:如果需要的话,绘制View的fading边缘并恢复图层
    canvas.drawRect(left, top, right, top + length, p);
    ...
    canvas.restoreToCount(saveCount);

    ...
    // 步骤六:绘制View的装饰(例如滚动条等等)
    onDrawForeground(canvas)
}
1.View树的递归draw流程图,如下:
2.setWillNotDraw的作用
// 如果一个View不需要绘制任何内容,那么设置这个标记位为true以后,
// 系统会进行相应的优化。
public void setWillNotDraw(boolean willNotDraw) {
    setFlags(willNotDraw ? WILL_NOT_DRAW : 0, DRAW_MASK);
}
- 默认情况下,View没有启用这个优化标记位,但是ViewGroup会默认启用这个优化标记位。
- 当我们的自定义控件继承于ViewGroup并且本身不具备绘制功能时,就可以开启这个标记位从而便于系统进行后续的优化。
- 当明确知道一个ViewGroup需要通过onDraw来绘制内容时,我们需要显示地关闭WILL_NOT_DRAW这个标记位。
7.参考链接
1.https://yongyu.itscoder.com/2016/09/11/view_measure/
2.https://www.jianshu.com/p/5a71014e7b1b
3.https://blog.csdn.net/yanbober/article/details/46128379


