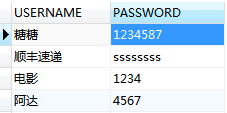
现今对于大多数公司来说,信息安全工作尤为重要,就像京东,阿里巴巴这样的大公司来说,信息安全是最为重要的一个话题,举个简单的例子:
就像这样的密码公开化,很容易造成一定的信息的泄露。所以今天我们要讲的就是如何来实现密码的加密和解密来提高数据的安全性。
在这首先要引入springboot融合mybatis的知识,如果有这方面不懂得同学,就要首先看一看这方面的知识:
推荐大家一个比较好的博客: 程序猿DD-翟永超 http://blog.didispace.com/springbootmybatis/
为了方便大家的学习,我直接将源代码上传:
1.pom.xml
12 4.0.0 3com.ninemax 4spring-Login-test 50.0.1-SNAPSHOT 6war 7 89 14 15org.springframework.boot 10spring-boot-starter-parent 111.3.2.RELEASE 1213 16 19 20UTF-8 171.8 1821 22 63 6423 26 27org.springframework.boot 24spring-boot-starter 2528 32 33org.springframework.boot 29spring-boot-starter-test 30test 3134 38 39org.mybatis.spring.boot 35mybatis-spring-boot-starter 361.1.1 3740 43 44org.springframework.boot 41spring-boot-starter-web 4245 48 49commons-dbcp 46commons-dbcp 4750 54 55 56com.oracle 51ojdbc14 5210.2.0.3.0 5357 60 61 62org.springframework.boot 58spring-boot-starter-thymeleaf 5965 79 80 8166 7867 70org.springframework.boot 68spring-boot-maven-plugin 6971 77org.apache.maven.plugins 72maven-surefire-plugin 7374 76true 75
2. AppTest.java
package com;

import org.springframework.boot.SpringApplication;
import org.springframework.boot.autoconfigure.SpringBootApplication;

@SpringBootApplication
public class AppTest {
     public static void main(String[] args) {
         SpringApplication.run(AppTest.class, args);
     }

}
3.User.java
package com.entity;

public class User {

    private String username;
    private String password;

    public String getUsername() {
        return username;
    }
    public void setUsername(String username) {
        this.username = username;
    }
    public String getPassword() {
        return password;
    }
    public void setPassword(String password) {
        this.password = password;
    }
    @Override
    public String toString() {
        return "User [username=" + username + ", password=" + password + "]";
    }

}
4.UserController.java
package com.controller;

import java.security.SecureRandom;

import javax.crypto.Cipher;
import javax.crypto.SecretKey;
import javax.crypto.SecretKeyFactory;
import javax.crypto.spec.DESKeySpec;
import javax.servlet.http.HttpServletRequest;

import org.springframework.beans.factory.annotation.Autowired;
import org.springframework.stereotype.Controller;
import org.springframework.web.bind.annotation.RequestMapping;

import com.dao.UserDao;
import com.entity.User;

@Controller
public class UserController {

      @Autowired
      private UserDao userDao;

      @RequestMapping("/regist")
      public String regist() {
          return "regist";
      }

      @RequestMapping("/login")
      public String login() {
          return "login";
      }

      @RequestMapping("/success")
      public String success(HttpServletRequest request) {
          String username = request.getParameter("username");
          String password = request.getParameter("password");

          userDao.save(username, password);
          return "success";
      }

      @RequestMapping("/Loginsuccess")
      public String successLogin(HttpServletRequest request) {
          String username = request.getParameter("username");
          String password = request.getParameter("password");  ///123456
          User user = userDao.findByUname(username);
              if(user.getPassword().equals(password)) {
                  return "successLogin";
              }
              return "failure";
      }
}
5.UserDao.java
package com.dao;

import org.apache.ibatis.annotations.Insert;
import org.apache.ibatis.annotations.Mapper;
import org.apache.ibatis.annotations.Param;
import org.apache.ibatis.annotations.Select;

import com.entity.User;

@Mapper
public interface UserDao {
      @Insert("INSERT INTO LOGIN_NINE VALUES(#{username}, #{password})")
      void save(@Param("username")String username,@Param("password")String password);

      @Select("SELECT * FROM LOGIN_NINE WHERE username= #{username}")
      User findByUname(@Param("username")String username);
}
6.application.properties
spring.datasource.url=jdbc:oracle:thin:@10.236.4.251:1521:orcl
spring.datasource.username=hello
spring.datasource.password=lisa
spring.datasource.driver-class-name=oracle.jdbc.driver.OracleDriver
7.还有一些静态HTML
(1.)regist.html
DOCTYPE html>
<html xmlns:th="http://www.thymeleaf.org">
<head>
<meta http-equiv="Content-Type" content="text/html; charset=UTF-8" />
<title>注册title>

<style type="text/css">
    h1 {
      text-align:center;
      font-size:35px;
      color:red;
    }
    div {
      text-align:center;
    }
    div input {
      margin:10px;
    }
style>
head>
<body>
     <h1>注册账号h1>
     <div>
     <form action="success" method="post">
                                  用户名<input type="text" name="username"/>  <br/>
                                  密码<input type="password" name = "password"/>  <br/>
            <input type="submit" value="提交"/>
            <input type="reset"/>

     form>
     div>
body>
html>
(2.)login.html
DOCTYPE html>
<html xmlns:th="http://www.thymeleaf.org">
<head>
<meta http-equiv="Content-Type" content="text/html; charset=UTF-8" />
<title>登录title>

<style type="text/css">
    h1 {
      text-align:center;
      font-size:35px;
      color:red;
    }
    div {
      text-align:center;
    }
    div input {
      margin:10px;
    }

style>
head>
<body>
     <h1>欢迎登录h1>
     <div>
     <form action="Loginsuccess" method="post">
                                  请输入用户名<input type="text" name="username"/>  <br/>
                                  请输入密码<input type="password" name = "password"/>  <br/>
            <input type="submit" value="提交"/>
            <input type="reset"/>     <br/>
            <a href="/regist">注册账号a>
     form>
     div>
body>
html>
(3.)success.html
DOCTYPE html>
<html xmlns:th="http://www.thymeleaf.org">
<head>
<meta http-equiv="Content-Type" content="text/html; charset=UTF-8" />
<title>注册成功title>
<style type="text/css">
   h1 {
     text-align:center;
     font-size:60px;
     color:green;
   }
   span {
     font-size:30px;
     color:green;
   }
style>
head>
<body>
<h1>注册成功h1>
<a href="/login">返回登录a>
body>
html>
(4.)failure.html
DOCTYPE html>
<html xmlns:th="http://www.thymeleaf.org">
<head>
<meta http-equiv="Content-Type" content="text/html; charset=UTF-8" />
<title>登录失败title>

head>
<body>
         登录失败
body>
html>
(5.)successLogin.html
DOCTYPE html>
<html xmlns:th="http://www.thymeleaf.org">
<head>
<meta http-equiv="Content-Type" content="text/html; charset=UTF-8" />
<title>成功title>
head>
<body>
      success
body>
html>
代码的格式如下:
完成了这一步的话首先运行一下AppTest看是否出错,如果有错,自己找原因,这里就不和大家讨论了,写了这么多,才要要进入正题了
本文采取的是EDS的加密解密方法,方法也很简单,不用添加额外的jar包,只需要在UserController上做出简单的修改就可以了:
*****UserController.java
package com.controller;

import java.security.SecureRandom;

import javax.crypto.Cipher;
import javax.crypto.SecretKey;
import javax.crypto.SecretKeyFactory;
import javax.crypto.spec.DESKeySpec;
import javax.servlet.http.HttpServletRequest;

import org.springframework.beans.factory.annotation.Autowired;
import org.springframework.stereotype.Controller;
import org.springframework.web.bind.annotation.RequestMapping;

import com.dao.UserDao;
import com.entity.User;

@Controller
public class UserController {

      @Autowired
      private UserDao userDao;

      @RequestMapping("/regist")
      public String regist() {
          return "regist";
      }

      @RequestMapping("/login")
      public String login() {
          return "login";
      }

      /**
       *  EDS的加密解密代码
       */
      private static final byte[] DES_KEY = { 21, 1, -110, 82, -32, -85, -128, -65 };
        @SuppressWarnings("restriction")
        public static String encryptBasedDes(String data) {
            String encryptedData = null;
            try {
                // DES算法要求有一个可信任的随机数源
                SecureRandom sr = new SecureRandom();
                DESKeySpec deskey = new DESKeySpec(DES_KEY);
                // 创建一个密匙工厂,然后用它把DESKeySpec转换成一个SecretKey对象
                SecretKeyFactory keyFactory = SecretKeyFactory.getInstance("DES");
                SecretKey key = keyFactory.generateSecret(deskey);
                // 加密对象
                Cipher cipher = Cipher.getInstance("DES");
                cipher.init(Cipher.ENCRYPT_MODE, key, sr);
                // 加密,并把字节数组编码成字符串
                encryptedData = new sun.misc.BASE64Encoder().encode(cipher.doFinal(data.getBytes()));
            } catch (Exception e) {
                // log.error("加密错误,错误信息:", e);
                throw new RuntimeException("加密错误,错误信息:", e);
            }
            return encryptedData;
        }
        @SuppressWarnings("restriction")
        public static String decryptBasedDes(String cryptData) {
            String decryptedData = null;
            try {
                // DES算法要求有一个可信任的随机数源
                SecureRandom sr = new SecureRandom();
                DESKeySpec deskey = new DESKeySpec(DES_KEY);
                // 创建一个密匙工厂,然后用它把DESKeySpec转换成一个SecretKey对象
                SecretKeyFactory keyFactory = SecretKeyFactory.getInstance("DES");
                SecretKey key = keyFactory.generateSecret(deskey);
                // 解密对象
                Cipher cipher = Cipher.getInstance("DES");
                cipher.init(Cipher.DECRYPT_MODE, key, sr);
                // 把字符串进行解码,解码为为字节数组,并解密
                decryptedData = new String(cipher.doFinal(new sun.misc.BASE64Decoder().decodeBuffer(cryptData)));
            } catch (Exception e) {
                throw new RuntimeException("解密错误,错误信息:", e);
            }
            return decryptedData;
        }

      @RequestMapping("/success")
      public String success(HttpServletRequest request) {
          String username = request.getParameter("username");
          String password = request.getParameter("password");
          String s1 = encryptBasedDes(password);
          userDao.save(username, s1);
          return "success";
      }

      @RequestMapping("/Loginsuccess")
      public String successLogin(HttpServletRequest request) {
          String username = request.getParameter("username");
          String password = request.getParameter("password");  ///123456
          User user = userDao.findByUname(username);
              if(decryptBasedDes(user.getPassword()).equals(password)) {
                  return "successLogin";
              }
              return "failure";
      }
}
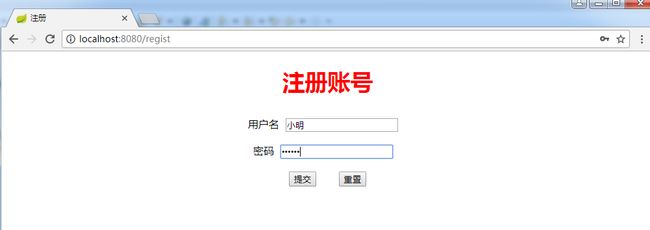
此时,直接运行Apptest.java,然后在浏览器输入地址:localhost:8080/regist 注册新的账号(我输入的是用户名:小明 密码:123456),如图
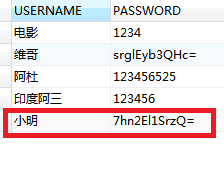
此时查看数据库信息
你就会发现密码实现了加密
当然,下次登陆的时候直接输入相应的账号和密码即可完成登录,实现了解码的过程
不知道大家完成的怎么样了,如果出现问题,可以在下面进行留言,我会为大家进行解答.


