CenOS配置深度学习开发环境
概述
- Anaconda2
- Cuda-8.0
- Cudnn-7
- Pytorh
- caffe
- opencv2
1. Anacoda2
墙裂推荐使用Anaconda2,如果需要使用python3可以自己创建虚拟环境。因为在Caffe的编译配置文件中,Anaconda默认使用的就是Anaconda2

安装完毕后及得将Anaconda的路径添加到~/.bashrc中
将`export PATH=/home/xxx/anaconda3/bin:$PATH`添加到`~/.bashrc`文件中,并使用

$ source ~/.bashrc
2. CUDA-8.0
建议使用CUDA8,在我安装CUDA9后,安装OpenCV和其他环境都遇到了问题
下面是我安装CUDA9的过程,CUDA8的安装过程相同
1> 安装前准备
$ lspci | grep -i nvidia ## 检查是否有GPU![]()
$ gcc --version # 查看是否安装了gcc及其版本
## 如果没有安装,执行下面的安装命令 ##
## --------------------------- ##
$ yum install gcc gcc-c++
## --------------------------- ##

$ sudo yum update # 最好先更新一下系统再执行下面的命令
$ sudo yum install kernel-devel # 安装内核
- 使用以下命令查看Nouveau驱动是否被加载了 ,系统刚刚安装完成后,默认使用Nouveau驱动。
$ lsmod | grep nouveau
# 如果打印出一些信息,说明Nouveau被加载了,正常情况下会打印出一些关于nouveau的信息- 将Nouveau驱动加入禁用黑名单
# 创建nouveau黑名单
$vim /etc/modprobe.d/blacklist-nouveau.conf
在blacklist-nouveau.conf中添加如下内容
blacklist nouveau
options nouveau modeset=0
完成以上步骤后重启系统
1. 检查nouveau是否被加载
$ lsmod | grep nouveau # 输入没有输出信息,则说明nouveau已被禁用- 关闭桌面服务
参考链接
$ sudo systemctl set-default multi-user.target  # 使用命令模式
$ sudo systemctl reboot # 重启系统- 开始安装cuda
$ chmod +x cuda_9.1.85_387.26.run  # 分配执行权限
$ sudo sh cuda_9.1.85_387.26.run # 执行安装命令- 安装完成
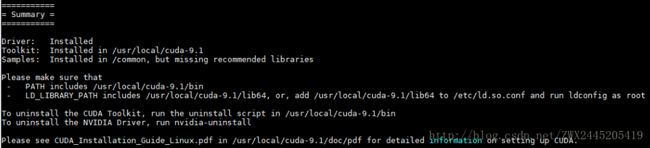
- 将环境添加到PATH
export PATH=/usr/local/cuda-9.1/bin:$PATH
export LD_LIBRARY_PATH=/usr/local/cuda-9.1/lib64:$LD_LIBRARY_PATH
$ source ~/.bashrc # 刷新
$ nvcc -V # 查看是否安装成功
- 重启桌面服务
$ sudo systemctl set-default graphical.target3> 安装cudnn
$ sudo cp cuda/include/cudnn.h /usr/local/cuda/include/
$ sudo cp cuda/lib64/libcudnn* /usr/local/cuda/lib64/
$ sudo chmod a+r /usr/local/cuda/include/cudnn.h
$ sudo chmod a+r /usr/local/cuda/lib64/libcudnn*
4> 安装OpenCV
建议安装OpenCV2,安装OpenCV3编译失败率高。
5> 安装Caffe
编译配置文件如下,Anaconda路径需要自己修改
## Refer to http://caffe.berkeleyvision.org/installation.html
# Contributions simplifying and improving our build system are welcome!

# cuDNN acceleration switch (uncomment to build with cuDNN).
USE_CUDNN := 1

# CPU-only switch (uncomment to build without GPU support).
# CPU_ONLY := 1

# uncomment to disable IO dependencies and corresponding data layers
# USE_OPENCV := 0
# USE_LEVELDB := 0
# USE_LMDB := 0

# uncomment to allow MDB_NOLOCK when reading LMDB files (only if necessary)
#   You should not set this flag if you will be reading LMDBs with any
#   possibility of simultaneous read and write
# ALLOW_LMDB_NOLOCK := 1

# Uncomment if you're using OpenCV 3
# OPENCV_VERSION := 3

# To customize your choice of compiler, uncomment and set the following.
# N.B. the default for Linux is g++ and the default for OSX is clang++
# CUSTOM_CXX := g++

# CUDA directory contains bin/ and lib/ directories that we need.
CUDA_DIR := /usr/local/cuda-8.0
# On Ubuntu 14.04, if cuda tools are installed via
# "sudo apt-get install nvidia-cuda-toolkit" then use this instead:
# CUDA_DIR := /usr

# CUDA architecture setting: going with all of them.
# For CUDA < 6.0, comment the *_50 through *_61 lines for compatibility.
# For CUDA < 8.0, comment the *_60 and *_61 lines for compatibility.
# For CUDA >= 9.0, comment the *_20 and *_21 lines for compatibility.
CUDA_ARCH := -gencode arch=compute_20,code=sm_20 \
        -gencode arch=compute_20,code=sm_21 \
        -gencode arch=compute_30,code=sm_30 \
        -gencode arch=compute_35,code=sm_35 \
        -gencode arch=compute_50,code=sm_50 \
        -gencode arch=compute_52,code=sm_52 \
        -gencode arch=compute_60,code=sm_60 \
        -gencode arch=compute_61,code=sm_61 \
        -gencode arch=compute_61,code=compute_61

# BLAS choice:
# atlas for ATLAS (default)
# mkl for MKL
# open for OpenBlas
BLAS := atlas
# Custom (MKL/ATLAS/OpenBLAS) include and lib directories.
# Leave commented to accept the defaults for your choice of BLAS
# (which should work)!
# BLAS_INCLUDE := /path/to/your/blas
# BLAS_LIB := /path/to/your/blas

# Homebrew puts openblas in a directory that is not on the standard search path
# BLAS_INCLUDE := $(shell brew --prefix openblas)/include
# BLAS_LIB := $(shell brew --prefix openblas)/lib

# This is required only if you will compile the matlab interface.
# MATLAB directory should contain the mex binary in /bin.
# MATLAB_DIR := /usr/local
# MATLAB_DIR := /Applications/MATLAB_R2012b.app

# NOTE: this is required only if you will compile the python interface.
# We need to be able to find Python.h and numpy/arrayobject.h.
# PYTHON_INCLUDE := /usr/include/python2.7 \
        # /usr/lib/python2.7/dist-packages/numpy/core/include
# Anaconda Python distribution is quite popular. Include path:
# Verify anaconda location, sometimes it's in root.
ANACONDA_HOME := $(HOME)/anaconda2
PYTHON_INCLUDE := $(ANACONDA_HOME)/include \
        $(ANACONDA_HOME)/include/python2.7 \
        $(ANACONDA_HOME)/lib/python2.7/site-packages/numpy/core/include

# Uncomment to use Python 3 (default is Python 2)
# PYTHON_LIBRARIES := boost_python3 python3.5m
# PYTHON_INCLUDE := /usr/include/python3.5m \
#                 /usr/lib/python3.5/dist-packages/numpy/core/include

# We need to be able to find libpythonX.X.so or .dylib.
# PYTHON_LIB := /usr/lib
PYTHON_LIB := $(ANACONDA_HOME)/lib

# Homebrew installs numpy in a non standard path (keg only)
# PYTHON_INCLUDE += $(dir $(shell python -c 'import numpy.core; print(numpy.core.__file__)'))/include
# PYTHON_LIB += $(shell brew --prefix numpy)/lib

# Uncomment to support layers written in Python (will link against Python libs)
# WITH_PYTHON_LAYER := 1

# Whatever else you find you need goes here.
INCLUDE_DIRS := $(PYTHON_INCLUDE) /usr/local/include
LIBRARY_DIRS := $(PYTHON_LIB) /usr/local/lib /usr/lib

# If Homebrew is installed at a non standard location (for example your home directory) and you use it for general dependencies
# INCLUDE_DIRS += $(shell brew --prefix)/include
# LIBRARY_DIRS += $(shell brew --prefix)/lib

# NCCL acceleration switch (uncomment to build with NCCL)
# https://github.com/NVIDIA/nccl (last tested version: v1.2.3-1+cuda8.0)
# USE_NCCL := 1

# Uncomment to use `pkg-config` to specify OpenCV library paths.
# (Usually not necessary -- OpenCV libraries are normally installed in one of the above $LIBRARY_DIRS.)
# USE_PKG_CONFIG := 1

# N.B. both build and distribute dirs are cleared on `make clean`
BUILD_DIR := build
DISTRIBUTE_DIR := distribute

# Uncomment for debugging. Does not work on OSX due to https://github.com/BVLC/caffe/issues/171
# DEBUG := 1

# The ID of the GPU that 'make runtest' will use to run unit tests.
TEST_GPUID := 0

# enable pretty build (comment to see full commands)
Q ?= @