centOS7:lamp,lnmp+redis环境快速搭建(yum)
趁有空贴一下自己常用的搭建环境代码
- 防火墙
- 切换英文系统语言
- php7
- Apache
- Nginx
- Mysql
- Redis
防火墙
在一切操作前,先关闭你的防火墙,或者开启某些端口(80,8080,3306等)
大部分新的镜像都是firewall,以下我就以firewall为例
# 查看firewall服务状态
systemctl status firewalld
# 查看firewall的状态
firewall-cmd --state
# 开启、重启、关闭、firewalld.service服务
# 开启
systemctl start firewalld.service
# 重启
systemctl restart firewalld.service
#  关闭
systemctl stop firewalld.service

# 查看防火墙规则
firewall-cmd --list-all
# 查询端口是否开放
firewall-cmd --query-port=8080/tcp
#  开放80端口
firewall-cmd --permanent --add-port=8080/tcp
# 移除端口
firewall-cmd --permanent --remove-port=8080/tcp

#操作完,记得restart
如果您正在运行防火墙,请运行以下命令以允许HTTP和HTTPS通信:
sudo firewall-cmd --permanent --zone=public --add-service=http
sudo firewall-cmd --permanent --zone=public --add-service=https
sudo firewall-cmd --reload

#重启防火墙(修改配置后要重启防火墙)
firewall-cmd --reload
参数解释:
1、firwall-cmd:是Linux提供的操作firewall的一个工具;
2、–permanent:表示设置为持久;
3、–add-port:标识添加的端口;
切换英文系统语言
# 当前系统为英文字符集,需要切换到中文字符集
cat /etc/locale.conf

# 切换到英文字符集
echo "LANG=en_US.utf8" > /etc/locale.conf

# 重启服务器操作
reboot
php7
# 首先确认yum源的地址是否有效
yum install epel-release
rpm -Uvh https://mirror.webtatic.com/yum/el7/webtatic-release.rpm

# 如果想删除上面安装的包,重新安装
rpm -qa | grep webstatic
rpm -e  上面搜索到的包即可

# 如果想换成php5.6,把70w改成56w,下面带的拓展,大部分项目都能吃掉,如果有缺,可另外再安装。
yum install php70w.x86_64 php70w-cli.x86_64 php70w-common.x86_64 php70w-gd.x86_64 php70w-ldap.x86_64 php70w-mbstring.x86_64 php70w-mcrypt.x86_64 php70w-mysql.x86_64 php70w-pdo.x86_64 php70w-process php-xml php70w-fpm

# 如果失败,清缓存再执行以上
yum clean all
这时候你会发现,他将apache也一并安装上了,如果你不想要apache,可以执行删除
# 删除apache
yum remove httpd
Apache
# 查看centos版本
cat /etc/redhat-release

# 检查是否装相关应用
# 检查apache
httpd -v
# 如果有安装过,清理下
rpm -qa | grep httpd

# 安装apache
yum install httpd

# 安装apache扩展
yum install httpd-manual mod_ssl mod_perl mod_auth_mysql

# 启动apache
systemctl start httpd.service #启动apache
systemctl stop httpd.service #停止
systemctl restart httpd.service #重启
systemctl enable httpd.service #开机启动
配置多项目
在/etc/httpd/conf/httpd.conf
最后一行加入
Include conf/extra/httpd-vhosts.conf
然后新建 extra/httpd-vhosts.conf文件并加入
Listen 10089


	DocumentRoot "/vagrant/my_project"
    ServerName pro.com
    ServerAlias *.pro.com

      Options FollowSymLinks ExecCGI
      AllowOverride All
      Order allow,deny
      Allow from all
      Require all granted
如需绑定内网ip,在主机hosts绑定ip
Nginx
 # 安装nginx
    yum install nginx
    # 启动nginx
    systemctl start nginx #启动nginx
    systemctl stop nginx #停止
    systemctl restart nginx #重启
    systemctl enable nginx #开机启动
    systemctl disable nginx #开机不启动

    # 配置php多项目
    vim /etc/nginx/conf.d/my_project.conf
    # 写入
    server {
         listen       8080;
         listen       [::]:8080;
         server_name  _;
         root         /vagrant/my_project;
         index index.php index.html index.htm;

         # Load configuration files for the default server block.

         location / {
                 try_files $uri $uri/ /index.php?$query_string;
         }
         error_page 404 /404.html;
         error_page 500 502 503 504 /50x.html;
         location = /50x.html {
             root /usr/share/nginx/html;
         }

         location ~ \.php$ {
             try_files $uri =404;
             fastcgi_pass 127.0.0.1:9000;
             fastcgi_index index.php;
             fastcgi_param SCRIPT_FILENAME /vagrant/my_project$fastcgi_script_name;
             include fastcgi_params;
         }
     }
 # 重启nginx
nginx的默认配置文件在 中,在中间你会发现一行
# 注意:是在 http{} 中
include /etc/nginx/conf.d/*.conf;
这是基础配置,需要配置多站点都在目录下建立,一个站点配置一个conf文件
Mysql
yum -y install mysql
发现报错!
原因是在centos7中,mysql被mariadb代替了,默认把mariadb视为mysql.解决如下
# 安装mariadb
yum install mariadb
yum install mariadb-server

# 安装php-mysql
yum install php-mysql

#安装mysql扩展
yum install mysql-connector-odbc libdbi-dbd-mysql mysql-devel
yum install mariadb-embedded mariadb-libs mariadb-bench mariadb mariadb-sever

# 启动mysql
systemctl start mariadb.service #启动
systemctl stop mariadb.service #停止
systemctl restart mariadb.service #重启
systemctl enable mariadb.service #设置开启启动
配置mysql
初次安装mysql是没有密码的,要设置密码,默认账户为root
设置mysql root账户的密码
mysql_secure_installation
输入当前密码(初次为空,直接回车即可)
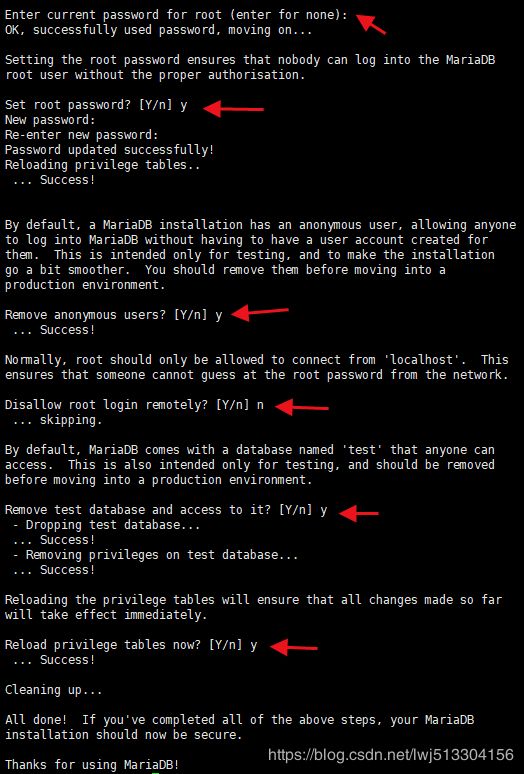
此时会发现让你输入[y/n]
依次是:是否设置密码->确认密码->删除匿名用户->不允许root远程连接->删除测试数据库并访问它->重新加载表数据,参考下图
解决不能远程登录
法一:改表法,登陆mysql
mysql>use mysql;
mysql>update user set host = '%'  where user ='root';(报错不予理会)
MariaDB [mysql]> update user set host = '%' where host = 'localhost';
Query OK, 0 rows affected (0.00 sec)
Rows matched: 0  Changed: 0  Warnings: 0
mysql>flush privileges;
mysql> select host, user from user;
mysql>quit
法二:授权法
例如,你想root使用mypassword从任何主机连接到mysql服务器的话。
GRANT ALL PRIVILEGES ON *.* TO 'root'@'%' IDENTIFIED BY 'root' WITH GRANT OPTION;
FLUSH   PRIVILEGES;
如果你想允许用户myuser从ip为192.168.1.6的主机连接到mysql服务器,并使用mypassword作为密码
GRANT ALL PRIVILEGES ON *.* TO 'myuser'@'192.168.1.3' IDENTIFIED BY 'mypassword' WITH GRANT OPTION;
FLUSH   PRIVILEGES;
Redis
配置编译环境:(报错忽略)
sudo yum install gcc-c++
下载源码:(可以安装自己想要的版本)
wget http://download.redis.io/releases/redis-3.2.8.tar.gz
解压源码:
tar -zxvf redis-3.2.8.tar.gz
进入到解压目录:
cd redis-3.2.8
执行make编译Redis:
make MALLOC=libc
注意:make命令执行完成编译后,会在src目录下生成6个可执行文件,分别是redis-server、redis-cli、redis-benchmark、redis-check-aof、redis-check-rdb、redis-sentinel。
安装Redis:
make install
配置Redis能随系统启动:
./utils/install_server.sh
显示结果信息如下:(可以全部回车)
Welcome to the redis service installer
This script will help you easily set up a running redis server

Please select the redis port for this instance: [6379]
Selecting default: 6379
Please select the redis config file name [/etc/redis/6379.conf]
Selected default - /etc/redis/6379.conf
Please select the redis log file name [/var/log/redis_6379.log]
Selected default - /var/log/redis_6379.log
Please select the data directory for this instance [/var/lib/redis/6379]
Selected default - /var/lib/redis/6379
Please select the redis executable path [/usr/local/bin/redis-server]
Selected config:
Port           : 6379
Config file    : /etc/redis/6379.conf
Log file       : /var/log/redis_6379.log
Data dir       : /var/lib/redis/6379
Executable     : /usr/local/bin/redis-server
Cli Executable : /usr/local/bin/redis-cli
Is this ok? Then press ENTER to go on or Ctrl-C to abort.
Copied /tmp/6379.conf => /etc/init.d/redis_6379
Installing service...
Successfully added to chkconfig!
Successfully added to runlevels 345!
Starting Redis server...
Installation successful!
Redis服务查看、开启、关闭:
a.通过ps -ef|grep redis命令查看Redis进程
b.开启Redis服务操作通过/etc/init.d/redis_6379 start命令,也可通过(service redis_6379 start)
c.关闭Redis服务操作通过/etc/init.d/redis_6379 stop命令,也可通过(service redis_6379 stop)