是时候来了解android7了:shortcuts(快捷方式)
本文已授权微信公众号:鸿洋(hongyangAndroid)在微信公众号平台原创首发。
就在前几天的一个晚上, Google召开了它的秋季发布会, 毫无悬念的宣布了它的最新手机品牌Pixel, 与此同时我的nexus设备也从亲儿子降级成为干儿子. 不过还好Google并没有对这一干一亲区别对待, 这不, 今天就推送了android7.1.1的更新, 随之而来的又是一大波新特性(又有我们开发者忙的了…), 这其中一个叫作Shortcuts的功能真的是太赞了, 利用这个功能以后我们就再也不用一页一页的进入我们想要的页面了, 在桌面长按图标就可以快捷进入(唉, 国产APP这个功能估计要等好久好久…), 而且, 这个快捷方式是我们开发者去自定义了! 所以, 就在API发布的当天晚上, 我从文档中了解了一下这个新特性, 然后就有了这篇文章.
Shortcuts初体验
好了, 在我们开始撸码之前, 还是来看看这个新特性有多赞, 新系统中好多google家的APP都集成了这项功能, 所以, 我们先挑个APP来体验一下.
这个功能还是很实用的, 有了它, 我们就可以直接打开短信应用给某人发短信啦~~ 下面我们就开始学习一下这个新的Shortcuts在开发中如何使用!
使用Static Shortcuts
什么是Static Shortcuts? 我的理解就是利用xml写死的配置, 想想BroadcastReceiver可以静态注册也可以利用java代码动态注册, 这里也是一样的.
那静态注册该如何做呢? 首先, 我们需要在res/xml目录下创建一个新的xml文件, 这里我们命名为shortcuts.xml.
<shortcuts xmlns:android="http://schemas.android.com/apk/res/android">
    <shortcut
        android:shortcutId="settings"
        android:enabled="true"
        android:icon="@drawable/icon"
        android:shortcutShortLabel="@string/settings_short_name"
        android:shortcutLongLabel="@string/settings_long_name"
        android:shortcutDisabledMessage="@string/settings_disable_msg">

        <intent
            android:action="android.intent.action.VIEW"
            android:targetPackage="org.loader.shotcutsstatic"
            android:targetClass="org.loader.shotcutsstatic.SettingsActivity" />
        <categories android:name="android.shortcut.conversation"/>
    shortcut>
shortcuts>首先一个shortcuts标签, 然后是一个shortcut, 到这里我们大概可以猜测到这里可以注册多个shortcut, shortcut标签有很多属性, 我们来一个个的了解下.
- shortcutId, 不用多说, 这肯定是一个唯一的id
- enabled, 表示这个shortcut是否可用
- shortcutShortLabel, 这里是配置的短名称, 下面还会有长名称, 如果长名称显示不下, 就显示短名称
- shortcutLongLabel, 这里是配置的长名称, launcher会优先选择长名称显示
- shortcutDisabledMessage, 这个配置是在我们选择一个不可用的shortcut时给用户的一个提示
在shortcut标签下还有两个我们熟悉的标签.
- intent, 这里表示我们点击shortcut时要干嘛, targetPackage是指定一个目标应用的包名, targetClass是我们要跳转的目标类, 这里要注意的是
android:action一定要配置, 否则会崩溃- categories, 这个东西目前位置官方只给提供了
android.shortcut.conversation
ok, 上面的几行代码, 我们一个static shortcuts就完成了, 那如何使用呢? 是在manifest中配置activity的地方使用, 而且这个activity是有要求的.
能配置shortcuts的activity必须要有action是android.intent.action.MAIN和category是android.intent.category.LAUNCHER!
为什么要有这个要求, 自己去体会…
最终, 我们来看看这个配置:
<application
        android:allowBackup="true"
        android:icon="@mipmap/ic_launcher"
        android:label="@string/app_name"
        android:supportsRtl="true"
        android:theme="@style/AppTheme">
        <activity android:name=".MainActivity">
            <intent-filter>
                <action android:name="android.intent.action.MAIN" />
                <category android:name="android.intent.category.LAUNCHER" />
            intent-filter>

            <meta-data
                android:name="android.app.shortcuts"
                android:resource="@xml/shortcuts"/>
        activity>

        <activity android:name=".SettingsActivity" />
    application>
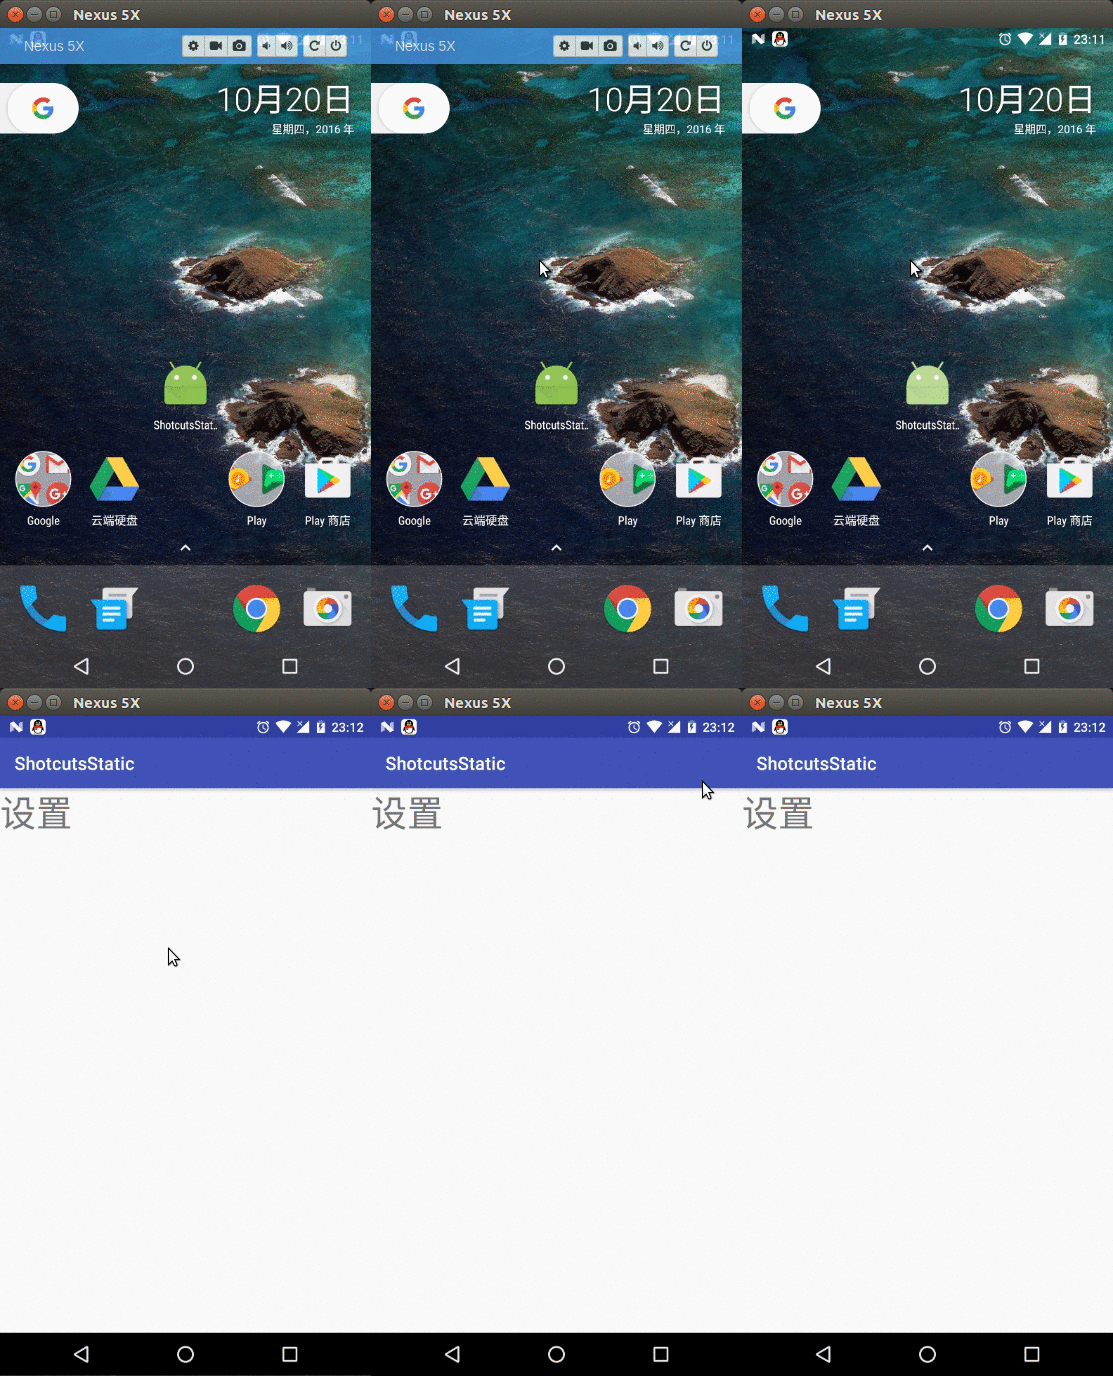
来看看最终实现的效果:
ok, 到这里, 静态配置shortcuts我们就学习完了, 是不是很简单? 那这个静态配置是用在什么地方呢? 我想了想, 这里适用的场景一般是一些固定不变的功能, 例如你APP的设置界面, 如果是一些动态的数据, 那静态配置就不适合了, 就需要我们接下来要介绍到了动态配置了.
使用Dynamic Shortcuts
在看完Static Shortcuts后, 我们不相信Google仅仅给我们开发者开放了局限性如此大的使用方式, 肯定还会存在灵活性更大的API, 是的, 这就是我们马上要讲的Dynamic Shortcuts, 我把它称为动态配置.
说起动态配置, 那肯定是用java代码实现了, 那如何实现呢?
首先第一步, 我们需要利用一下代码拿到ShortcutManager
getSystemService(ShortcutManager.class)拿到ShortcutManager后, 我们可以调用setDynamicShortcuts(List方法去设置Shortcut, 那这个List如何得到呢? 我们来看看完整点的代码,
private void setupShortcuts() {
    mShortcutManager = getSystemService(ShortcutManager.class);

    List infos = new ArrayList<>();
    for (int i = 0; i < mShortcutManager.getMaxShortcutCountPerActivity(); i++) {
        Intent intent = new Intent(this, MessageActivity.class);
        intent.setAction(Intent.ACTION_VIEW);
        intent.putExtra("msg", "我和" + mAdapter.getItem(i) + "的对话");

        ShortcutInfo info = new ShortcutInfo.Builder(this, "id" + i)
                .setShortLabel(mAdapter.getItem(i))
                .setLongLabel("联系人:" + mAdapter.getItem(i))
                .setIcon(Icon.createWithResource(this, R.drawable.icon))
                .setIntent(intent)
                .build();
        infos.add(info);
//            manager.addDynamicShortcuts(Arrays.asList(info));
    }

    mShortcutManager.setDynamicShortcuts(infos);
}
这段代码的背景是我们模拟了一个联系人列表功能, 在launcher中我们长按图标会出现一定数量的联系人快捷方式, 点击某个快捷方式会直接跳转该联系人相关的页面. 好, 介绍完背景, 我们来看代码, 首先我们通过getSystemService(ShortcutManager.class)来拿到ShortcutManager, 接下来一个for循环, 注意这个for循环的次数, 因为我们要添加的Shortcut不能是无限个, 所以这里我们用getMaxShortcutCountPerActivity来获取到最大个数. 然后在for循环里, 我们首先构造一个intent, 注意, 这里和Static Shortcut一样, 必须要提供一个Action. 然后我们用ShortcutInfo.Builder来构造一个ShortcutInfo并且放到List中, 最终我们调用mShortcutManager.setDynamicShortcuts(infos)来设置Shortcuts.
好了, 代码其实很简单, 我们来看看效果.
是不是很666?
动态更新 Shortcuts
上面的代码我们虽然说是Dynamic, 但仅仅是使用java代码实现的罢了, 真正的Dynamic我们接下来才去讲解, 在讲解Dynamic之前, 我们先来介绍一个名词-Pinning Shortcuts, 这是个啥玩意呢? 其实对于Shortcut, Android是允许我们直接放到桌面的, 这样就更加方便了用户的操作, google把他称作为Pinning Shortcuts, 具体啥样, 我们来张图就明白了.
对于这个Pinning Shortcuts, google的文档说, 我们开发者是没有权利去删除的, 能删除它的只有用户. 那我该项功能删除了咋办? 这东西还在桌面上, 是不是APP要崩? 当然Google考虑到了这点, 它允许我们去disable这个shortcut. 具体还是来看代码, 这里我们长按item来模拟一下删除.
private void removeItem(int index) {
    List infos = mShortcutManager.getPinnedShortcuts();
    for (ShortcutInfo info : infos) {
        if (info.getId().equals("id" + index)) {
            mShortcutManager.disableShortcuts(Arrays.asList(info.getId()), "暂无该联系人");
        }
    }
    mShortcutManager.removeDynamicShortcuts(Arrays.asList("id" + index));
} 首先我们先调用mShortcutManager.getPinnedShortcuts()来获取到所有的Pinning Shortcuts, 然后去遍历它, 找到我们删除的那个, 然后通过APIdisableShortcuts(List来disable掉该项, 最后我们还要用过removeDynamicShortcuts(List来从shortcuts中移除. 来看看效果.
通过效果中, 我们可以看到, 我们disableShortcuts的那个Pinning Shortcut已经变灰了, 而且在点击的时候会提醒暂无该联系人, 这个提醒正是disableShortcuts的第二个参数.
现在, 删除和禁用我们已经了解了, 那更新呢? 假如我修改了某个联系人的名字, shortcut是不是也应该相应的修改呢? 是的, 这里还是需要我们通过代码来实现.
private void updItem(int index) {
    Intent intent = new Intent(this, MessageActivity.class);
    intent.setAction(Intent.ACTION_VIEW);
    intent.putExtra("msg", "我和" + mAdapter.getItem(index) + "的对话");

    ShortcutInfo info = new ShortcutInfo.Builder(this, "id" + index)
            .setShortLabel(mAdapter.getItem(index))
            .setLongLabel("联系人:" + mAdapter.getItem(index))
            .setIcon(Icon.createWithResource(this, R.drawable.icon))
            .setIntent(intent)
            .build();

    mShortcutManager.updateShortcuts(Arrays.asList(info));
}
构建intent我们就不说了, 接下来我们又使用ShortcutInfo.Builder来构建了一个新的ShortcutInfo, 最后我们是用过updateShortcuts(List来实现更新shortcut的, 很简单, 来看看效果.
ok, 现在, Android7.1的Shortcuts功能我们就差不多介绍完了, 文章中的实例代码大家可以在https://github.com/qibin0506/Android7_Shortcuts_Demo上下载到, 官网的文档大家也可以多看看, 这里给出地址: https://developer.android.com/preview/shortcuts.html
最后的彩蛋:大家都知道, 从android 7开始, google开始推广圆形图标了, 那肯定有很多人疑惑“那我在之前的launcher上咋办? 很丑陋啊”, 其实这点google完全考虑到了,圆形图标并不是通过android:icon指定的, 是一个额外提供的属性支持圆形图标的:android:roundIcon, 所以说,现在我们的manifest应该这么写了:
<manifest xmlns:android="http://schemas.android.com/apk/res/android"
    package="com.example.android.commitcontent.app">

    <application
        android:allowBackup="true"
        android:icon="@mipmap/ic_launcher"
        android:roundIcon="@mipmap/ic_launcher_round"
        android:label="@string/app_name"
        android:supportsRtl="true"
        android:theme="@style/AppTheme">
        <activity android:name=".MainActivity">
            <intent-filter>
                <action android:name="android.intent.action.MAIN" />

                <category android:name="android.intent.category.LAUNCHER" />
            intent-filter>
        activity>
    application>
manifest>看application的配置, android:icon指定普通图标, android:roundIcon指定的是圆形图标, 那么在支持圆形图标的launcher上就会显示圆形图标, 我们现在大部分人用的launcher上海市显示默认的图标。
