一、快速入门
nodejs 安装 mongoose
npm install --save mongoose
现在往 dbs 这个数据库里面添加一个 students 文档(表)并写入一条数据。
// 引入mongoose,mongoose的依赖中自动有mongodb的,所以不需要再次引入mongodb
var mongoose = require('mongoose');

//链接数据库,端口号不需要写,最后的反斜杠是数据库名字
mongoose.connect('mongodb://localhost/dbs', {useNewUrlParser: true});

//用mongoose.model()函数创建一个模型,是一个类。此时你传入的第一个参数将自动大写变为小写,末尾加s,变为集合名字。
//第二个参数是schema,就是字段列表,用kv对表示字段名字和类型。
var Student = mongoose.model('Student', {
    class : String,
    name : String,
    sex : String,
    age : Number,
    height : Number,
    weight : Number
});

//实例化对象
var huayue = new Student({
    "class":"高一一班",
    "name":"花月",
    "sex":"girl",
    "age":19,
    "height":"170",
    "weight":45
});

//保存对象
huayue.save();

console.log("光标挂起,我成功创建students这个表,并插入new实例里面的数据!");
使用 node 运行这个程序。结果如下:
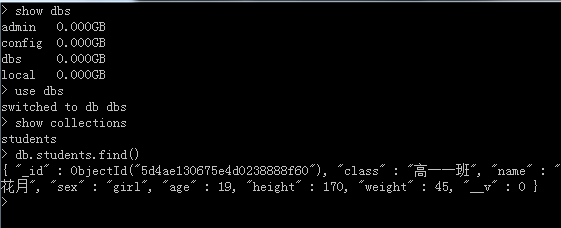
此时要在另一个 CMD 窗口输入 mongo 进入数据库的 REPL 环境。来查看数据是否插入成功。结果如下:
上面还有一句代码未解释。现在来说明一下。
{useNewUrlParser: true} 的作用?
如果不加运行程序报如下的错。
 D:\mongodb\nodedb>node 1.js
光标挂起,我成功创建students这个表,并插入new实例里面的数据!
(node:3340) DeprecationWarning: current URL string parser is deprecated, and wil
l be removed in a future version. To use the new parser, pass option { useNewUrl
Parser: true } to MongoClient.connect.
原因:https://mongoosejs.com/docs/deprecations.html
二、创建模型Model和Schema
为了之后可以使面向对象操作数据库,我们需要把 model 函数第二个参数提取出来,变成 schema ,schema 是系统内置的可以直接使用。模板如下:
mongoose.model(类名字,schema)
现在我们尝试把代码提出来。
// 引入mongoose,mongoose的依赖中自动有mongodb的,所以不需要再次引入mongodb
const mongoose = require("mongoose");

//链接数据库,端口号不需要写,最后的反斜杠是数据库名字
mongoose.connect("mongodb://localhost/dbs", {useNewUrlParser: true});

//创建schema
var schema = new mongoose.Schema({
    class:String,
    name : String,
    sex : String,
    age : Number,
    height:Number,
    weight:Number
});
var Student = mongoose.model("Student", schema);
// 数据库状态监听
// 连接成功
mongoose.connection.on("connected", function () {
    console.log("mongoose 数据库连接成功!");
});

// 连接异常
mongoose.connection.on("error",function (err) {
    console.log("Mongoose 数据库连接发现异常,异常为:" + err);
});

// 连接断开
mongoose.connection.on("disconnected", function () {
    console.log("Mongoose 数据库已经断开连接!");
});

// 实例化对象其实就是往数据库里面增加东西
var huayue = new Student({
    "class":"高一一班",
    "name":"花月",
    "sex":"girl",
    "age":19,
    "height":"170",
    "weight":45,
    "nationality":"满"
});

//保存对象另一种ES6的写法
huayue.save().then(()=>console.log("光标挂起,我成功创建students这个表,并插入new实例里面的数据!"));
三、mongoose 中的静态方法和动态方法
Mongoose 最好用的地方就是可以提供静态方法和动态方法。
动态方法和静态方法的区分:
- 静态方法是类能够调用的方法:
类名.方法() - 动态方法是实例能够调用的方法:
实例.方法()
接下来的案例演示,我们使用下面这个数据表:
清空我们的 dbs 数据库,再把这个数据导入我们的 students 这个文档里面,使用命令为:
mongoimport -d dbs -c students 1.txt
回车显示:
D:\mongodb\nodedb>mongoimport -d dbs -c students 1.txt
2019-08-12T22:02:26.320+0800    connected to: localhost
2019-08-12T22:02:26.376+0800    imported 22 documents
本次案例演示的数据:
{"class":"高一二班","name":"紫萱","sex":"girl","age":17,"hobby":["唱歌","看书","看剧"],"score":{"math":85,"philosophy":78,"english":98,"chemical":84}}
{"class":"高一一班","name":"花月","sex":"girl","age":19,"hobby":["化妆","看剧","购物"],"score":{"math":77,"philosophy":89,"english":87,"chemical":58}}
{"class":"高一三班","name":"佳宁","sex":"girl","age":20,"hobby":["看书","画画","跑步","游泳"],"score":{"math":94,"philosophy":89,"english":82,"chemical":98}}
{"class":"高一一班","name":"香巧","sex":"girl","age":19,"hobby":["跳舞","游泳","化妆","看剧"],"score":{"math":93,"philosophy":86,"english":79,"chemical":85}}
{"class":"高一一班","name":"惜玉","sex":"girl","age":17,"hobby":["摄影","跳舞","游泳"],"score":{"math":100,"philosophy":92,"english":91,"chemical":83}}
{"class":"高一一班","name":"玥婷","sex":"girl","age":18,"hobby":["跳舞","游泳","做饭"],"score":{"math":89,"philosophy":90,"english":95,"chemical":80}}
{"class":"高一四班","name":"诗琪","sex":"girl","age":19,"hobby":["唱歌","游泳","做饭","化妆"],"score":{"math":100,"philosophy":95,"english":77,"chemical":82}}
{"class":"高一一班","name":"欣怡","sex":"girl","age":20,"hobby":["化妆","看剧","购物"],"score":{"math":99,"philosophy":68,"english":89,"chemical":98}}
{"class":"高一一班","name":"玥怡","sex":"girl","age":19,"hobby":["唱歌","看书","看剧"],"score":{"math":89,"philosophy":69,"english":87,"chemical":84}}
{"class":"高一四班","name":"梦瑶","sex":"girl","age":17,"hobby":["摄影","看剧","购物"],"score":{"math":78,"philosophy":79,"english":96,"chemical":85}}
{"class":"高一一班","name":"怜雪","sex":"girl","age":19,"hobby":["唱歌","看书"],"score":{"math":88,"philosophy":89,"english":87,"chemical":85}}
{"class":"高一二班","name":"安婷","sex":"girl","age":21,"hobby":["唱歌","跑步","摄影","跳舞"],"score":{"math":95,"philosophy":87,"english":92,"chemical":86}}
{"class":"高一五班","name":"怡瑶","sex":"girl","age":20,"hobby":["游泳","做饭","化妆","看剧"],"score":{"math":92,"philosophy":81,"english":93,"chemical":89}}
{"class":"高一一班","name":"韵茹","sex":"girl","age":16,"hobby":["吃饭","做饭","化妆","看剧"],"score":{"math":91,"philosophy":82,"english":95,"chemical":97}}
{"class":"高一一班","name":"念蕾","sex":"girl","age":19,"hobby":["跑步","摄影","购物"],"score":{"math":99,"philosophy":90,"english":97,"chemical":88}}
{"class":"高一五班","name":"一萌","sex":"girl","age":20,"hobby":["唱歌","看书","画画","购物"],"score":{"math":92,"philosophy":89,"english":73,"chemical":78}}
{"class":"高一一班","name":"凌旋","sex":"girl","age":21,"hobby":["唱歌","做饭"],"score":{"math":99,"philosophy":79,"english":99,"chemical":88}}
{"class":"高一二班","name":"芷梦","sex":"girl","age":22,"hobby":["化妆","看剧","购物"],"score":{"math":99,"philosophy":91,"english":92,"chemical":88}}
{"class":"高一四班","name":"雅静","sex":"girl","age":16,"hobby":["跑步","摄影"],"score":{"math":76,"philosophy":88,"english":96,"chemical":100}}
{"class":"高一一班","name":"紫夏","sex":"girl","age":15,"hobby":["跳舞","游泳","做饭"],"score":{"math":78,"philosophy":99,"english":92,"chemical":88}}
{"class":"高一一班","name":"芸萱","sex":"girl","age":16,"hobby":["唱歌","游泳","做饭"],"score":{"math":89,"philosophy":75,"english":93,"chemical":90}}
{"class":"高一五班","name":"靖瑶","sex":"girl","age":15,"hobby":["唱歌","看剧","购物"],"score":{"math":99,"philosophy":79,"english":96,"chemical":98}}
数据对应的 schema:
//创建schema
var schema = new mongoose.Schema({
    class   : String,
    name    : String,
    sex     : String,
    age     : Number,
    hobby   : [String],
    score  : {math : Number , philosophy : Number , english : Number , chemical : Number}
});
静态方法要定义在 schema 上,定义完毕之后再 mongoose.model() 创建 model。
静态方法中的 this 表示整个数据表,通常用于查询,this.find() 是非常常用的东西。
下面定义一个静态方法,输入名字,控制台打印出这个人的全部信息。例如下面我输入花月。
// 引入mongoose,mongoose的依赖中自动有mongodb的,所以不需要再次引入mongodb
const mongoose = require("mongoose");

//链接数据库,端口号不需要写,最后的反斜杠是数据库名字
mongoose.connect("mongodb://localhost/dbs", {useNewUrlParser: true});

//创建schema
var schema = new mongoose.Schema({
    class   : String,
    name    : String,
    sex     : String,
    age     : Number,
    hobby   : [String],
    score  : {math : Number , philosophy : Number , english : Number , chemical : Number}
});
// <<<<<<<<<<<<<<新增代码>>>>>>>>>>>>>>>>>>>>>>>>
// 静态方法要定义在 schema 上,定义完毕之后再 mongoose.model() 创建 model。
schema.statics.sayHello = function(name){
    // this就是这个表Model { Student }
    this.find({"name":name},function(err,res){
        console.log(res)
    });
}
// 创建这个 Student 这个类
var Student = mongoose.model("Student", schema);
// 调用静态方法
Student.sayHello("花月");

// <<<<<<<<<<<<<<新增代码>>>>>>>>>>>>>>>>>>>>>>>>

// 数据库状态监听
// 连接成功
mongoose.connection.on("connected", function () {
    console.log("mongoose 数据库连接成功!");
});

// 连接异常
mongoose.connection.on("error",function (err) {
    console.log("Mongoose 数据库连接发现异常,异常为:" + err);
});

// 连接断开
mongoose.connection.on("disconnected", function () {
    console.log("Mongoose 数据库已经断开连接!");
});
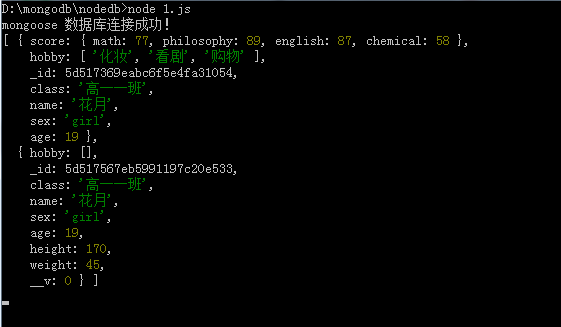
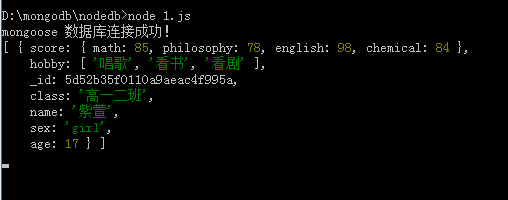
node 运行控制台打印出结果如下:
我们检索出来结果是可以进行修改的。例如:
现在我们查询的 花月 这个名字对应的性别是女孩。现在我们可以对她的性别进行更改。
// <<<<<<<<<<<<<<新增代码>>>>>>>>>>>>>>>>>>>>>>>>
// 静态方法要定义在 schema 上,定义完毕之后再 mongoose.model() 创建 model。
schema.statics.sayHello = function(name){
    // this就是这个表Model { Student }
    this.find({"name":name},function(err,res){
        var dom = res[0];
        if(dom.sex === "girl"){
            dom.sex = "boy";
            dom.save();
        }else {
            dom.sex = "girl";
        }
        console.log(dom);
    });
}
// 创建这个 Student 这个类
var Student = mongoose.model("Student", schema);
// 调用静态方法
Student.sayHello("花月");

// <<<<<<<<<<<<<<新增代码>>>>>>>>>>>>>>>>>>>>>>>>
使用 node 运行程序,运行结果如下:
运行完这个例子估计你也发现 mongoose 数据库的本质。就是可以使用面向对象的方法来操作数据库。这就是这个数据库最大的优点。
现在来看动态方法,动态的方法也是定义在 schema 上。只是在调用的时候必须使用静态方法调用返回的实例(结果),只有返回的实例才能调用动态方法。这个绝技就叫做: 静包动
我们来做一个例子来观察一下:
// <<<<<<<<<<<<<<新增代码>>>>>>>>>>>>>>>>>>>>>>>>
// 静态方法要定义在 schema 上,定义完毕之后再 mongoose.model() 创建 model。
schema.statics.sayHello = function(name){
    // this就是这个表Model { Student }
    this.find({"name":name},function(err,res){
        // 静态方法查询得到的实例来调用动态方法
        res[0].findName(name);
    });
}
// 动态方法也是定义在schema上
schema.methods.findName = function(name){
    console.log("使用静包动,来查询" + name + "的个人信息");
}
// 创建这个 Student 这个类
var Student = mongoose.model("Student", schema);
// 调用静态方法
Student.sayHello("花月");

// <<<<<<<<<<<<<<新增代码>>>>>>>>>>>>>>>>>>>>>>>>
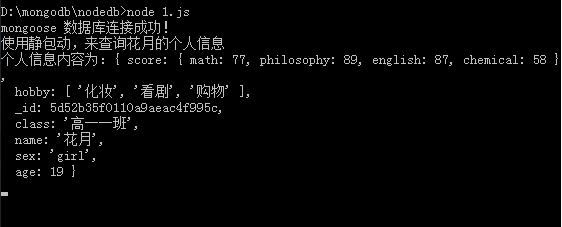
代码 node 运行结果:
四、封装动态方法
上一节静态调用动态方法,过程不是太同步,我们来完善一下,调用静态的时候同时来调用动态方法。代码改装如下:
// <<<<<<<<<<<<<<新增代码>>>>>>>>>>>>>>>>>>>>>>>>
// 静态方法要定义在 schema 上,定义完毕之后再 mongoose.model() 创建 model。
schema.statics.sayHello = function(name,callback){
    // this就是这个表Model { Student }
    this.find({"name":name},function(err,res){
        // 静态方法查询得到的实例来调用动态方法
        callback(res,name);
    });
}
// 动态方法也是定义在schema上
schema.methods.findName = function(data,name){
    console.log("使用静包动,来查询" + name + "的个人信息");
    console.log("个人信息内容为:" + data);
}
// 创建这个 Student 这个类
var Student = mongoose.model("Student", schema);
// 调用静态方法
Student.sayHello("花月",function(data,name){
    //静态方法返回的实例
    var el = data[0];
    el.findName(data,name);
});
五、案例练手
下面的案例都是借用讲动态动态方法时候的 JSON 数据来练习。
- 查找 hobby(爱好) 为
化妆的人,并输出结果。
查询的项为数组,可直接匹配。
// <<<<<<<<<<<<<<项目代码>>>>>>>>>>>>>>>>>>>>>>>>

schema.statics.findHobby = function(hobby,callback){

    this.find({"hobby":hobby},function(err,res){
        callback(res,hobby);
    });
}
schema.methods.printName = function(i,arr){
    arr.push(i["name"]);
}

var Student = mongoose.model("Student", schema);

Student.findHobby("化妆",function(data,hobby){
    // 查询返回的结果是一个数组
    var arr = [];
    data.map(item => item.printName(item,arr));
    console.log("喜欢化妆的女孩有 : " + arr.join(","));
});

// <<<<<<<<<<<<<<项目代码>>>>>>>>>>>>>>>>>>>>>>>>
node 运行结果:
- 寻找所有数学超过九十的人:查询项为对象,这个比较特殊,照理讲应该对象的 k 使用变量应该用方括号,这里不行必须使用 字符串打点调用的方法才行。代码如下:
// <<<<<<<<<<<<<<项目代码>>>>>>>>>>>>>>>>>>>>>>>>

schema.statics.findMath = function(score,callback){

    this.find({"score.math":{$gt:90}},function(err,res){
        callback(res,"math");
    });
}
schema.methods.printMath = function(i,arr){
    arr.push(i["name"]);
}

var Student = mongoose.model("Student", schema);

Student.findMath("score",function(data){
    // 查询返回的结果是一个数组
    var arr = [];
    data.map(item => item.printMath(item,arr));
    console.log("数学超过九十的人有 : " + arr.join(","));
});

// <<<<<<<<<<<<<<项目代码>>>>>>>>>>>>>>>>>>>>>>>>
node 运行结果如下:
- 再来看数学过了九十,且年龄为十七的女孩。
// <<<<<<<<<<<<<<项目代码>>>>>>>>>>>>>>>>>>>>>>>>

schema.statics.findMath = function(score,callback){

    this.find({"score.math":{$gt:90},"age":18},function(err,res){
        callback(res,"math");
    });
}
schema.methods.printMath = function(i,arr){
    arr.push(i["name"]);
}

var Student = mongoose.model("Student", schema);

Student.findMath("score",function(data){
    // 查询返回的结果是一个数组
    var arr = [];
    data.map(item => item.printMath(item,arr));
    console.log("数学过了九十,且年龄为十七的有 : " + arr.join(","));
});

// <<<<<<<<<<<<<<项目代码>>>>>>>>>>>>>>>>>>>>>>>>
六、数据库的常见 API
1. 查
查询数据库 dbs 里面 students 文档里面的学生年纪小于 16 的人。并在控制台打印出来。
// 引入mongoose,mongoose的依赖中自动有mongodb的,所以不需要再次引入mongodb
const mongoose = require("mongoose");

//链接数据库,端口号不需要写,最后的反斜杠是数据库名字
mongoose.connect("mongodb://localhost/dbs", {useNewUrlParser: true});

//第一步,创建一个schema
var Student = mongoose.model("Student", {
    class:String,
    name : String,
    sex : String,
    age : Number,
    height:Number,
    weight:Number
});
// 数据库状态监听
// 连接成功
mongoose.connection.on("connected", function () {
    console.log("mongoose 数据库连接成功!");
});

// 连接异常
mongoose.connection.on("error",function (err) {
    console.log("Mongoose 数据库连接发现异常,异常为:" + err);
});

// 连接断开
mongoose.connection.on("disconnected", function () {
    console.log("Mongoose 数据库已经断开连接!");
});

//以下是新增代码
// 数据库查找年龄小于16的并打印出来
Student.find({
    "age":{$lt:16}
}).exec(function(err, res) {
    // exec表示执行res是查询的结果
    // if有错误扔出错误
    if (err) throw new Error("数据库查询错误:" + err)
    console.log(res);
});
node 运行程序。
2. 统计数据库符合条件的个数
Model.count :Counts number of matching documents in a database collection.
更改代码部分:
//...
// 数据库查找年龄小于16的个数
Student.count({"age":{$lt:16}},function(err, count) {
    // exec表示执行res是查询的结果
    // if有错误扔出错误
    if (err) throw new Error("数据库查询错误:" + err)
    console.log(`查询满足条件的个数为:${count}`);
});
查询结果为两个人。
根据控制台的结果我们发现一个警告:
(node:5028) DeprecationWarning: collection.count is deprecated, and will be remo
ved in a future version. Use collection.countDocuments or collection.estimatedDo
cumentCount instead
node 提示我们 count 这个 API 已经被废弃,未来不会在使用了,请使用 countDocuments 或 estimatedDocumentCount 来替代。我们换一下就好了。
接着讲 ,统计结果这个 API 有两个参数,第一个参数是一个 JSON 表示筛选条件,第二参数是一个函数,函数的第二个参数就是匹配成功的个数。如果把第一个参数省略的话就是查询整个表的内容:
// 查询整个表的内容
Student.countDocuments(function(err, count) {
    // exec表示执行res是查询的结果
    // if有错误扔出错误
    if (err) throw new Error("数据库查询错误:" + err)
    console.log(`查询满足条件的个数为:${count}`);
});
node 运行查询结果显示如下:
3. 对查询结果排序
我们现在查询年龄在 16 到 19 之间的人,一共是四个。查询结果如下:
现在我们根据查询结果对她们的化学成绩(chemical)进行排序:
// <<<<<<<<<<<<<<项目代码>>>>>>>>>>>>>>>>>>>>>>>>

var Student = mongoose.model("Student", schema);

Student.find({"age":{$lt:19,$gt:16}}).sort({"score.chemical":1}).exec(function(err,res){
    console.log(res);
});
// 设置排序的时候:

// 如果传入的参数是个对象,字段值可以是 asc(正序)或 1, desc(倒叙) 或 -1

// 如果传入参数是字符串,它得是以空格间隔的字段路径名列表。
// 每个字段的排列顺序默认是正序,如果字段名有 - 前缀, 那么这个字段是倒序。

// 示例sort("age -id -score.math")  年龄字段正向排序...另外两个倒叙
// <<<<<<<<<<<<<<项目代码>>>>>>>>>>>>>>>>>>>>>>>>
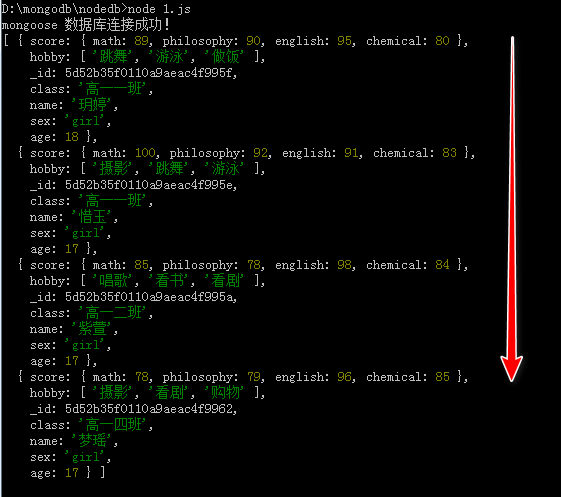
node 查询结果为:
4. exec(err,res)表示执行查询结果,res 是以数组的形式来存取查询的结果。
5. skip指定对查询结果跳过的文档条数。
我们现在已知年龄在 16 到 19 之间的人,一共是四个。现在我们跳过两个显示。
// <<<<<<<<<<<<<<项目代码>>>>>>>>>>>>>>>>>>>>>>>>

var Student = mongoose.model("Student", schema);

Student.find({"age":{$lt:19,$gt:16}}).skip(2).exec(function(err,res){
    console.log(res);
});
// <<<<<<<<<<<<<<项目代码>>>>>>>>>>>>>>>>>>>>>>>>
6. limit 指定查询结果的最大条数。
limit 就是自定查询结果显示条数的。
我们现在已知年龄在 16 到 19 之间的人,一共是四个。我们现在只想显示一个。代码如下:
// <<<<<<<<<<<<<<项目代码>>>>>>>>>>>>>>>>>>>>>>>>

var Student = mongoose.model("Student", schema);

Student.find({"age":{$lt:19,$gt:16}}).limit(1).exec(function(err,res){
    console.log(res);
});
// <<<<<<<<<<<<<<项目代码>>>>>>>>>>>>>>>>>>>>>>>>
node 运行结果:
学习更多请参考:
Mongoose 5.0 中文文档

