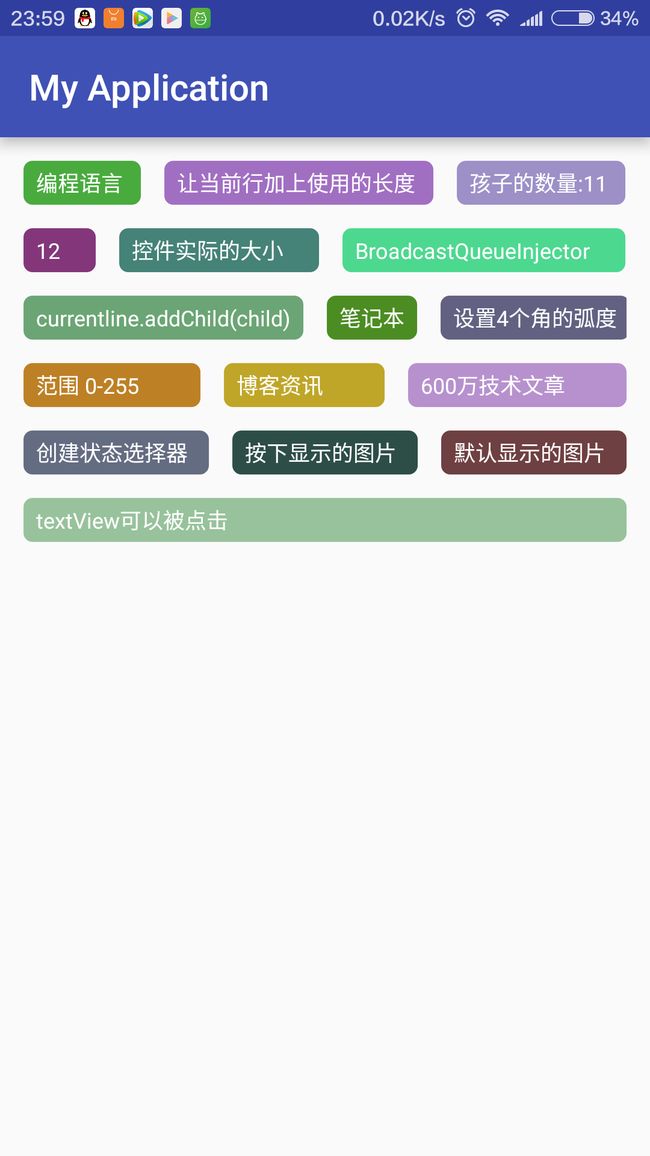
自定义ViewGroup 五彩缤纷的流式布局,并且自动填充满整个屏幕

在此文章中将有以下知识点:
1 自定义ViewGroup omeasure()onLayout()的使用;
2 使用代码动态的创建状态选择器
3 随机生成的textview的颜色
3 使用代码创建shape图片
效果如图 就是父View测量子view的宽高后 如果子View已经到达了父View的宽度或者 在父view已经填充了几个子view后剩余的宽度不足以在填充后来再加进来的子view就自动换行 依此类推!
当子view填充后 如果父view还有剩余空间的话 让已经填充的子view平均来分配还剩余的空间,如果当前只有一个子view的话 则填充整个父宽度;
好了 开始帖代码:
自定义viewgroup
FlowLayout.java
package com.example.administrator.myapplication.layout;

import android.content.Context;
import android.util.AttributeSet;
import android.view.View;
import android.view.ViewGroup;

import com.example.administrator.myapplication.MainActivity;

import java.util.ArrayList;
import java.util.List;

public class FlowLayout extends ViewGroup {
    private int horizontolSpacing;
    private int verticalSpacing;

    public FlowLayout(Context context) {
        super(context);
        init(context);
    }

    public FlowLayout(Context context, AttributeSet attrs, int defStyle) {
        super(context, attrs, defStyle);
        init(context);
    }

    private Line currentline;// 当前的行
    private int useWidth = 0;// 当前行使用的宽度
    private List mLines = new ArrayList();
    private int width;

    public FlowLayout(Context context, AttributeSet attrs) {
        super(context, attrs);
        init(context);
    }

    private void init(Context context) {
        horizontolSpacing = MainActivity.dip2px(13, context);
        verticalSpacing = MainActivity.dip2px(13, context);
    }

    // 测量 当前控件Flowlayout
    // 父类是有义务测量每个子View的
    @Override
    protected void onMeasure(int widthMeasureSpec, int heightMeasureSpec) {
        mLines.clear();
        currentline = null;
        useWidth = 0;

        /**
         * 获得此ViewGroup上级容器为其推荐的宽和高,以及计算模式
         */
        int widthMode = MeasureSpec.getMode(widthMeasureSpec);
        int heightMode = MeasureSpec.getMode(heightMeasureSpec);
        // 计算出所有的childView的宽和高
        measureChildren(widthMeasureSpec, heightMeasureSpec);
        width = MeasureSpec.getSize(widthMeasureSpec) - getPaddingLeft() - getPaddingRight();
        int height = MeasureSpec.getSize(heightMeasureSpec) - getPaddingBottom() - getPaddingTop(); // 获取到宽和高
        int childeWidthMode;
        int childeHeightMode;
        //  为了测量每个子View 需要指定每个子View测量规则
        childeWidthMode = widthMode == MeasureSpec.EXACTLY ? MeasureSpec.AT_MOST : widthMode;
        childeHeightMode = heightMode == MeasureSpec.EXACTLY ? MeasureSpec.AT_MOST : heightMode;
        int childWidthMeasureSpec = MeasureSpec.makeMeasureSpec(childeWidthMode, width);
        int childHeightMeasureSpec = MeasureSpec.makeMeasureSpec(childeHeightMode, height);
        currentline = new Line();// 创建了第一行
        for (int i = 0; i < getChildCount(); i++) {
            View child = getChildAt(i);
            // 测量每个子View
            child.measure(childWidthMeasureSpec, childHeightMeasureSpec);
            int measuredWidth = child.getMeasuredWidth();
            useWidth += measuredWidth;// 让当前行加上使用的长度
            if (useWidth <= width) {
                currentline.addChild(child);//这时候证明当前的子View是可以放进当前的行里,放进去
                useWidth += horizontolSpacing;
            } else {
                //换行
                newLine(child);
            }
        }

        if (!mLines.contains(currentline)) {
            mLines.add(currentline);// 添加最后一行
        }
        int totalheight = 0;
        for (Line line : mLines) {
            totalheight += line.getHeight();
        }
        totalheight += verticalSpacing * (mLines.size() - 1) + getPaddingTop() + getPaddingBottom();

        System.out.println(totalheight);
        setMeasuredDimension(width + getPaddingLeft() + getPaddingRight(), resolveSize(totalheight, heightMeasureSpec));
    }

    private void newLine(View child) {
        mLines.add(currentline);// 记录之前的行
        currentline = new Line();// 创建新的一行
        currentline.addChild(child);
        useWidth = currentline.lineWidth;
    }

    private class Line {
        int height = 0; //当前行的高度
        int lineWidth = 0;
        private List children = new ArrayList();

        /**
         * 添加一个子View
         *
         * @param child
         */
        public void addChild(View child) {
            children.add(child);
            if (child.getMeasuredHeight() > height) {
                height = child.getMeasuredHeight();
            }
            lineWidth += child.getMeasuredWidth();
        }

        public int getHeight() {
            return height;
        }

        /**
         * 返回子View的数量
         *
         * @return
         */
        public int getChildCount() {
            return children.size();
        }

        public void layout(int l, int t) {
            lineWidth += horizontolSpacing * (children.size() - 1);
            int surplusChild = 0;
            int surplus = width - lineWidth;
            if (surplus > 0 && children.size() > 0) {
                surplusChild = surplus / children.size();
            }
            for (int i = 0; i < children.size(); i++) {
                View child = children.get(i);
                child.layout(l, t, l + child.getMeasuredWidth() + surplusChild, t + child.getMeasuredHeight());
                l += child.getMeasuredWidth() + surplusChild;
                l += horizontolSpacing;
            }
        }

    }

    // 分配每个子View的位置
    @Override
    protected void onLayout(boolean changed, int l, int t, int r, int b) {
        l += getPaddingLeft();
        t += getPaddingTop();
        for (int i = 0; i < mLines.size(); i++) {
            Line line = mLines.get(i);
            line.layout(l, t);  //交给每一行去分配
            t += line.getHeight() + verticalSpacing;
        }
    }

}
MainActivity.java
package com.example.administrator.myapplication;

import android.content.Context;
import android.graphics.Color;
import android.graphics.drawable.Drawable;
import android.graphics.drawable.GradientDrawable;
import android.graphics.drawable.StateListDrawable;
import android.os.Bundle;
import android.support.v7.app.AppCompatActivity;
import android.view.Gravity;
import android.view.View;
import android.widget.LinearLayout;
import android.widget.ScrollView;
import android.widget.TextView;
import android.widget.Toast;

import com.example.administrator.myapplication.layout.FlowLayout;

import java.util.Random;

public class MainActivity extends AppCompatActivity {

    private FlowLayout flowLayout;
  private String[] data={"编程语言","让当前行加上使用的长度","孩子的数量:11","12","控件实际的大小","BroadcastQueueInjector","currentline.addChild(child)","笔记本","设置4个角的弧度","范围 0-255","博客资讯","600万技术文章","创建状态选择器","按下显示的图片","默认显示的图片","textView可以被点击"};
    @Override
    protected void onCreate(Bundle savedInstanceState) {
        super.onCreate(savedInstanceState);
        setContentView(R.layout.activity_main);

        ScrollView root = (ScrollView) findViewById(R.id.root);
        flowLayout = new FlowLayout(this);
        int padding=dip2px(13,this);
        flowLayout.setPadding(padding, padding, padding, padding);
        int backColor = 0xffcecece;
        Drawable pressedDrawable = createShape(backColor);// 按下显示的图片


        for (int i = 0; i < data.length; i++) {

            TextView textView = new TextView(this);
            textView.setGravity(Gravity.CENTER_HORIZONTAL);
            final String str = data[i];
            textView.setText(str);

            Random random = new Random();   //创建随机
            int red = random.nextInt(200) + 22;
            int green = random.nextInt(200) + 22;
            int blue = random.nextInt(200) + 22;
            int color = Color.rgb(red, green, blue);//范围 0-255
            GradientDrawable createShape = createShape(color); // 默认显示的图片
            StateListDrawable createSelectorDrawable = createSelectorDrawable(pressedDrawable, createShape);// 创建状态选择器
            textView.setBackgroundDrawable(createSelectorDrawable);
            textView.setTextColor(Color.WHITE);
            //textView.setTextSize(UiUtils.dip2px(14));
            int textPaddingV = dip2px(4, this);
            int textPaddingH = dip2px(7, this);
            textView.setPadding(textPaddingH, textPaddingV, textPaddingH, textPaddingV); //设置padding
            textView.setClickable(true);//设置textView可以被点击
            textView.setOnClickListener(new View.OnClickListener() {  // 设置点击事件

                @Override
                public void onClick(View v) {
                    Toast.makeText(MainActivity.this, str, Toast.LENGTH_SHORT).show();
                }
            });
            flowLayout.addView(textView,new LinearLayout.LayoutParams(LinearLayout.LayoutParams.WRAP_CONTENT, -2));// -2 包裹内容
        }
        root.addView(flowLayout);
    }

    public GradientDrawable createShape(int color) {
        GradientDrawable drawable = new GradientDrawable();
        drawable.setCornerRadius(dip2px(5, this));//设置4个角的弧度
        drawable.setColor(color);// 设置颜色
        return drawable;


    }

    public StateListDrawable createSelectorDrawable(Drawable pressedDrawable, Drawable normalDrawable) {
        StateListDrawable stateListDrawable = new StateListDrawable();
        stateListDrawable.addState(new int[]{android.R.attr.state_pressed}, pressedDrawable);// 按下显示的图片
        stateListDrawable.addState(new int[]{}, normalDrawable);// 抬起显示的图片
        return stateListDrawable;

    }

    /**
     * dip转换px
     */
    public static int dip2px(int dip, Context context) {
        final float scale = context.getResources().getDisplayMetrics().density;
        return (int) (dip * scale + 0.5f);
    }

    /**
     * px转换dip
     */

    public static int px2dip(int px, Context context) {
        final float scale = context.getResources().getDisplayMetrics().density;
        return (int) (px / scale + 0.5f);
    }
}
布局文件相对简单 就一个根布局
<ScrollView
    xmlns:android="http://schemas.android.com/apk/res/android"
    xmlns:tools="http://schemas.android.com/tools"
    android:layout_width="match_parent"
    android:id="@+id/root"
    android:layout_height="match_parent"
    tools:context="com.example.administrator.myapplication.MainActivity">
ScrollView>