DBProxy代码浅析
DBProxy代码浅析
- DBProxy代码浅析
- 你理想中的数据库Proxy是什么样子的?
- 怎样通过DBProxy插入和查找一条数据
- 线程池
- shardingQuery
- Transaction
- DBDeployer
- 使用中的建议
DBProxy代码浅析
你理想中的数据库Proxy是什么样子的?
程序员都希望数据库是能够无限存储数据的,但是单个DB Instance明显是无法做到的,所以分库分表就是解决海量数据存储的必经之路,但是我们又不希望在应用层指定db1,db2,table1,table2来增删改查,那样的话太繁琐了。所以我们希望有这样一个Proxy:
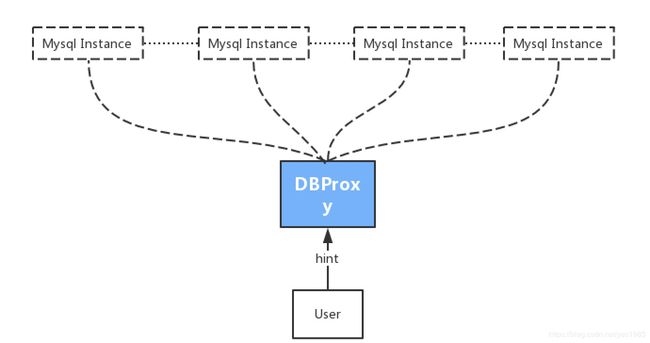
- User直接连接Proxy做DB Operation,跟使用单库单表没有区别。
- Proxy去处理分库分表的细节,User完全不用关心。
- 支持读写/主从分离,能做负载均衡。
DBProxy(https://github.com/highras/dbproxy)就是这样一个Proxy,你只需要提供一个hint(hash码),DBProxy就能帮你找到数据在哪个库哪个表上。数据库的扩容也不用担心,可以交给运维同学啦:)
怎样通过DBProxy插入和查找一条数据
现在我们假设游戏需要一张role表存放玩家的基础信息,roleid是主键。role表会为每个新玩家都创建一行数据,所以这张表往往是游戏里最大的几张表之一,在全球同服的游戏架构里,是不可能把所有role信息保存在单张表里的,只能做分库分表。我们这里把主键roleid作为hintid(这是一个通用策略,建议每张表的hintid都用该表的主键值),来分析DBProxy是怎么定位这条数据该保存到哪张库那张表。这里仅分析hash分表的方式,也是DBProxy强力推荐的方式。对range split感兴趣的同学在看完这篇md之后可以自行分析,其实主体流程基本是一样的。
- DBProxy要处理分库分表的细节,那它就肯定要保存分库分表的信息。DBProxy用以下几张表来保存信息:
server_info表:用来保存mysql instance的信息,每添加一个mysql instance,在表中就插入一行,DBProxy就可以使用这个mysql instance了。
CREATE TABLE IF NOT EXISTS server_info (
	server_id int unsigned not null primary key auto_increment,
	master_sid int unsigned not null default 0,   -- if master_id is zero, self is master; else self is slave.
	host varchar(255) not null,
	port int unsigned not null default 3306,
	user varchar(32) not null default '',
	passwd varchar(64) not null default '',
	timeout int unsigned not null default 0,
	default_database_name varchar(255) not null default '',
	index(master_sid),
	unique(host, port)
)ENGINE=InnoDB DEFAULT CHARSET=utf8;
table_info表:记录分表信息,比如刚才提到的role表要做分库分表,在table_info里就会插入一行数据,table_name是role,table_count是分成多少张表,hint_field是hintid对应的column名(比如主键roleid)
CREATE TABLE IF NOT EXISTS table_info (
	id int unsigned not null primary key auto_increment,  -- just using for stepwise loading
	table_name varchar(64) not null,
	cluster varchar(64) not null default '',
	split_type tinyint not null,	-- 0: mod type, 1: range type.
	range_span int not null default -1,
	database_category varchar(64) not null default '',  -- only for range type.
	secondary_split tinyint not null default 0, -- only for range type. 格式:tablename#: table_name0, table_name1, table_name2, ...
	secondary_split_span int unsigned not null default 0, -- only for range type.
	table_count int unsigned not null default 0,   -- only for mod type. 0 & 1 means no splitted.
	hint_field varchar(64) not null default '',  -- 分库分表字段
	unique (table_name, cluster)
)ENGINE=InnoDB DEFAULT CHARSET=utf8;
split_table_info:记录每张分表的信息,比如role表分成100张表,在split_table_info里就有100行,这里最关键的几个column是table_name,table_number,server_id,database_name,通过这几个字段可以定位到具体的某张分表在哪台instance的哪个database。
CREATE TABLE IF NOT EXISTS split_table_info (
	id int unsigned not null primary key auto_increment,  -- just using for stepwise loading
	table_name varchar(64) not null default '',
	table_number int not null,    -- 分表编号,从0开始。如果一个表没有分表,该字段忽略,但建议设置为0。
	cluster varchar(64) not null default '',
	server_id int unsigned not null default 0,    -- MUST fill the master database id.
	database_name varchar(64) not null,
	unique (table_name, table_number, cluster)
)ENGINE=InnoDB DEFAULT CHARSET=utf8;
还有其他的几张表(详见tools/DBDeployer/createConfigDatabaseSQLs.inc),但为了突出重点,我们只列重要的几张表。这些数据我们先假设已经有了,至于怎么插入这些数据的后面会讲。
2. 接下来插入一张DBProxy官方文档的架构图:
[外链图片转存失败(img-c33gdKFD-1566659079274)(https://github.com/highras/dbproxy/raw/master/doc/architecture.png)]
2.1 DBProxy用一个TableManager来保存分表的信息,这些信息是通过TableManagerBuilder::build方法load进TableManager对象的,有两个重要方法:
TableManagerBuilder::init_step5_dbCollection_to_dbTaskQueues
给每个mysql主从集群创建一个dbTaskQueue,里面包含一个task queue和集群里的主从instance的sever信息
TableManagerBuilder::init_step6_tableSplittingInfos_dbTaskQueues_to_tableTaskQueues
step6完成的任务是:一张表是可以分布在多个mysql集群上的,所以要构造一个叫_tableTaskQueues的map,key是分表的信息,value是这张分表所属mysql集群的taskqueue,(step5已结给每个集群创建了一个执行task的queue),所以对这张分表的所有sql都会在这个queue里执行。
2.2 通过以上的步骤,其实已经可以大概猜出DBProxy处理sql的方式了:每个mysql集群有一个taskqueue,sql会封装成一个task放入这个queue中执行,关键是要判断出这个sql是属于哪张分表的,然后根据这张分表从_tableTaskQueues找出taskqueue。我们接着往下看。
- DBProxy会启动一个TCPServer,主要的处理逻辑在DataRouterQuestProcessor.cpp中
ServerPtr server = TCPEpollServer::create();
	server->setQuestProcessor(std::make_shared());
	if (server->startup())
		server->run();
sql和tablename被封装进了一个QueryTask中,然后调用TableManager的query方法,这个query方法主要做两件事:找到执行这个task的queue和做负载均衡:
3.1 找到taskqueue是通过TableManager::findDatabaseTaskQueue来实现的,task里已经有tablename了,现在要确定是哪张分表,也就是分表的序号,这个关键的一步就是通过hintid来实现的:
int count = tableInfo->tableCount;
		if (count <= 1)
			hintId = 0;
		else
		{
			if (hintId < 0)
				hintId = -hintId;

			if (hintId >= count)
				hintId = hintId % count;
		}
可以看到,DBProxy的hash分表,就是用hintId对tableCount取模,获得分表的序号的,一旦有了分表的序号,就可以构造出TableTaskHint,进而从_tableTaskQueues获取到DatabaseTaskQueuePtr。
3.2 负载均衡只能针对read task,write task只能在master db上执行。如果是read task,负载均衡的方式基本上可以认为是随机挑一个:用task的指针取模,然后找一个空闲的instance执行:
size_t v = ((uint64_t)task.get()/16) % databaseQueuePtr->databaseList.size();

		for (size_t i = 0; i < databaseQueuePtr->databaseList.size(); i++)
		{
			DatabaseInfoPtr dip = databaseQueuePtr->databaseList[v];
			if (dip->wakeUp())
				return true;

			v++;
			if (v == databaseQueuePtr->databaseList.size())
				v = 0;
		}
线程池
上面一节最后一段代码里有出现wakeUp方法,它的作用就是唤醒mysql instance的线程池里的一个线程来执行task。注意这里要明确一下:线程池是每个mysql instance都会有一个的,而taskqueue是一个mysql主从集群才会有一个,比如一个一主两从的mysql集群,会有三个线程池连接三个mysql instance执行task,但是这三个线程池都是从同一个taskqueue里取task的。master mysql的线程池优先取write task,slave mysql的线程池只能取read task
mysql 线程池的init非常简单,根据下面几个参数决定要初始化多少个线程:
        int32_t                   _initCount;    //pool初始化时线程的数量
        int32_t                 _appendCount;  //每次添加线程的数量
        int32_t                 _perfectCount;  //理想的线程池数量,超过这个数量就只会生成临时线程
        int32_t                 _maxCount;    //最大线程数量,包括临时线程
        size_t                  _tempThreadLatencySeconds;   //临时线程的空闲时间,如果超过这个时间还没有执行task,则销毁
        int32_t                   _normalThreadCount;     //-- The number of normal work threads in pool.
        int32_t                 _busyThreadCount;       //-- The number of work threads which are busy for processing.
        int32_t                 _tempThreadCount;  //-- The number of temporary/overdraft work threads.
线程池里有两种线程:
- normal thread
执行逻辑就是不停地从taskqueue取任务执行,如果没有任务了就wait,把自己挂起:
while (true)
	{
		std::shared_ptr task;
		while (true)
		{
			task = _taskQueue->pop();
			if (task)
				break;

			std::unique_lock lck(_mutex);
			if (_willExit)
			{
				_normalThreadCount -= 1;
				return;
			}
			_condition.wait(lck);
		}

		{
			std::unique_lock lck(_mutex);
			_busyThreadCount += 1;
		}

		//---------- Running the task. -----------------------
		try{
			task->processTask(mySQL);
		} catch (...) {}

		task.reset();

		{
			std::unique_lock lck(_mutex);
			_busyThreadCount -= 1;
		}
	}
- temporary thread
主逻辑和normal thread非常像,但是多了一个超时的判断,当超过一定的时间都没有执行task的话,temporary thread会被回收:
std::unique_lock lck(_mutex);
			if (restLatencySeconds <= 0 || _willExit)
			{
				_tempThreadCount -= 1;
				_detachCondition.notify_one();
				return;
			}

			latencyStartTime = slack_mono_sec();
			_condition.wait_for(lck, std::chrono::seconds(restLatencySeconds));
			restLatencySeconds -= slack_mono_sec() - latencyStartTime;
剩下的wakeup,append方法都比较简单,大家看一下应该就能明白是什么意思,这里就不赘述了。
shardingQuery
上面提到的都是hintid有且只有一个的情况,如果给多个hintid呢?DBProxy的处理逻辑也很直接:每个hintid封装成一个task,等这些task执行完成后如果是select,那么把结果拼成一个result返回,其他sql语句则把结果拼成一个result array返回,DBProxy不会对array做任何处理,需要应用层自己处理。
这部分的逻辑可以参考DataRouterQuestProcessor::sharedingQuery:
1.多个hintid的query会生成一个AggregateTask(DataRouterQuestProcessor::generateAggregatedTask),在这个方法里,最重要的是reformhintid获得了equivalentTableIds,这是什么意思呢,比如你的hintid是从1-10,但是表你只分了5张,那么按照hash分表的取模算法,equivalentTableIds只有5个值(0,1,2,3,4),那么只会有5个task加入相同或不同的dbtaskqueue,而不是10个task。
reformhintid的关键代码:
std::set positiveHintIds;
	for (int64_t hintId: hintIds)
	{
		if (hintId < 0)
		{
			if (tableInfo->splitByRange)
				invalidHintIds.insert(hintId);
			else
				positiveHintIds.insert(-hintId);
		}
		else
			positiveHintIds.insert(hintId);
	}

    for (int64_t oldId: positiveHintIds)
		{
			int64_t newId = oldId % tableInfo->tableCount;
			addIdToMap(newId, oldId, hintMap);
		}
2.aggregatetask拼接result的关键代码(AggregatedTask::finish):
FPAnswerPtr answer;
	if (resultType == QueryResult::SelectType)
	{
		answer = buildAnswerForSelectQuery();
	}
	else if (resultType == QueryResult::ModifyType)
	{
		int errorPart = 0;
		if (_invalidUnitInfo)
			errorPart += 1;
		if (_unitInfoMap.size())
			errorPart += 1;

		FPAWriter aw(1 + errorPart, _asyncAnswer->getQuest());
		aw.paramArray("results", _resultMap.size());

		for (auto resultPair: _resultMap)
		{
			aw.paramArray(3);
			aw.param(resultPair.first);
			aw.param(resultPair.second->affectedRows);
			aw.param(resultPair.second->insertId);
		}

		if (errorPart)
			fillFailedInfos(aw);

		answer = aw.take();
	}
Transaction
DBProxy也可以支持Transaction,但是Transaction不能跨库,必须要在同一个dbtaskqueue且同一个database。在TableManager::transaction中,有一段代码专门用来检验Transaction中的sql是不是都是在同一个database中:
for (size_t i = 0; i < task->_sqls.size(); i++)
	{
		std::string currentDatabaseName;
		DatabaseTaskQueuePtr taskQueue = findDatabaseTaskQueue(nullptr, task->_hintIds[i],
			task->_tableNames[i], task->cluster(), task->_sqls[i], ¤tDatabaseName);

		if (!taskQueue)
		{
			task->finish(ErrorInfo::notFoundCode, i, "Target database or table not found.");
			return false;
		}

		if (dbTaskQueue)
		{
			if (dbTaskQueue.get() != taskQueue.get() || databaseName != currentDatabaseName)
			{
				task->finish(ErrorInfo::disabledCode, i, "Target database or database instance is different from previous.");
				return false;
			}
		}
		else
		{
			databaseName = currentDatabaseName;
			dbTaskQueue = taskQueue;
		}
	}
DBDeployer
DBProxy运行必须依赖config database,我们来看下怎么往config database里加入分库分表的信息
- 首先是创建db和表(DBDeployer::createConfigDatabase)
std::string createSQL_configDB("CREATE DATABASE IF NOT EXISTS ");
	createSQL_configDB.append(dbname).append(" CHARACTER SET utf8");

	if (executeSQL(&_configDBClient, "", createSQL_configDB, "create database failed.") == false)
		return;

	if (executeSQL(&_configDBClient, dbname, createSQL_serverInfo, "create table server_info failed.") == false)
		return;
	if (executeSQL(&_configDBClient, dbname, createSQL_tableInfo, "create table table_info failed.") == false)
		return;
	if (executeSQL(&_configDBClient, dbname, createSQL_splitTableInfo, "create table split_table_info failed.") == false)
		return;
	if (executeSQL(&_configDBClient, dbname, createSQL_splitRangeInfo, "create table split_range_info failed.") == false)
		return;
	if (executeSQL(&_configDBClient, dbname, createSQL_variableSetting, "create table variable_setting failed.") == false)
		return;
- 然后通过DBDeployer::addMySQLInstance反复把mysql instance加入server_info表,主从库都是通过这个方法添加
if (master)
		masterServerId = 0;

	if (!mySQLIdleCheck(&_configDBClient))
		return;

	std::ostringstream oss;
	oss<<"insert into server_info (master_sid, host, port, user, passwd, timeout) values (";
oss<- addDeployServer.我的理解是它是master instance的一个子集,DBProxy可以连接n个master instance,但是只用m个(m<=n)来存放table,这m个实际使用的instance就成为deploy instance。因为DBProxy的配置是可以刷新的,所以deploy instance可以随时变化。
bool ConfigDatabase::addDeployServer(int server_id)
{
	auto iter = _masterInstances.find(server_id);
	if (iter != _masterInstances.end())
	{
		_deployInstances.insert(server_id);
		return true;
	}
	else
		return false;
}
4.现在可以添加一张表的分库分表信息了。我们可以在一开始就确定一张表要分成多少张表,存储在多个database上。比如role表,打算分100张表(tableCount=100),存储在10个db(databaseCount=10)。假设现在DBProxy连接10个mysql master instance,deploy了其中的5个。
代码参考DBDeployer::createHashTable
4.1 先把10个db分配到5个deploy instance上,采用的办法是均匀分配:
for (int serverId: _configDB._deployInstances)
			deployServerIds.push_back(serverId);

		if (databaseCount == 1)
		{
			databaseDistribution[0].databaseName = targetDatabase;
			databaseDistribution[0].serverId = deployServerIds[0];
		}
		else
		{
			size_t deployIdx = 0;
			for (int i = 0; i < databaseCount; i++)
			{
				std::string realDatabaseName(targetDatabase);
				realDatabaseName.append("_").append(std::to_string(i));

				databaseDistribution[i].databaseName = realDatabaseName;
				databaseDistribution[i].serverId = deployServerIds[deployIdx];
				deployIdx += 1;

				if (deployIdx == deployServerIds.size())
					deployIdx = 0;
			}
		}
4.2 然后把100张表分配到10个db上,也是均匀分配:
std::map tableDistribution; //-- map
{
int dbIdx = 0;
for (int i = 0; i < tableCount; i++)
{
tableDistribution[i] = dbIdx;
dbIdx += 1;
if (dbIdx == databaseCount)
dbIdx = 0;
}
}
4.3 有了表到db,db到instance的映射关系,就可以把100张表都创建了,注意最后的insertHashTableInfo方法把分表的信息插入了DBProxy的configdatabase:
for (int i = 0; i < tableCount; i++)
{
int databaseIdx = tableDistribution[i];
int deployServerId = databaseDistribution[databaseIdx].serverId;
MySQLClientPtr mySQLClient = _configDB.getMySQLClient(deployServerId);
std::string& databaseName = databaseDistribution[databaseIdx].databaseName;
std::string suffix("_");
suffix.append(std::to_string(i));
std::string realSQL(createSQL);
size_t found = realSQL.find(tableName);
realSQL.insert(found + tableName.length(), suffix);
std::ostringstream oss;
oss<<"Create table "<
4.4 做完上面的操作后再做一次update config time,它的作用是会促使configmonitor线程生成一个新的TableManager:
if (sync_tick >= _cfgDBInfo.checkInterval)
{
if (!mysql)
mysql = createMySQLClient(hostIndex);
new_update_time = getConfigurationUpdateTime(mysql.get());
if (new_update_time <= 0)
throw FPNN_ERROR_FMT(InvalidConfigError, "Invalid config tables update time info at %s.", _cfgDBInfo.hosts[hostIndex].c_str());
if (new_update_time > currentTableManager->updateTime())
requireUpdate = true;
sync_tick = 0;
}
当requireUpdate = true,会生成一个新的TableManager,这个新TableManager会读取最新的DBProxy Config db的信息,成为currentTableManager,所以在官方的架构图里会有多个TableManger,除了currentTableManager,其他的TableManager都是旧TableManager,等待被回收。
if (requireUpdate)
{
if (!mysql)
mysql = createMySQLClient(hostIndex);
TableManagerPtr tmp = initTableManager(mysql.get(), currentTableManager);
if (tmp != nullptr)
{
{
std::lock_guard lck (_mutex);
_tableManager = tmp;
_needRefresh = false;
}
if (currentTableManager)
{
currentTableManager->signTakenOverTaskQueues(*tmp);
_recycledTableManagers.push_back(currentTableManager);
}
currentTableManager = tmp;
LOG_INFO("Load new table config info success. Database at index %d, addr: %s", hostIndex, _cfgDBInfo.hosts[hostIndex].c_str());
}
else
throw FPNN_ERROR_FMT(InvalidConfigError, "Invalid config info at %s.", _cfgDBInfo.hosts[hostIndex].c_str());
}
使用中的建议
- DBProxy不支持联合查询,多表查询,JOIN语句,所以使用中你可以把它当成一个key-value的数据库,hintid就是key,所以任何一条sql都要指定至少一个hintid。根据以往游戏开发的经验,key-value是完全能hold住项目需求的。如果不提供hintid,DBProxy会对所有分表执行sql,可能会影响性能。
- Transaction要求不能跨库,所以应用层需要自己确保Transaction里的语句都是在同一库,否则DBProxy会报错。
- 一开始分库分表的时候,就要根据经验对表的大小有预估,分表的时候尽量多分一些表,这样可以防止将来上线后做rehash,只需要把分表挪到新的mysql instance,修改DBProxy的config数据即可。(感谢晓康提供的经验)
你可能感兴趣的:(瞎折腾研究)