好玩的动画加载和自定义ProgressBar
完整源代码可见github:https://github.com/junmei520/UserDefinedProgressBar
或者从我的资源中下载:即动态小狗的加载效果.rar
和 自定义圆形ProgressBar源码.rar
第一种
这么好玩的加载效果,其实只要用动画就可以完成了,而且简单的都不要不要的~
1.布局文件中直接这样写:
<ProgressBar
    android:layout_width="100dp"
    android:layout_height="110dp"
    style="?android:progressBarStyleInverse"
    android:indeterminateDrawable="@drawable/loading_list"
    />
2.在drawable下提供animation-list的drawable动画
<animation-list
xmlns:android="http://schemas.android.com/apk/res/android"
android:oneshot="false">

    <item android:drawable="@drawable/wc_ac_01" android:duration="30"/>
    <item android:drawable="@drawable/wc_ac_02" android:duration="30" />
    <item android:drawable="@drawable/wc_ac_03" android:duration="30" />
    <item android:drawable="@drawable/wc_ac_04" android:duration="30" />
    <item android:drawable="@drawable/wc_ac_05" android:duration="30" />
    <item android:drawable="@drawable/wc_ac_06" android:duration="30" />
    <item android:drawable="@drawable/wc_ac_07" android:duration="30" />
    <item android:drawable="@drawable/wc_ac_08" android:duration="30" />
    <item android:drawable="@drawable/wc_ac_09" android:duration="30" />
    <item android:drawable="@drawable/wc_ac_10" android:duration="30" />
    <item android:drawable="@drawable/wc_ac_11" android:duration="30" />
    <item android:drawable="@drawable/wc_ac_12" android:duration="30" />
    <item android:drawable="@drawable/wc_ac_13" android:duration="30" />
    <item android:drawable="@drawable/wc_ac_14" android:duration="30" />
    <item android:drawable="@drawable/wc_ac_15" android:duration="30" />
    <item android:drawable="@drawable/wc_ac_16" android:duration="30" />
animation-list>
注:图片资源放在drawable-xxhdpi文件下
然后,就好了~
实现步骤:
1.自定义MyProgressBar类继承 View
public class MyProgressBar extends View {2.相关属性值
 //属性
    private int roundColor;  //圆环颜色
    private int roundProgressColor;  //圆弧的颜色
    private int textColor;  //文本颜色

    private int roundWidth;//圆环的宽度
    private int textSize; //字体的大小

    //提供当前的进度和最大值
    private int progress;
    private int max;
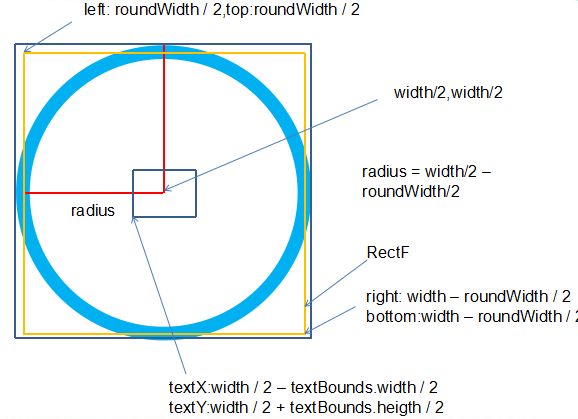
3.绘制圆环,圆弧,文本
  //绘制圆环,圆弧,文本
    @Override
    protected void onDraw(Canvas canvas) {
        super.onDraw(canvas);
        //1.绘制圆环
        //设置圆环的中心点
        int dx=width/2;
        int dy=width/2;
        //设置半径
        int radius=width/2-roundWidth/2;
        //设置画笔
        paint.setColor(roundColor);  //设置圆环颜色
        paint.setStyle(Paint.Style.STROKE); //设置为圆环
        paint.setStrokeWidth(roundWidth); //设置圆环宽度
        canvas.drawCircle(dx,dy,radius,paint);


        //2.绘制圆弧
        //理解为包裹圆环中心线的圆的矩形
        RectF rectF=new RectF(roundWidth/2,roundWidth/2,width-roundWidth/2,width-roundWidth/2);
        paint.setColor(roundProgressColor); //设置圆弧的画笔颜色
        canvas.drawArc(rectF, 0, progress * 360 / max, false, paint);


        //3.绘制文本(注意:设置字体大小的操作要放在设置包裹的rect之前)
        paint.setColor(textColor);//设置文本颜色
        paint.setTextSize(textSize); //设置字体大小
        paint.setStrokeWidth(0);
        String text=progress*100/max+"%";
        Rect bound=new Rect();  //此时包裹文本的矩形框还没有宽度和高度
        paint.getTextBounds(text,0,text.length(),bound);//此时bound有了宽度和高度
        //提供文本区域的左下定点
        int left=width/2-bound.width()/2;
        int bottom=width/2+bound.width()/2;

        canvas.drawText(text,left,bottom,paint);
    }

    //将dp-->px
    public  int dp2px(int dp){
        //先获取手机的密度
        float desity=context.getResources().getDisplayMetrics().density;
        //通过+0.5来实现四舍五入
        return (int) (dp*desity+0.5);
    }
4.自定义属性
① 在values目录下创建attrs.xml
<resources>
    <declare-styleable name="JMRoundProgressBar">
        <attr name="roundColor" format="color">attr>
        <attr name="roundProgressColor" format="color">attr>
        <attr name="textColor" format="color">attr>

        <attr name="roundWidth" format="dimension">attr>
        <attr name="textSize" format="dimension">attr>

        <attr name="progress" format="integer">attr>
        <attr name="max" format="integer">attr>

    declare-styleable>

resources>
② 在布局文件中引用当前应用的名称空间
xmlns:junmei="http://schemas.android.com/apk/res-auto"③在自定义视图标签中使用自定义属性
 <com.example.chenjunmei.userdefinedprogressbar.MyProgressBar
       android:id="@+id/myprogressbar"
       android:layout_width="100dp"
       android:layout_height="100dp"

       junmei:roundColor="@color/product_detail_common"
       junmei:roundProgressColor="@color/round_red_common"
       junmei:textColor="@color/title_text"
       junmei:roundWidth="10dp"
       junmei:textSize="20sp"
       junmei:progress="70"
       junmei:max="100"

       />
④在自定义View类的构造方法中, 取出布局中的自定义属性值
   public MyProgressBar(Context context) {
        this(context, null);
    }

    public MyProgressBar(Context context, AttributeSet attrs) {
        this(context, attrs, 0);
    }

    public MyProgressBar(Context context, AttributeSet attrs, int defStyleAttr) {
        super(context, attrs, defStyleAttr);
        this.context=context;

        //1.得到所有自定义属性的数组
        TypedArray typedArray=context.obtainStyledAttributes(attrs, R.styleable.JMRoundProgressBar);

        //2.获取自定义属性的值, 如果没有指定取默认值
        roundColor=typedArray.getColor(R.styleable.JMRoundProgressBar_roundColor, Color.GRAY);
        roundProgressColor=typedArray.getColor(R.styleable.JMRoundProgressBar_roundProgressColor,Color.RED);
        textColor=typedArray.getColor(R.styleable.JMRoundProgressBar_textColor,Color.RED);

        roundWidth= (int) typedArray.getDimension(R.styleable.JMRoundProgressBar_roundWidth, 10);
        textSize = (int) typedArray.getDimension(R.styleable.JMRoundProgressBar_textSize, 20);

        max = typedArray.getInteger(R.styleable.JMRoundProgressBar_max, 100);
        progress = typedArray.getInteger(R.styleable.JMRoundProgressBar_progress, 60);

        //3.释放资源数据
        typedArray.recycle();

        paint=new Paint();  //创建画笔
        paint.setAntiAlias(true);  //设置抗锯齿

    }
5.让圆环进度”动起来”
①1.自定义RoundProgress类中提供进度属性的getter和setter方法
  public int getProgress() {
        return progress;
    }

    public void setProgress(int progress) {
        this.progress = progress;
    }

    public int getMax() {
        return max;
    }

    public void setMax(int max) {
        this.max = max;
    }
②在Activity(或Fragment)中让其动起来
private MyProgressBar myProgressBar;
    private int totalProgress;

    @Override
    protected void onCreate(Bundle savedInstanceState) {
        super.onCreate(savedInstanceState);
        setContentView(R.layout.activity_main);
        myProgressBar= (MyProgressBar) findViewById(R.id.myprogressbar);

        //直接设置进度
        totalProgress=90;

        //在子线程中让progressBar动态加载
        new Thread(runnable).start();

    }

    //进度条的加载
    private Runnable runnable = new Runnable() {
        @Override
        public void run() {
            myProgressBar.setProgress(0);
            myProgressBar.setMax(100);//可修改max值
            for (int i = 0; i < totalProgress; i++) {
                myProgressBar.setProgress(myProgressBar.getProgress() + 1);
                SystemClock.sleep(50);

                myProgressBar.postInvalidate();
            }
        }
    };
ok,也完成了~


