C++ 多线程(互斥量、死锁、条件变量)
文章目录
- 四、数据竞争与互斥对象
- 1. 使用互斥锁防止多线程竞争同一资源
- 2. 受保护的代码抛出异常时的处理
- 五、死锁
- 1. 使用lock()函数同时给多个mutex上锁
- 2. Unique_lock 和Lazy Initialization
- 六、条件变量
- 七、Future和Promise
- 1. 基本概念
- 2. std::future
- 3. std::promise
- 4. std::packaged_task
- 5. std::async
四、数据竞争与互斥对象
1. 使用互斥锁防止多线程竞争同一资源
在多个线程访问同一数据或资源时,会造成数据竞争,此时需要加锁来保证各个线程独立有序运行,互不造成干扰。
:声明与互斥量相关的类,包括:std:mutex系列类,std:lock_guard,std:unique_lock以及其他的类型和函数
互斥锁mutex保护了临界区,任何一个时刻只能有一个线程在此mutex划出的临界区内活动
基本语法(不建议使用,因为无法处理受保护代码发生异常时的情况):
std::mutex mu;     //定义互斥锁

mu.lock();         //加锁
受保护的代码
mu.unlock();       //解锁
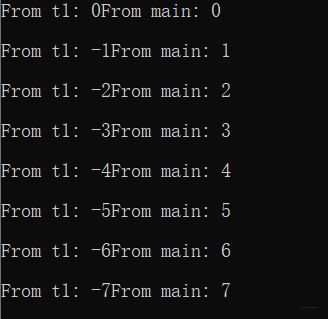
示例:使用mutex互斥锁防止主线程main函数和新建线程t1竞争同一资源cout
1)未加锁:多线程竞争同一资源
#include输出:
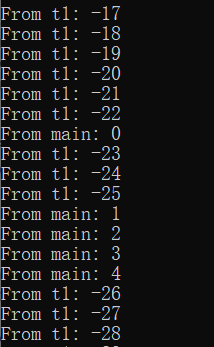
2) 使用互斥锁mutex:资源在同一时间只被一个线程使用
#include输出:
2. 受保护的代码抛出异常时的处理
1) lock_guard:管理互斥锁对象,使其总保持上锁状态。
( cpp reference: A lock guard is an object that manages a mutex object by keeping it always locked.)
在构造时,互斥对象被调用线程锁定,并且在销毁时,互斥锁被解锁。它是最简单的锁,特别适用于具有自动持续时间的对象,该持续时间一直持续到其上下文结束。通过这种方式,它可以保证在抛出异常时正确解锁互斥对象。
使用lock_guard
std::mutex mu;     //定义互斥锁

mu.lock();         //加锁
受保护的代码
mu.unlock();       //解锁
上述方式中, 如果保护代码抛出异常,那么互斥锁mu将永远不会解锁,所以不建议直接使用mu.lock()和mu.unlock()。而是使用
std::mutex mu;     //定义互斥锁
lock_guard<mutex> guard(mu);        //加锁
 受保护的代码
但是此时cout并不在mu的保护下,其他的系统资源仍然可以使用,所以我们做如下改进:将输出置于互斥锁的保护下,此时不通过互斥量m_mutex将无法访问输出of。
(但此时不能将of 的访问接口暴露到类LogFile外,否则将不受互斥锁保护)
#include五、死锁
死锁示例:
#include上述例子中:线程t1调用shared_print1,给互斥锁mutex1上锁,在t1给mutex2上锁之前,若主线程main函数调用shared_print2并给mutex2上锁。此时t1等待主线程给mutex2解锁,主线程等待t1给mutex1解锁,这样就造成了死锁。
对应死锁产生的四个条件
① 互斥条件:一个资源一次只能被一个线程(进程)所使用
② 请求与保持条件:一个线程(进程)已占有一个资源,又请求别的资源,但请求的资源已被其他线程(进程)占用,此时请求被阻塞时,对已占有的资源保持不放
③ 不剥夺条件:线程(进程)已获得的资源,在未使用完之前不能被强行剥夺
④ 循环等待条件:若干线程(进程)形成一条首尾相连的循环等待资源关系。
输出未结束:
1. 使用lock()函数同时给多个mutex上锁
例子: lock_guard locker1(mutex1, adopt_lock);
adopt_lock:告诉locker1互斥锁mutex1已经加锁,你所需要的做的是采用该mutex1的所有权
#include2. Unique_lock 和Lazy Initialization
1) Unique_lock相比lock_guard更具弹性:
- 可以使用defer_lock参数告诉locker互斥锁mutex暂时并未上锁,从而可以在之后有需要的地方上锁和解锁
- 可以多次上锁
- Unique_lock可以从一个线程中移动到另一个线程,而lock_guard不可以
但是Unique_lock会消耗更多的计算机性能
基本语法:unique_locklocker(m_mutex, defer_lock);
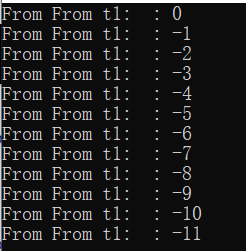
#include2) 懒惰初始化:只在线程第一次使用shared_print时打开log.txt
class LogFile {
	mutex m_mutex;
	//mutex m_mutex_open;
	once_flag m_flag;

	ofstream of;
public:
	LogFile() {
	}   //Need destructor to close file
	void shared_print(string id, int value)
	{
	    /*{
		    unique_locklocker(m_mutex_open, defer_lock);
		    if (!of.is_open())
				of.open("log.txt");
		}*/
		call_once(m_flag, [&]() {	of.open("log.txt");	} );   //log.txt只会被一个线程打开而且只打开一次

		unique_lock<mutex>locker(m_mutex, defer_lock);   //defer_lock的作用是告诉locker m_mutex并未被锁住

		of << "From " << id << " : " << value << endl;
	}
};
六、条件变量
this_thread::sleep_for(std::chrono::milliseconds(3));
chrono::steady_clock::time_point tp= chrono::steady_clock::now() +chrono::milliseconds(4);
std::this_thread::sleep_until(tp);    //保持休眠直到时间点tp

mutex m;
std::unique_lock<muetx> ulocker(mu);
ulocker.try_lock();   //尝试上锁,不成功则return
ulocker.try_lock_for(chrono::nanoseconds(500)); //在500ns内尝试上锁,超出时间不成功return
ulock.try_lock_until(tp);  //在时间点tp之前尝试上锁

//condition_variable  future
cond.wait_for(ulocker,chrono::microseconds(2));
cond.wait_until(ulocker,tp);
fu.wait_for(chrono::milliseconds(2));
fu.wait_until(tp);
1.基本语法:
1)声明条件变量
condition_variable cond;
2)使用条件变量激活等待的线程
- 激活一个等待的线程 : cond.notify_one ();
- 激活所有等待的线程 : cond.notify_all ();
3)线程等待的实现
- 无条件休眠 : wait (unique_lock& locker);
(直接休眠直到被cond.notify_one()或者cond.notify_all()唤醒,唤醒时不要额外条件)
- 带有条件谓词的休眠: wait (unique_lock& locker, Predicate pred);
(在谓词条件为 false 时线程才能被休眠(阻塞) ,等待cond.notify_one()或者cond.notify_all()激活,同时线程需要满足谓词条件为 true时才能被唤醒。
谓词同时可以避免线程因被自己唤醒造成的伪唤醒)
2.为什么wait函数需要locker作为参数:因为线程在上锁后不应该休眠,休眠的进程也不需要上锁这个操作。
3.wait 在休眠前调用locker.unlock()解锁locker。在被其他线程唤醒后调用locker.lock()重新上锁 。因为需要多次实现上锁解锁操作,所以需要使用unique_lock而不能使用lock_guard.
#include七、Future和Promise
1. 基本概念
头文件简介:
-
Classes
std::future
std::future_error
std::packaged_task
std::promise
std::shared_future -
Functions
std::async
std::future_category
2. std::future
简单的说,std::future提供了一种访问异步操作结果的机制
异步操作:在异步执行模式下,各语句执行结束的顺序与语句执行开始的顺序并不一定相同。通常一个异步操作我们是不能马上就获取操作的,只能在未来某个时候获取。
1) Future : 用来表示一个尚未有结果的对象,而产生这个结果的行为是异步操作
(Future表示“将来”你需要某些结果(一般是网络请求的结果),但是你现在就要发起这样的请求,并且这个请求会异步执行)
2) 可以通过查询future_status来获取异步操作的结果,future_status有3种状态:
① deferred:异步操作还没开始
② ready:异步操作已经完成
③ timeout:异步操作超时
3) 获取future结果有三种方式:
① get: 等待异步操作结束并返回结果
② wait: 只是等待异步操作完成,无返回值
③ wait_for: 超时等待返回结果
例子:
#include fu= async(launch::deferred,factorial,4); //async函数将不会创建子线程,而是延期启动factoria函数直到get被调用
future<int> fu = async(launch::async, factorial, 4); //async函数将创建一个新的子线程
//future fu = async(launch::async | launch::deferred, factorial, 4);
//等价于future fu = async(factorial,4),即是否创建子线程取决于实际情况
x = fu.get();
//fu.get(); //crash, cause a future can only get once
cout << "x becomes: " << x << endl;
return 0;
}
3. std::promise
Promise : future 对象可以使用promise对象来创建(用get_future函数),创建后,promise保存的值可以被future对象读取 ,同时将两个对象的共享状态关联起来。可以认为promise为执行异步但是结果同步提供了一种手段。
1) promise成员函数
①std::promise::get_future:返回一个与promise共享状态相关联的future对象
②std::promise::set_value:设置共享状态的值,此后promise共享状态标识变为ready
③std::promise::set_exception:为promise设置异常,此后promise的共享状态标识变为ready
④std::promise::set_value_at_thread_exit:设置共享状态的值,但是不将共享状态的标志设置为 ready,当线程退出时该 promise 对象会自动设置为 ready(注意:该线程已设置promise的值,如果在线程结束之后有其他修改共享状态值的操作,会抛出future_error:(promise_already_satisfied)异常)
⑤std::promise::swap:交换 promise 的共享状态。
例子:
#include从上面的例子可以看出,通过promise对象和future对象,实现了先执行factoria()函数,再给函数传参数值的异步操作:
promise<int> pro;   //将来需要某些结果,先用promise对象
future<int> f = pro.get_future();
future<int> fu = async(launch::async, factoria, ref(f));
//告诉子线程我会给你传递一个value,但是现在我还没有这个value,我会在之后给你发送,
这是我的promise,你可以先执行你要做的事情然后等待我的数据
4. std::packaged_task
std::packaged_task包装了一个可调用的目标(如function, lambda expression, bind expression, or another function object),以便异步调用,它和promise在某种程度上有点像,promise保存了一个共享状态的值,而packaged_task保存的是一个函数
基本用法:
int factoria(int x){}
std::packaged_task<int(int)> t(factoria);
std::future<int> fu=t.get_future();
t(6);
实例:
#include在这个例子中:
①主线程创建一个packaged_task,任务的功能是返回6的阶乘,然后将这个packged_task压入到队列task_q中;线程thread_1将packaged_task从队列中取出并且执行它。
②由于主线程和线程thread_1都涉及到对队列task_q的访问,会造成数据竞争,所以需要对主线程和thead_1对task_q操作的相应部分进行加锁。
③ 为了保证在主线程创建packaged_task并且将其压入task_q之后线程thread_1再对其进行操作,所以需要使用条件变量保证两个操作的先后执行不会乱序。
5. std::async
1)std::async大概的工作过程:
先将异步操作用std::packaged_task包装起来,然后将异步操作的结果放到std::promise中,这个过程就是创造future的过程。外面再通过future.get/wait来获取这个未来的结果。
可以说,std::async帮我们将std::future、std::promise和std::packaged_task三者结合了起来。
2)std::async的原型:
async(std::launch::async | std::launch::deferred, f, args...)
第一个参数是线程的创建策略,默认的策略是立即创建线程:
- std::launch::async:在调用async就开始创建线程。
- std::launch::deferred:延迟加载方式创建线程。调用async时不创建线程,直到调用了future的get或者wait时才创建线程。
第二个参数是线程函数,后面的参数是线程函数的参数。
简单的例子:
    std::future<int> f1 = std::async(std::launch::async, [](){   return 8;  });
    cout<<f1.get()<<endl; //output: 8
    std::future<int> f2 = std::async(std::launch::async, [](){  cout<<8<<endl;  });
    f2.wait(); //output: 8
多线程时使用shared_future
#include参考:https://blog.csdn.net/jiange_zh/article/details/51602938