Python 数据分析:时间序列
- 1. 日期和时间数据的类型及工具
- 1.1 字符串与 datetime 互相转换
- datetime 格式说明(兼容 ISO C89)(基础知识部分也有该表格)
- 2. 时间序列基础
- 2.1 索引、选择、子集
- 2.2 含有重复索引的时间序列
- 3. 日期范围、频率和移位
- 3.1 生成日期范围
- 3.2 频率和日期偏置
- 3.3 移位(前向和后向)日期
- 4. 时区处理
- 4.1 时区的本地化和转换
- 4.2 时区感知时间戳对象的操作
- 4.3 不同时区间的操作
- 5. 时间区间和区间算数
- 5.1 区间频率转换
- 5.2 季度区间频率
- 5.3 时间戳与区间的转换
- 5.4 从数组生成 PeriodIndex
- 6. 重新采样与频率转换
- 6.1 向下采样
- 6.2 向上采样与插值
- 6.3 使用区间进行重新采样
- 7. 移动窗口函数
- 7.1 指数加权函数
- 7.2 二元移动窗口函数
- 7.3 用户自定义的移动窗口函数
1. 日期和时间数据的类型及工具
import pandas as pd
import numpy as np
from datetime import datetime
now = datetime.now()
now
datetime.datetime(2019, 8, 11, 14, 17, 29, 402021)
- datetime 既存储了日期,也存储了细化到微秒的时间
now.year, now.month, now.day
(2019, 8, 11)
- timedelta 表示两个 datetime 对象的时间差
delta = datetime(2019, 1, 1) - datetime(2018, 8, 8, 10, 10)
print(delta, delta.days, delta.seconds, sep='\n')
145 days, 13:50:00
145
49800
- 为 datetime 对象加上(或减去)一个 timedelta 或其整数倍来产生一个新的 datetime 对象
from datetime import timedelta
start = datetime(2019, 8, 1)
start + timedelta(12) * 2
datetime.datetime(2019, 8, 25, 0, 0)
datetime 模块中的类型表格
| 类型 |
描述 |
| date |
使用公历日历存储日历日期(年月日) |
| time |
将时间存储为小时、分钟、秒和微秒 |
| datetime |
存储日期和时间 |
| timedelta |
表示两个 datetime 值之间的差(如日、秒和微秒) |
| tzinfo |
用于存储时区信息的基本类型 |
1.1 字符串与 datetime 互相转换
- 使用 str 方法或传递一个指定的格式给 strftime 方法来对 datetime 对象和 pandas 的 Timestamp 对象进行格式化
stamp = datetime(2019, 8, 1)
print(str(stamp))
print(stamp.strftime('%Y-%m-%d'))
2019-08-01 00:00:00
2019-08-01
- 使用 datetime.strptime 将字符串转换为日期
value = '2019-08-01'
print(datetime.strptime(value, '%Y-%m-%d'))
datestrs = ['8/1/2019', '8/2/2019']
print([datetime.strptime(x, '%m/%d/%Y') for x in datestrs])
2019-08-01 00:00:00
[datetime.datetime(2019, 8, 1, 0, 0), datetime.datetime(2019, 8, 2, 0, 0)]
- 使用 dateutil 的 parser.parse 方法解析大部分人类可理解的日期表示
from dateutil.parser import parse
print(parse('2019-08-01'))
print(parse('Aug 1, 2019 10:00 PM'))
print(parse('1/8/2019', dayfirst=True))
2019-08-01 00:00:00
2019-08-01 22:00:00
2019-08-01 00:00:00
- 使用 pandas.to_datetime 将日期表示转换为 DataFrame 的索引
datestrs = ['2019-08-01 12:00:00', '2019-08-02 00:00:00']
print(pd.to_datetime(datestrs))
idx = pd.to_datetime(datestrs + [None])
print(idx)
print(pd.isnull(idx))
DatetimeIndex(['2019-08-01 12:00:00', '2019-08-02 00:00:00'], dtype='datetime64[ns]', freq=None)
DatetimeIndex(['2019-08-01 12:00:00', '2019-08-02 00:00:00', 'NaT'], dtype='datetime64[ns]', freq=None)
[False False  True]
datetime 格式说明(兼容 ISO C89)(基础知识部分也有该表格)
https://blog.csdn.net/u012470887/article/details/92431590
| 类型 |
描述 |
| %Y |
四位的年份 |
| %y |
两位的年份 |
| %m |
两位的月份[01, 12] |
| %d |
两位的天数值 [01, 31] |
| %H |
小时值(24 小时制)[00, 23] |
| %I |
小时值(12 小时制)[01, 12] |
| %M |
两位的分钟值 [00, 59] |
| %S |
秒值 [00, 61] (60, 61用于区分闰秒) |
| %w |
星期值 [0(星期天), 6] |
| %U |
一年中的第几个星期值 [00, 53],星期天为每周第一天,第一个星期天前一周是第0周 |
| %W |
一年中的第几个星期值 [00, 53],星期一为每周第一天,第一个星期一前一周是第0周 |
| %z |
UTC 时区偏置,格式为 +HHMM 或 -HHMM,如果是简单时区则为空 |
| %F |
%Y-%m-%d 的简写 |
| %D |
%m/%d/%y 的简写 |
2. 时间序列基础
- pandas 中的基础时间序列种类是由时间戳索引的 Series, 在 pandas 外部则通常表示为 Python 字符串或 datetime 对象
from datetime import datetime
dates = [datetime(2019, 8, 1), datetime(2019, 8, 5),
        datetime(2019, 8, 7), datetime(2019, 8, 8),
        datetime(2019, 8, 10), datetime(2019, 8, 12)]
ts = pd.Series(np.random.randn(6), index=dates)
ts
2019-08-01    0.468772
2019-08-05    2.333443
2019-08-07   -0.502920
2019-08-08    1.145697
2019-08-10   -0.504389
2019-08-12   -1.343926
dtype: float64
- 这种情况下,这些 datetime 对象可以被放入 DatetimeIndex 中
ts.index
DatetimeIndex(['2019-08-01', '2019-08-05', '2019-08-07', '2019-08-08',
               '2019-08-10', '2019-08-12'],
              dtype='datetime64[ns]', freq=None)
- 和其他 Series 一样,不同索引的时间序列之间的算术运算在日期上自动对齐
ts + ts[::2]
2019-08-01    0.937543
2019-08-05         NaN
2019-08-07   -1.005840
2019-08-08         NaN
2019-08-10   -1.008777
2019-08-12         NaN
dtype: float64
- DatetimeIndex 中的标量值是 pandas 的 Timestamp 对象
stamp = ts.index[0]
stamp
Timestamp('2019-08-01 00:00:00')
2.1 索引、选择、子集
- 基于标签进行索引和选择时,时间序列的行为和其他的 pandas.Series 类似
stamp = ts.index[2]
s[stamp]
-0.5029199053879977
print(ts['8/1/2019'])
print(ts['20190801'])
0.46877169482728676
0.46877169482728676
- 对于一个长的时间序列,可以传递一个年份或一个年份和月份来选择数据的切片
longer_ts = pd.Series(np.random.randn(1000),
                     index=pd.date_range('1/1/2017', periods=1000))
print(longer_ts[:10], longer_ts['2018'][:10], longer_ts['2018-05'][:10], sep='\n' + '*' * 10 + '\n')
2017-01-01   -1.000006
2017-01-02   -0.012311
2017-01-03    1.290370
2017-01-04   -1.411002
2017-01-05   -1.043768
2017-01-06   -2.026386
2017-01-07    0.923300
2017-01-08   -1.159909
2017-01-09   -0.340406
2017-01-10   -2.195334
Freq: D, dtype: float64
**********
2018-01-01   -0.614101
2018-01-02    0.034989
2018-01-03   -0.816531
2018-01-04   -0.025899
2018-01-05    1.499072
2018-01-06   -0.025201
2018-01-07   -1.936647
2018-01-08    0.748457
2018-01-09   -0.159147
2018-01-10   -1.762938
Freq: D, dtype: float64
**********
2018-05-01    1.912698
2018-05-02   -0.614768
2018-05-03    3.010737
2018-05-04   -0.828237
2018-05-05    0.866249
2018-05-06   -0.035166
2018-05-07   -1.222878
2018-05-08    0.541532
2018-05-09    1.337297
2018-05-10   -1.633647
Freq: D, dtype: float64
- 也可以使用 datetime 对象进行切片,由于大部分时间序列数据是按时间顺序排序的,因此可以使用不包含在时间序列中的时间戳进行切片,以执行范围查询
ts[datetime(2019, 8, 4): datetime(2019, 8, 10)]
2019-08-05    2.333443
2019-08-07   -0.502920
2019-08-08    1.145697
2019-08-10   -0.504389
dtype: float64
- 使用 truncate() 方法也可以实现在两个日期间对 Series 进行切片
ts.truncate(before='8/2/2019', after='8/8/2019')
2019-08-05    2.333443
2019-08-07   -0.502920
2019-08-08    1.145697
dtype: float64
- 上面的操作也同样适用于 DataFrame,并在其行上进行索引
dates = pd.date_range('1/1/2018', periods=100, freq='W-WED')
long_df = pd.DataFrame(np.random.randn(100, 4),
                      index=dates,
                      columns=['Colorado', 'Texas', 'Nwe York', 'Ohio'])
long_df[:10]
|
Colorado |
Texas |
Nwe York |
Ohio |
| 2018-01-03 |
-0.865582 |
1.623844 |
-0.200563 |
-1.166387 |
| 2018-01-10 |
0.441938 |
1.022298 |
-0.834719 |
-0.125343 |
| 2018-01-17 |
-0.767586 |
-0.434506 |
0.008906 |
-0.359749 |
| 2018-01-24 |
0.151662 |
-0.904767 |
-1.224332 |
1.169810 |
| 2018-01-31 |
-0.172146 |
-0.495993 |
0.841341 |
-0.080990 |
| 2018-02-07 |
0.485385 |
-1.327956 |
0.144750 |
0.294078 |
| 2018-02-14 |
-0.071519 |
1.098334 |
-0.923484 |
-1.466727 |
| 2018-02-21 |
-0.482320 |
-0.122691 |
-0.719345 |
-1.044682 |
| 2018-02-28 |
0.160908 |
1.044807 |
-0.020349 |
-0.426059 |
| 2018-03-07 |
-0.009414 |
0.081428 |
-0.523577 |
1.182005 |
long_df.loc['5-2018']
|
Colorado |
Texas |
Nwe York |
Ohio |
| 2018-05-02 |
-1.519427 |
-0.158811 |
1.191555 |
1.005464 |
| 2018-05-09 |
-0.704590 |
-0.332483 |
0.096710 |
-0.031565 |
| 2018-05-16 |
0.062633 |
0.375264 |
-0.321858 |
-0.776452 |
| 2018-05-23 |
-1.657576 |
-0.445090 |
-0.718661 |
-1.409694 |
| 2018-05-30 |
0.153913 |
0.402754 |
1.435081 |
-0.883503 |
2.2 含有重复索引的时间序列
- 对于有些数据,可能在某个特定的时间戳上有多个数据,导致索引重复,可以调用索引对象的 is_unique 属性查看是否重复,对于不重复的索引,其索引的结果为标量值,对于重复的索引,其索引结果为 Series 的切片
dates = pd.DatetimeIndex(['1/1/2019', '1/2/2019', '1/2/2019', '1/2/2019', '1/3/2019'])
dup_ts = pd.Series(np.arange(5), index=dates)
print(dup_ts, dup_ts.index.is_unique, dup_ts['1/3/2019'], dup_ts['1/2/2019'], sep='\n' + '*' * 10 + '\n')
2019-01-01    0
2019-01-02    1
2019-01-02    2
2019-01-02    3
2019-01-03    4
dtype: int32
**********
False
**********
4
**********
2019-01-02    1
2019-01-02    2
2019-01-02    3
dtype: int32
- 聚合含有非唯一时间戳的数据的一种方法是使用 groupby 并传递 level=0
grouped = dup_ts.groupby(level=0)
print(grouped, grouped.mean(), grouped.count(), sep='\n' + '*' * 10 + '\n')
**********
2019-01-01    0
2019-01-02    2
2019-01-03    4
dtype: int32
**********
2019-01-01    1
2019-01-02    3
2019-01-03    1
dtype: int64
3. 日期范围、频率和移位
- pandas 的通用时间序列很多是频率不定的,有时候需要将其转化为固定频率的数据,因此需要进行重新采样、推断频率以及生成固定频率的数据范围,本节先学习如何使用基础频率及其倍数
3.1 生成日期范围
- 之前的示例中出现了 pd.date_range() 方法,其作用是根据特定频率生成指定长度的 DatetimeIndex 对象,默认生成每日的时间戳
index = pd.date_range('2019-04-01', '2019-05-01')
print(index)
DatetimeIndex(['2019-04-01', '2019-04-02', '2019-04-03', '2019-04-04',
               '2019-04-05', '2019-04-06', '2019-04-07', '2019-04-08',
               '2019-04-09', '2019-04-10', '2019-04-11', '2019-04-12',
               '2019-04-13', '2019-04-14', '2019-04-15', '2019-04-16',
               '2019-04-17', '2019-04-18', '2019-04-19', '2019-04-20',
               '2019-04-21', '2019-04-22', '2019-04-23', '2019-04-24',
               '2019-04-25', '2019-04-26', '2019-04-27', '2019-04-28',
               '2019-04-29', '2019-04-30', '2019-05-01'],
              dtype='datetime64[ns]', freq='D')
- 若只传递一个起始或结尾日期,必须传递一个用于生成范围的数字
print(pd.date_range(start='2019-04-01', periods=20))
DatetimeIndex(['2019-04-01', '2019-04-02', '2019-04-03', '2019-04-04',
               '2019-04-05', '2019-04-06', '2019-04-07', '2019-04-08',
               '2019-04-09', '2019-04-10', '2019-04-11', '2019-04-12',
               '2019-04-13', '2019-04-14', '2019-04-15', '2019-04-16',
               '2019-04-17', '2019-04-18', '2019-04-19', '2019-04-20'],
              dtype='datetime64[ns]', freq='D')
- 若传入的时间戳包含时间数据,则默认保留该数据至生成的时间索引中,若想要将其标准化为零点,则只需传入 normalize=True
print(pd.date_range('2019-05-02 12:56:31', periods=5))
print('*' * 30)
print(pd.date_range('2019-05-02 12:56:31', periods=5, normalize=True))
DatetimeIndex(['2019-05-02 12:56:31', '2019-05-03 12:56:31',
               '2019-05-04 12:56:31', '2019-05-05 12:56:31',
               '2019-05-06 12:56:31'],
              dtype='datetime64[ns]', freq='D')
******************************
DatetimeIndex(['2019-05-02', '2019-05-03', '2019-05-04', '2019-05-05',
               '2019-05-06'],
              dtype='datetime64[ns]', freq='D')
部分基础时间序列频率表格
| 别名 |
偏置类型 |
描述 |
| D |
Day |
日历日的每天 |
| B |
BusinessDay |
工作日的每天 |
| H |
Hour |
每小时 |
| T 或 min |
Minute |
每分钟 |
| S |
Second |
每秒 |
| L 或 ms |
Milli |
每毫秒 |
| U |
Micro |
每微秒 |
| M |
MonthEnd |
日历日的每个月底日期 |
| BM |
BusinessMonthEnd |
工作日的每个月底日期 |
| MS |
MonthBegin |
日历日的每个月初日期 |
| BMS |
BusinessMonthBegin |
工作日的每个月初日期 |
| W-MON, W-TUE… |
Week |
每周几(MON, TUE, WED, THU, FRI, SAT, SUN) |
| WOM-1MON, WOM-2MON… |
WeekOfMonth |
每月的第几个周几(如 WOM-3FRI 代表每月的第三个星期五) |
| Q-JAN, Q-FEB… |
QuarterEnd |
每季度,且指定月最后一个日历日为季度结束日(如 Q-JAN 的每个季度分别为上一年的 11 月到本年的 1 月,本年的 2 月到 4 月,以此类推;JAN, FEB, MAR, APR, MAY, JUN, JUL, AUG, SEP, OCT, NOV, DEC) |
| BQ-JAN, BQ-FEB… |
BusinessQuarterEnd |
每季度,且指定月最后一个工作日为季度结束日 |
| QS-JAN, QS-FEB… |
QuarterBegin |
每季度,且指定月第一个日历日为季度开始日 |
| BQS-JAN, BQS-FEB… |
BusinessQuarterBegin |
每季度,且指定月第一个工作日为季度开始日 |
| A-JAN, A-FEB… |
YearEnd |
每年,且指定月的最后一个日历日为年度结束日 |
| BA-JAN, BA-FEB |
BusinessYearEnd |
每年,且指定月的最后一个工作日为年度结束日 |
| AS-JAN, AS-FEB… |
YearBegin |
每年,且指定月的第一个日历日为年度开始日 |
| BAS-JAN, BAS-FEB… |
BusinessYearBegin |
每年,且指定月的第一个工作日为年度开始日 |
3.2 频率和日期偏置
- pandas 中的频率是由基础频率和倍数组成的,对于每个基础频率,都有一个对象可以被用于定义日期偏置,如每小时的频率可以使用 Hour 类来表示
from pandas.tseries.offsets import Hour, Minute
hour = Hour()
print(hour)
four_hours = Hour(4)
print(four_hours)
<4 * Hours>
- 大多数时候我们使用字符串别名来表示,在基础频率前放一个倍数就可以生成倍数,且多个偏置可以通过加法进行联合,或者直接使用频率字符串
- 有些频率描述点的时间并不是均匀分隔的,例如’M’和‘BM’取决于当月天数,这些日期被称为锚定偏置量
print(pd.date_range('2019-01-01', '2019-01-03 23:59', freq='4H'))
print('*' * 20)
print(Hour(2) + Minute(30))
print('*' * 20)
print(pd.date_range('2019-01-01', periods=10, freq='1h30min'))
DatetimeIndex(['2019-01-01 00:00:00', '2019-01-01 04:00:00',
               '2019-01-01 08:00:00', '2019-01-01 12:00:00',
               '2019-01-01 16:00:00', '2019-01-01 20:00:00',
               '2019-01-02 00:00:00', '2019-01-02 04:00:00',
               '2019-01-02 08:00:00', '2019-01-02 12:00:00',
               '2019-01-02 16:00:00', '2019-01-02 20:00:00',
               '2019-01-03 00:00:00', '2019-01-03 04:00:00',
               '2019-01-03 08:00:00', '2019-01-03 12:00:00',
               '2019-01-03 16:00:00', '2019-01-03 20:00:00'],
              dtype='datetime64[ns]', freq='4H')
********************
<150 * Minutes>
********************
DatetimeIndex(['2019-01-01 00:00:00', '2019-01-01 01:30:00',
               '2019-01-01 03:00:00', '2019-01-01 04:30:00',
               '2019-01-01 06:00:00', '2019-01-01 07:30:00',
               '2019-01-01 09:00:00', '2019-01-01 10:30:00',
               '2019-01-01 12:00:00', '2019-01-01 13:30:00'],
              dtype='datetime64[ns]', freq='90T')
- 对于一个常用的频率类,月中某星期,可以使用以 ‘WOM’ 开头的频率字符串
list(pd.date_range('2019-01-01', '2019-09-01', freq='WOM-3FRI'))
[Timestamp('2019-01-18 00:00:00', freq='WOM-3FRI'),
 Timestamp('2019-02-15 00:00:00', freq='WOM-3FRI'),
 Timestamp('2019-03-15 00:00:00', freq='WOM-3FRI'),
 Timestamp('2019-04-19 00:00:00', freq='WOM-3FRI'),
 Timestamp('2019-05-17 00:00:00', freq='WOM-3FRI'),
 Timestamp('2019-06-21 00:00:00', freq='WOM-3FRI'),
 Timestamp('2019-07-19 00:00:00', freq='WOM-3FRI'),
 Timestamp('2019-08-16 00:00:00', freq='WOM-3FRI')]
3.3 移位(前向和后向)日期
- 移位是指将日期按时间向前或向后移动,Series 和 DataFrame 都有一个 shift 方法用于简单的前向或后向移位,而不改变索引。shift 常用于计算时间序列或 DataFrame 多列时间序列的百分比变化
ts = pd.Series(np.random.randn(4),
              index=pd.date_range('1/1/2019', periods=4, freq='M'))
print(ts)
print('*' * 20)
print(ts.shift(2))
print('*' * 20)
print(ts.shift(-2))
print('*' * 20)
print(ts/ts.shift(1) - 1)
2019-01-31    1.768847
2019-02-28   -0.255197
2019-03-31    0.685883
2019-04-30    0.613614
Freq: M, dtype: float64
********************
2019-01-31         NaN
2019-02-28         NaN
2019-03-31    1.768847
2019-04-30   -0.255197
Freq: M, dtype: float64
********************
2019-01-31    0.685883
2019-02-28    0.613614
2019-03-31         NaN
2019-04-30         NaN
Freq: M, dtype: float64
********************
2019-01-31         NaN
2019-02-28   -1.144273
2019-03-31   -3.687666
2019-04-30   -0.105367
Freq: M, dtype: float64
- 上面的这种简单移位并不改变索引,但是一些数据会被丢弃,如果频率是已知的,则可以将频率传递给 shift 来推移时间戳而不是数据
print(ts.shift(2, freq='M'))
print('*' * 20)
print(ts.shift(3, freq='D'))
2019-03-31    1.768847
2019-04-30   -0.255197
2019-05-31    0.685883
2019-06-30    0.613614
Freq: M, dtype: float64
********************
2019-02-03    1.768847
2019-03-03   -0.255197
2019-04-03    0.685883
2019-05-03    0.613614
dtype: float64
- pandas 日期偏置也可以使用 datetime 或 Timestamp 对象来完成
from pandas.tseries.offsets import Day, MonthEnd
now = datetime(2019, 8, 11)
print(now + 3 * Day())
2019-08-14 00:00:00
- 如果添加了一个锚定偏置量,比如 MonthEnd,根据频率规则,第一个增量会将日期“前滚”到下一个日期,锚定偏置可以使用其 rollforward() 方法和 rollback() 方法分别显式地将日期向前或向后“滚动”
print(now + MonthEnd())
print(now + MonthEnd(2))
offset = MonthEnd()
print(offset.rollforward(now))
print(offset.rollback(now))
2019-08-31 00:00:00
2019-09-30 00:00:00
2019-08-31 00:00:00
2019-07-31 00:00:00
- 将移位方法和 groupby 一起使用,可以实现重采样,其效果和 Series 的 resample() 方法一样
ts = pd.Series(np.random.randn(10),
              index=pd.date_range('8/1/2019', periods=10, freq='4d'))
print(ts)
print('*' * 20)
print(ts.groupby(offset.rollforward).mean())
print('*' * 20)
print(ts.resample('M').mean())
2019-08-01   -1.043915
2019-08-05    1.200408
2019-08-09    0.858810
2019-08-13   -1.427360
2019-08-17   -0.439623
2019-08-21    1.591962
2019-08-25    0.320857
2019-08-29   -0.842882
2019-09-02    0.857552
2019-09-06    0.498283
Freq: 4D, dtype: float64
********************
2019-08-31    0.027282
2019-09-30    0.677918
dtype: float64
********************
2019-08-31    0.027282
2019-09-30    0.677918
Freq: M, dtype: float64
4. 时区处理
- 对于时区,目前的国际标准为世界协调时间或 UTC,时区通常表示为 UTC 的偏置
- Python 中,时区信息来源于 pytz 库,时区名称可以在其文档中找到,也可以使用 pytz.timezone 得到时区对象,pandas 接收时区名称或时区对象
import pytz
print(pytz.common_timezones[-5:])
pytz.timezone('America/New_York')
['US/Eastern', 'US/Hawaii', 'US/Mountain', 'US/Pacific', 'UTC']
4.1 时区的本地化和转换
- 默认情况下,pandas 中的时间序列是时区简单型的,即索引的 tz 属性是 None
rng = pd.date_range('3/9/2019 9:30', periods=6, freq='D')
ts = pd.Series(np.random.randn(len(rng)), index=rng)
print(ts)
print('*' * 20)
print(ts.index.tz)
2019-03-09 09:30:00    1.426332
2019-03-10 09:30:00   -1.166613
2019-03-11 09:30:00   -1.142714
2019-03-12 09:30:00   -1.110601
2019-03-13 09:30:00    1.143094
2019-03-14 09:30:00    1.664323
Freq: D, dtype: float64
********************
None
- 可以在定义索引的时候添加时区属性进行本地化,也可以使用 tz_localize() 方法从简单时区转化到本地化时区
print(pd.date_range('3/9/2019 9:30', periods=6, freq='D', tz='UTC'))
print('*' * 20)
ts_utc = ts.tz_localize('UTC')
print(ts_utc)
print('*' * 20)
print(ts_utc.index)
DatetimeIndex(['2019-03-09 09:30:00+00:00', '2019-03-10 09:30:00+00:00',
               '2019-03-11 09:30:00+00:00', '2019-03-12 09:30:00+00:00',
               '2019-03-13 09:30:00+00:00', '2019-03-14 09:30:00+00:00'],
              dtype='datetime64[ns, UTC]', freq='D')
********************
2019-03-09 09:30:00+00:00    1.426332
2019-03-10 09:30:00+00:00   -1.166613
2019-03-11 09:30:00+00:00   -1.142714
2019-03-12 09:30:00+00:00   -1.110601
2019-03-13 09:30:00+00:00    1.143094
2019-03-14 09:30:00+00:00    1.664323
Freq: D, dtype: float64
********************
DatetimeIndex(['2019-03-09 09:30:00+00:00', '2019-03-10 09:30:00+00:00',
               '2019-03-11 09:30:00+00:00', '2019-03-12 09:30:00+00:00',
               '2019-03-13 09:30:00+00:00', '2019-03-14 09:30:00+00:00'],
              dtype='datetime64[ns, UTC]', freq='D')
- 一旦时间序列被本地化为某个特定的时区,则可以通过 tz_convert 将其转换为另一个时区
- 本地化是添加 tz 属性,时间不变,而时区转化不仅添加了 tz 属性,还改变了时间
- 美国分了夏令时和冬令时,夏令时比 UTC 晚 4 小时,冬令时晚 5 小时
print(ts_utc.tz_convert('America/New_York'))
print('*' * 20)
ts_eastern = ts.tz_localize('America/New_York')
print(ts_eastern)
print('*' * 20)
print(ts_eastern.tz_convert('UTC'))
print('*' * 20)
print(ts_eastern.tz_convert('Europe/Berlin'))
2019-03-09 04:30:00-05:00    1.426332
2019-03-10 05:30:00-04:00   -1.166613
2019-03-11 05:30:00-04:00   -1.142714
2019-03-12 05:30:00-04:00   -1.110601
2019-03-13 05:30:00-04:00    1.143094
2019-03-14 05:30:00-04:00    1.664323
Freq: D, dtype: float64
********************
2019-03-09 09:30:00-05:00    1.426332
2019-03-10 09:30:00-04:00   -1.166613
2019-03-11 09:30:00-04:00   -1.142714
2019-03-12 09:30:00-04:00   -1.110601
2019-03-13 09:30:00-04:00    1.143094
2019-03-14 09:30:00-04:00    1.664323
Freq: D, dtype: float64
********************
2019-03-09 14:30:00+00:00    1.426332
2019-03-10 13:30:00+00:00   -1.166613
2019-03-11 13:30:00+00:00   -1.142714
2019-03-12 13:30:00+00:00   -1.110601
2019-03-13 13:30:00+00:00    1.143094
2019-03-14 13:30:00+00:00    1.664323
Freq: D, dtype: float64
********************
2019-03-09 15:30:00+01:00    1.426332
2019-03-10 14:30:00+01:00   -1.166613
2019-03-11 14:30:00+01:00   -1.142714
2019-03-12 14:30:00+01:00   -1.110601
2019-03-13 14:30:00+01:00    1.143094
2019-03-14 14:30:00+01:00    1.664323
Freq: D, dtype: float64
- tz_convert 和 tz_localize 也是 DatetimeIndex 的实例方法
ts.index.tz_localize('Asia/Shanghai')
DatetimeIndex(['2019-03-09 09:30:00+08:00', '2019-03-10 09:30:00+08:00',
               '2019-03-11 09:30:00+08:00', '2019-03-12 09:30:00+08:00',
               '2019-03-13 09:30:00+08:00', '2019-03-14 09:30:00+08:00'],
              dtype='datetime64[ns, Asia/Shanghai]', freq='D')
4.2 时区感知时间戳对象的操作
- 与时间序列和日期范围类似,单独的 Timestamp 对象也可以从简单时间戳本地化为时区感应时间戳,并从一个时区转换为另一个时区
stamp = pd.Timestamp('2011-03-12 04:00')
stamp_utc = stamp.tz_localize('utc')
print(stamp_utc)
print(stamp_utc.tz_convert('America/New_York'))
stamp_moscow = pd.Timestamp('2011-03-12 04:00', tz='Europe/Moscow')
print(stamp_moscow)
2011-03-12 04:00:00+00:00
2011-03-11 23:00:00-05:00
2011-03-12 04:00:00+03:00
- 时区感知的 Timestamp 对象内部存储了一个 Unix 纪元(1970/1/1)至今的纳秒数量 UTC 时间戳数值,该数值在时区转换中是不变的
print(stamp_utc.value)
print(stamp_utc.tz_convert('America/New_York').value)
1299902400000000000
1299902400000000000
4.3 不同时区间的操作
- 如果两个不同时区的时间序列需要联合,那么结果将是 UTC 时间的
rng = pd.date_range('3/7/2012 9:30', periods=10, freq='B')
ts = pd.Series(np.random.randn(len(rng)), index=rng)
print(ts)
print('*' * 20)
ts_1 = ts[:7].tz_localize('Europe/London')
print(ts_1)
print('*' * 20)
ts_2 = ts_1[2:].tz_convert('Europe/Moscow')
print(ts_2)
print('*' * 20)
result = ts_1 + ts_2
print(result)
2012-03-07 09:30:00    1.024024
2012-03-08 09:30:00   -0.693508
2012-03-09 09:30:00   -1.810992
2012-03-12 09:30:00    0.526046
2012-03-13 09:30:00    0.033328
2012-03-14 09:30:00    0.142689
2012-03-15 09:30:00    0.115741
2012-03-16 09:30:00    0.216307
2012-03-19 09:30:00   -2.500368
2012-03-20 09:30:00   -1.309708
Freq: B, dtype: float64
********************
2012-03-07 09:30:00+00:00    1.024024
2012-03-08 09:30:00+00:00   -0.693508
2012-03-09 09:30:00+00:00   -1.810992
2012-03-12 09:30:00+00:00    0.526046
2012-03-13 09:30:00+00:00    0.033328
2012-03-14 09:30:00+00:00    0.142689
2012-03-15 09:30:00+00:00    0.115741
Freq: B, dtype: float64
********************
2012-03-09 13:30:00+04:00   -1.810992
2012-03-12 13:30:00+04:00    0.526046
2012-03-13 13:30:00+04:00    0.033328
2012-03-14 13:30:00+04:00    0.142689
2012-03-15 13:30:00+04:00    0.115741
Freq: B, dtype: float64
********************
2012-03-07 09:30:00+00:00         NaN
2012-03-08 09:30:00+00:00         NaN
2012-03-09 09:30:00+00:00   -3.621983
2012-03-12 09:30:00+00:00    1.052092
2012-03-13 09:30:00+00:00    0.066656
2012-03-14 09:30:00+00:00    0.285378
2012-03-15 09:30:00+00:00    0.231482
Freq: B, dtype: float64
5. 时间区间和区间算数
- 时间区间表示的是时间范围,比如一些天,一些月。Period 类表示的正是这种数据类型,其 freq 参数表示了时间的长度
p = pd.Period(2018, freq='A-DEC')
p
Period('2018', 'A-DEC')
p + 5, p - 2
(Period('2023', 'A-DEC'), Period('2016', 'A-DEC'))
pd.Period('2020', freq='A-DEC') - p
<2 * YearEnds: month=12>
- 使用 period_range 函数可以构造规则区间序列,返回的是 PeriodIndex 对象
- 该对象存储的是区间的序列,可以作为数据结构的轴索引
- 对于字符串数组,也可以使用 PeriodIndex 类
rng = pd.period_range('2018-01-01', '2018-06-30', freq='M')
print(rng)
print('*' * 20)
print(pd.Series(np.random.randn(6), index=rng))
print('*' * 20)
values = ['2017Q3', '2018Q2', '2019Q1']
index = pd.PeriodIndex(values, freq='Q-DEC')
print(index)
PeriodIndex(['2018-01', '2018-02', '2018-03', '2018-04', '2018-05', '2018-06'], dtype='period[M]', freq='M')
********************
2018-01   -1.428061
2018-02    0.743515
2018-03   -0.829522
2018-04    0.955304
2018-05   -0.669098
2018-06   -0.247631
Freq: M, dtype: float64
********************
PeriodIndex(['2017Q3', '2018Q2', '2019Q1'], dtype='period[Q-DEC]', freq='Q-DEC')
5.1 区间频率转换
- 使用 asfreq 可以将区间和 PeriodIndex 对象转换为其他的频率
- 从低频率到高频率转换时,需指定是转换为其开始或结束的区间
p = pd.Period('2018', freq='A-JUN')
p
Period('2018', 'A-JUN')
p.asfreq('M', how='start')
Period('2017-07', 'M')
p.asfreq('M', how='end')
Period('2018-06', 'M')
- 从高频率到低频率转换时,pandas 根据子区间的“所属”来决定父区间
p = pd.Period('Aug-2018', 'M')
p
Period('2018-08', 'M')
p.asfreq('A-JUN')
Period('2019', 'A-JUN')
- 完整的 PeriodIndex 对象或时间序列可以按照相同的语义进行转换
rng = pd.period_range('2016', '2019', freq='A-DEC')
ts = pd.Series(np.random.randn(len(rng)), index=rng)
print(ts)
print('*' * 20)
print(ts.asfreq('M', how='start'))
print('*' * 20)
print(ts.asfreq('B', how='end'))
2016    0.307965
2017    2.008601
2018    0.442805
2019    0.730941
Freq: A-DEC, dtype: float64
********************
2016-01    0.307965
2017-01    2.008601
2018-01    0.442805
2019-01    0.730941
Freq: M, dtype: float64
********************
2016-12-30    0.307965
2017-12-29    2.008601
2018-12-31    0.442805
2019-12-31    0.730941
Freq: B, dtype: float64
5.2 季度区间频率
- 季度数据是会计、金融和其他领域的标准,pandas 支持所有的可能的 12 个季度频率从 Q-JAN 到 Q-DEC
- 在财年结束于1月的情况下,2018Q4 运行时间为 2017 年 11 月至 2018 年 1 月
p = pd.Period('2018Q4', freq='Q-JAN')
p, p.asfreq('D', 'start'), p.asfreq('D', 'end')
(Period('2018Q4', 'Q-JAN'),
 Period('2017-11-01', 'D'),
 Period('2018-01-31', 'D'))
- 可以做简单的区间算术,如下获取在季度倒数第二个工作日下午 4 点的时间戳
p4pm = (p.asfreq('B', 'e') - 1).asfreq('T', 's') + 16 * 60
p4pm, p4pm.to_timestamp()
(Period('2018-01-30 16:00', 'T'), Timestamp('2018-01-30 16:00:00'))
- 可以使用 period_range 生成季度序列,其算术也是一样的
rng = pd.period_range('2017Q3', '2018Q4', freq='Q-JAN')
ts = pd.Series(np.arange(len(rng)), index=rng)
print(ts)
print('*' * 20)
new_rng = (rng.asfreq('B', 'e') - 1).asfreq('T', 's') + 16 * 60
ts.index = new_rng.to_timestamp()
print(ts)
2017Q3    0
2017Q4    1
2018Q1    2
2018Q2    3
2018Q3    4
2018Q4    5
Freq: Q-JAN, dtype: int32
********************
2016-10-28 16:00:00    0
2017-01-30 16:00:00    1
2017-04-27 16:00:00    2
2017-07-28 16:00:00    3
2017-10-30 16:00:00    4
2018-01-30 16:00:00    5
dtype: int32
5.3 时间戳与区间的转换
- 通过时间戳索引的 Series 和 DataFrame 可以被 to_period 方法转换为区间
rng = pd.date_range('2018-01-01', periods=3, freq='M')
ts = pd.Series(np.random.randn(3), index=rng)
print(ts)
print('*' * 20)
pts = ts.to_period()
print(pts)
2018-01-31    0.022206
2018-02-28   -0.297590
2018-03-31    0.529964
Freq: M, dtype: float64
********************
2018-01    0.022206
2018-02   -0.297590
2018-03    0.529964
Freq: M, dtype: float64
- 虽然时间区间是非重叠时间范围,一个时间戳只能属于给定频率的单个区间。默认情况下根据时间戳推断出新 PeriodIndex 的频率,但可以指定任何想要的频率,在结果中包含重复的区间也是没有问题的
rng = pd.date_range('1/29/2018', periods=6, freq='D')
ts2 = pd.Series(np.random.randn(6), index=rng)
print(ts2)
print('*' * 20)
print(ts2.to_period('M'))
2018-01-29    0.109360
2018-01-30    0.595276
2018-01-31    0.627808
2018-02-01   -1.367416
2018-02-02    0.986550
2018-02-03    2.713046
Freq: D, dtype: float64
********************
2018-01    0.109360
2018-01    0.595276
2018-01    0.627808
2018-02   -1.367416
2018-02    0.986550
2018-02    2.713046
Freq: M, dtype: float64
- 使用 to_timestamp 可以将区间再转换为时间戳
pts = ts2.to_period()
print(pts)
print('*' * 20)
print(pts.to_timestamp(how='S'))
2018-01-29    0.109360
2018-01-30    0.595276
2018-01-31    0.627808
2018-02-01   -1.367416
2018-02-02    0.986550
2018-02-03    2.713046
Freq: D, dtype: float64
********************
2018-01-29    0.109360
2018-01-30    0.595276
2018-01-31    0.627808
2018-02-01   -1.367416
2018-02-02    0.986550
2018-02-03    2.713046
Freq: D, dtype: float64
5.4 从数组生成 PeriodIndex
- 固定频率数据集有时存储在跨越多列的时间范围信息中,通过将这些数组和频率传递给 PeriodIndex,可以联合这些数组形成 DataFrame 索引
data = pd.read_csv(r'C:/Users/Raymone/Data Analysis/examples/macrodata.csv')
data.head(5)
|
year |
quarter |
realgdp |
realcons |
realinv |
realgovt |
realdpi |
cpi |
m1 |
tbilrate |
unemp |
pop |
infl |
realint |
| 0 |
1959.0 |
1.0 |
2710.349 |
1707.4 |
286.898 |
470.045 |
1886.9 |
28.98 |
139.7 |
2.82 |
5.8 |
177.146 |
0.00 |
0.00 |
| 1 |
1959.0 |
2.0 |
2778.801 |
1733.7 |
310.859 |
481.301 |
1919.7 |
29.15 |
141.7 |
3.08 |
5.1 |
177.830 |
2.34 |
0.74 |
| 2 |
1959.0 |
3.0 |
2775.488 |
1751.8 |
289.226 |
491.260 |
1916.4 |
29.35 |
140.5 |
3.82 |
5.3 |
178.657 |
2.74 |
1.09 |
| 3 |
1959.0 |
4.0 |
2785.204 |
1753.7 |
299.356 |
484.052 |
1931.3 |
29.37 |
140.0 |
4.33 |
5.6 |
179.386 |
0.27 |
4.06 |
| 4 |
1960.0 |
1.0 |
2847.699 |
1770.5 |
331.722 |
462.199 |
1955.5 |
29.54 |
139.6 |
3.50 |
5.2 |
180.007 |
2.31 |
1.19 |
index = pd.PeriodIndex(year=data.year, quarter=data.quarter, freq='Q-DEC')
data.index = index
data.head(5)
|
year |
quarter |
realgdp |
realcons |
realinv |
realgovt |
realdpi |
cpi |
m1 |
tbilrate |
unemp |
pop |
infl |
realint |
| 1959Q1 |
1959.0 |
1.0 |
2710.349 |
1707.4 |
286.898 |
470.045 |
1886.9 |
28.98 |
139.7 |
2.82 |
5.8 |
177.146 |
0.00 |
0.00 |
| 1959Q2 |
1959.0 |
2.0 |
2778.801 |
1733.7 |
310.859 |
481.301 |
1919.7 |
29.15 |
141.7 |
3.08 |
5.1 |
177.830 |
2.34 |
0.74 |
| 1959Q3 |
1959.0 |
3.0 |
2775.488 |
1751.8 |
289.226 |
491.260 |
1916.4 |
29.35 |
140.5 |
3.82 |
5.3 |
178.657 |
2.74 |
1.09 |
| 1959Q4 |
1959.0 |
4.0 |
2785.204 |
1753.7 |
299.356 |
484.052 |
1931.3 |
29.37 |
140.0 |
4.33 |
5.6 |
179.386 |
0.27 |
4.06 |
| 1960Q1 |
1960.0 |
1.0 |
2847.699 |
1770.5 |
331.722 |
462.199 |
1955.5 |
29.54 |
139.6 |
3.50 |
5.2 |
180.007 |
2.31 |
1.19 |
6. 重新采样与频率转换
- 重新采样是指将时间序列从一个频率转换为另一个频率的过程
- 将更高频率的数据聚合到低频率被称为向下采样,从低频率转换到高频率称为向上采样
- 但不是所有的频率转换都是上面两类,如从 W-WED 每周三转换到 W-FRI 每周五就不属于上面两类
- pandas 对象都有 resample 方法用于频率转换,它类似 groupby 函数,调用该方法进行分组,再调用聚合函数输出结果
- resample 的示例及参数如下
| 参数 |
描述 |
| freq |
表明所需采样频率的字符串或 DataOffset 对象(例如,‘M’, ‘5min’ 或 Second(1)) |
| axis |
需要采样的轴向,默认为 0 |
| fill_method |
向上采样时的插值方式,‘ffill’ 或 ‘bfill’,默认不插值 |
| closed |
向下采样中,每段间隔的哪一段是封闭的(包含的),‘right’ 或 ‘left’ |
| label |
向下采样中,如何用 ‘right’ 或 ‘left’ 的箱标签标记聚合结果 |
| loffset |
对箱标签进行时间调校,如 ‘-1s’ 可以将聚合标签向前移动一秒 |
| limit |
在前向或后向填充时,填充区间的最大值 |
| kind |
对区间(‘period’)或时间戳(‘timestamp’)的聚合,默认为时间序列索引的类型 |
| convention |
在对区间重新采样时,用于将低频周期转换为高频的约定(‘start’ or ‘end’),默认‘end’ |
rng = pd.date_range('2018-01-01', periods=100, freq='D')
ts = pd.Series(np.random.randn(len(rng)), index=rng)
ts.resample('M').mean()
2018-01-31    0.090781
2018-02-28    0.194547
2018-03-31    0.202273
2018-04-30   -0.032387
Freq: M, dtype: float64
6.1 向下采样
- 向下采样为高频率聚合至低频率,要聚合的数据不必是固定频率的
- 期望的频率定义了用于对时间序列切片以聚合的箱体边界,或者说区间,区间的集合必须是整个时间帧,因此每个区间都是半闭合的,且一个数据点只能属于一个时间间隔
- 因此在进行向下采样时,需考虑每段间隔的哪一边是闭合的(closed 参数,默认 left),以及如何在间隔的起始或结束位置标记每个已聚合的箱体(label 参数,默认 left)
rng = pd.date_range('2018-01-01', periods=12, freq='T')
ts = pd.Series(np.arange(12), index=rng)
print('原始数据:\n', ts, sep='')
print('*' * 20)
print('右侧封闭,左侧标记:\n', ts.resample('5min', closed='right').sum(), sep='')
print('*' * 20)
print('左侧封闭,左侧标记:\n', ts.resample('5min').sum(), sep='')
print('*' * 20)
print('右侧封闭,右侧标记:\n', ts.resample('5min', closed='right', label='right').sum(), sep='')
原始数据:
2018-01-01 00:00:00     0
2018-01-01 00:01:00     1
2018-01-01 00:02:00     2
2018-01-01 00:03:00     3
2018-01-01 00:04:00     4
2018-01-01 00:05:00     5
2018-01-01 00:06:00     6
2018-01-01 00:07:00     7
2018-01-01 00:08:00     8
2018-01-01 00:09:00     9
2018-01-01 00:10:00    10
2018-01-01 00:11:00    11
Freq: T, dtype: int32
********************
右侧封闭,左侧标记:
2017-12-31 23:55:00     0
2018-01-01 00:00:00    15
2018-01-01 00:05:00    40
2018-01-01 00:10:00    11
Freq: 5T, dtype: int32
********************
左侧封闭,左侧标记:
2018-01-01 00:00:00    10
2018-01-01 00:05:00    35
2018-01-01 00:10:00    21
Freq: 5T, dtype: int32
********************
右侧封闭,右侧标记:
2018-01-01 00:00:00     0
2018-01-01 00:05:00    15
2018-01-01 00:10:00    40
2018-01-01 00:15:00    11
Freq: 5T, dtype: int32
- loffset 参数指定将结果索引移动一定数量,传递值为字符串或日期偏置
ts.resample('5min', closed='right', label='right', loffset='-1s').sum()
2017-12-31 23:59:59     0
2018-01-01 00:04:59    15
2018-01-01 00:09:59    40
2018-01-01 00:14:59    11
Freq: 5T, dtype: int32
- 开端、峰值、谷值、结束(OHLC)为金融中的重要指标,比如股票 K 线的开盘价、最高价、最低价、收盘价,使用ohlc() 聚合函数很容易实现:
ts.resample('5min').ohlc()
|
open |
high |
low |
close |
| 2018-01-01 00:00:00 |
0 |
4 |
0 |
4 |
| 2018-01-01 00:05:00 |
5 |
9 |
5 |
9 |
| 2018-01-01 00:10:00 |
10 |
11 |
10 |
11 |
6.2 向上采样与插值
- 当从低频率到高频率转换时,不需要任何聚合,而需要进行插值,因为数据量变多了,若不进行插值,则会出现 NA
s = pd.Series(np.random.randn(2),
                    index=pd.date_range('1/1/2019', periods=2, freq='W-WED'))
print(s)
print('*' * 20)
print(s.resample('D').asfreq())
2019-01-02   -0.846711
2019-01-09    0.758713
Freq: W-WED, dtype: float64
********************
2019-01-02   -0.846711
2019-01-03         NaN
2019-01-04         NaN
2019-01-05         NaN
2019-01-06         NaN
2019-01-07         NaN
2019-01-08         NaN
2019-01-09    0.758713
Freq: D, dtype: float64
- 插值是通过 filna 完成的,可以选择向前或向后填充,或者只填充一定数量的区间
print(s.resample('D').ffill())
print('*' * 20)
print(s.resample('D').ffill(limit=2))
2019-01-02   -0.846711
2019-01-03   -0.846711
2019-01-04   -0.846711
2019-01-05   -0.846711
2019-01-06   -0.846711
2019-01-07   -0.846711
2019-01-08   -0.846711
2019-01-09    0.758713
Freq: D, dtype: float64
********************
2019-01-02   -0.846711
2019-01-03   -0.846711
2019-01-04   -0.846711
2019-01-05         NaN
2019-01-06         NaN
2019-01-07         NaN
2019-01-08         NaN
2019-01-09    0.758713
Freq: D, dtype: float64
- 需要注意的是,重采样后的日期索引可以不和旧的索引重叠
print(s.resample('W-THU').ffill())
2019-01-03   -0.846711
2019-01-10    0.758713
Freq: W-THU, dtype: float64
6.3 使用区间进行重新采样
- 对以区间为索引的数据进行采样与时间戳的情况类似,如下为向下采样
s = pd.Series(np.random.randn(24),
                    index=pd.period_range('1-2017', '12-2018', freq='M'))
print(s[:5])
print('*' * 20)
annual_s = s.resample('A-DEC').mean()
print(annual_s)
2017-01   -0.357309
2017-02    1.328097
2017-03    1.169833
2017-04   -1.096610
2017-05   -1.901794
Freq: M, dtype: float64
********************
2017   -0.293896
2018   -0.008636
Freq: A-DEC, dtype: float64
- 向上采样更为细致,因为必须在重新采样前决定新频率中在时间段的哪一端放置数值,就像 asfreq 方法一样,resample 中使用 convention 参数进行选择
print(annual_s.resample('Q-DEC').ffill())
print('*' * 20)
print(annual_s.resample('Q-DEC', convention='end').ffill())
2017Q1   -0.293896
2017Q2   -0.293896
2017Q3   -0.293896
2017Q4   -0.293896
2018Q1   -0.008636
2018Q2   -0.008636
2018Q3   -0.008636
2018Q4   -0.008636
Freq: Q-DEC, dtype: float64
********************
2017Q4   -0.293896
2018Q1   -0.293896
2018Q2   -0.293896
2018Q3   -0.293896
2018Q4   -0.008636
Freq: Q-DEC, dtype: float64
- 由于涉及时间范围,因此:
- 在向下采样中,目标频率必须是原频率的子区间
- 在向上采样中,目标频率必须是原频率的父区间
- 例如 “Q-MAR” 是 “A-MAR”, “A-JUN”, “A-SEP”, “A-DEC” 的子区间
annual_s.resample('Q-MAR').ffill()
2017Q4   -0.293896
2018Q1   -0.293896
2018Q2   -0.293896
2018Q3   -0.293896
2018Q4   -0.008636
2019Q1   -0.008636
2019Q2   -0.008636
2019Q3   -0.008636
Freq: Q-MAR, dtype: float64
7. 移动窗口函数
- 通过移动窗口或指数衰减而运行的函数是用于时间序列操作的数组变换的一个重要类别。这些函数有助于平滑噪声或粗糙的数据。这些函数被称为移动窗口函数
- 如下以通过 rolling() 函数计算苹果公司股价的 250 日均线为例,rolling 与 resample 和 groupby 行为类似,在 Series 或 DataFrame 上通过一个window(以一个区间的数字来表示)进行调用,它创建的对象是根据250日滑动窗口分组而不是直接分组,因此得到 250 日均线
close_px_all = pd.read_csv(r'C:/Users/Raymone/Data Analysis/examples/stock_px_2.csv',
parse_dates=True, index_col=0)
close_px = close_px_all[['AAPL', 'MSFT', 'XOM']]
close_px = close_px.resample('B').ffill()
%matplotlib notebook
close_px.AAPL.plot()
close_px.AAPL.rolling(250).mean().plot()
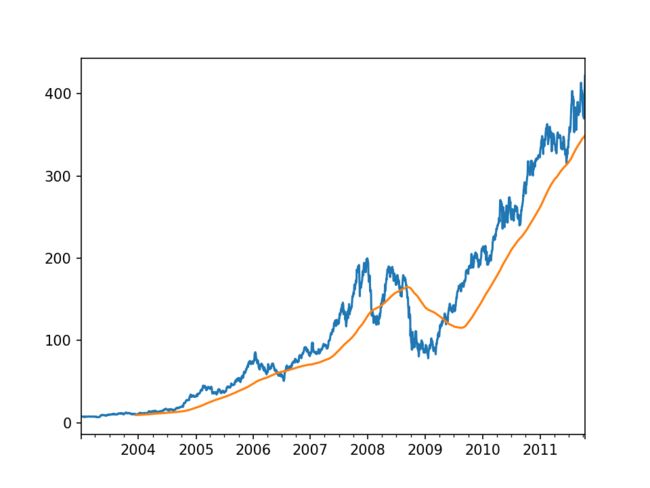
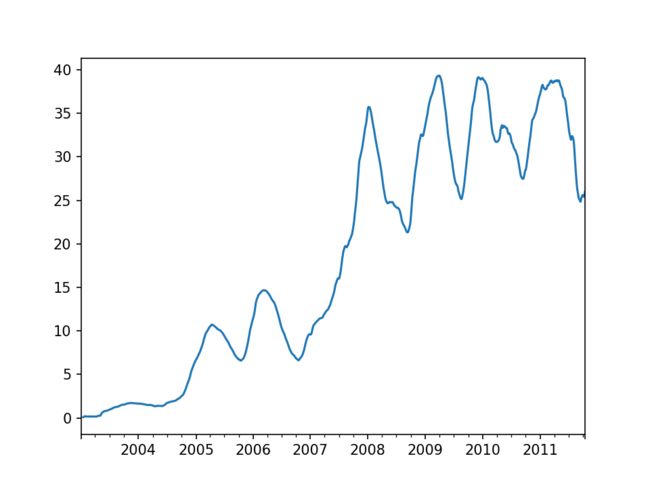
- 在传入的窗口大小参数是数字的时候,rolling 函数的 min_periods 参数默认为窗口大小,因此默认情况滚动函数需要窗口中所有的值必须是非 NA 值,例如在起始位置数据少于窗口区间,因此会得到 NA,直到第 250 条数据才能计算均值。
- 可以通过 min_periods 参数传入想要的值,例如 min_priods=10 代表窗口中有 10 个非 NA 值就开始计算均值,然后窗口开始扩大,达到 250 条后窗口停止扩大而开始移动
appl_std250 = close_px.AAPL.rolling(250, min_periods=10).std()
print(appl_std250[5:12])
appl_std250.plot()
2003-01-09         NaN
2003-01-10         NaN
2003-01-13         NaN
2003-01-14         NaN
2003-01-15    0.077496
2003-01-16    0.074760
2003-01-17    0.112368
Freq: B, Name: AAPL, dtype: float64
- rolling 函数也接受表示固定大小的时间偏置字符串,注意这种情况下 min_periods 默认为 1
close_px.rolling('20D').mean()[:5]
|
AAPL |
MSFT |
XOM |
| 2003-01-02 |
7.400000 |
21.110000 |
29.220000 |
| 2003-01-03 |
7.425000 |
21.125000 |
29.230000 |
| 2003-01-06 |
7.433333 |
21.256667 |
29.473333 |
| 2003-01-07 |
7.432500 |
21.425000 |
29.342500 |
| 2003-01-08 |
7.402000 |
21.402000 |
29.240000 |
- expanding 算子可以计算窗口扩展均值,即从时间序列的起始位置开始时间窗口,并增加窗口的大小,直到它涵盖整个序列
- expanding 的默认 min_priods 为 1,即从一开始就计算
expanding_mean = close_px.AAPL.expanding().mean()
expanding_mean[:5]
2003-01-02    7.400000
2003-01-03    7.425000
2003-01-06    7.433333
2003-01-07    7.432500
2003-01-08    7.402000
Freq: B, Name: AAPL, dtype: float64
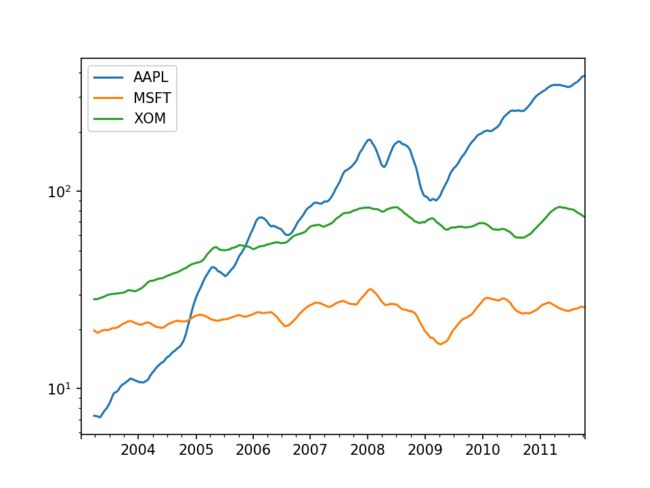
- 在 DataFrame 上调用一个移动窗口函数会将变化应用到每一列上
close_px.rolling(60).mean().plot(logy=True)
7.1 指数加权函数
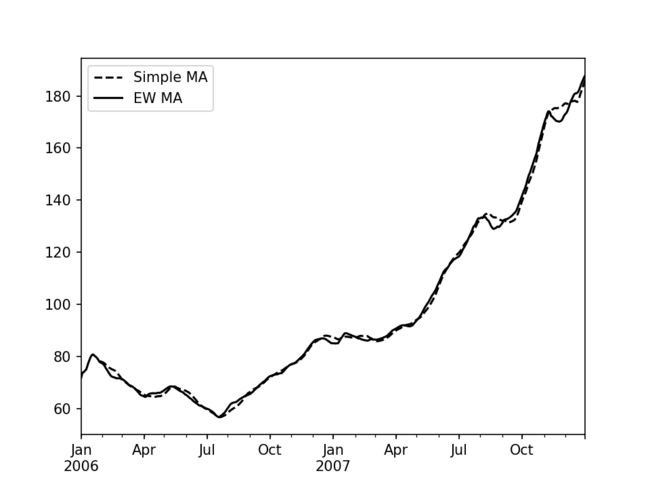
- 指定一个常数衰减因子以向更多近期观测值提供更多权重,其中一种方法为使用一个跨度(span)指定衰减因子,α=2/(span+1), for span≥1
- pandas 拥有 ewm 算子,和 rolling, expanding 算子一起使用
- 如下为苹果公司股价 60 日均线与 span=60 的 EW 移动平均线进行比较的例子
- 关于 ewm 的更多参数,参考官方文档:https://pandas.pydata.org/pandas-docs/stable/reference/api/pandas.Series.ewm.html#pandas.Series.ewm
import matplotlib.pyplot as plt
appl_px = close_px.AAPL['2006':'2007']
ma60 = appl_px.rolling(30, min_periods=20).mean()
ewma60 = appl_px.ewm(span=30).mean()
ma60.plot(style='k--', label='Simple MA')
ewma60.plot(style='k-', label='EW MA')
plt.legend()
7.2 二元移动窗口函数
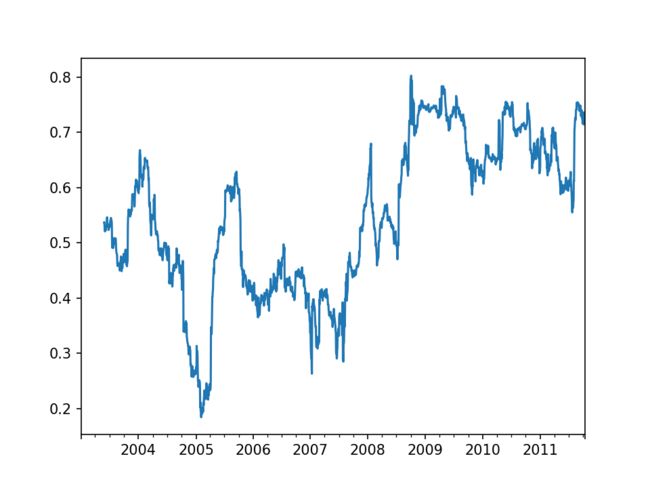
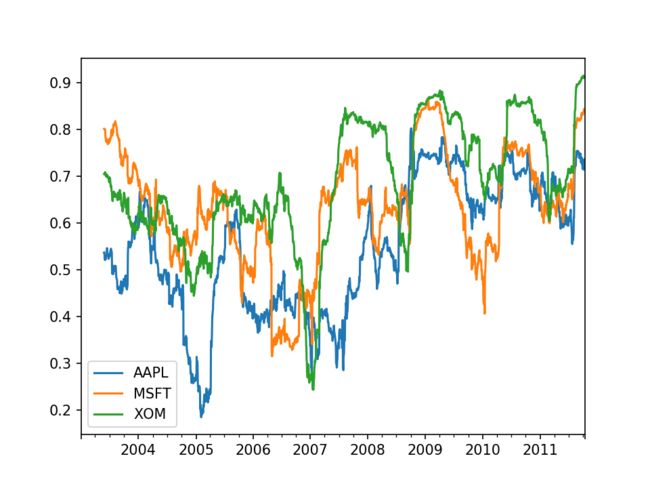
- 一些统计算子,如相关度和协方差,需要操作两个时间序列,实际的例子是分析某股票与大盘指数的关联性
- 首先分别计算该股票和大盘指数的百分比变换,然后调用 rolling,这种情况下,corr 函数可以根据 spx_rets,即大盘百分比变化计算滚动相关性
spx_px = close_px_all['SPX']
spx_rets = spx_px.pct_change()
returns = close_px.pct_change()
corr = returns.AAPL.rolling(125, min_periods=100).corr(spx_rets)
corr.plot()
- 如果要一次性计算多只股票与大盘指数的相关性,可以对 DataFrame 直接使用 rolling_corr 计算 Series 与 DataFrame 中每一列的相关性
corr = returns.rolling(125,min_periods=100).corr(spx_rets)
corr.plot()
7.3 用户自定义的移动窗口函数
- 在 rolling 及其相关方法上使用 apply 方法,可以在移动窗口中应用自己设计的数组函数
- 如下例子计算一年窗口下苹果公司股价 2% 收益的百分位等级
from scipy.stats import percentileofscore
score_at_2percent = lambda x: percentileofscore(x, 0.02)
result = returns.AAPL.rolling(250).apply(score_at_2percent, raw=True)
result.plot()
