【时间序列】Prophet使用
目录
- 1 Prophet 的安装
- 2 快速上手
- 3 预测值的上下限
1 Prophet 的安装
按照官网的指导安装就可以。
一开始我用的是pip install fbprophet,不过提示我Microsoft Visual C++ 14.0 is required。然后我就去安装了Microsoft Visual Studio。安装完成之后,我试了用conda install -c conda-forge fbprophet。然后就安装好了。
我也不知道是不是因为安装了C++,所以conda 安装就很顺利。不过一般而言还是使用conda 安装比较好。
关于conda install XXX 和pip install XXX的区别:https://blog.csdn.net/weixin_43211480/article/details/103623941
2 快速上手
首先加载库,并导入数据(数据官网有)。
# Python
import pandas as pd
from fbprophet import Prophet

data_path = 'D:\\jupyter files\\data_practice_python\\'
df = pd.read_csv(data_path + 'example_wp_log_peyton_manning.csv')
数据长这个样子:
df.head()
type(df.ds.iloc[0])
日期相关的那一列,日期格式都是str。
[output]:
			ds	y
0	2007-12-10	9.590761
1	2007-12-11	8.519590
2	2007-12-12	8.183677
3	2007-12-13	8.072467
4	2007-12-14	7.893572

str
使用历史数据进行拟合,训练模型。
# Python
m = Prophet()
m.fit(df)
将时间序列进行分解,并进行预测。首先设置时间戳数据,其中periods参数,可以设置包含多少个未来的时间点。
future = m.make_future_dataframe(periods=30)
future.tail()
[output]:
		ds
2930	2016-02-15
2931	2016-02-16
2932	2016-02-17
2933	2016-02-18
2934	2016-02-19
然后进行预测。forecast里面包含多个预测结果。
forecast = m.predict(future)
print(forecast.columns)
forecast[['ds', 'yhat', 'yhat_lower', 'yhat_upper']].tail()
[output]:
Index(['ds', 'trend', 'yhat_lower', 'yhat_upper', 'trend_lower', 'trend_upper',
       'additive_terms', 'additive_terms_lower', 'additive_terms_upper',
       'weekly', 'weekly_lower', 'weekly_upper', 'yearly', 'yearly_lower',
       'yearly_upper', 'multiplicative_terms', 'multiplicative_terms_lower',
       'multiplicative_terms_upper', 'yhat'],
      dtype='object')

		ds	yhat	yhat_lower	yhat_upper
2930	2016-02-15	8.015695	7.414741	8.606473
2931	2016-02-16	7.704455	7.133636	8.286706
2932	2016-02-17	7.442229	6.810673	8.029873
2933	2016-02-18	7.364244	6.718821	8.026936
2934	2016-02-19	7.298973	6.692743	7.933251
画出时间序列的真实值,以及模型的预测值。
fig1 = m.plot(forecast)
如果我们想看各个部分的预测值,可以使用Prophet.plot_components。默认情况下,我们可以看到趋势(Trend)、年季节效应(yearly seasonality)、周季节效应(weekly seasonality)。
fig2 = m.plot_components(forecast)
画图还可以用plotly这个神器。以后学习一下。
from fbprophet.plot import plot_plotly
import plotly.offline as py
py.init_notebook_mode()

fig = plot_plotly(m, forecast)  # This returns a plotly Figure
py.iplot(fig)
3 预测值的上下限
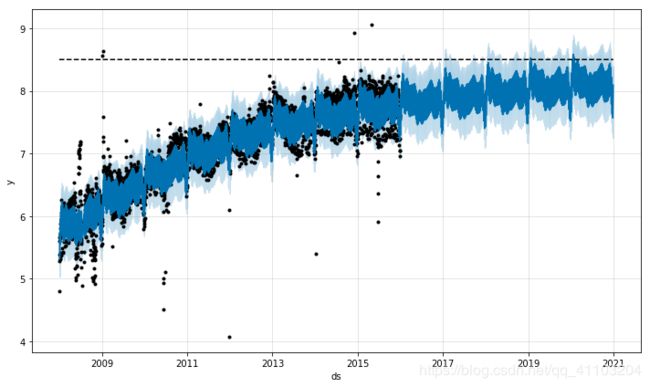
默认情况下,prophet 会使用线性模型来进行预测。但是,随着预测值的增长,通常有一些最大可达点(maximum achievable point),比如:总市场大小、总人口数量等。这些叫做容纳量(carrying capacity),并且预测在这些点上应该达到饱和。
prophet 允许我们使用逻辑增长趋势模型(logistic growth trend model),并设置一个特定的容纳量。
首先加载数据。
我们必须指定一列为容纳量cap。需要注意的是,每一行的cap不一定是相同的,也就是说cap可以随着时间增大,比如市场在不断增长。
训练模型和之前是一样的,通过参数growth来指定模型的形式。
m = Prophet(growth='logistic')
m.fit(df)

future = m.make_future_dataframe(periods=1826)
future['cap'] = 8.5
fcst = m.predict(future)
fig = m.plot(fcst)
df['y'] = 10 - df['y']
df['cap'] = 6
df['floor'] = 1.5
future['cap'] = 6
future['floor'] = 1.5
m = Prophet(growth='logistic')
m.fit(df)
fcst = m.predict(future)
fig = m.plot(fcst)


