Android开发自定义UI组件
Android开发自定义UI组件
一些复用的UI组件,可以通过设置模板复用,接口回调等方法提高开发效率,降低代码耦合度。
自定义组件大概分为3步:
1、自定义标签属性
2、定义组件类
3、在XML界面布局使用自定义标签
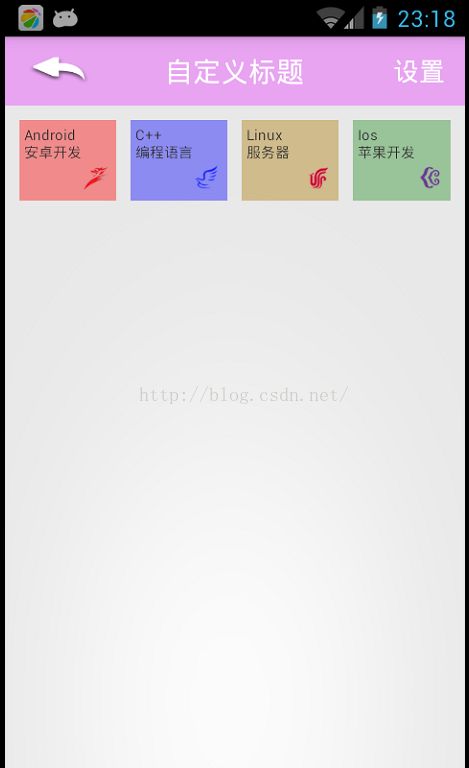
下面举例实现一个TopBar和一个GridItem的自定义组件。
这是项目目录结构
一、自定义标签属性
//TopBar标签属性定义
//GridItem标签属性定义
format 参数值:
1. reference:参考某一资源ID
2. color:颜色值
3. boolean:布尔值
4. dimension:尺寸值
5. float:浮点值
6. integer:整型值
7. string:字符串
8. fraction:百分数
9. enum:枚举值
//enum举例  属性定义:
< declare -styleable name = "UI名称" >
二、定义组件类
TopBar组件类
public class TopBar extends RelativeLayout {

	//左边Button,中间标题,右边Button
	private Button leftBtn, rightBtn;
	private TextView tvTitle;

	private int leftTextColor;//左边Button字体颜色
	private Drawable leftBackground;//左边Button背景色
	private String leftText;//左边button文本

	private int rightTextColor;
	private Drawable rightBackground;
	private String rightText;

	private float titleTextSize;//标题字体大小
	private int titleTextColor;//标题字体颜色
	private String title;//标题内容
	private LayoutParams leftParams, rightParams, titleParams;
	private topBarClickListener listener;

	/**
	 * 接口回调,实现按钮监听模板
	 */
	public interface topBarClickListener {
		public void leftClick();//点击左边按钮监听

		public void rightClick();//点击右边按钮监听
	}

	public void setOnTopBarClickListener(topBarClickListener listener) {
		this.listener = listener;
	}

	public TopBar(Context context, AttributeSet attrs) {
		super(context, attrs);
		//用TypedArray获得TopBar属性回传的值
		TypedArray ta = context.obtainStyledAttributes(attrs,
				R.styleable.TopBar);
        //左边按钮属性值
		leftTextColor = ta.getColor(R.styleable.TopBar_leftTextColor, 0);
		leftBackground = ta.getDrawable(R.styleable.TopBar_leftBackground);
		leftText = ta.getString(R.styleable.TopBar_leftText);
        //右边按钮属性值
		rightTextColor = ta.getColor(R.styleable.TopBar_rightTextColor, 0);
		rightBackground = ta.getDrawable(R.styleable.TopBar_rightBackground);
		rightText = ta.getString(R.styleable.TopBar_rightText);
        //中间标题属性值
		title = ta.getString(R.styleable.TopBar_titleTopBar);
		titleTextColor = ta.getColor(R.styleable.TopBar_titleTextColor, 0);
		titleTextSize = ta.getDimension(R.styleable.TopBar_titleTextSize, 0);
		// 回收,避免浪费资源
		ta.recycle();
        //此处是创建控件对象,通过LayoutParams设置控件属性,也可使用XML界面布局代码创建
		leftBtn = new Button(context);
		rightBtn = new Button(context);
		tvTitle = new TextView(context);

		leftBtn.setTextColor(leftTextColor);
		leftBtn.setBackground(leftBackground);
		leftBtn.setText(leftText);

		rightBtn.setTextColor(rightTextColor);
		rightBtn.setBackground(rightBackground);
		rightBtn.setText(rightText);

		tvTitle.setText(title);
		tvTitle.setTextColor(titleTextColor);
		tvTitle.setTextSize(titleTextSize);
		tvTitle.setGravity(Gravity.CENTER);

		setBackgroundColor(0x66E93EFF);

		leftParams = new LayoutParams(LayoutParams.WRAP_CONTENT,
				LayoutParams.WRAP_CONTENT);
		leftParams.addRule(RelativeLayout.ALIGN_PARENT_LEFT);
		addView(leftBtn, leftParams);

		rightParams = new LayoutParams(LayoutParams.WRAP_CONTENT,
				LayoutParams.WRAP_CONTENT);
		rightParams.addRule(RelativeLayout.ALIGN_PARENT_RIGHT);
		addView(rightBtn, rightParams);

		titleParams = new LayoutParams(LayoutParams.WRAP_CONTENT,
				LayoutParams.MATCH_PARENT);
		titleParams.addRule(RelativeLayout.CENTER_IN_PARENT);
		addView(tvTitle, titleParams);

		leftBtn.setOnClickListener(new OnClickListener() {

			@Override
			public void onClick(View v) {
				listener.leftClick();
			}
		});
		rightBtn.setOnClickListener(new OnClickListener() {

			@Override
			public void onClick(View v) {
				listener.rightClick();
			}
		});
	}

	/**
	 * 定义左边Button是否可见
	 */
	public void setLeftButtonVisiable(boolean flag) {
		if (flag) {
			leftBtn.setVisibility(View.VISIBLE);
		} else {
			leftBtn.setVisibility(View.GONE);
		}
	}

	/**
	 * 定义右边Button是否可见
	 */
	public void setRightButtonVisiable(boolean flag) {
		if (flag) {
			rightBtn.setVisibility(View.VISIBLE);
		} else {
			rightBtn.setVisibility(View.GONE);
		}
	}

	/**
	 * 设置左边Button背景
	 */
	public void setLeftBackground(int resid) {
		leftBtn.setBackgroundResource(resid);
	}

	/**
	 * 设置右边Button背景
	 */
	public void setRightBackground(int resid) {
		rightBtn.setBackgroundResource(resid);
	}

}public class GridItem extends LinearLayout {
private TextView tvGridTitle, tvGridContent;
private ImageView ivGridIcon;
private View gridView;
private String title;
private String content;
private Drawable imageResId;
public GridItem(Context context, AttributeSet attrs) {
super(context, attrs);
// TODO Auto-generated constructor stub
TypedArray ta = context.obtainStyledAttributes(attrs,
R.styleable.GridItem);
gridView = LayoutInflater.from(context).inflate(R.layout.grid_item,
this, true);
tvGridTitle = (TextView) gridView.findViewById(R.id.tvGridTitle);
tvGridContent = (TextView) gridView.findViewById(R.id.tvGridContent);
ivGridIcon = (ImageView) gridView.findViewById(R.id.ivGridIcon);
// 获取自定义属性值
title = ta.getString(R.styleable.GridItem_titlegrid);
content = ta.getString(R.styleable.GridItem_content);
imageResId = ta.getDrawable(R.styleable.GridItem_image);
// 回收一下,避免资源浪费
ta.recycle();
tvGridTitle.setText(title);
tvGridContent.setText(content);
ivGridIcon.setImageDrawable(imageResId);
}
}
三、在XML界面布局使用自定义标签
activity_main.xml布局文件:
xmlns:app="http://schemas.android.com/apk/res/com.example.topbar"
    android:layout_width="match_parent"
    android:layout_height="match_parent" >
首先重点是声明组件的命名空间,作用相当于类中引用包名。
xmlns:app="http://schemas.android.com/apk/res/com.example.topbar与系统的命名空间比较:
系统:xmlns:android="http://schemas.android.com/apk/res/androidres/后面的包名不同。
在AndroidStudio中可以设置为这样:
xmlns:custom="http://schemas.android.com/apk/res-auto
