plantUml 中文指南 plus
用简单语言绘制有用的uml
plantuml
- 1. 时序图
- * 基础概念
- * 元素速查表
- 1.1 简单示例
- 1.2 声明参与者
- 1.3 在参与者中使用非字母符号
- 1.4 给自己发消息
- 1.5 修改箭头样式
- 1.6 修改箭头颜色
- 1.7 对消息序列编号
- 1.8 Page Title, Header and Footer
- 1.9 分割示意图 (可分多个图)
- 1.10 组合消息
- 1.11 给消息添加注释
- 1.12 其他的注释
- 1.13 改变备注框的形状
- 1.14 Creole 和 HTML
- 1.15 分隔符
- 1.16 引用
- 1.17 延迟
- 1.18 空间
- 1.19 生命线的激活与撤销
- 1.20 Return
- 1.21 创建参与者
- 1.22 进入和发出消息
- 1.23 构造类型和圈点
- 1.24 更多标题信息
- 1.25 包裹参与者
- 1.26 移除脚注
- 1.27 外观参数 (skinparam)
- 1.28 填充区设置
- 2. 用例图
- 2.1 用例
- 2.2 角色
- 2.3 用例描述
- 2.5 继承
- 2.6 使用注释
- 2.6 使用注释
- 2.7 构造类型
- 2.8 改变箭头方向
- 2.9 分割图示
- 2.10 从左向右方向
- 2.11 显示参数
- 2.12 一个完整的例子
- 3. 类图
- 3.1 类之间的关系
- 3.2 关系上的标识
- 3.3 添加方法
- 3.4 定义可访问性
- 3.5 抽象与静态
- 3.6 高级类体
- 3.7 备注和模板
- 3.8 更多注释
- 3.9 链接的注释
- 3.10 抽象类和接口
- 3.11 使用非字母字符
- 3.12 隐藏属性、函数等
- 3.13 隐藏类
- 3.14 泛型(generics)
- 3.15 指定标记(Spot)
- 3.16 包
- 3.17 包样式
- 3.18 命名空间(Namespaces)
- 3.19 自动创建命名空间
- 3.20 棒棒糖接口
- 3.21 改变箭头方向
- 3.22 “关系”类
- 3.23 皮肤参数
- 3.24 原型类的皮肤
- 3.25 颜色渐变
- 3.26 辅助布局
- 3.27 拆分大文件
- 4. 活动图
- 4.1 简单活动
- 4.2 箭头上的标签
- 4.3 改变箭头方向
- 4.4 分支
- 4.5 更多分支
- 4.6 同步
- 4.7 长的活动描述
- 4.8 注释
- 4.9 分区
- 4.10 显示参数
- 4.11 八边形活动
- 4.12 一个完整的例子
- 5. 活动图 (新语法)
- 5.1 简单活动图
- 5.2 开始/结束
- 5.3 条件语句
- 5.4 重复循环
- 5.5 while 循环
- 5.6 并行处理
- 5.7 注释
- 5.8 颜色
- 5.9 箭头
- 5.10 连接器 (Connector)
- 5.11 组合 (grouping)
- 5.12 泳道 (Swimlanes)
- 5.13 分离 (detach)
- 5.14 特殊领域语言 (SDL)
- 5.15 一个完整的例子
- 6. 组件图
- 6.1 组件
- 6.2 接口
- 6.3 基础的示例
- 6.4 使用注释
- 6.5 组合组件
- 6.6 改变箭头方向
- 6.7 使用 UML2 标记符
- 6.8 长描述
- 6.9 不同的颜色表示
- 6.10 在定型组件中使用精灵图
- 6.11 显示参数
- 7. 状态图
- 7.1 简单状态
- 7.2 Change state rendering
- 7.3 合成状态
- 7.4 长名字
- 7.5 并发状态
- 7.6 箭头方向
- 7.7 注释
- 7.8 更多注释
- 7.9 显示参数
- 8. 对象图
- 8.1 对象的定义
- 8.2 对象之间的关系
- 8.3 添加属性
- 8.4 类图中的通用特性
- 9. 时序图
- 9.1 声明参与者
- 9.2 增加消息
- 9.3 相对时间
- 9.4 Participant oriented
- 9.5 Setting scale
- 9.6 Initial state
- 9.7 Intricated state
- 9.8 Hidden state
- 9.9 Adding constraint
- 9.10 Adding texts
- 10. 甘特图
- 10.1 Declaring tasks 任务
- 10.2 Adding constraints
- 10.3 Short names
- 10.4 Customize colors
- 10.5 Milestone
- 10.6 Calendar
- 10.7 Close day
- 10.8 Simplified task succession
- 10.9 Separator
- 10.10 Working with resources
- 10.11 Complex example
1. 时序图
* 基础概念
是一种UML交互图。它通过描述对象之间发送消息的时间顺序显示多个对象之间的动态协作。
时序图中包括如下元素:角色,对象,生命线,控制焦点和消息
-
角色(Actor)
系统角色,可以是人或者其他系统,子系统。 -
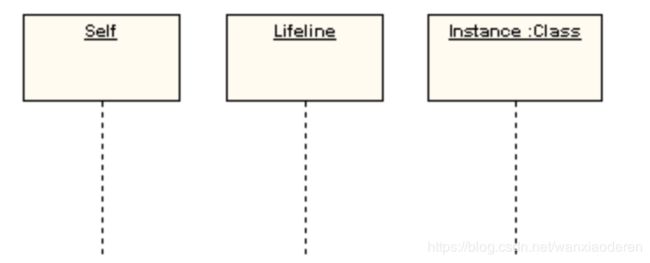
对象(Object)
对象代表时序图中的对象在交互中所扮演的角色,
对象一般包含以下三种命名方式:
第一种方式包含对象名和类名。
第二种方式只显示类名不显示对象名,即为一个匿名对象。
第三种方式只显示对象名不显示类名。 -
生命线(Lifeline)
生命线代表时序图中的对象在一段时期内的存在。时序图中每个对象和底部中心都有一条垂直的虚线,这就是对象的生命线,对象间 的消息存在于两条虚线间。
-
控制焦点(Activation)
控制焦点是顺序图中表示时间段的符号,在这个时间段内对象将执行相应的操作。用小矩形表示。

-
消息(Message)
同步消息 实线+加粗箭头
异步消息 实线+箭头
返回消息 虚线+箭头
消息一般分为同步消息(Synchronous Message),异步消息(Asynchronous Message)和返回消息(Return Message).如下图所示
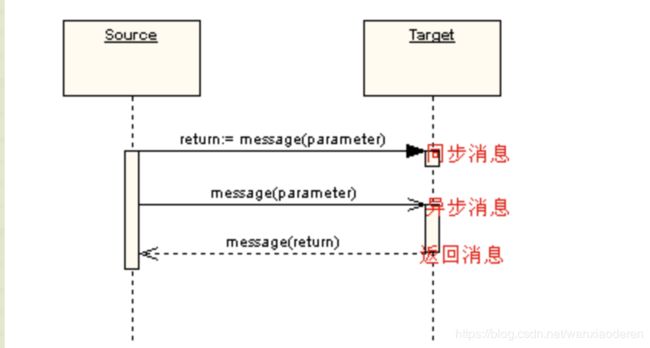
同步消息=调用消息(Synchronous Message)(消息的发送者发送完了 只能等待接受者)
消息的发送者把控制传递给消息的接收者,然后停止活动,等待消息的接收者放弃或者返回控制。用来表示同步的意义。
异步消息(Asynchronous Message)(消息的发送者发送完了 可以继续活动)
消息发送者通过消息把信号传递给消息的接收者,然后继续自己的活动,不等待接受者返回消息或者控制。异步消息的接收者和发送者是并发工作的。
返回消息(Return Message)
返回消息表示从过程调用返回
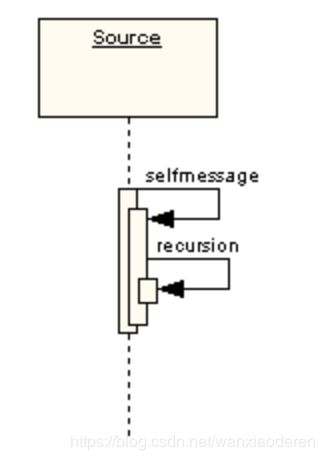
- 自关联消息
表示方法的自身调用以及一个对象内的一个方法调用另外一个方法
* 元素速查表
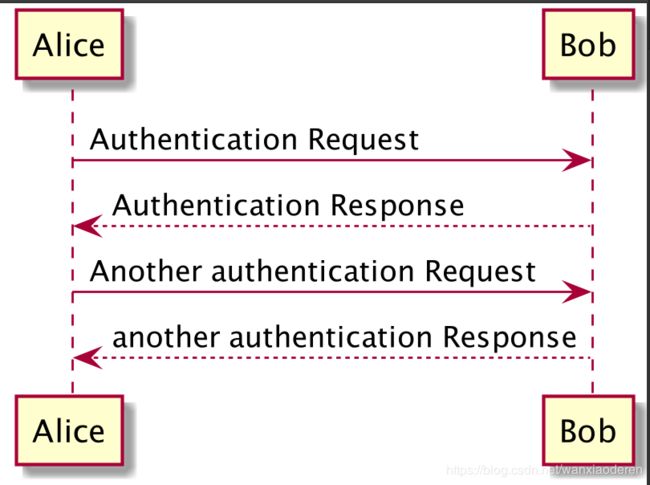
1.1 简单示例
你可以用 -> 来绘制参与者之间传递的消息,而不必显式地声明参与者。
你也可以使用 --> 绘制一个虚线箭头。
另外,你还能用 <- 和 <--,这不影响绘图,但可以提高可读性。注意:仅适用于时序图,对于其它示意
图,规则是不同的。
@startuml
Alice -> Bob: Authentication Request
Bob --> Alice: Authentication Response
Alice -> Bob: Another authentication Request
Alice <-- Bob: another authentication Response
@enduml
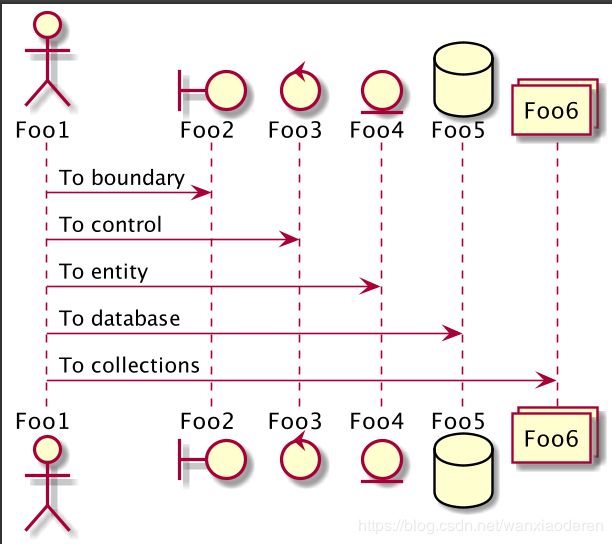
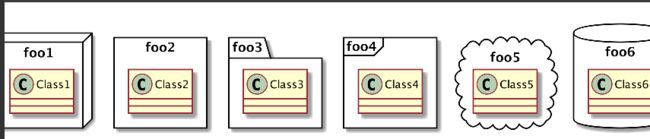
1.2 声明参与者
关键字 participant 用于改变参与者的先后顺序。
你也可以使用其它关键字来声明参与者:
- actor 角色
- boundary 系统边界
- control 系统控制
- entity 实体
- database 数据库
@startuml
actor Foo1
boundary Foo2
control Foo3
entity Foo4
database Foo5
collections Foo6
Foo1 -> Foo2 : To boundary
Foo1 -> Foo3 : To control
Foo1 -> Foo4 : To entity
Foo1 -> Foo5 : To database
Foo1 -> Foo6 : To collections
@enduml
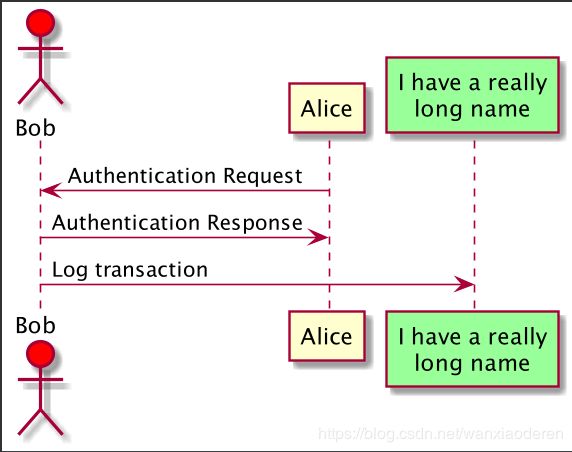
关键字 as 用于重命名参与者
你可以使用 RGB 值或者颜色名修改actor或参与者的背景颜色。
@startuml
actor Bob #red
' The only difference between actor
'and participant is the drawing
participant Alice
participant "I have a really\nlong name" as L #99FF99
/' You can also declare:
participant L as "I have a really\nlong name" #99FF99
'/
Alice->Bob: Authentication Request
Bob->Alice: Authentication Response
Bob->L: Log transaction
@enduml
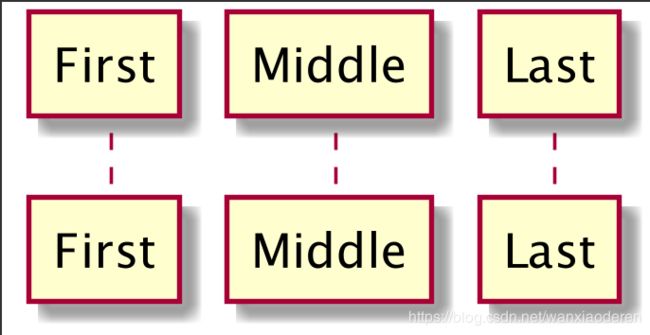
您可以使用关键字 order 自定义顺序来打印参与者。
@startuml
participant Last order 30
participant Middle order 20
participant First order 10
@enduml
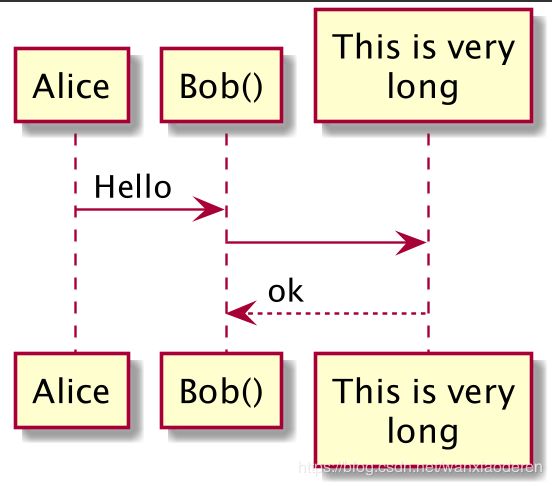
1.3 在参与者中使用非字母符号
你可以使用引号定义参与者,还可以用关键字as 给参与者定义别名。
Alice -> "Bob()" : Hello
"Bob()" -> "This is very\nlong" as Long
' You can also declare:
' "Bob()" -> Long as "This is very\nlong"
Long --> "Bob()" : ok
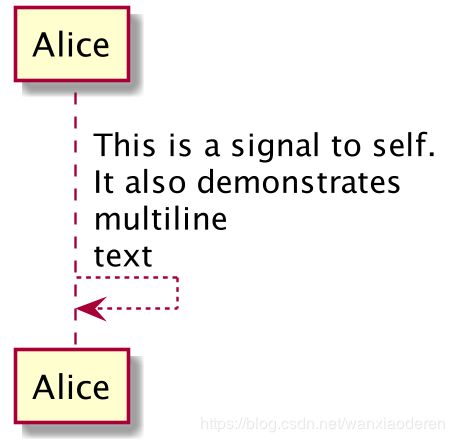
1.4 给自己发消息
参与者可以给自己发信息,
消息文字可以用 \n来换行。
@startuml
Alice --> Alice: This is a signal to self.\nIt also demonstrates\nmultiline \ntext
@enduml
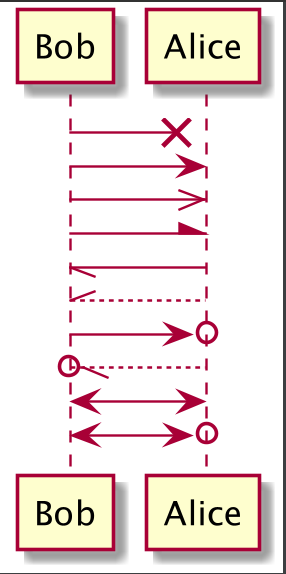
1.5 修改箭头样式
修改箭头样式的方式有以下几种:
- 表示一条丢失的消息:末尾加 x
- 让箭头只有上半部分或者下半部分:将 < 和 > 替换成 \ 或者 /
- 细箭头:将箭头标记写两次 (如 >> 或 //)
- 虚线箭头:用 – 替代 -
- 箭头末尾加圈:->o
- 双向箭头:<->
@startuml
Bob ->x Alice
Bob -> Alice
Bob ->> Alice
Bob -\ Alice
Bob \\- Alice
Bob //-- Alice
Bob ->o Alice
Bob o\\-- Alice
Bob <-> Alice
Bob <->o Alice
@enduml
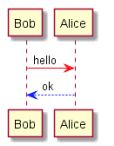
1.6 修改箭头颜色
你可以用以下记号修改箭头的颜色:
@startuml
Bob -[#red]> Alice : hello
Alice -[#0000FF]->Bob : ok
@enduml
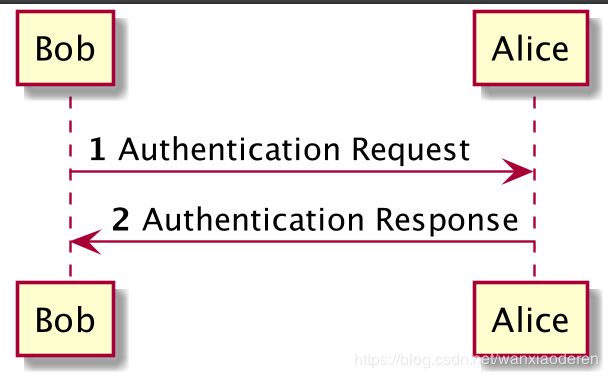
1.7 对消息序列编号
关键字 autonumber 用于自动对消息编号。
@startuml
autonumber
Bob -> Alice : Authentication Request
Bob <- Alice : Authentication Response
@enduml
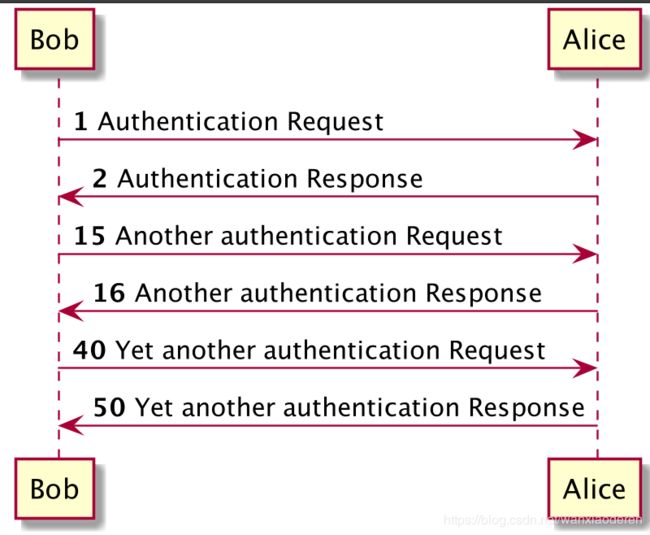
语句 autonumber start用于指定编号的初始值,而autonumber start increment 可以同时指定编号的初始值和每次增加的值。
@startuml
autonumber
Bob -> Alice : Authentication Request
Bob <- Alice : Authentication Response
autonumber 15
Bob -> Alice : Another authentication Request
Bob <- Alice : Another authentication Response
autonumber 40 10
Bob -> Alice : Yet another authentication Request
Bob <- Alice : Yet another authentication Response
@enduml
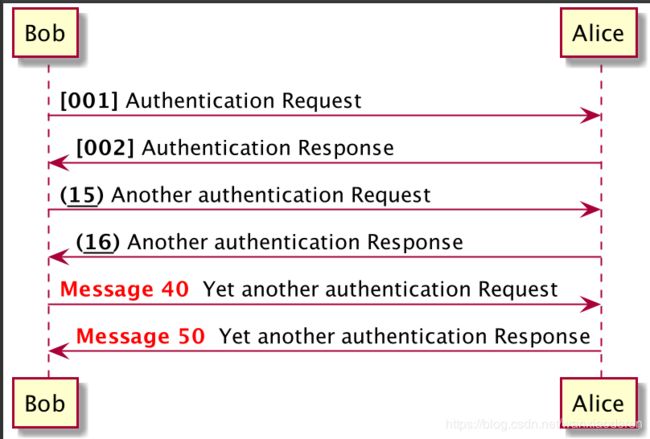
@startuml
autonumber "[000]"
Bob -> Alice : Authentication Request
Bob <- Alice : Authentication Response
autonumber 15 "(##)"
Bob -> Alice : Another authentication Request
Bob <- Alice : Another authentication Response
autonumber 40 10 "Message 0 "
Bob -> Alice : Yet another authentication Request
Bob <- Alice : Yet another authentication Response
@enduml
你还可以用语句 autonumber stop 和 autonumber resume increment format来表示暂停或继续使用自
动编号。
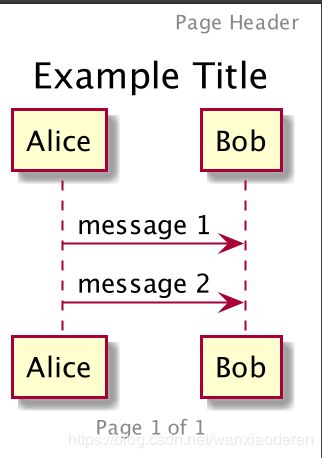
1.8 Page Title, Header and Footer
The title keyword is used to add a title to the page.
@startuml
header Page Header
footer Page %page% of %lastpage%
title Example Title
Alice -> Bob : message 1
Alice -> Bob : message 2
@enduml
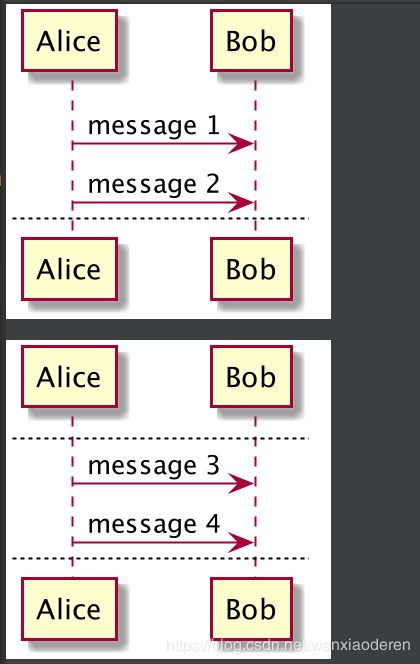
1.9 分割示意图 (可分多个图)
关键字 newpage 用于把一张图分割成多张。
在 newpage 之后添加文字,作为新的示意图的标题。
这样就能很方便地在 Word 中将长图分几页打印。
@startuml
Alice -> Bob : message 1
Alice -> Bob : message 2
newpage
Alice -> Bob : message 3
Alice -> Bob : message 4
newpage A title for the\nlast page
Alice -> Bob : message 5
Alice -> Bob : message 6
@enduml
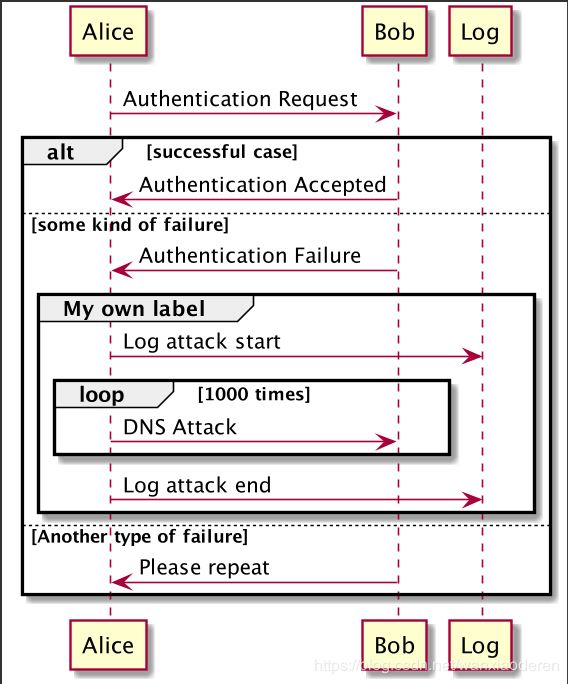
1.10 组合消息
我们可以通过以下关键词将组合消息:
- alt/else 抉择
- opt 选项包含一个可能发生或不发生的序列
- loop 循环
- par 并行
- break 提供了和编程语言中的break类拟的机制;
- critical 排他处理
- group, 后面紧跟着消息内容
可以在标头 (header) 添加需要显示的文字 (group 除外)。
关键词 end 用来结束分组。
注意,分组可以嵌套使用。
@startuml
Alice -> Bob: Authentication Request
alt successful case
Bob -> Alice: Authentication Accepted
else some kind of failure
Bob -> Alice: Authentication Failure
group My own label
Alice -> Log : Log attack start
loop 1000 times
Alice -> Bob: DNS Attack
end
Alice -> Log : Log attack end
end
else Another type of failure
Bob -> Alice: Please repeat
end
@enduml
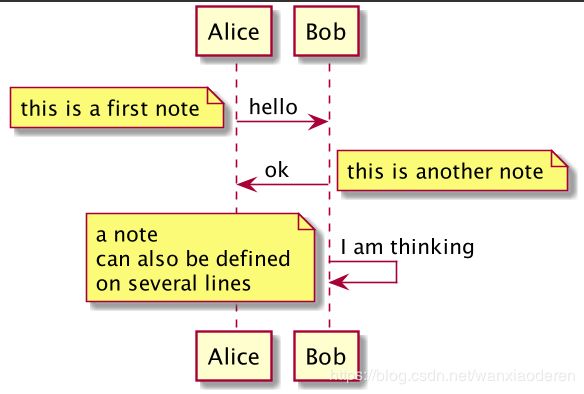
1.11 给消息添加注释
我们可以通过在消息后面添加 note left或者 note right 关键词来给消息添加注释。
你也可以通过使用 end note 来添加多行注释。
@startuml
Alice->Bob : hello
note left: this is a first note
Bob->Alice : ok
note right: this is another note
Bob->Bob : I am thinking
note left
a note
can also be defined
on several lines
end note
@enduml
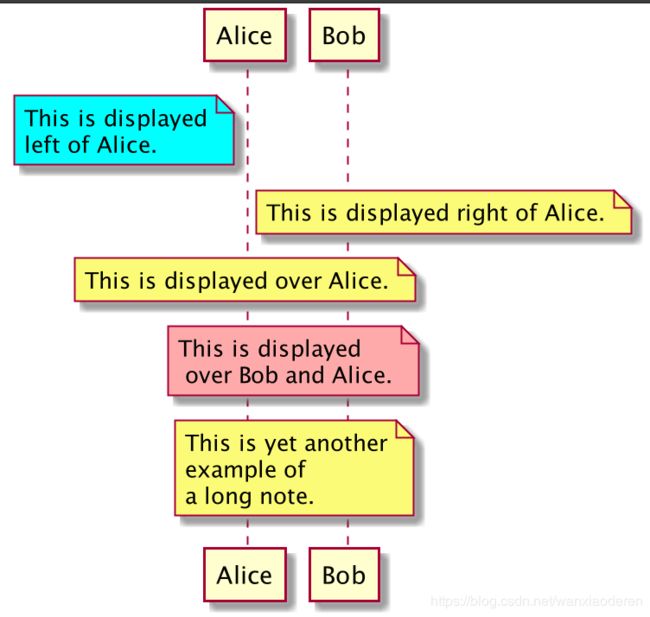
1.12 其他的注释
可以使用 note left of,note right of 或note over 在节点 (participant) 的相对位置放置注释。
还可以通过修改背景色来高亮显示注释。
以及使用关键字 end note 来添加多行注释。
@startuml
participant Alice
participant Bob
note left of Alice #aqua
This is displayed
left of Alice.
end note
note right of Alice: This is displayed right of Alice.
note over Alice: This is displayed over Alice.
note over Alice, Bob #FFAAAA: This is displayed\n over Bob and Alice.
note over Bob, Alice
This is yet another
example of
a long note.
end note
@enduml
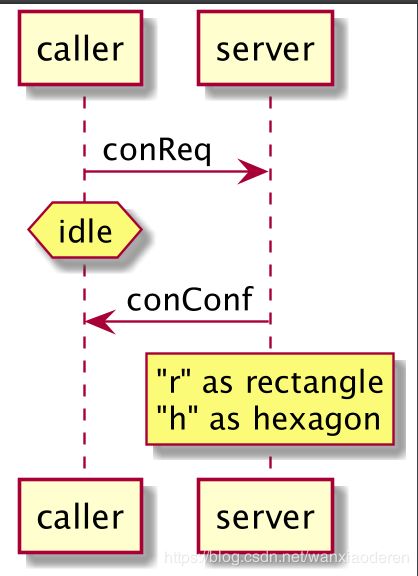
1.13 改变备注框的形状
你可以使用 hnote 和 rnote 这两个关键字来修改备注框的形状。
@startuml
caller -> server : conReq
hnote over caller : idle
caller <- server : conConf
rnote over server
"r" as rectangle
"h" as hexagon
endrnote
@enduml
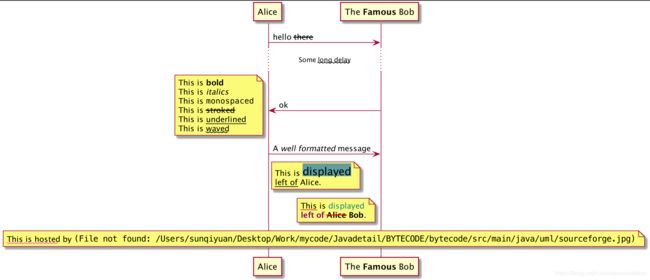
1.14 Creole 和 HTML
可以使用 creole 格式。
@startuml
participant Alice
participant "The **Famous** Bob" as Bob
Alice -> Bob : hello --there--
... Some ~~long delay~~ ...
Bob -> Alice : ok
note left
This is **bold**
This is //italics//
This is ""monospaced""
This is --stroked--
This is __underlined__
This is ~~waved~~
end note
Alice -> Bob : A //well formatted// message
note right of Alice
This is displayed displayedor>
**<color purple>left of Alice Bob**.
end note
note over Alice, Bob
<w:#FF33FF>This is hosted by ![]() end note
@enduml
end note
@enduml
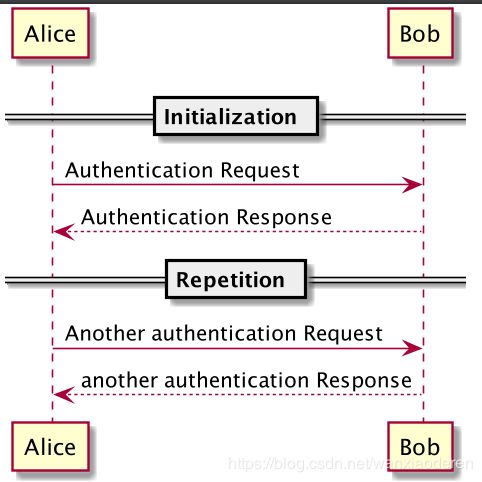
1.15 分隔符
你可以通过使用 == 关键词来将你的图表分割多个步骤。
@startuml
== Initialization ==
Alice -> Bob: Authentication Request
Bob --> Alice: Authentication Response
== Repetition ==
Alice -> Bob: Another authentication Request
Alice <-- Bob: another authentication Response
@enduml
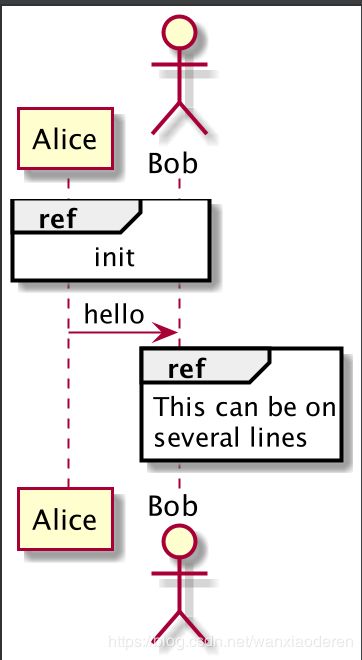
1.16 引用
你可以在图中通过使用 ref over关键词来实现引用
@startuml
participant Alice
actor Bob
ref over Alice, Bob : init
Alice -> Bob : hello
ref over Bob
This can be on
several lines
end ref
@enduml
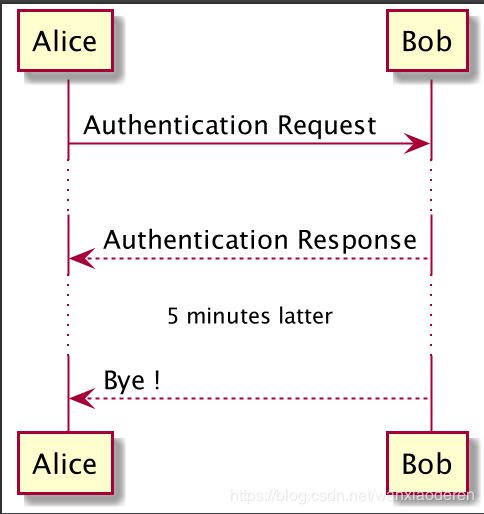
1.17 延迟
你可以使用... 来表示延迟,并且还可以给延迟添加注释。
@startuml
Alice -> Bob: Authentication Request
...
Bob --> Alice: Authentication Response
...5 minutes latter...
Bob --> Alice: Bye !
@enduml
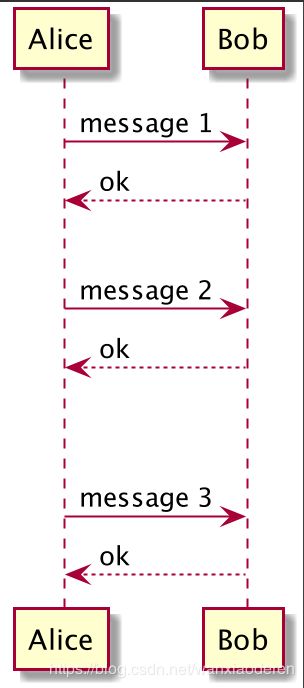
1.18 空间
你可以使用 |||来增加空间。
还可以使用数字指定增加的像素的数量。
@startuml
Alice -> Bob: message 1
Bob --> Alice: ok
|||
Alice -> Bob: message 2
Bob --> Alice: ok
||45||
Alice -> Bob: message 3
Bob --> Alice: ok
@enduml
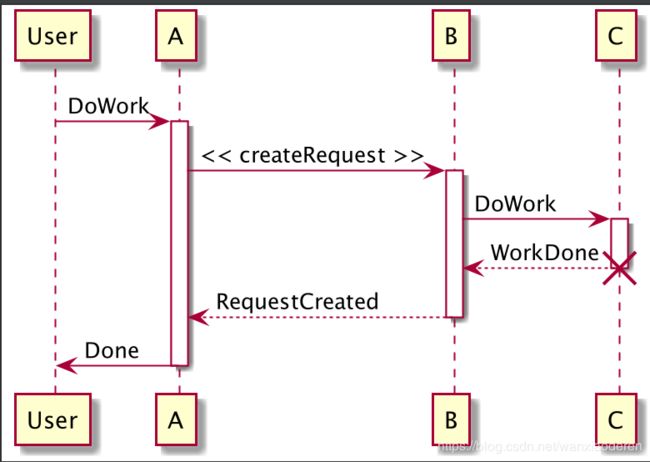
1.19 生命线的激活与撤销
关键字 activate 和 deactivate 用来表示参与者的生命活动。
一旦参与者被激活,它的生命线就会显示出来。
activate和 deactivate 适用于以上情形。
destroy 表示一个参与者的生命线的终结。
@startuml
participant User
User -> A: DoWork
activate A
A -> B: << createRequest >>
activate B
B -> C: DoWork
activate C
C --> B: WorkDone
destroy C
B --> A: RequestCreated
deactivate B
A -> User: Done
deactivate A
@enduml
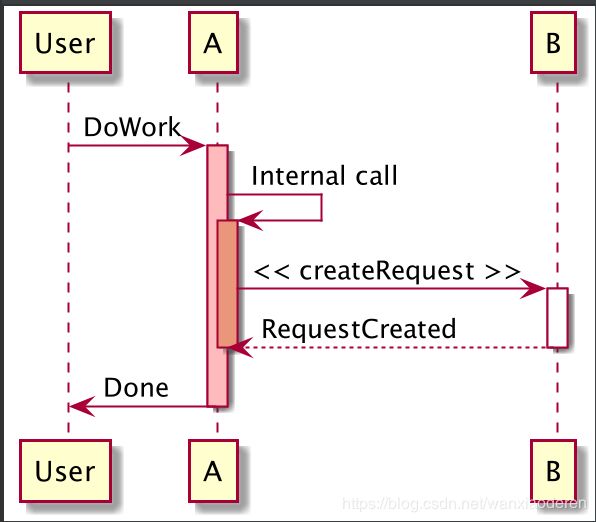
还可以使用嵌套的生命线,并且运行给生命线添加颜色。
@startuml
participant User
User -> A: DoWork
activate A #FFBBBB
A -> A: Internal call
activate A #DarkSalmon
A -> B: << createRequest >>
activate B
B --> A: RequestCreated
deactivate B
deactivate A
A -> User: Done
deactivate A
@enduml
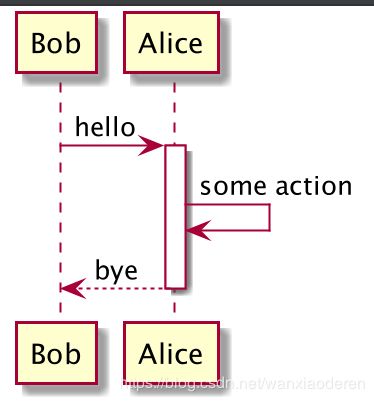
1.20 Return
生成return消息有可选的 方式。表示返回到最近的生命线。
@startuml
Bob -> Alice : hello
activate Alice
Alice -> Alice : some action
return bye
@enduml
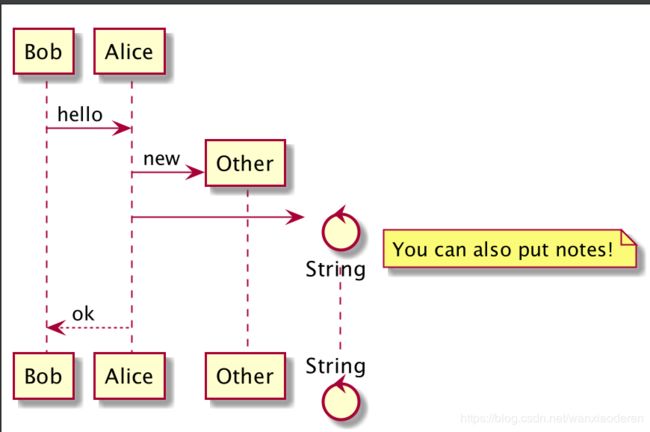
1.21 创建参与者
你可以把关键字 create 放在第一次接收到消息之前,以强调本次消息实际上是在创建新的对象。
@startuml
Bob -> Alice : hello
create Other
Alice -> Other : new
create control String
Alice -> String
note right : You can also put notes!
Alice --> Bob : ok
@enduml
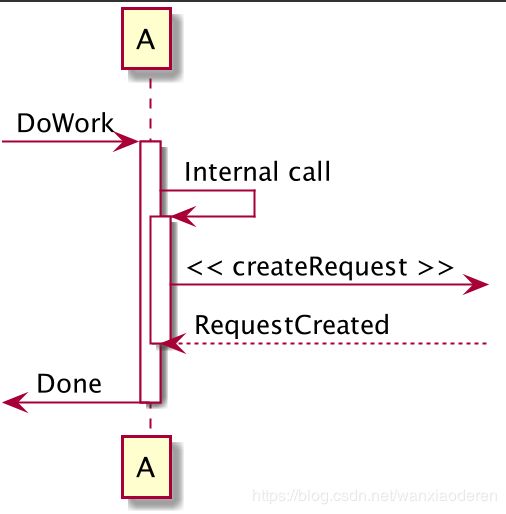
1.22 进入和发出消息
如果只想关注部分图示,你可以使用进入和发出箭头。
使用方括号 [和] 表示图示的左、右两侧。
@startuml
[-> A: DoWork
activate A
A -> A: Internal call
activate A
A ->] : << createRequest >>
A<--] : RequestCreated
deactivate A
[<- A: Done
deactivate A
@enduml
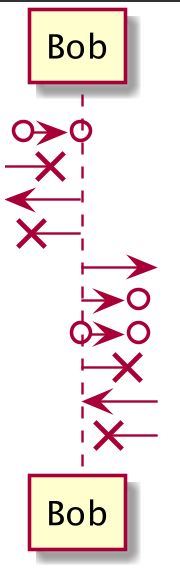
还可以使用下面的语法:
@startuml
[-> Bob
[o-> Bob
[o->o Bob
[x-> Bob
[<- Bob
[x<- Bob
Bob ->]
Bob ->o]
Bob o->o]
Bob ->x]
Bob <-]
Bob x<-]
@enduml
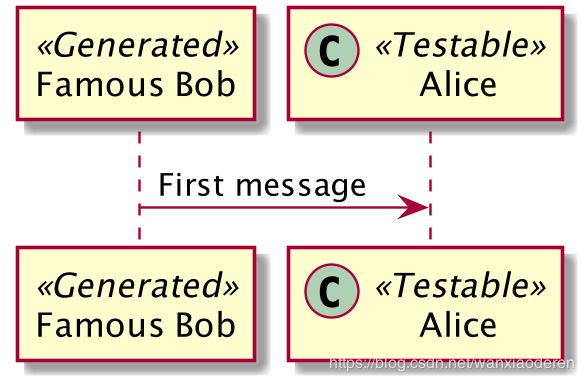
1.23 构造类型和圈点
可以使用 << 和 >> 给参与者添加构造类型。
在构造类型中,你可以使用(X,color)格式的语法添加一个圆圈圈起来的字符。
@startuml
participant "Famous Bob" as Bob << Generated >>
participant Alice << (C,#ADD1B2) Testable >>
Bob->Alice: First message
@enduml
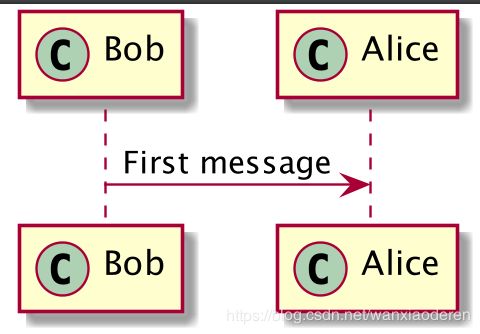
默认使用 guillemet 字符来显示构造类型。你可以使用外观参数 guillemet来修改显示行为。
@startuml
participant Bob << (C,#ADD1B2) >>
participant Alice << (C,#ADD1B2) >>
Bob->Alice: First message
@enduml
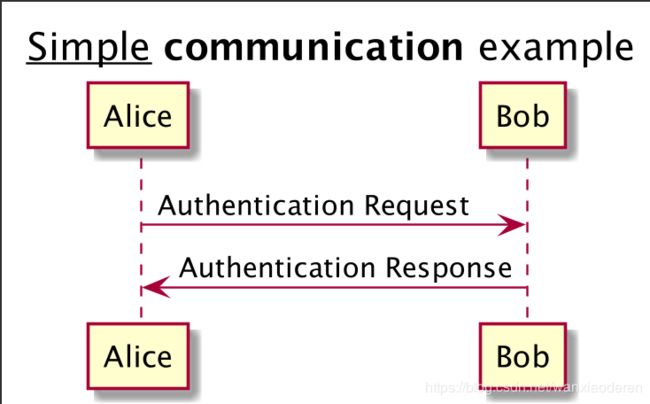
1.24 更多标题信息
你可以在标题中使用 creole 格式。
@startuml
title __Simple__ **communication** example
Alice -> Bob: Authentication Request
Bob -> Alice: Authentication Response
@enduml
在标题描述中使用 \n 表示换行。
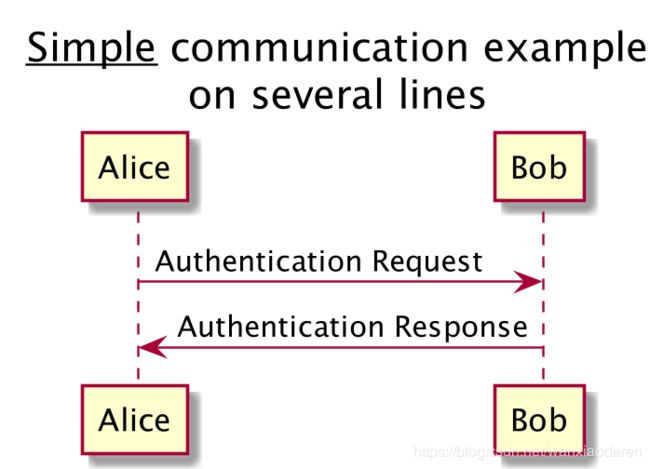
还可以使用关键字 title 和 end title 定义多行标题。
@startuml
title
Simple communication example
on several lines and using <font color=red>html
This is hosted by 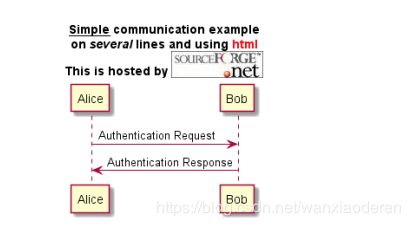
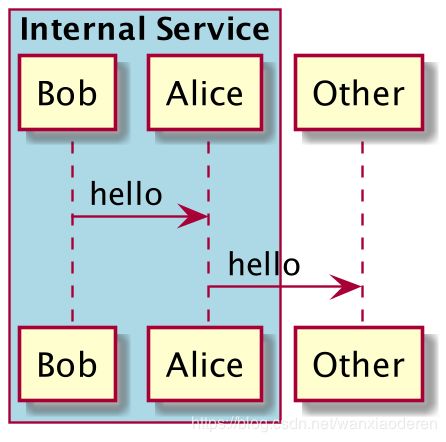
1.25 包裹参与者
可以使用 box 和 end box 画一个盒子将参与者包裹起来。
还可以在 box 关键字之后添加标题或者背景颜色。
@startuml
box "Internal Service" #LightBlue
participant Bob
participant Alice
end box
participant Other
Bob -> Alice : hello
Alice -> Other : hello
@enduml
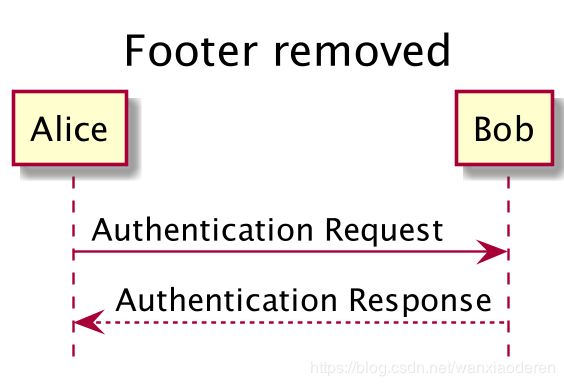
1.26 移除脚注
使用hide footbox 关键字移除脚注。
@startuml
hide footbox
title Footer removed
Alice -> Bob: Authentication Request
Bob --> Alice: Authentication Response
@enduml
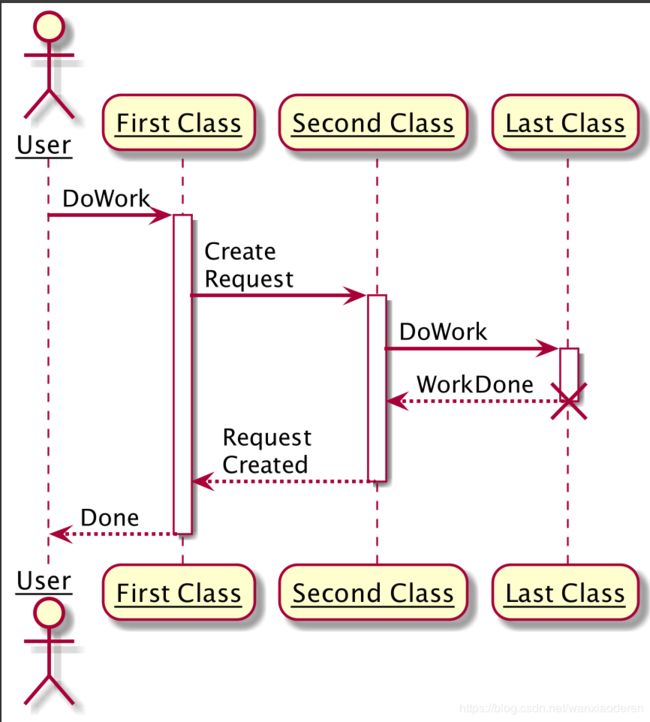
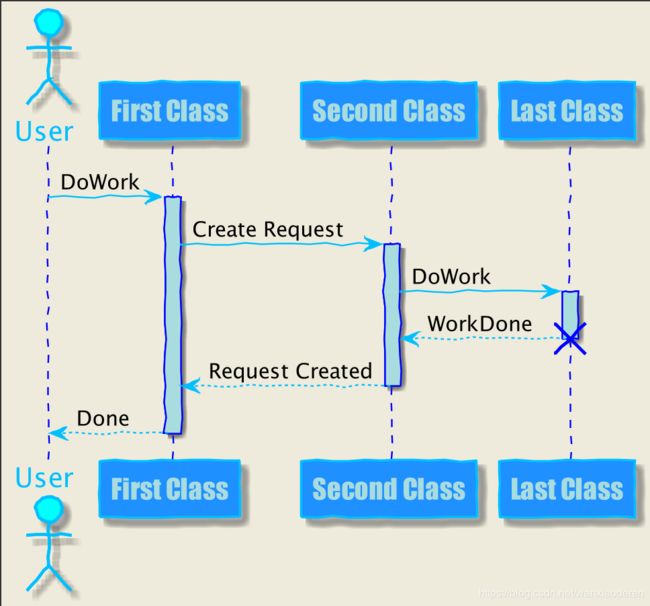
1.27 外观参数 (skinparam)
用 skinparam 改变字体和颜色。
可以在如下场景中使用:
- 在图示的定义中,
- 在引入的文件中,
- 在命令行或者 ANT 任务提供的配置文件中。
你也可以修改其他渲染元素,如以下示例:
@startuml
skinparam sequenceArrowThickness 2
skinparam roundcorner 20
skinparam maxmessagesize 60
skinparam sequenceParticipant underline
actor User
participant "First Class" as A
participant "Second Class" as B
participant "Last Class" as C
User -> A: DoWork
activate A
A -> B: Create Request
activate B
B -> C: DoWork
activate C
C --> B: WorkDone
destroy C
B --> A: Request Created
deactivate B
A --> User: Done
deactivate A
@enduml
}
actor User
participant "First Class" as A
participant "Second Class" as B
participant "Last Class" as C
User -> A: DoWork
activate A
A -> B: Create Request
activate B
B -> C: DoWork
activate C
C --> B: WorkDone
destroy C
B --> A: Request Created
deactivate B
A --> User: Done
deactivate A
@enduml
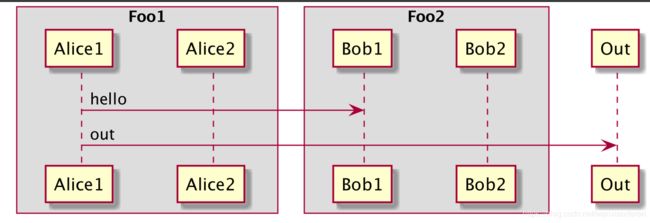
1.28 填充区设置
可以设定填充区的参数配置。
@startuml
skinparam ParticipantPadding 20
skinparam BoxPadding 10
box "Foo1"
participant Alice1
participant Alice2
end box
box "Foo2"
participant Bob1
participant Bob2
end box
Alice1 -> Bob1 : hello
Alice1 -> Out : out
@enduml
2. 用例图
一个简单的例子
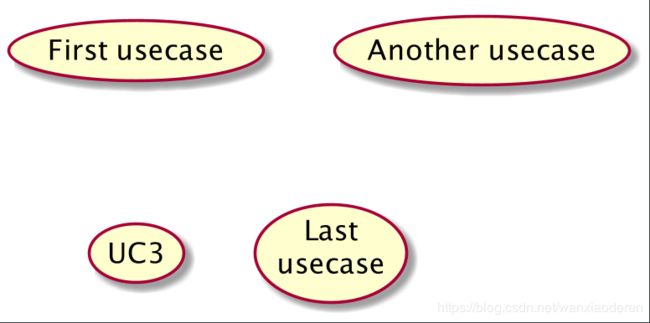
2.1 用例
用例用圆括号括起来。
也可以用关键字 usecase 来定义用例。还可以用关键字 as 定义一个别名,这个别名可以在以后定义关系的时候使用。
@startuml
(First usecase)
(Another usecase) as (UC2)
usecase UC3
usecase (Last\nusecase) as UC4
@enduml
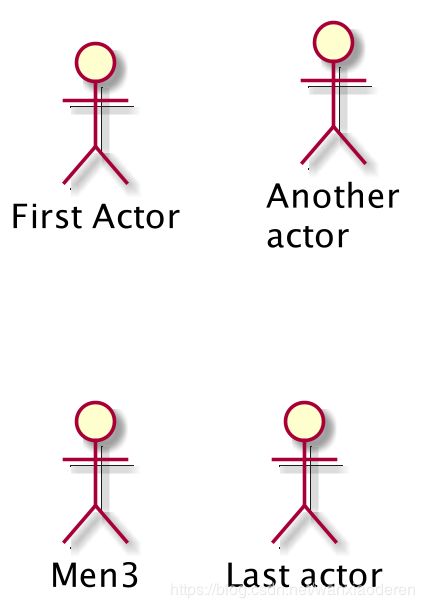
2.2 角色
角色用两个冒号包裹起来。
也可以用 actor 关键字来定义角色。还可以用关键字 as 来定义一个别名,这个别名可以在以后定义关系的时候使用。
后面我们会看到角色的定义是可选的。
@startuml
:First Actor:
:Another\nactor: as Men2
actor Men3
actor :Last actor: as Men4
@enduml
2.3 用例描述
如果想定义跨越多行的用例描述,可以用双引号将其裹起来。
还可以使用这些分隔符:-- .. == __。并且还可以在分隔符中间放置标题。
@startuml
usecase UC1 as "You can use
several lines to define your usecase.
You can also use separators.
\--
Several separators are possible.
\==
And you can add titles:
..Conclusion..
This allows large description."
@enduml
```
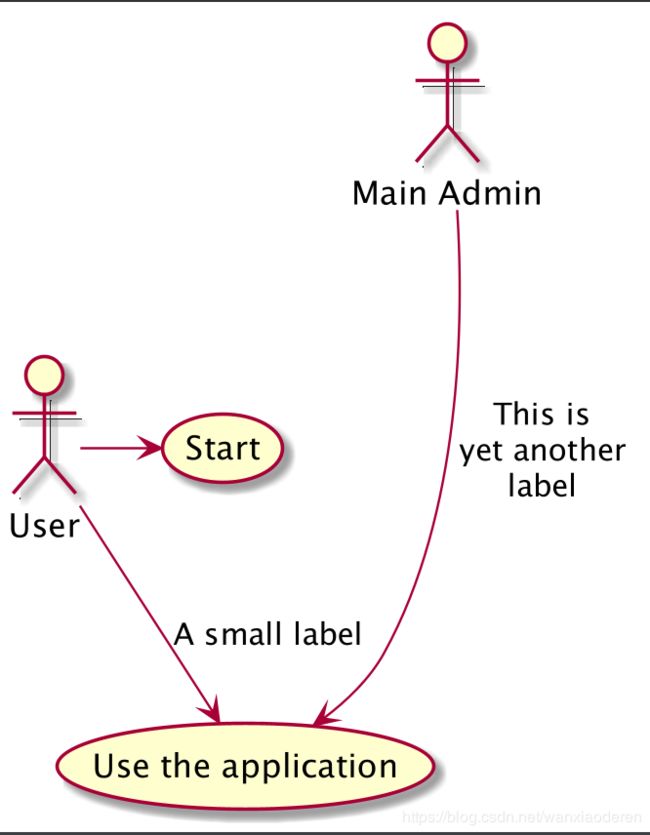
## 2.4 基础示例
用箭头 `--> `连接角色和用例。
横杠 `-`越多,箭头越长。通过在箭头定义的后面加一个冒号及文字的方式来添加标签。
在这个例子中,`User `并没有定义,而是直接拿来当做一个角色使用。
```perl
@startuml
User -> (Start)
User --> (Use the application) : A small label
:Main Admin: ---> (Use the application) : This is\nyet another\nlabel
@enduml
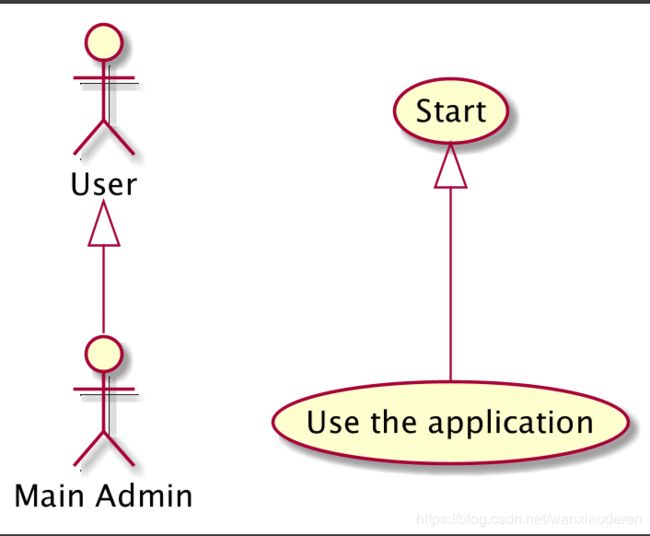
2.5 继承
如果一个角色或者用例继承于另一个,那么可以用 <|–符号表示。
@startuml
:Main Admin: as Admin
(Use the application) as (Use)
User <|-- Admin
(Start) <|-- (Use)
@enduml
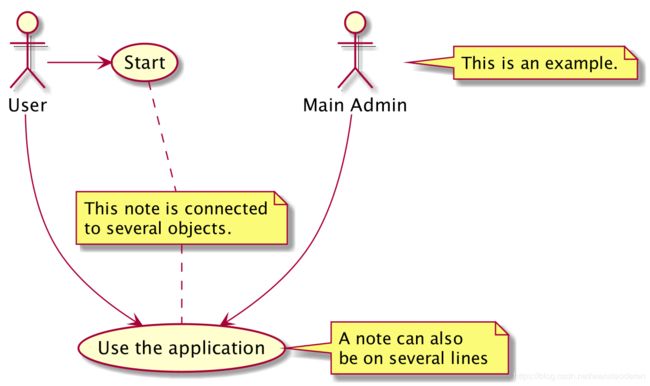
2.6 使用注释
可以用 note left of , note right of , note top of , note bottom of等关键字给一个对象添加注释。
注释还可以通过 note 关键字来定义,然后用… 连接其他对象。
@startuml
:Main Admin: as Admin
(Use the application) as (Use)
User -> (Start)
User --> (Use)

Admin ---> (Use)
note right of Admin : This is an example.
note right of (Use)
A note can also
be on several lines
end note
note "This note is connected\nto several objects." as N2
(Start) .. N2
N2 .. (Use)
@enduml
2.6 使用注释
@startuml
:Main Admin: as Admin
(Use the application) as (Use)
User -> (Start)
User --> (Use)

Admin ---> (Use)
note right of Admin : This is an example.
note right of (Use)
A note can also
be on several lines
end note
note "This note is connected\nto several objects." as N2
(Start) .. N2
N2 .. (Use)
@enduml
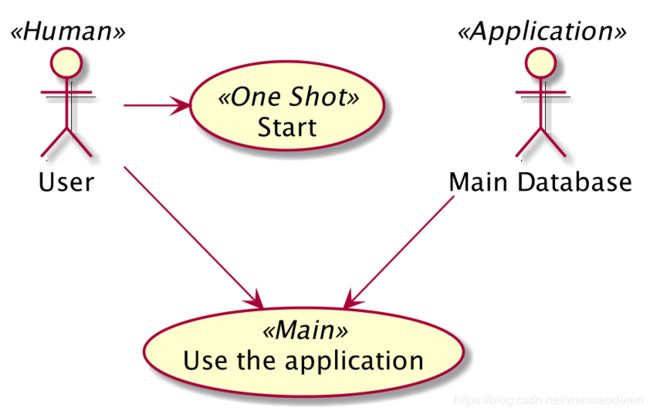
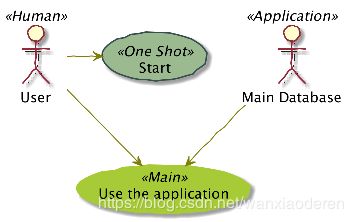
2.7 构造类型
用 << 和 >> 来定义角色或者用例的构造类型。
@startuml
User << Human >>
:Main Database: as MySql << Application >>
(Start) << One Shot >>
(Use the application) as (Use) << Main >>
User -> (Start)
User --> (Use)
MySql --> (Use)
@enduml
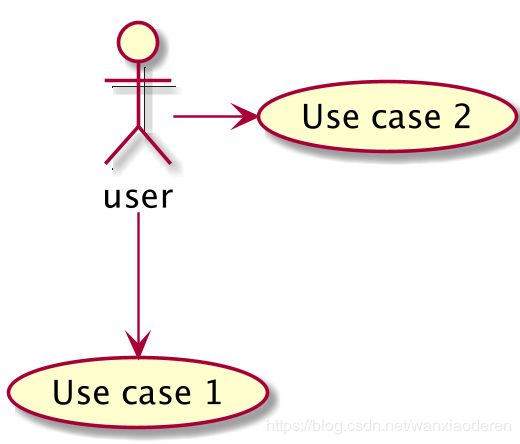
2.8 改变箭头方向
默认连接是竖直方向的,用 --表示,可以用一个横杠或点来表示水平连接。
@startuml
:user: --> (Use case 1)
:user: -> (Use case 2)
@enduml
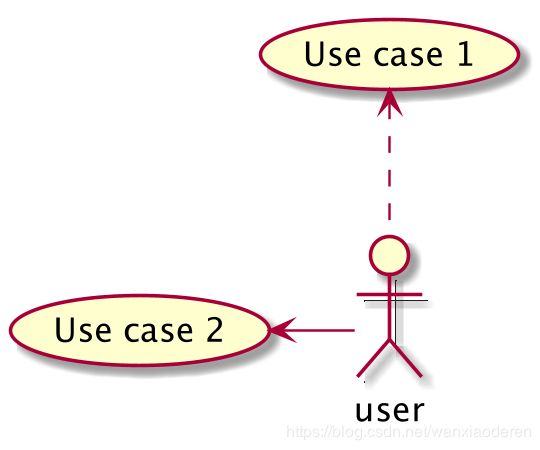
也可以通过翻转箭头来改变方向。
@startuml
(Use case 1) <.. :user:
(Use case 2) <- :user:
@enduml
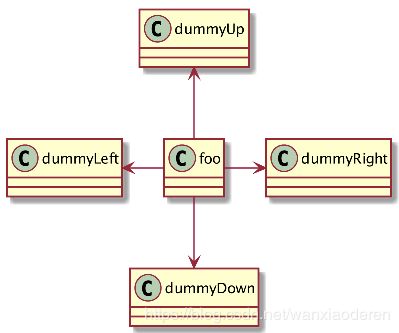
还可以通过给箭头添加left, right, up 或 down 等关键字来改变方向。
@startuml
:user: -left-> (dummyLeft)
:user: -right-> (dummyRight)
:user: -up-> (dummyUp)
:user: -down-> (dummyDown)
@enduml
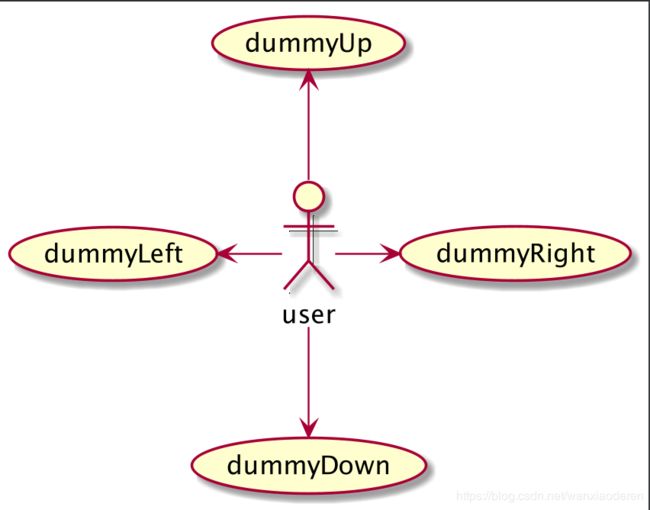
这些方向关键字也可以只是用首字母或者前两个字母的缩写来代替。
但是请注意,这样的缩写不要乱用,Graphviz 不喜欢这样。
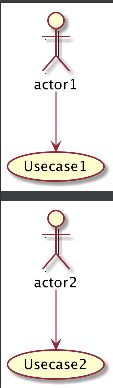
2.9 分割图示
@startuml
:actor1: --> (Usecase1)
newpage
:actor2: --> (Usecase2)
@enduml
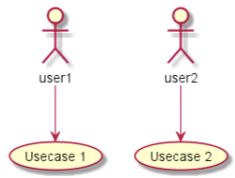
2.10 从左向右方向
@startuml
'default
top to bottom direction
user1 --> (Usecase 1)
user2 --> (Usecase 2)
@enduml
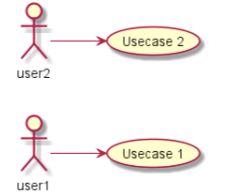
你可以用 left to right direction 命令改变图示方向
@startuml

left to right direction
user1 --> (Usecase 1)
user2 --> (Usecase 2)
@enduml
2.11 显示参数
用 skinparam 改变字体和颜色。 可以在如下场景中使用:
- 在图示的定义中,
- 在引入的文件中,
- 在命令行或者 ANT 任务提供的配置文件中。
你也可以给构造的角色和用例指定特殊颜色和字体。
@startuml
skinparam handwritten true
skinparam usecase {
BackgroundColor DarkSeaGreen
BorderColor DarkSlateGray
BackgroundColor<< Main >> YellowGreen
BorderColor<< Main >> YellowGreen
ArrowColor Olive
ActorBorderColor black
ActorFontName Courier
ActorBackgroundColor<< Human >> Gold
}

User << Human >>
:Main Database: as MySql << Application >>
(Start) << One Shot >>
(Use the application) as (Use) << Main >>
User -> (Start)
User --> (Use)
MySql --> (Use)
@enduml
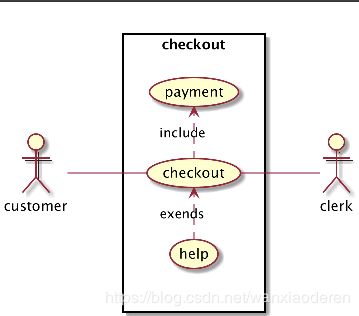
2.12 一个完整的例子
@startuml
left to right direction
skinparam packageStyle rectangle
actor customer
actor clerk
rectangle checkout {
  customer -- (checkout)
  (checkout) .> (payment) : include
  (help) .> (checkout) : extends
  (checkout) -- clerk
}
@enduml
3. 类图
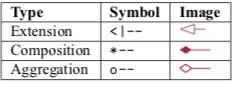
3.1 类之间的关系
类之间的关系通过下面的符号定义:
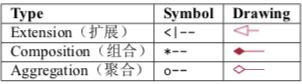
使用… 来代替 – 可以得到点线.
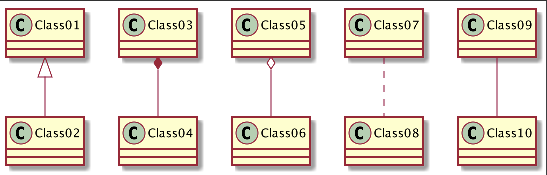
在这些规则下,也可以绘制下列图形
@startuml
Class01 <|-- Class02
Class03 *-- Class04
Class05 o-- Class06
Class07 .. Class08
Class09 -- Class10
@enduml
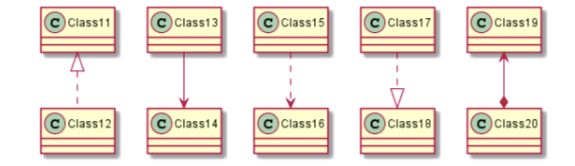
@startuml
Class11 <|.. Class12
Class13 --> Class14
Class15 ..> Class16
Class17 ..|> Class18
Class19 <--* Class20
@enduml
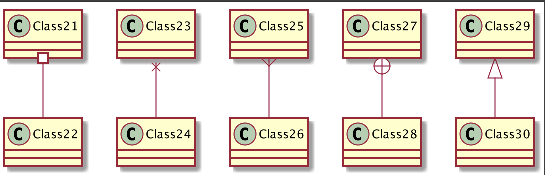
@startuml
Class21 #-- Class22
Class23 x-- Class24
Class25 }-- Class26
Class27 +-- Class28
Class29 ^-- Class30
@enduml
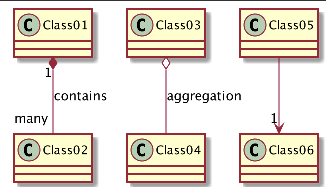
3.2 关系上的标识
在关系之间使用标签来说明时, 使用 : 后接标签文字。 对元素的说明,你可以在每一边使用 “” 来说明.
@startuml
Class01 "1" *-- "many" Class02 : contains
Class03 o-- Class04 : aggregation
Class05 --> "1" Class06
@enduml
@startuml
class Car
Driver - Car : drives >
Car *- Wheel : have 4 >
Car -- Person : < owns
@enduml

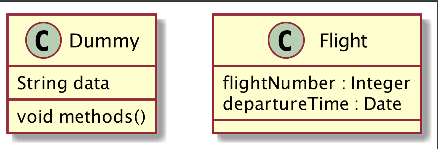
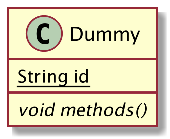
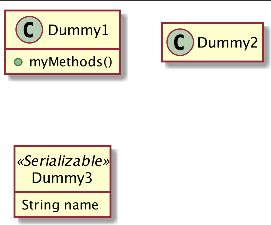
3.3 添加方法
为了声明字段 (对象属性)或者方法,你可以使用后接字段名或方法名。
系统检查是否有括号来判断是方法还是字段。
也可以使用 {} 把字段或者方法括起来 注意,这种语法对于类型/名字的顺序是非常灵活的。
@startuml
class Dummy {
String data
  void methods()
}
class Flight {
   flightNumber : Integer
   departureTime : Date
}
@enduml
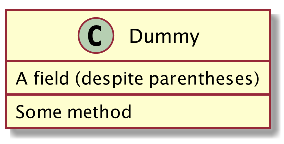
你可以(显式地)使用 {field} 和 {method}修饰符来覆盖解析器的对于字段和方法的默认行为
@startuml
class Dummy {
  {field} A field (despite parentheses)
  {method} Some method
}
@enduml
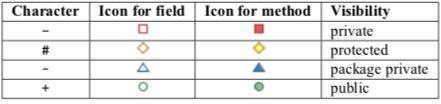
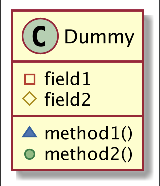
3.4 定义可访问性
一旦你定义了域或者方法,你可以定义相应条目的可访问性质。
@startuml
class Dummy {
 -field1
 #field2
 ~method1()
 +method2()
} @enduml
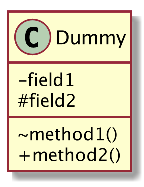
你可以采用以下命令停用这些特性 skinparam classAttributeIconSize 0:
@startuml
skinparam classAttributeIconSize 0
class Dummy {
 -field1
 #field2
 ~method1()
 +method2()
}
@enduml
3.5 抽象与静态
通过修饰符 {static} 或者 {abstract},可以定义静态或者抽象的方法或者属性。 这些修饰符可以写在行的开始或者结束。也可以使用 {classifier} 这个修饰符来代替{static}.
@startuml
class Dummy {
  {static} String id
  {abstract} void methods()
}
@enduml
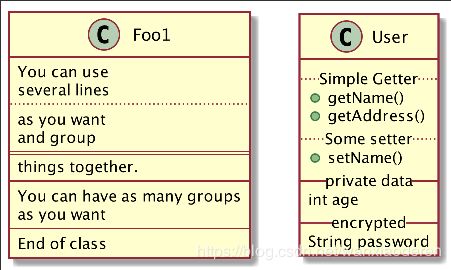
3.6 高级类体
PlantUML 默认自动将方法和属性重新分组,你可以自己定义分隔符来重排方法和属性,下面的分隔符都
是可用的:-- .. == __.
还可以在分隔符中添加标题:
@startuml
class Foo1 {
  You can use
  several lines
  ..
  as you want
  and group
  ==
  things together.
  __
  You can have as many groups
  as you want
  --
  End of class
}
class User {
  .. Simple Getter ..
  + getName()
  + getAddress()
  .. Some setter ..
  + setName()
  __ private data __
  int age
  -- encrypted --
  String password
} @enduml
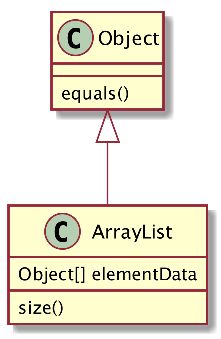
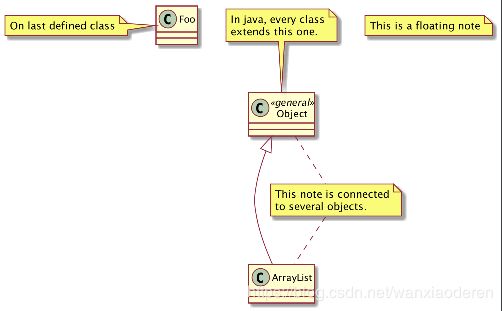
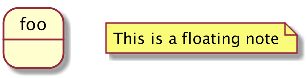
3.7 备注和模板
模板通过类关键字 ("<<" 和">>") 来定义
你可以使用 note left of , note right of , note top of , note bottom of这些关键字来添加备注。 你还可以在类的声明末尾使用 note left, note right,note top, note bottom 来添加备注。 此外,单独用 note 这个关键字也是可以的,使用 ..符号可以作出一条连接它与其它对象的虚线。
@startuml
class Object << general >>
Object <|--- ArrayList
note top of Object : In java, every class\nextends this one.
note "This is a floating note" as N1
note "This note is connected\nto several objects." as N2
Object .. N2
N2 .. ArrayList
class Foo
note left: On last defined class
@enduml
3.8 更多注释
可以在注释中使用部分 html 标签:
,,- or
or
你也可以在注释中展示多行。
你也可以在定义的 class 之后直接使用 note left, note right, note top, note bottom 来定义注释。
@startuml
class Foo
note left: On last defined class
note top of Object
In java, 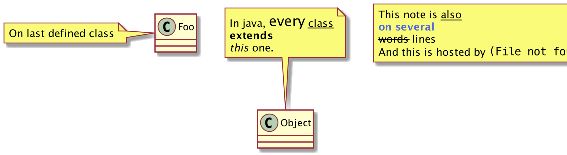
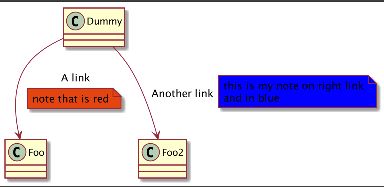
3.9 链接的注释
在定义链接之后,你可以用 note on link 给链接添加注释
如果想要改变注释相对于标签的位置,你也可以用 note left on link,note right on link,note bottom on link。(对应位置分别在 label的左边,右边,下边)
3.10 抽象类和接口
用关键字 abstract 或 abstract class 来定义抽象类。抽象类用斜体显示。也可以使用 interface,
annotation 和 enum 关键字。
@startuml
abstract class AbstractList
abstract AbstractCollection
interface List
interface Collection
List <|-- AbstractList
Collection <|-- AbstractCollection
Collection <|- List
AbstractCollection <|- AbstractList
AbstractList <|-- ArrayList
class ArrayList {
  Object[] elementData
  size()
}

annotation SuppressWarnings

enum TimeUnit {
DAYS
HOURS
MINUTES
}
@enduml

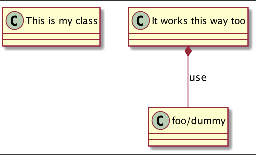
3.11 使用非字母字符
如果你想在类(或者枚举)的显示中使用非字母符号,你可以:
- 在类的定义中使用as关键字
- 在类名旁边加上""
@startuml
class "This is my class" as class1
class class2 as "It works this way too"
class2 *-- "foo/dummy" : use
@enduml
3.12 隐藏属性、函数等
通过使用命令“hide/show”,你可以用参数表示类的显示方式。 基础命令是: hide empty members. 这个命令会隐藏空白的方法和属性。 除 empty members 外,你可以用:
- empty fields 或者 empty attributes 空属性,
- empty methods 空函数,
- fields或attributes隐藏字段或属性,即使是被定义了 • methods隐藏方法,即使是被定义了
- members隐藏字段和方法,即使是被定义了
- circle类名前带圈的
- stereotype原型。
同样可以使用 hide 或 show 关键词,对以下内容进行设置: - class所有类,
- interface所有接口,
- enum所有枚举,
- <
> 实现 foo1 的类, • 一个既定的类名。
你可以使用 show/hide 命令来定义相关规则和例外。
3.13 隐藏类
你也可以使用 show/hide 命令来隐藏类
如果你定义了一个大的!included 文件,且想在文件包含之后隐藏部分类,该功能会很有帮助。
@startuml
class Foo1
class Foo2
Foo2 *-- Foo1
hide Foo2
@enduml

3.14 泛型(generics)
你可以用 < 和 > 来定义类的泛型。
@startuml
class Foo<? extends Element> {
  int size()
}
Foo *- Element
@enduml

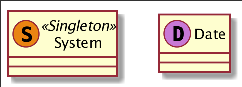
3.15 指定标记(Spot)
通常标记字符 (C, I, E or A) 用于标记类 (classes), 接口(interface), 枚举(enum)和抽象类(abstract classes) .
但是当你想定义原型时,可以增加对应的单个字符及颜色,来定义自己的标记(spot),就像下面一样:
@startuml
class System << (S,#FF7700) Singleton >>
class Date << (D,orchid) >>
@enduml
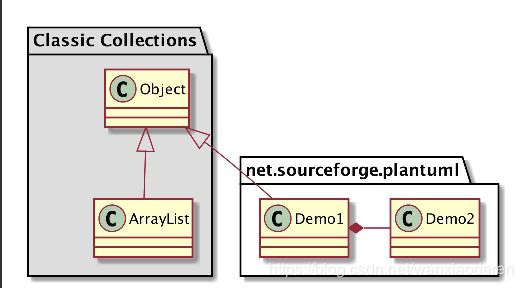
3.16 包
@startuml
package "Classic Collections" #DDDDDD {
  Object <|-- ArrayList
}
package net.sourceforge.plantuml {
 Object <|-- Demo1
  Demo1 *- Demo2
}
@enduml
3.17 包样式
包可以定义不同的样式。
你可以通过以下的命令来设置默认样式: skinparam packageStyle, 或者对包使用对应的模板:
@startuml
scale 750 width
package foo1 <> {
  class Class1
}
package foo2 <> {
  class Class2
}
package foo3 <> {
  class Class3
}
package foo4 <> {
  class Class4
}
package foo5 <> {
  class Class5
}
package foo6 <> {
  class Class6
} @enduml
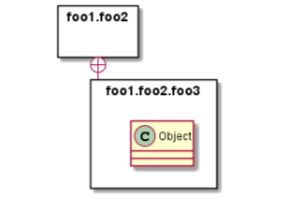
你也可以参考下面的示例来定义包之间的连线:
@startuml
skinparam packageStyle rectangle
package foo1.foo2 {
}
package foo1.foo2.foo3 {
  class Object
}
foo1.foo2 +-- foo1.foo2.foo3
@enduml
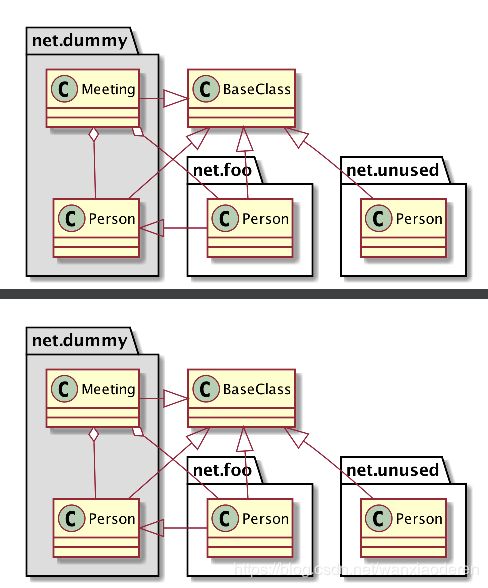
3.18 命名空间(Namespaces)
在使用包(package)时(区别于命名空间),类名是类的唯一标识。也就意味着,在不同的包(package)中的类,不能使用相同的类名。
在那种情况下(译注:同名、不同全限定名类),你应该使用命名空间来取而代之。
你可以从其他命名空间,使用全限定名来引用类,默认命名空间(译注:无名的命名空间)下的类,以一 个“." 开头(的类名)来引用(译注:示例中的 BaseClass).
注意:你不用显示地创建命名空间:一个使用全限定名的类会自动被放置到对应的命名空间。
@startuml
class BaseClass
namespace net.dummy #DDDDDD {
Meeting o-- Person
.BaseClass <|- Meeting
}
namespace net.foo {
  net.dummy.Person  <|- Person
  .BaseClass <|-- Person
  net.dummy.Meeting o-- Person
}
BaseClass <|-- net.unused.Person
@enduml
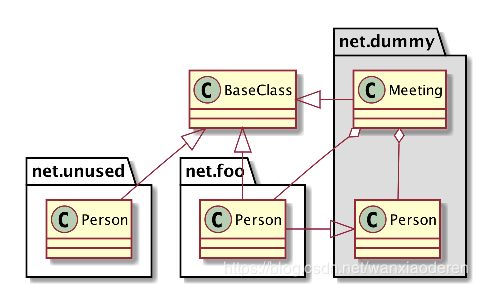
.BaseClass为默认命名空间下的类 -net.unused. 为自动生成的命名空间
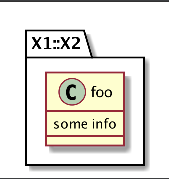
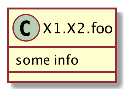
3.19 自动创建命名空间
使用命令 set namespaceSeparator ??? 你可以自定义命名空间分隔符(为“.”以外的字符).
@startuml
set namespaceSeparator ::
class X1::X2::foo {
some info
}

@enduml
禁止自动创建包则可以使用 set namespaceSeparator none.
@startuml
set namespaceSeparator none
class X1.X2.foo {
some info
}
@enduml
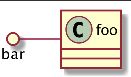
3.20 棒棒糖接口
需要定义棒棒糖样式的接口时可以遵循以下语法:
- bar ()- foo
- bar ()-- foo
- foo -() bar
@startuml
class foo
bar ()- foo
@enduml
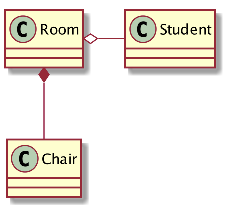
3.21 改变箭头方向
类之间默认采用两个破折号 – 显示出垂直方向的线. 要得到水平方向的可以像这样使用单破折号 (或者点):
@startuml
Room o- Student
Room *-- Chair
@enduml
你也可以通过改变倒置链接来改变方向
@startuml
Student -o Room
Chair --* Room
@enduml

也可通过在箭头内部使用关键字,例如left, right, up 或者 down,来改变方向
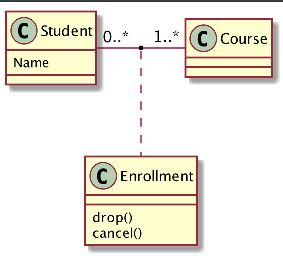
3.22 “关系”类
你可以在定义了两个类之间的关系后定义一个 关系类 association class 例如:
@startuml
class Student
{
Name
}
Student "0..*" - "1..*" Course
(Student, Course) .. Enrollment
class Enrollment
{
 drop()
cancel()
}
@enduml
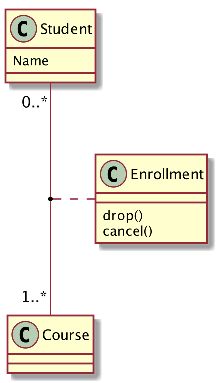
也可以用另一种方式:
@startuml
class Student
{
Name
}
Student "0..*" -- "1..*" Course
(Student, Course) . Enrollment
class Enrollment
{
  drop()
cancel()
}
@enduml
3.23 皮肤参数
用 skinparam 改变字体和颜色。 可以在如下场景中使用:
- 在图示的定义中,
- 在引入的文件中,
- 在命令行或者 ANT 任务提供的配置文件中。
@startuml
skinparam class {
BackgroundColor PaleGreen
ArrowColor SeaGreen
BorderColor SpringGreen
}
skinparam stereotypeCBackgroundColor YellowGreen
Class01 "1" *-- "many" Class02 : contains
Class03 o-- Class04 : aggregation
@enduml

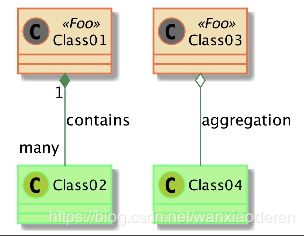
3.24 原型类的皮肤
@startuml
skinparam class {
BackgroundColor PaleGreen
ArrowColor SeaGreen
BorderColor SpringGreen
BackgroundColor<> Wheat
BorderColor<> Tomato
}
skinparam stereotypeCBackgroundColor YellowGreen
skinparam stereotypeCBackgroundColor<< Foo >> DimGray
Class01 <>
Class03 <>
Class01 "1" *-- "many" Class02 : contains
Class03 o-- Class04 : aggregation
@enduml
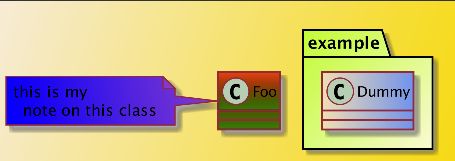
3.25 颜色渐变
可以把两种颜色放在一起组成渐变效果,依赖
- |,
- /,
- \,
- -
分割
@startuml
skinparam backgroundcolor AntiqueWhite/Gold
skinparam classBackgroundColor Wheat|CornflowerBlue
class Foo #red-green
note left of Foo #blue\9932CC
this is my
  note on this class
end note
package example #GreenYellow/LightGoldenRodYellow {
  class Dummy
}
@enduml
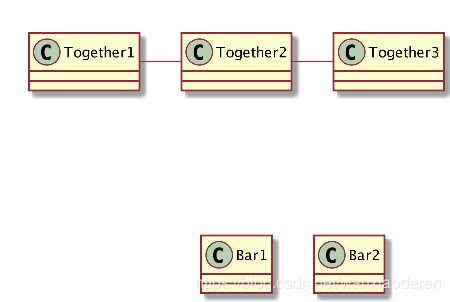
3.26 辅助布局
有时候,默认布局并不完美…
你可以使用together 关键词将某些类进行分组:布局引擎会尝试将它们捆绑在一起(如同在一个包 (package) 内)
你也可以使用建立 隐藏链接的方式来强制布局
@startuml
class Bar1
class Bar2
together {
  class Together1
  class Together2
  class Together3
}
Together1 - Together2
Together2 - Together3
Together2 -[hidden]--> Bar1
Bar1 -[hidden]> Bar2
3.27 拆分大文件
有些情况下,会有一些很大的图片文件。
可以用 page (hpages)x(vpages)这个命令把生成的图片文件拆分成若干个文件。 hpages 用来表示水平方向页面数,and vpages 用来表示垂直方面页面数。 你也可以使用特定的皮肤设定来给分页添加边框(见例子)
@startuml
' Split into 4 pages
page 2x2
skinparam pageMargin 10
skinparam pageExternalColor gray
skinparam pageBorderColor black
class BaseClass
namespace net.dummy #DDDDDD {
.BaseClass <|-- Person
Meeting o-- Person
.BaseClass <|- Meeting
}
namespace net.foo {
  net.dummy.Person  <|- Person
  .BaseClass <|-- Person
  net.dummy.Meeting o-- Person
}
BaseClass <|-- net.unused.Person
@enduml
4. 活动图
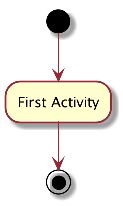
4.1 简单活动
使用(*)作为活动图的开始点和结束点。 有时,你可能想用(*top)强制开始点位于图示的顶端。 使用-->绘制箭头。
@startuml
(*) --> "First Activity"
"First Activity" --> (*)
@enduml
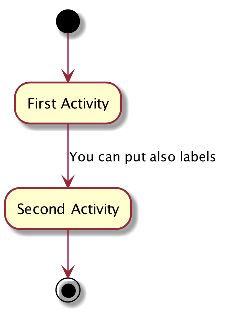
4.2 箭头上的标签
默认情况下,箭头开始于最接近的活动。 可以用 [和] 放在箭头定义的后面来添加标签
@startuml
(*) --> "First Activity"
-->[You can put also labels] "Second Activity"
--> (*)
@enduml
4.3 改变箭头方向
你可以使用 -> 定义水平方向箭头,还可以使用下列语法强制指定箭头的方向:
- -down-> (default arrow)
PlantUML 语言参考指引 (1.2019.9) - -right-> or -> • -left->
- -up->
@startuml
(*) -up-> "First Activity"
-right-> "Second Activity"
--> "Third Activity"
-left-> (*)
@enduml
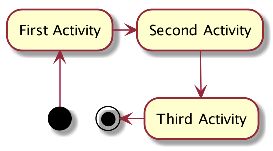
4.4 分支
你可以使用关键字 if/then/else 创建分支。
@startuml
(*) --> "Initialization"
if "Some Test" then
  -->[true] "Some Activity"
  --> "Another activity"
  -right-> (*)
else
  ->[false] "Something else"
  -->[Ending process] (*)
endif
@enduml
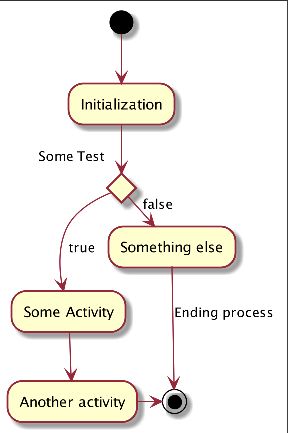
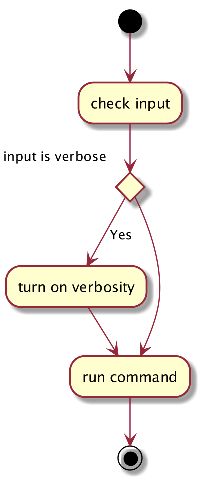
不过,有时你可能需要重复定义同一个活动:
@startuml
(*)  --> "check input"
If "input is verbose" then
--> [Yes] "turn on verbosity"
--> "run command"
else
--> "run command"
Endif
-->(*)
@enduml
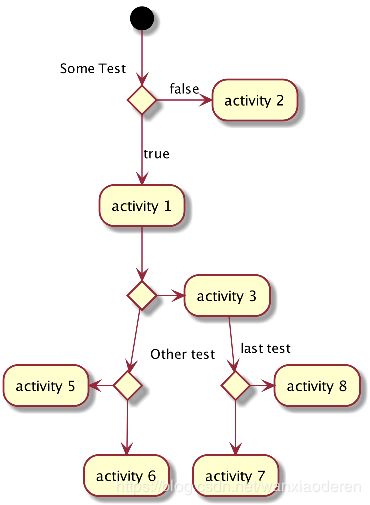
4.5 更多分支
默认情况下,一个分支连接上一个最新的活动,但是也可以使用 if 关键字进行连接。 还可以嵌套定义分支。
@startuml
(*) --> if "Some Test" then
  -->[true] "activity 1"
  if "" then
-> "activity 3" as a3
  else
if "Other test" then
  -left-> "activity 5"
else
  --> "activity 6"
endif
endif
else
  ->[false] "activity 2"
endif
 a3 --> if "last test" then
  --> "activity 7"
else
  -> "activity 8"
endif
@enduml
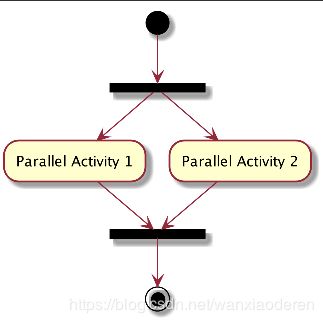
4.6 同步
你可以使用=== code === 来显示同步条。
@startuml
(*) --> ===B1===
--> "Parallel Activity 1"
--> ===B2===
===B1=== --> "Parallel Activity 2"
--> ===B2===
--> (*)
@enduml
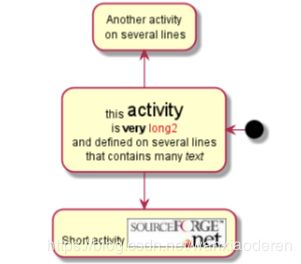
4.7 长的活动描述
定义活动时可以用 \n 来定义跨越多行的描述。
还可以用as 关键字给活动起一个短的别名。这个别名可以在接下来的图示定义中使用。
@startuml
(*) -left-> "this activity
is very long2
and defined on several lines
that contains many text" as A1

-up-> "Another activity\\n on several lines"
A1 --> "Short activity "
@enduml
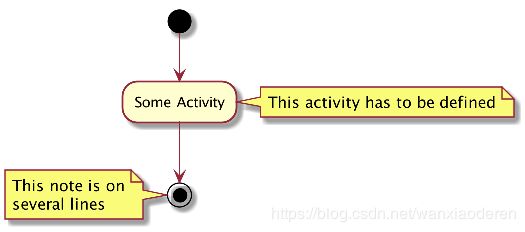
4.8 注释
你可以在活动定义之后用note left, note right, note top or note bottom, 命令给活动添加注释。 如果想给开始点添加注释,只需把注释的定义放在活动图最开始的地方即可。
也可以用关键字 endnote定义多行注释。
@startuml
(*) --> "Some Activity"
note right: This activity has to be defined
"Some Activity" --> (*)
note left
 This note is on
 several lines
end note
@enduml
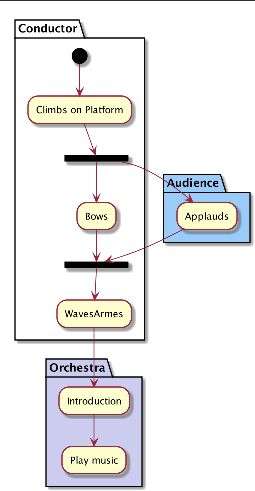
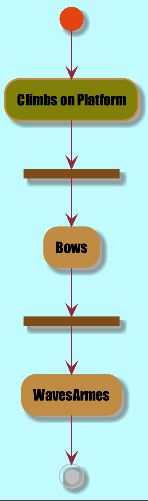
4.9 分区
用关键字 partition 定义分区,还可以设置背景色 (用颜色名或者颜色值)。 定义活动的时候,它自动被放置到最新的分区中。
用} 结束分区的定义。
@startuml
partition Conductor {
  (*) --> "Climbs on Platform"
  --> === S1 ===
  --> Bows
}
partition Audience #LightSkyBlue {
  === S1 === --> Applauds
}
partition Conductor {
  Bows --> === S2 ===
  --> WavesArmes
  Applauds --> === S2 ===
}
partition Orchestra #CCCCEE {
  WavesArmes --> Introduction
  --> "Play music"
}
@enduml
4.10 显示参数
用 skinparam 命令修改字体和颜色。 如下场景可用:
- 在图示定义中
- 在引入的文件中
- 在命令行或 ANT 任务提供的配置文件中。
还可以为构造类型指定特殊颜色和字体。
@startuml
skinparam backgroundColor #AAFFFF
skinparam activity {
  StartColor red
  BarColor SaddleBrown
  EndColor Silver
  BackgroundColor Peru
  BackgroundColor<< Begin >> Olive
  BorderColor Peru
  FontName Impact
}
(*) --> "Climbs on Platform" << Begin >>
--> === S1 ===
--> Bows
--> === S2 ===
--> WavesArmes
--> (*)
@enduml
4.11 八边形活动
可用用 skinparam activityShape octagon命令将活动的外形改为八边形。
@startuml
'Default is skinparam activityShape roundBox
skinparam activityShape octagon
(*) --> "First Activity"
"First Activity" --> (*)
@enduml
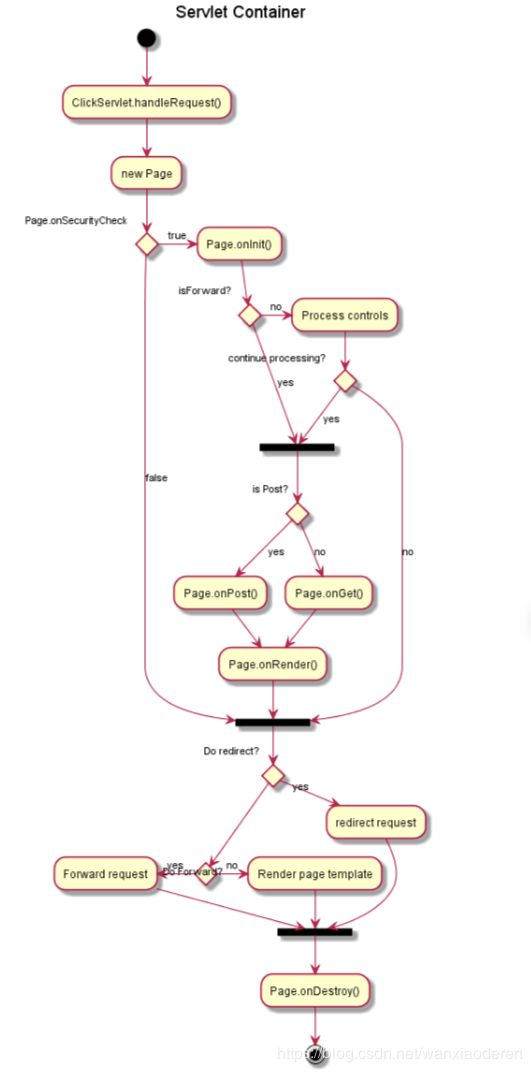
4.12 一个完整的例子
@startuml
title Servlet Container
(*) --> "ClickServlet.handleRequest()"
--> "new Page"
if "Page.onSecurityCheck" then
  ->[true] "Page.onInit()"
  if "isForward?" then
   ->[no] "Process controls"
   if "continue processing?" then
 -->[yes] ===RENDERING===
   else
 -->[no] ===REDIRECT_CHECK===
endif
  else
   -->[yes] ===RENDERING===
endif
  if "is Post?" then
-->[yes] "Page.onPost()"
--> "Page.onRender()" as render
--> ===REDIRECT_CHECK===
  else
-->[no] "Page.onGet()"
--> render
endif
else
  -->[false] ===REDIRECT_CHECK===
endif
if "Do redirect?" then
 ->[yes] "redirect request"
 --> ==BEFORE_DESTROY===
else
 if "Do Forward?" then
  -left->[yes] "Forward request"
  --> ==BEFORE_DESTROY===
 else
  -right->[no] "Render page template"
  --> ==BEFORE_DESTROY===
 endif
endif
--> "Page.onDestroy()"
-->(*)
@enduml
5. 活动图 (新语法)
当前活动图 (activity diagram) 的语法有诸多限制和缺点,比如代码难以维护。
所以从 V7947 开始提出一种全新的、更好的语法格式和软件实现供用户使用 (beta 版)。 就像序列图一样,新的软件实现的另一个优点是它不再依赖于 Graphviz。 新的语法将会替换旧的语法。然而考虑到兼容性,旧的语法仍被能够使用以确保向前兼容。 但是我们鼓励用户使用新的语法格式。
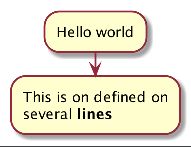
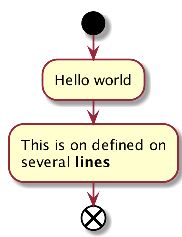
5.1 简单活动图
活动标签 (activity label) 以冒号开始,以分号结束。 文本格式支持 creole wiki 语法。 活动默认安装它们定义的顺序就行连接。
@startuml
:Hello world;
:This is on defined on
several **lines**;
@enduml
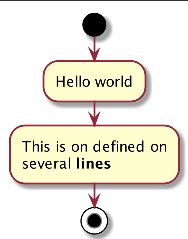
5.2 开始/结束
你可以使用关键字 start和 stop表示图示的开始和结束。
@startuml
start
:Hello world;
:This is on defined on
several **lines**;
stop
@enduml
也可以使用 end 关键字。
@startuml
start
:Hello world;
:This is on defined on
several **lines**;
end
@enduml
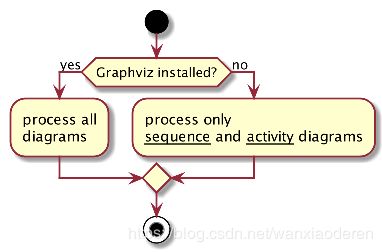
5.3 条件语句
在图示中可以使用关键字if,then 和 else设置分支测试。标注文字则放在括号中。
@startuml
start
if (Graphviz installed?) then (yes)
  :process all\ndiagrams;
else (no)
  :process only
  __sequence__ and __activity__ diagrams;
endif
stop
@enduml
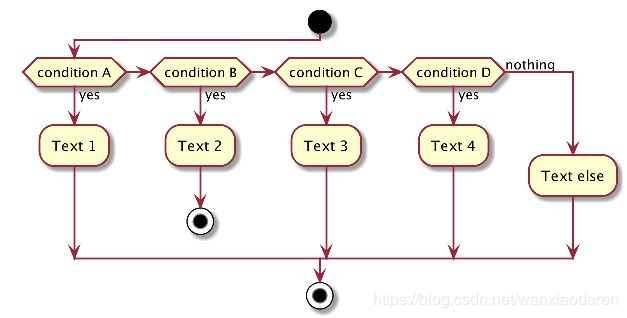
也可以使用关键字 elseif设置多个分支测试。
@startuml
start
if (condition A) then (yes)
  :Text 1;
elseif (condition B) then (yes)
:Text 2;
  stop
elseif (condition C) then (yes)
  :Text 3;
elseif (condition D) then (yes)
  :Text 4;
else (nothing)
:Text else;
endif
stop
@enduml
5.4 重复循环
你可以使用关键字 repeat和 repeatwhile 进行重复循环。
@startuml
start
repeat
  :read data;
  :generate diagrams;
repeat while (more data?)
stop
@enduml

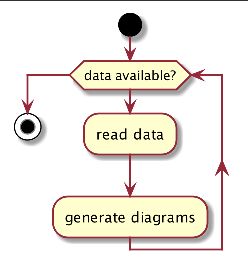
5.5 while 循环
可以使用关键字while 和 end while 进行 while 循环。
@startuml
start
while (data available?)
  :read data;
  :generate diagrams;
endwhile
stop
@enduml
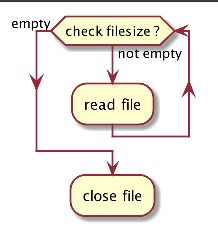
还可以在关键字endwhile后添加标注,还有一种方式是使用关键字is。
@startuml
while (check filesize ?) is (not empty)
  :read file;
endwhile (empty)
:close file;
@enduml
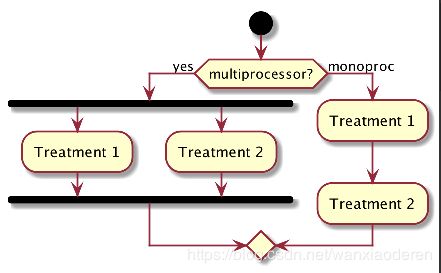
5.6 并行处理
你可以使用关键字 fork,fork again 和 end fork 表示并行处理。
@startuml
start
if (multiprocessor?) then (yes)
  fork
:Treatment 1;
  fork again
:Treatment 2;
  end fork
else (monoproc)
  :Treatment 1;
  :Treatment 2;
endif
@enduml
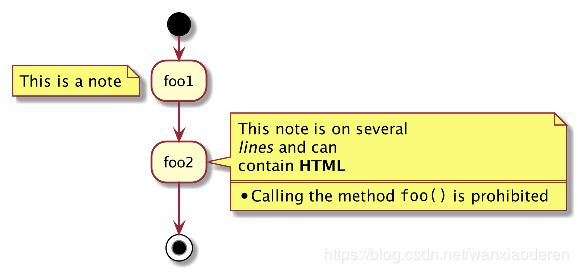
5.7 注释
文本格式支持 creole wiki 语法。
A note can be floating, using floating keyword. @startuml
start
:foo1;
floating note left: This is a note
:foo2;
note right
  This note is on several
  //lines// and can
  contain HTML
  ====
  * Calling the method ""foo()"" is prohibited
end note
stop
@enduml
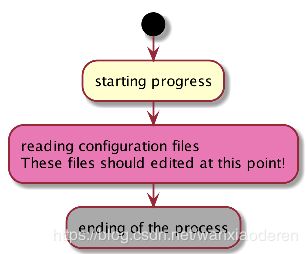
5.8 颜色
你可以为活动 (activity) 指定一种颜色。
@startuml
start
:starting progress;
#HotPink:reading configuration files
These files should edited at this point!;
#AAAAAA:ending of the process;
@enduml
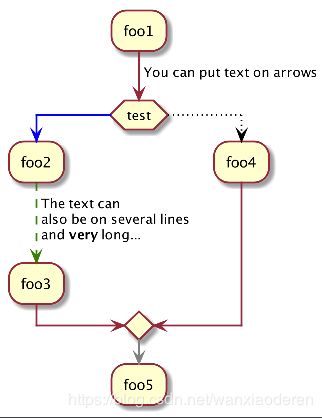
5.9 箭头
使用->标记,你可以给箭头添加文字或者修改箭头颜色。 同时,你也可以选择点状 (dotted),条状 (dashed),加粗或者是隐式箭头。
@startuml
:foo1;
-> You can put text on arrows;
if (test) then
  -[#blue]->
  :foo2;
  -[#green,dashed]-> The text can
  also be on several lines
  and **very** long...;
  :foo3;
else
  -[#black,dotted]->
  :foo4;
endif
-[#gray,bold]->
:foo5;
@enduml
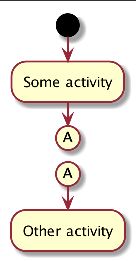
5.10 连接器 (Connector)
你可以使用括号定义连接器。
@startuml
start
:Some activity;
(A)
detach
(A)
:Other activity;
@enduml
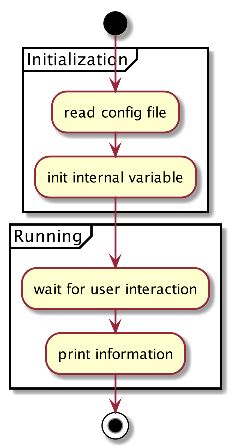
5.11 组合 (grouping)
通过定义分区 (partition),你可以把多个活动组合 (group) 在一起。
@startuml
start
partition Initialization {
:read config file;
:init internal variable;
}
partition Running {
:wait for user interaction;
:print information;
}
stop
@enduml
5.12 泳道 (Swimlanes)
你可以使用管道符 |来定义泳道。
还可以改变泳道的颜色。
@startuml
|Swimlane1|
start
:foo1;
|#AntiqueWhite|Swimlane2|
:foo2;
:foo3;
|Swimlane1|
:foo4;
|Swimlane2|
:foo5;
stop
@enduml

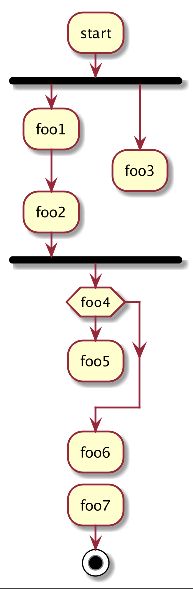
5.13 分离 (detach)
可以使用关键字 detach 移除箭头。
@startuml
 :start;
 fork
   :foo1;
   :foo2;
 fork again
   :foo3;
   detach
 endfork
 if (foo4) then
    :foo5;
    detach
 endif
    :foo6;
 detach
    :foo7;
 stop
@enduml
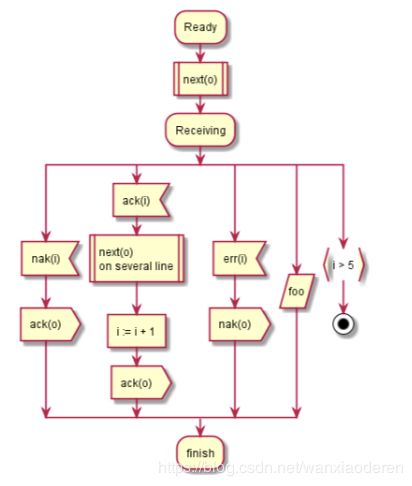
5.14 特殊领域语言 (SDL)
通过修改活动标签最后的分号分隔符 (,可以为活动设置不同的形状。
- |
- <
- >
- /
- ]
- }
@startuml
:Ready;
:next(o)|
:Receiving;
split
:nak(i)<
 :ack(o)>
split again
 :ack(i)<
 :next(o)
 on several line|
 :i := i + 1]
 :ack(o)>
split again
 :err(i)<
 :nak(o)>
split again
 :foo/
split again
 :i > 5}
 stop
 end split
 :finish;
 @enduml
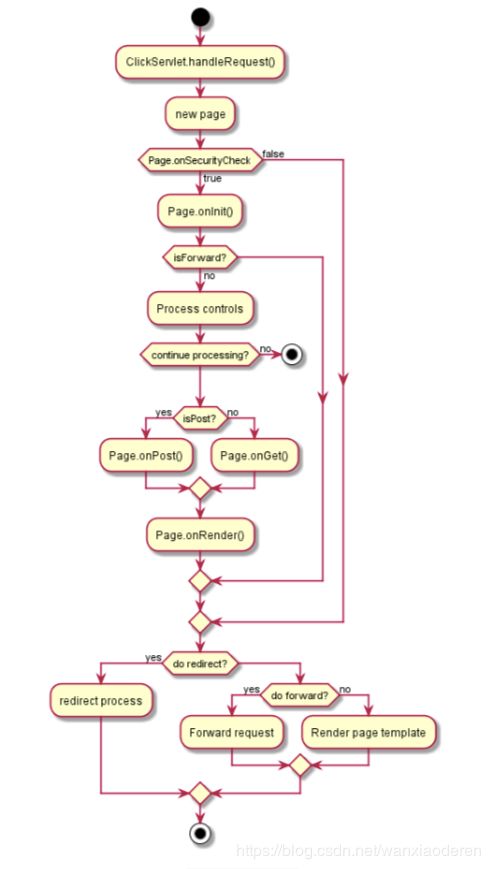
5.15 一个完整的例子
@startuml
start
:ClickServlet.handleRequest();
:new page;
if (Page.onSecurityCheck) then (true)
  :Page.onInit();
  if (isForward?) then (no)
:Process controls;
if (continue processing?) then (no)
stop
 endif
if (isPost?) then (yes)
  :Page.onPost();
else (no)
  :Page.onGet();
endif
:Page.onRender();
  endif
else (false)
endif
if (do redirect?) then (yes)
  :redirect process;
else
  if (do forward?) then (yes)
:Forward request;
  else (no)
:Render page template;
endif
endif
stop
@enduml
6. 组件图
我们来看几个例子:
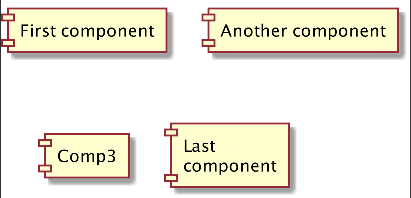
6.1 组件
组件必须用中括号括起来。
还可以使用关键字 component定义一个组件。并且可以用关键字 as 给组件定义一个别名。这个别名可 以在稍后定义关系的时候使用。
@startuml
[First component]
[Another component] as Comp2
component Comp3
component [Last\ncomponent] as Comp4
@enduml
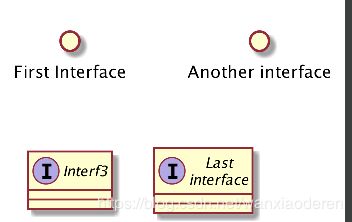
6.2 接口
接口可以使用()来定义 (因为这个看起来像个圆)。
还可以使用关键字interface关键字来定义接口。并且还可以使用关键字 as 定义一个别名。这个别名 可以在稍后定义关系的时候使用。
我们稍后可以看到,接口的定义是可选的。
@startuml
() "First Interface"
() "Another interface" as Interf2
interface Interf3
interface "Last\ninterface" as Interf4
@enduml
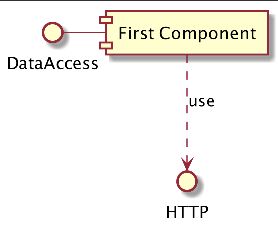
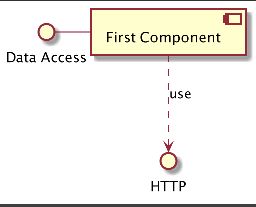
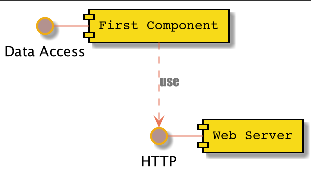
6.3 基础的示例
元素之间可以使用虚线 (…)、直线 (–)、箭头 (–>) 进行连接。
@startuml
DataAccess - [First Component]
[First Component] ..> HTTP : use
@enduml
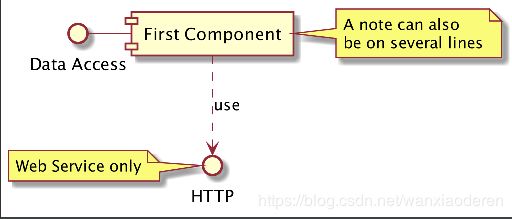
6.4 使用注释
你可以使用 note left of , note right of , note top of , note bottom of 等关键字定义相对于对象
位置的注释。
也可以使用关键字 note 单独定义注释,然后使用虚线 (..) 将其连接到其他对象。
@startuml
interface "Data Access" as DA
DA - [First Component]
[First Component] ..> HTTP : use
note left of HTTP : Web Service only
note right of [First Component]
  A note can also
  be on several lines
end note
@enduml
6.5 组合组件
你可以使用多个关键字将组件和接口组合在一起。
- package
- node
- folder
- frame
- cloud
- database
@startuml
package "Some Group" {
  HTTP - [First Component]
  [Another Component]
}
node "Other Groups" {
  FTP - [Second Component]
  [First Component] --> FTP
}
cloud {
  [Example 1]
}
database "MySql" {
  folder "This is my folder"  {
    [Folder 3]
   }
  frame "Foo" {
    [Frame 4]
    }
}
[Another Component] --> [Example 1]
[Example 1] --> [Folder 3]
[Folder 3] --> [Frame 4]
@enduml

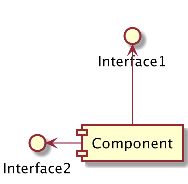
6.6 改变箭头方向
默认情况下,对象之间用--连接,并且连接是竖直的。不过可以使用一个横线或者点设置水平方向的连
接,就行这样:
@startuml
[Component] --> Interface1
[Component] -> Interface2
@enduml

也可以使用反向连接:
@startuml
Interface1 <-- [Component]
Interface2 <- [Component]
@enduml
还可以使用关键字 left, right, up or down改变箭头方向。
@startuml
[Component] -left-> left
[Component] -right-> right
[Component] -up-> up
[Component] -down-> down
@enduml
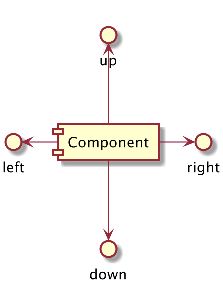
允许使用方向单词的首字母或者前两个字母表示方向 (例如 -d-, -do-, -down-都是等价的)。 请不要乱用这些功能:Graphviz(PlantUML 的后端引擎) 不喜欢这个样子。
6.7 使用 UML2 标记符
命令 skinparam componentStyle uml2可以切换到 UML2 标记符。
@startuml
skinparam componentStyle uml2
interface "Data Access" as DA
DA - [First Component]
[First Component] ..> HTTP : use
@enduml
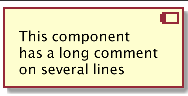
6.8 长描述
可以用方括号"[ ]" 在连线上添加描述。
@startuml
component comp1 [
This component
has a long comment
on several lines
]
@enduml
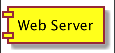
6.9 不同的颜色表示
你可以在声明一个组件时加上颜色的声明。
@startuml
component  [Web Server] #Yellow
@enduml
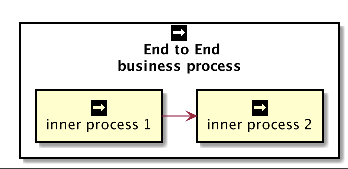
6.10 在定型组件中使用精灵图
你可以在定型组件中使用精灵图(sprite)。
@startuml
sprite $businessProcess [16x16/16] {
FFFFFFFFFFFFFFFF
FFFFFFFFFFFFFFFF
FFFFFFFFFFFFFFFF
FFFFFFFFFFFFFFFF
FFFFFFFFFF0FFFFF
FFFFFFFFFF00FFFF
FF00000000000FFF
FF000000000000FF
FF00000000000FFF
FFFFFFFFFF00FFFF
FFFFFFFFFF0FFFFF
FFFFFFFFFFFFFFFF
FFFFFFFFFFFFFFFF
FFFFFFFFFFFFFFFF
FFFFFFFFFFFFFFFF
FFFFFFFFFFFFFFFF
}
rectangle " End to End\nbusiness process" <<$businessProcess>> {
 rectangle "inner process 1" <<$businessProcess>> as src
 rectangle "inner process 2" <<$businessProcess>> as tgt
 src -> tgt
}
@enduml
6.11 显示参数
用 skinparam 改变字体和颜色。 可以在如下场景中使用:
- 在图示的定义中,
- 在引入的文件中,
- 在命令行或者 ANT 任务提供的配置文件中。
可以为构造类型和接口定义特殊的颜色和字体。
@startuml
skinparam interface {
  backgroundColor RosyBrown
  borderColor orange
}
skinparam component {
  FontSize 13
  BackgroundColor<> Red
  BorderColor<> #FF6655
  FontName Courier
  BorderColor black
  BackgroundColor gold
  ArrowFontName Impact
  ArrowColor #FF6655
  ArrowFontColor #777777
}
() "Data Access" as DA
DA - [First Component]
[First Component] ..> () HTTP : use
HTTP - [Web Server] << Apache >>
@enduml
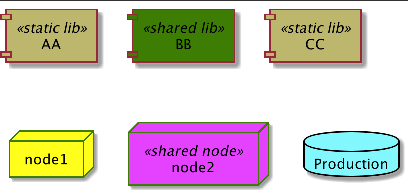
@startuml
[AA] <<static lib>>
[BB] <<shared lib>>
[CC] <<static lib>>
node node1
node node2 <<shared node>>
database Production
skinparam component {
backgroundColor<<static lib>> DarkKhaki
backgroundColor<<shared lib>> Green
}
skinparam node {
borderColor Green
backgroundColor Yellow
backgroundColor<<shared node>> Magenta
}
skinparam databaseBackgroundColor Aqua
@enduml
7. 状态图
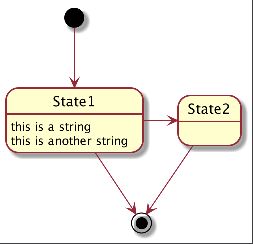
7.1 简单状态
使用 ([*]) 开始和结束状态图。 使用-->添加箭头。
@startuml
[*] --> State1
State1 --> [*]
State1 : this is a string
State1 : this is another string
State1 -> State2
State2 --> [*]
@enduml
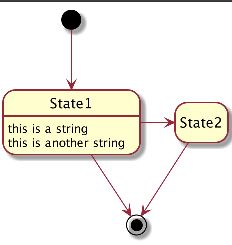
7.2 Change state rendering
You can use hide empty description to render state as simple box.
@startuml
hide empty description
[*] --> State1
State1 --> [*]
State1 : this is a string
State1 : this is another string
State1 -> State2
State2 --> [*]
@enduml
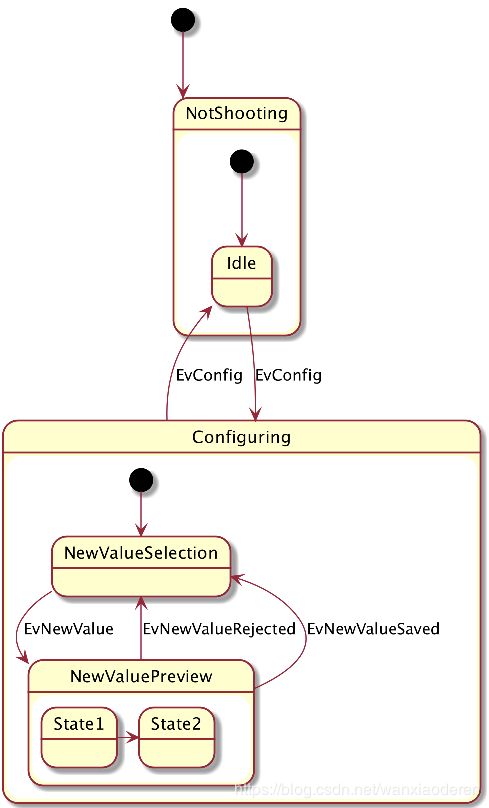
7.3 合成状态
一个状态也可能是合成的,必须使用关键字state 和花括号来定义合成状态。
@startuml
scale 350 width
[*] --> NotShooting
state NotShooting {
  [*] --> Idle
  Idle --> Configuring : EvConfig
  Configuring --> Idle : EvConfig
}
state Configuring {
  [*] --> NewValueSelection
  NewValueSelection --> NewValuePreview : EvNewValue
  NewValuePreview --> NewValueSelection : EvNewValueRejected
  NewValuePreview --> NewValueSelection : EvNewValueSaved
  state NewValuePreview {
 State1 -> State2
}
}
@enduml
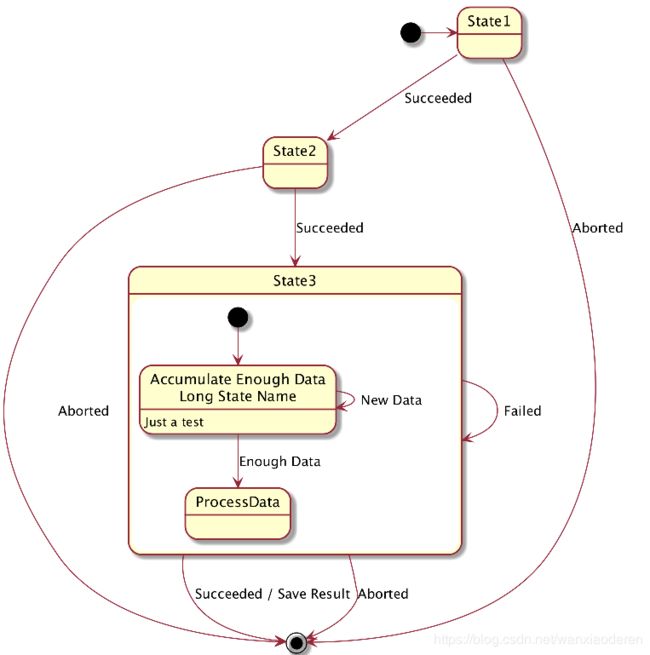
7.4 长名字
也可以使用关键字 state 定义长名字状态。
@startuml
scale 600 width
[*] -> State1
State1 --> State2 : Succeeded
State1 --> [*] : Aborted
State2 --> State3 : Succeeded
State2 --> [*] : Aborted
state State3 {
  state "Accumulate Enough Data\nLong State Name" as long1
  long1 : Just a test
  [*] --> long1
  long1 --> long1 : New Data
  long1 --> ProcessData : Enough Data
}
State3 --> State3 : Failed
State3 --> [*] : Succeeded / Save Result
State3 --> [*] : Aborted
@enduml
7.5 并发状态
用 – or || 作为分隔符来合成并发状态。
@startuml
[*] --> Active
state Active {
  [*] -> NumLockOff
  NumLockOff --> NumLockOn : EvNumLockPressed
  NumLockOn --> NumLockOff : EvNumLockPressed
  --
  [*] -> CapsLockOff
  CapsLockOff --> CapsLockOn : EvCapsLockPressed
  CapsLockOn --> CapsLockOff : EvCapsLockPressed
  --
  [*] -> ScrollLockOff
  ScrollLockOff --> ScrollLockOn : EvCapsLockPressed
  ScrollLockOn --> ScrollLockOff : EvCapsLockPressed
}
@enduml

7.6 箭头方向
使用 -> 定义水平箭头,也可以使用下列格式强制设置箭头方向:
- -down-> (default arrow)
- -right-> or ->
- -left->
- -up->
@startuml
[*] -up-> First
First -right-> Second
Second --> Third
Third -left-> Last
@enduml
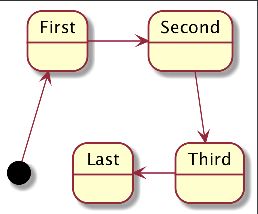
可以用首字母缩写或者开始的两个字母定义方向 (如, -d-,-down-和 -do-是完全等价的)。 请不要滥用这些功能,Graphviz 不喜欢这样。
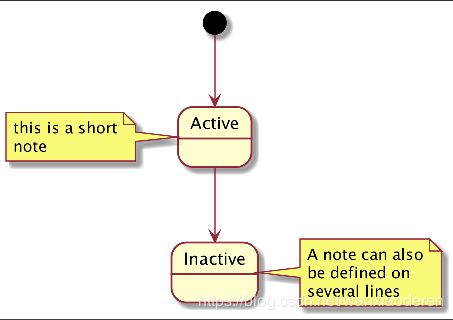
7.7 注释
可以用 note left of, note right of, note top of, note bottom of关键字来定义注释。 还可以定义多行注释。
@startuml
[*] --> Active
Active --> Inactive
note left of Active : this is a short\nnote
note right of Inactive
  A note can also
  be defined on
  several lines
end note
@enduml
以及浮动注释。
@startuml
state foo
note "This is a floating note" as N1
@enduml
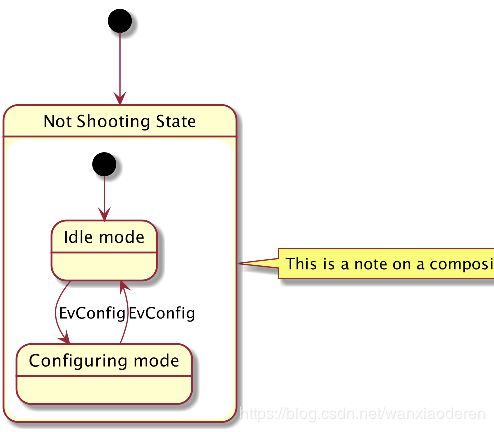
7.8 更多注释
可以在合成状态中放置注释。
@startuml
[*] --> NotShooting
state "Not Shooting State" as NotShooting {
  state "Idle mode" as Idle
  state "Configuring mode" as Configuring
  [*] --> Idle
  Idle --> Configuring : EvConfig
  Configuring --> Idle : EvConfig
}
note right of NotShooting : This is a note on a composite state
@enduml
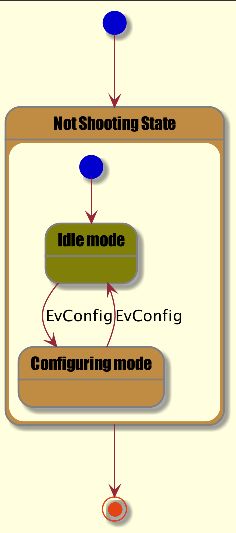
7.9 显示参数
用 skinparam 改变字体和颜色。 可以在如下场景中使用:
- 在图示的定义中,
- 在引入的文件中,
- 在命令行或者 ANT 任务提供的配置文件中。
还可以为状态的构造类型指定特殊的字体和颜色。
@startuml
skinparam backgroundColor LightYellow
skinparam state {
  StartColor MediumBlue
  EndColor Red
  BackgroundColor Peru
  BackgroundColor<> Olive
  BorderColor Gray
  FontName Impact
  }
  [*] --> NotShooting
  state "Not Shooting State" as NotShooting {
    state "Idle mode" as Idle <>
    state "Configuring mode" as Configuring
    [*] --> Idle
    Idle --> Configuring : EvConfig
    Configuring --> Idle : EvConfig
  }
  NotShooting --> [*]
  @enduml
8. 对象图
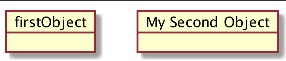
8.1 对象的定义
使用关键字 object 定义实例。
@startuml
object firstObject
object "My Second Object" as o2
@enduml
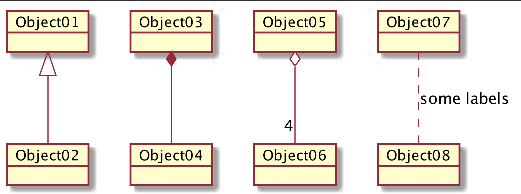
8.2 对象之间的关系
对象之间的关系用如下符号定义
也可以用 .. 来代替 -- 以使用点线。 知道了这些规则,就可以画下面的图: 可以用冒号给关系添加标签,标签内容紧跟在冒号之后。 用双引号在关系的两边添加基数。
@startuml
object Object01
object Object02
object Object03
object Object04
object Object05
object Object06
object Object07
object Object08
Object01 <|-- Object02
Object03 *-- Object04
Object05 o-- "4" Object06
Object07 .. Object08 : some labels
@enduml
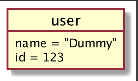
8.3 添加属性
用冒号加属性名的形式声明属性。
@startuml
object user
user : name = "Dummy"
user : id = 123
@enduml
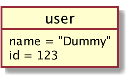
也可以用大括号批量声明属性。
@startuml
object user {
  name = "Dummy"
  id = 123
}
@enduml
8.4 类图中的通用特性
- 可见性
- 定义注释
- 使用包
- 美化输出内容
9. 时序图
这只是个提案,主题和内容可能改变.
非常欢迎您参与这个新特性的讨论。您的反馈、创意和建议可以帮助我们找寻适合的解决方案。
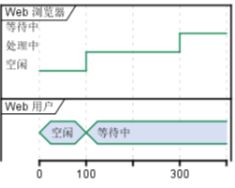
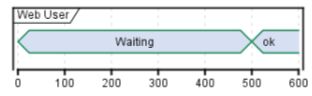
9.1 声明参与者
使用 concise or robust 关键字声明参与者, 选择哪个取决于所需的显示样式。 通过 @标注, 和 is动词定义状态.
@startuml
robust "Web 浏览器" as WB
concise "Web 用户" as WU
@0
WU is 空闲
WB is 空闲
@100
WU is 等待中
WB is 处理中
@300
WB is 等待中
@enduml
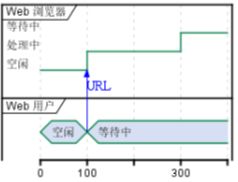
9.2 增加消息
使用下述的语法增加对消息的描述。
@startuml
robust "Web 浏览器" as WB
concise "Web 用户" as WU
@0
WU is 空闲
WB is 空闲
@100
WU -> WB : URL
WU is 等待中
WB is 处理中
@300
WB is 等待中
@enduml
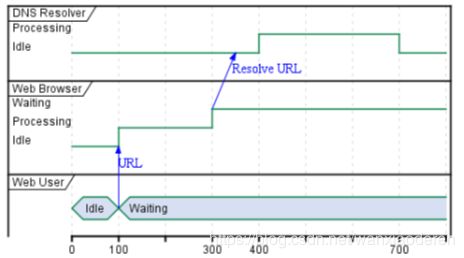
9.3 相对时间
@startuml
robust "DNS Resolver" as DNS
robust "Web Browser" as WB
concise "Web User" as WU
@0
WU is Idle
WB is Idle
DNS is Idle
@+100
WU -> WB : URL
WU is Waiting
WB is Processing
@+200
WB is Waiting
WB -> DNS@+50 : Resolve URL
@+100
DNS is Processing
@+300
DNS is Idle
@enduml
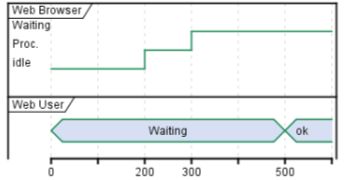
9.4 Participant oriented
Rather than declare the diagram in chronological order, you can define it by participant.
@startuml
robust "Web Browser" as WB
concise "Web User" as WU
@WB
0 is idle
+200 is Proc.
+100 is Waiting
@WU
0 is Waiting
+500 is ok
@enduml
9.5 Setting scale
You can also set a specific scale.
@startuml
concise "Web User" as WU
scale 100 as 50 pixels
@WU
0 is Waiting
+500 is ok
@enduml
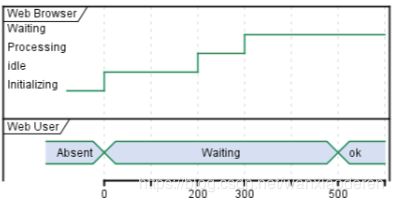
9.6 Initial state
You can also define an inital state.
@startuml
robust "Web Browser" as WB
concise "Web User" as WU
WB is Initializing
WU is Absent
9.7 Intricated state
9 时序图
 @WB
0 is idle
+200 is Processing
+100 is Waiting
@WU
0 is Waiting
+500 is ok
@enduml
9.7 Intricated state
A signal could be in some undefined state.
@startuml
robust "Signal1" as S1
robust "Signal2" as S2
S1 has 0,1,2,hello
S2 has 0,1,2
@0
S1 is 0
S2 is 0
@100
S1 is {0,1} #SlateGrey
S2 is {0,1}
@200
S1 is 1
S2 is 0
@300
S1 is hello
S2 is {0,2}
@enduml

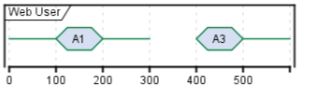
9.8 Hidden state
It is also possible to hide some state.
@startuml
concise "Web User" as WU
@0
WU is {-}
@100
WU is A1
@200
WU is {-}
@300
WU is {hidden}
@400
WU is A3
@500
WU is {-}
@enduml
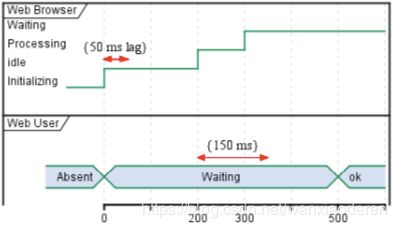
9.9 Adding constraint
It is possible to display time constraints on the diagrams.
@startuml
robust "Web Browser" as WB
concise "Web User" as WU
WB is Initializing
WU is Absent
@WB
0 is idle
+200 is Processing
+100 is Waiting
WB@0 <-> @50 : {50 ms lag}
@WU
0 is Waiting
+500 is ok
@200 <-> @+150 : {150 ms}
@enduml
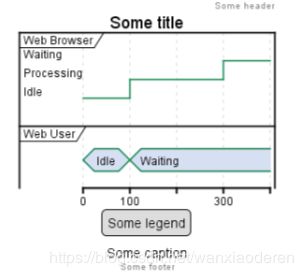
9.10 Adding texts
You can optionally add a title, a header, a footer, a legend and a caption:
@startuml
Title this is my title
header: some header
footer: some footer
legend
Some legend
end legend
caption some caption
robust "Web Browser" as WB
concise "Web User" as WU
@0
WU is Idle
WB is Idle
@100
WU is Waiting
WB is Processing
@300
WB is Waiting
@enduml
10. 甘特图
描述进度
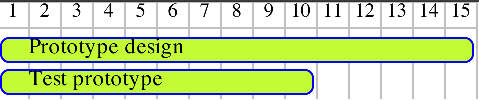
10.1 Declaring tasks 任务
Tasks defined using square bracket. Their durations are defined using the last verb:
@startgantt
[Prototype design] lasts 15 days
[Test prototype] lasts 10 days
@endgantt
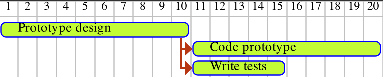
10.2 Adding constraints
It is possible to add constraints between task.
@startgantt
[Prototype design] lasts 15 days
[Test prototype] lasts 10 days
[Test prototype] starts at [Prototype design]'s end
@endgantt

@startgantt
[Prototype design] lasts 10 days
[Code prototype] lasts 10 days
[Write tests] lasts 5 days
[Code prototype] starts at [Prototype design]'s end
[Write tests] starts at [Code prototype]'s start
@endgantt
10.3 Short names
It is possible to define short name for tasks with the as keyword.
@startgantt
[Prototype design] as [D] lasts 15 days
[Test prototype] as [T] lasts 10 days
[T] starts at [D]'s end
@endgantt

10.4 Customize colors
It also possible to customize colors.
@startgantt
[Prototype design] lasts 13 days
[Test prototype] lasts 4 days
[Test prototype] starts at [Prototype design]'s end
[Prototype design] is colored in Fuchsia/FireBrick
[Test prototype] is colored in GreenYellow/Green
@endgantt

10.5 Milestone
You can define Milestones using the happens verb.
@startgantt
[Test prototype] lasts 10 days
[Prototype completed] happens at [Test prototype]'s end
[Setup assembly line] lasts 12 days
[Setup assembly line] starts at [Test prototype]'s end
@endgantt

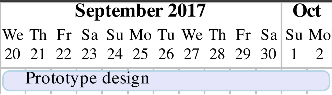
10.6 Calendar
You can specify a starting date for the whole project. By default, the first task starts at this date.
@startgantt
Project starts the 20th of september 2017
[Prototype design] as [TASK1] lasts 13 days
[TASK1] is colored in Lavender/LightBlue
@endgantt
10.7 Close day
It is possible to close some day.
@startgantt
project starts the 2018/04/09
saturday are closed
sunday are closed
2018/05/01 is closed
2018/04/17 to 2018/04/19 is closed
[Prototype design] lasts 14 days
[Test prototype] lasts 4 days
[Test prototype] starts at [Prototype design]'s end
[Prototype design] is colored in Fuchsia/FireBrick
[Test prototype] is colored in GreenYellow/Green
@endgantt

10.8 Simplified task succession
It’s possible to use the then keyword to denote consecutive tasks.
@startgantt
[Prototype design] lasts 14 days
then [Test prototype] lasts 4 days
then [Deploy prototype] lasts 6 days
@endgantt

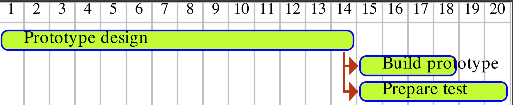
You can also use arrow ->
@startgantt
[Prototype design] lasts 14 days
[Build prototype] lasts 4 days
[Prepare test] lasts 6 days
[Prototype design] -> [Build prototype]
[Prototype design] -> [Prepare test]
@endgantt
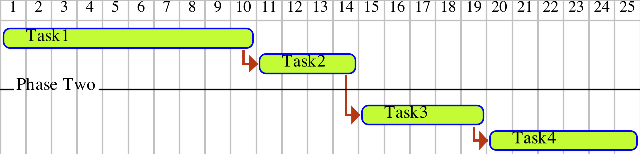
10.9 Separator
You can use – to separate sets of tasks.
@startgantt
[Task1] lasts 10 days
then [Task2] lasts 4 days
-- Phase Two --
then [Task3] lasts 5 days
then [Task4] lasts 6 days
@endgantt
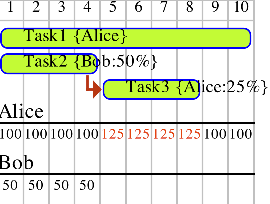
10.10 Working with resources
You can affect tasks on resources using the on keyword and brackets for resource name.
@startgantt
[Task1] on {Alice} lasts 10 days
[Task2] on {Bob:50%} lasts 2 days
then [Task3] on {Alice:25%} lasts 1 days
@endgantt
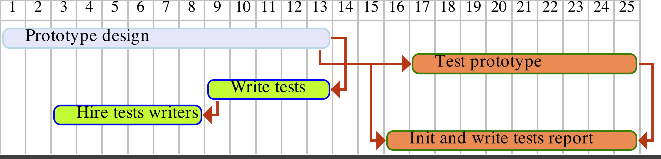
10.11 Complex example
It also possible to use the and conjunction.
You can also add delays in constraints.
@startgantt
[Prototype design] lasts 13 days and is colored in Lavender/LightBlue
[Test prototype] lasts 9 days and is colored in Coral/Green and starts 3 days after [Prototype design]'s end
 [Write tests] lasts 5 days and ends at [Prototype design]'s end
[Hire tests writers] lasts 6 days and ends at [Write tests]'s start
[Init and write tests report] is colored in Coral/Green
[Init and write tests report] starts 1 day before [Test prototype]'s start and ends at [Test prototype]'s end
@endgantt