【Absible学习】Ansible playbook (一)
* 简介
执行一些简单的任务,使用ad-hoc命令可以方便的解决问题,但是有时一个设施过于复杂,需要大量的操作时候,执行的ad-hoc命令是不适合的,这时最好使用playbook。playbook 字面意思,即剧本,是 一个不同于使用Ansible命令行执行方式的模式,其功能更强大灵活,可以定制配置,可以按照指定的操作步骤有序执行,支持同步和异步方式。就像执行shell命令与写shell脚本一样,一个playbook文件由一个或多个play组成,每个play定义了在一个或多个远程主机上执行的一系列的task,不过playbook有自己的语法格式。playbook由YMAL( /ˈjæməl/ )语言编写。YMAL格式是类似于JSON的文件格式。playbook和模板文件(template)还可使用jinja2语法语法实现高级功能。
- YMAL格式:
1、文件的第一行应该以 "---" (三个连字符)开始,表明YMAL文件的开始。
2、在同一行中,#之后的内容表示注释,类似于shell,python和ruby。
3、YMAL中的列表元素以”-”开头,然后紧跟着一个空格,后面为元素内容。
4、同一个列表中的元素应该保持相同的缩进。否则会被当做错误处理。
5、play中hosts,variables,roles,tasks等对象的表示方法都是键值中间以":"分隔表示,":"后面还要增加一个空格。
* 核心元素
- Tasks:任务,由模板定义的操作列表
- Variables:变量
- Templates:模板,即使用模板语法的文件
- Handlers:处理器 ,当某条件满足时,触发执行的操作
- Roles:角色
* hosts和users
在playbook中的每一个play都可以选择在哪些服务器和以什么用户执行,hosts一行可以是一个主机组(以逗号分隔)、主机(多个主机以冒号分隔),可使用通配模式。其中remote_user表示执行的用户账号。
[root@Super ansible]# cat ping.yml
---
- hosts: HWY
  tasks:
  - name: test ping
    ping:
[root@Super ansible]#
上面playbook中只有一个play,也可以在一个playbook中写多个play:
[root@Super ansible]# cat ping.yml
---
- hosts: 10.15.43.17
  remote_user: ywbz
  become: yes
  become_method: su
  become_user: root
  tasks:
  - name: test ping
    ping:
- hosts: 10.15.43.15:10.15.43.16
  remote_user: ywbz
  become: yes
  become_method: su
  become_user: root
  tasks:
  - name: test ping
    ping:
- hosts: 10.10.15.165
         10.10.15.192
  remote_user: ywbz
  become: yes
  become_method: su
  become_user: root
  tasks:
  - name: test ping
    ping:
[root@Super ansible]#
上面的playbook中写了3个play,第一个play针对10.15.43.17;第二个play针对10.15.43.15和10.15.43.16;第三个play针对10.10.15.165和10.10.15.192。
- 指定远程主机sudo切换
[root@Super ansible]# cat ping.yml
---
- hosts: 10.10.15.165:10.10.15.192
  remote_user: ywbz
  become: yes
  become_method: su
  become_user: root
  tasks:
  - name: test ping
    ping:
  - name: mkdir directory 20180817
    file:
      path: /app/20180817
      state: directory
      owner: ywbz
      group: ywbz
      mode: 650
  - name: touch file ywbz
    file: path=/app/20180817/ywbz state=touch owner=ywbz
          group=ywbz mode=765
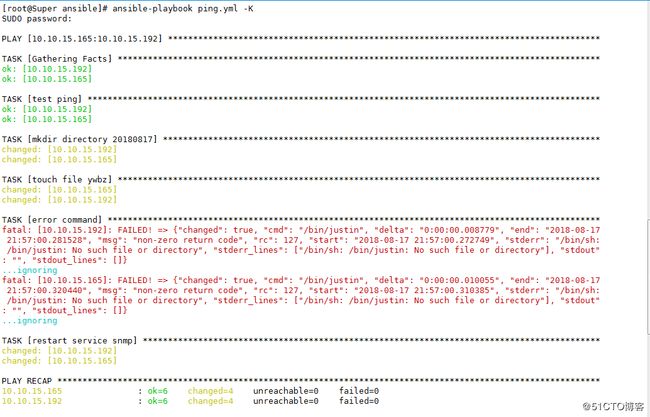
  - name: error command
    shell: /bin/justin
    ignore_errors: True
  - name: restart service snmp
    service: name=snmpd state=restarted enabled=yes
[root@Super ansible]#
remote_user: ywbz //在远程主机上以哪个用户身份执行
become: yes //是否允许身份切换
become_method: su //切换用户身份的方式,有sudo、su、pbrun等方式,默认为sudo
become_user: root //切换成什么用户身份,默认为root
remote_user、become、become_method、become_use选项不仅可用于全局,也可用于各task中。remote_user、become、become_method、become_user分别对应inventory文件中的ansible_user、ansible_become、ansible_become_method、ansible_become_user。如果需要指定切换用户身份时的密码,可在执行ansible-playbook时使用选项 --ask-become-pass指定(旧版ansible使用 --ask-sudo-pass指定sudo切换时的密码)
* Tasks list 和action
- Play的主体部分是task列表,task列表中的各任务按次序逐个在hosts中指定的主机上执行,即在所有主机上完成第一个任务后再开始第二个任务。
在运行playbook时(从上到下执行),如果一个host执行task失败,整个tasks都会回滚,请修正playbook 中的错误,然后重新执行即可。
Task的目的是使用指定的参数执行模块,而在模块参数中可以使用变量,模块执行时幂等的,这意味着多次执行是安全的,因为其结果一致。- 每一个task最好有一个名称name,这样在运行playbook时,从其输出的任务执行信息中可以很好的辨别出是属于哪一个task的。如果没有定义name,‘action’的值将会用作输出信息中标记特定的task。
- 定义一个task,常见的格式:”module: options” 例如:yum: name=httpd
- ansible的自带模块中,command模块和shell模块无需使用key=value格式
-
常用命令
1、执行playbook
格式:
ansible-playbook playbookname.yml ( 文件名以.yaml或.yml结尾)
参数:-u REMOTE_USER, --user=REMOTE_USER # ssh 连接的用户名
-k, --ask-pass #ssh登录认证密码
-s, --sudo #sudo 到root用户,相当于Linux系统下的sudo命令
-U SUDO_USER, --sudo-user=SUDO_USER #sudo 到对应的用户
-K, --ask-sudo-pass #用户的密码(—sudo时使用)
-T TIMEOUT, --timeout=TIMEOUT # ssh 连接超时,默认 10 秒
-C, --check # 指定该参数后,执行 playbook 文件不会真正去执行,而是模拟执行一遍,然后输出本次执行会对远程主机造成的修改
-e EXTRA_VARS, --extra-vars=EXTRA_VARS # 设置额外的变量如:key=value 形式 或者 YAML or JSON,以空格分隔变量,或用多个-e
-f FORKS, --forks=FORKS # 进程并发处理,默认 5
-i INVENTORY, --inventory-file=INVENTORY # 指定 hosts 文件路径,默认 default=/etc/ansible/hosts -
l SUBSET, --limit=SUBSET # 指定一个 pattern,对- hosts:匹配到的主机再过滤一次
--list-hosts # 只打印有哪些主机会执行这个 playbook 文件,不是实际执行该 playbook
--list-tasks # 列出该 playbook 中会被执行的 task
--private-key=PRIVATE_KEY_FILE # 私钥路径
--step # 同一时间只执行一个 task,每个 task 执行前都会提示确认一遍
--syntax-check # 只检测 playbook 文件语法是否有问题,不会执行该 playbook
-t TAGS, --tags=TAGS #当 play 和 task 的 tag 为该参数指定的值时才执行,多个 tag 以逗号分隔
--skip-tags=SKIP_TAGS # 当 play 和 task 的 tag 不匹配该参数指定的值时,才执行
-v, --verbose #输出更详细的执行过程信息,-vvv可得到所有执行过程信息。2、检查yaml文件的语法是否正确
格式:
ansible-playbook playbookname.yml --syntax-check
[root@Super ansible]# ansible-playbook handler.yml --syntax-check
ERROR! 'task' is not a valid attribute for a Play   //提示task不是一个有效的属性,应该是tasks

The error appears to have been in '/opt/ansible/handler.yml': line 2, column 3, but may
be elsewhere in the file depending on the exact syntax problem.

The offending line appears to be:

---
- hosts: 10.10.13.100
  ^ here

[root@Super ansible]# ansible-playbook handler.yml --syntax-check
 [WARNING]: Could not match supplied host pattern, ignoring: 10.10.13.100   //提示主机在/etc/ansible/host里没有定义

playbook: handler.yml   //提示这个说明没有语法问题
[root@Super ansible]# ansible-playbook handler.yml --syntax-check

playbook: handler.yml
[root@Super ansible]#
3、检查tasks任务
格式:
ansible-playbook playbookname.yml --list-task
4、检查生效的主机
格式:
ansible-playbook playbookname.yml --list-hosts
[root@Super ansible]# ansible-playbook handler.yml --list-task

playbook: handler.yml

  play #1 (10.10.13.100): 10.10.13.100  TAGS: []
    tasks:
      config yum repo   TAGS: []
      install snmp  TAGS: []
      copy snmp config  TAGS: []
      make cache    TAGS: []
[root@Super ansible]#
5、检查tag
格式:
ansible-playbook playbookname.yml --list-tags
[root@Super ansible]# ansible-playbook tags.yml --list-tags

playbook: tags.yml

  play #1 (10.15.43.17): 10.15.43.17    TAGS: []
      TASK TAGS: [always, del_user]
[root@Super ansible]#
6、测试运行
'模拟执行'并不是真正的执行,只是'假装'执行一下,playbook中的任务并不会真正在目标主机中运行,所以你可以放心大胆的进行模拟,使用如下命令即可模拟运行playbook,模拟运行功能可以帮助我们'预估'playbook是否能够正常执行。
格式:
ansible-playbook ping.yml --check
使用上述命令进行'模拟'时,一些任务可能会报错,这可能是因为报错的任务在执行时需要依赖之前的其他任务的完成结果,但是因为是'模拟'执行,所以之前的任务并不会真正的执行,既然之前的任务没有真正的执行,自然不会产生对应的结果,所以后面的任务就报错了。
6、指定从某个task开始运行
格式:
ansible-playbook ping.yml --start-at-task='ping'
[root@Super ansible]# cat ping.yml
---
- hosts: 10.10.15.165:10.10.15.192
  remote_user: ywbz
  become: yes
  become_method: su
  become_user: root
  tasks:
  - name: test ping
    ping:
  - name: mkdir directory 20180817
    file:
      path: /app/20180817
      state: directory
      owner: ywbz
      group: ywbz
      mode: 650
  - name: touch file ywbz
    file: path=/app/20180817/ywbz state=touch owner=ywbz
          group=ywbz mode=765
  - name: error command
    shell: /bin/justin
    ignore_errors: True      //忽略错误
  - name: restart service snmp
    service: name=snmpd state=restarted enabled=yes
[root@Super ansible]#
ansible-playbook输出内容为JSON格式。并且由不同颜色组成:
绿色代表执行成功,系统保持原样
×××代表系统状态发生改变
红色代表执行失败,显示错误输出
- 对模块的参数赋值可以使用"冒号"(冒号后有空格):
file:path: /app/20180817
state: directory
owner: ywbz
group: ywbz
mode: 650
还可以使用"等号",每个参数之间使用空格隔开:
service: name=snmpd state=restarted enabled=yes
使用“等号”给模块参数赋值时,当模块参数比较多,这些参数"挤在一行"里面,可以把它们分成多行去写,但,也需要注意缩进。
file: path=/app/20180817/ywbz state=touch owner=ywbzgroup=ywbz mode=765
-
playbook里每个task都有对应的name,当我们省略name时,默认以当前任务调用的模块的名称作为任务的名称,不过建议不要省略name,因为当任务存在name时,可读性比较高。
-
task里的各个属性并没有严格的顺序要求,但是仍然需要严格按照缩进进行对齐。
- play中只要执行命令的返回值不为0,就会报错,tasks停止,可以添加下面【ignore_errors: True】(也可以在命令后添加true、false,例如 shell: /usr/bin/somecommand || /bin/true)忽略错误,强制返回成功,但是需要注意后面task是否对此task有依赖关系,如果有依赖关系后面的作业就无法完成。
* Handlers
用于当关注的资源发生变化时触发一定的操作。handlers也是一些task的列表,这些task与前述的task并没有本质上的不同。由通知者进行的notify,如果没有被notify,则Handlers不会执行,假如被notify了,则Handlers被执行,“notify”这个action可用于在每个play的最后被触发,这样可以避免多次有改变发生时每次都执行指定的操作,取而代之,仅在所有的变化发生完成后一次性地执行指定操作。在notify中列出的操作称为handler。
格式:
notify:
- restart service nginx
- restart service tomcat
或者
notify: restart service nginx
注意:这里handlers前面没有-,是两个空格,与task对齐,否则语法报错
* 引用变量
变量命名: 字母数字下划线组成,只能以字母开头
- ansible内置变量
ansible变量可以通过fact获取,在playbook中可以直接调用。
[root@Super ansible]# ansible 10.15.43.17 -S -R root -m setup
10.15.43.17 | SUCCESS => {
    "ansible_facts": {
        "ansible_all_ipv4_addresses": [
            "10.15.43.17"
        ],
        "ansible_all_ipv6_addresses": [
            "fe80::20c:29ff:fe12:3840"
        ],
        "ansible_apparmor": {
            "status": "disabled"
        },
        "ansible_architecture": "x86_64",
        "ansible_bios_date": "07/31/2013",
        "ansible_bios_version": "6.00",
......
[root@Super ansible]# ansible 10.15.43.17 -S -R root -m setup -a"filter=*distribution*"
10.15.43.17 | SUCCESS => {
    "ansible_facts": {
        "ansible_distribution": "CentOS",
        "ansible_distribution_file_parsed": true,
        "ansible_distribution_file_path": "/etc/redhat-release",
        "ansible_distribution_file_variety": "RedHat",
        "ansible_distribution_major_version": "7",
        "ansible_distribution_release": "Core",
        "ansible_distribution_version": "7.5.1804"
    },
    "changed": false
}
[root@Super ansible]#
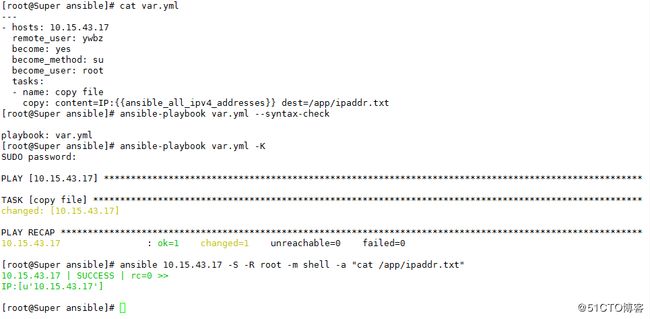
ansible_all_ipv4_addresses:获取IP
- 自定义变量
- 在inventory定义变量:在资源清单inventory(/etc/ansible/hosts)里主机后面添加的变量。
[root@Super ansible]# grep '10.15.43.17' /etc/ansible/hosts
10.15.43.17 ansible_ssh_port=22 ansible_ssh_user=ywbz ansible_ssh_pass='ygnl@428#' ansible_become_pass='FinChina@510267' testvar='my ip address:'
[root@Super ansible]# cat var.yml
---
- hosts: 10.15.43.17
  remote_user: ywbz
  become: yes
  become_method: su
  become_user: root
  tasks:
  - name: copy file
    copy: content={{testvar}}:{{ansible_all_ipv4_addresses}} dest=/app/ipaddr.txt
[root@Super ansible]# ansible-playbook var.yml --syntax-check

playbook: var.yml
[root@Super ansible]# ansible-playbook var.yml -K
SUDO password:

PLAY [10.15.43.17] ****************************************************************************************************

TASK [copy file] ******************************************************************************************************
changed: [10.15.43.17]

PLAY RECAP ************************************************************************************************************
10.15.43.17                : ok=1    changed=1    unreachable=0    failed=0

[root@Super ansible]# ansible 10.15.43.17 -S -R root -m shell -a "cat /app/ipaddr.txt"
10.15.43.17 | SUCCESS | rc=0 >>
my ip address::[u'10.15.43.17']

[root@Super ansible]#
- 在palybook里定义变量
格式:
vars:
– var_name1: value1
– var_name2: value2
或者
vars:
var_name=value
[root@Super ansible]# cat var.yml
---
- hosts: 10.15.43.17
  remote_user: ywbz
  become: yes
  become_method: su
  become_user: root
  vars:
  - blogname: ityunwei2017
  - blogaddr: 51cto
  tasks:
  - name: copy file
    copy: content="{{blogname}} {{blogaddr}}:{{ansible_all_ipv4_addresses}}" dest=/app/ipaddr.txt
[root@Super ansible]# ansible-playbook var.yml --syntax-check

playbook: var.yml
[root@Super ansible]# ansible-playbook var.yml -K
SUDO password:

PLAY [10.15.43.17] ****************************************************************************************************

TASK [copy file] ******************************************************************************************************
changed: [10.15.43.17]

PLAY RECAP ************************************************************************************************************
10.15.43.17                : ok=1    changed=1    unreachable=0    failed=0

[root@Super ansible]# ansible 10.15.43.17 -S -R root -m shell -a "cat /app/ipaddr.txt"
10.15.43.17 | SUCCESS | rc=0 >>
ityunwei2017 51cto:[u'10.15.43.17']

[root@Super ansible]# - 通过命令行传递变量
格式:-e vars=var1
--extra-vars=VARS
--extra-vars “{'key1':'var1','key2':'var2','key3':'var3',........}”
当key=value方式传递变量时,如果变量中包含特殊字符,必须防止其被shell解析。
ansible-playbook test.yml  -e host='10.15.43.18'
ansible-playbook test.yml –extra-vars “host=www user=tom“
ansible-playbook install_redis.yml --extra-vars "{'ip':'10.15.97.136','redis_version':'redis-4.0.11','redis_home':'/app/redis','redis_password':'ywbz97.136'}"
如果剧本中已有此处定义的变量则会被覆盖
-
向不同的主机传递不同的变量
格式:IP/HOSTNAME variable_name=value -
向组内的所有主机传递相同的变量
格式:[groupname:vars]
variable_name=value - 在角色调用时传递
roles:
– { role: ROLE_NAME, var: value, …}
变量调用:
{{ var_name }}
* 条件判断
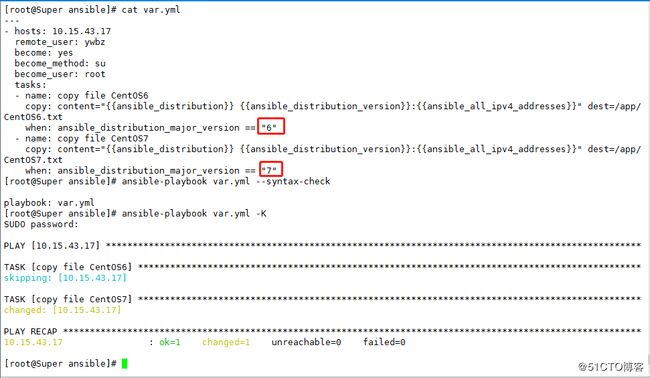
在ansible中,只有when可以实现条件判断。when的值是一个条件表达式,如果条件判断成立,这个task就执行,如果判断不成立,则task不执行,如果需要根据变量、facts(setup)或此前任务的执行结果来作为某task执行与否的前提时要用到条件测试,在Playbook中条件测试使用when子句,在task后添加when子句即可使用条件测试。
- 单条件判断
1、when判断的对象是task,所以和task在同一列表层次。它的判断结果决定它所在task是否执行,而不是它下面的task是否执行。
2、when中引用变量的时候不需要加{{ }}符号。
3、when中变量值判断是否相等使用2个等号,值需要用双引号引起来。
- 多条件判断
[root@Super ansible]# cat var.yml
---
- hosts: 10.15.43.17
  remote_user: ywbz
  become: yes
  become_method: su
  become_user: root
  tasks:
  - name: CentOS 7 7.5.1804
    copy: content="{{ansible_distribution}} {{ansible_distribution_version}}:{{ansible_all_ipv4_addresses}}" dest=/app/CentOS7.5.txt
    when:
      - ansible_distribution_major_version == "7"
      - ansible_distribution_version == '7.5.1804'
  - name: CentOS7
    copy: content="{{ansible_distribution}} {{ansible_distribution_version}}:{{ansible_all_ipv4_addresses}}" dest=/app/CentOS7.txt
    when: ansible_distribution_major_version == "7"
[root@Super ansible]# ansible-playbook var.yml --syntax-check

playbook: var.yml
[root@Super ansible]# ansible-playbook var.yml -K
SUDO password:

PLAY [10.15.43.17] ****************************************************************************************************

TASK [CentOS 7 7.5.1804] **********************************************************************************************
changed: [10.15.43.17]

TASK [CentOS7] ********************************************************************************************************
changed: [10.15.43.17]

PLAY RECAP ************************************************************************************************************
10.15.43.17                : ok=2    changed=2    unreachable=0    failed=0

[root@Super ansible]#
ansible_distribution_major_version == "7" 和 ansible_distribution_version == '7.5.1804' 同时满足才执行task。
- 组条件判断
when条件判断支持各种逻辑组合
[root@Super ansible]# cat when.yml
---
- hosts: 10.15.43.17
  remote_user: ywbz
  become: yes
  become_method: su
  become_user: root
  tasks:
  - name: restart snmp  CentOS 5 or CentOS 6
    cron: name="ansible cron test"
          minute=30 hour=6 day=* month=* weekday=*  user=root job="/sbin/service snmpd restart"
          backup=yes
    when: (ansible_distribution == "CentOS" and ansible_distribution_major_version == "5") or
          (ansible_distribution == "CentOS" and ansible_distribution_major_version == "6")
  - name: restart cron  CentOS 5 or CentOS 6
    service: name=crond state=restarted
    when: (ansible_distribution == "CentOS" and ansible_distribution_major_version == "5") or
          (ansible_distribution == "CentOS" and ansible_distribution_major_version == "6")
  - name: restart snmp CentOS 7
    cron: name="ansible cron test"
          minute=30 hour=6 day=* month=* weekday=*  user=root job="/usr/bin/systemctl restart snmpd"
          backup=yes
    when:
      - ansible_distribution == "CentOS"
      - ansible_distribution_major_version == "7"
  - name: restart cron CentOS 7
    service: name=crond state=restarted
    when:
      - ansible_distribution == "CentOS"
      - ansible_distribution_major_version == "7"
[root@Super ansible]# ansible-playbook when.yml --syntax-check

playbook: when.yml
[root@Super ansible]# ansible-playbook when.yml -K
SUDO password:

PLAY [10.15.43.17] ****************************************************************************************************

TASK [restart snmp  CentOS 5 or CentOS 6] *****************************************************************************
skipping: [10.15.43.17]

TASK [restart cron  CentOS 5 or CentOS 6] *****************************************************************************
skipping: [10.15.43.17]

TASK [restart snmp CentOS 7] ******************************************************************************************
changed: [10.15.43.17]

TASK [restart cron CentOS 7] ******************************************************************************************
changed: [10.15.43.17]

PLAY RECAP ************************************************************************************************************
10.15.43.17                : ok=2    changed=2    unreachable=0    failed=0

[root@Super ansible]#
取反
when: not ansible_distribution_major_version == "7"
- 自定义条件判断
* 迭代-循环
- with_items迭代列表
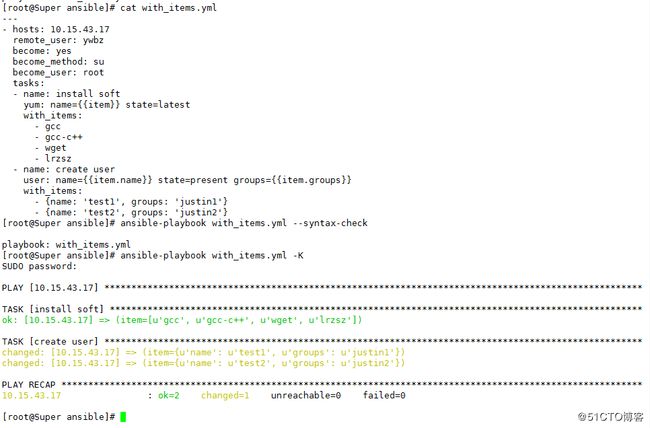
有需要重复性执行的任务时,可以使用迭代机制。其使用格式为将需要迭代的内容定义为item变量引用,并通过with_items语句指明迭代的元素列表即可。
例如:要安装一堆软件包。
按照with_itenms里的顺序依次安装
例如:创建多个用户
[root@Super ansible]# cat with_items.yml
---
- hosts: 10.15.43.17
  remote_user: ywbz
  become: yes
  become_method: su
  become_user: root
  tasks:
  - name: install soft
    yum: name={{item}} state=latest
    with_items:
      - gcc
      - gcc-c++
      - wget
      - lrzsz
  - name: create user
    user: name={{item.name}} state=present groups={{item.groups}}
    with_items:
      - {name: 'test1', groups: 'justin1'}    //创建用户test1,用户组为justin1
      - {name: 'test2', groups: 'justin2'}   //左右括号可以不用空格,冒号后需要空格
[root@Super ansible]# ansible-playbook with_items.yml --syntax-check

playbook: with_items.yml
[root@Super ansible]# ansible-playbook with_items.yml -K
SUDO password:

PLAY [10.15.43.17] ****************************************************************************************************

TASK [install soft] ***************************************************************************************************
ok: [10.15.43.17] => (item=[u'gcc', u'gcc-c++', u'wget', u'lrzsz'])

TASK [create user] ****************************************************************************************************
changed: [10.15.43.17] => (item={u'name': u'test1', u'groups': u'justin1'})
changed: [10.15.43.17] => (item={u'name': u'test2', u'groups': u'justin2'})

PLAY RECAP ************************************************************************************************************
10.15.43.17                : ok=2    changed=1    unreachable=0    failed=0

[root@Super ansible]# ansible 10.15.43.17 -S -R root -a 'tail -5 /etc/passwd'
10.15.43.17 | SUCCESS | rc=0 >>
zabbix:x:1001:1001::/home/zabbix:/sbin/nologin
ywbz:x:1002:1002::/home/ywbz:/bin/bash
nginx:x:998:996:Nginx web server:/var/lib/nginx:/sbin/nologin
test1:x:1003:1005::/home/test1:/bin/bash
test2:x:1004:1006::/home/test2:/bin/bash

[root@Super ansible]#- 字典
- name: add some groups
  group: name={{ item }} state=present
  with_items:
    - group11
    - group12
    - group13
- name: add some users
  user: name={{ item.name }} group={{ item.group }} state=present
  with_items:
    - { name: 'user11', group: 'group11' }
    - { name: 'user12', group: 'group12' }
    - { name: 'user13', group: 'group13' }
* Templates
Jinja2是python的一种模板语言,以Django的模板语言为原本。template类是Jinja的另一个重要组件,可以看作一个编译过的模块文件,用来生产目标文本,传递Python的变量给模板去替换模板中的标记。
例如:
[root@master ansible]# cat roles/temp/templates/test.j2 ExecStart=/usr/local/bin/etcd --name {{ master_hostname }} --initial-advertise-peer-urls http://{{ master_ip }}:2380在执行playbook时候变量{{ master_hostname }}、{{ master_ip }}会被替换成具体的值。
template只能在palybook中使用。
- jinga2基本语法
字面量:
  字符串:使用单引号或双引号
  数字:整型,浮点数
  列表:{item1,item2,...}
  字典:{key1:value1,key2:value2,...}
  布尔型:true/false
算术运算:
  +,-,*,/,//,%,**
比较运算:
  ==,!=,>,>=,<,<=
逻辑运算:
and,or,not- template模块调用的j2文件可以使用{% if %} {% endif %}进行控制:
[root@master ansible]# cat roles/temp/templates/test_if.j2
{% if ansible_hostname == master_hostname %}
ExecStart=/usr/local/bin/etcd --name {{ master_hostname }} --initial-advertise-peer-urls http://{{ master_ip }}:2380
{% elif ansible_hostname == node1_hostname %}
ExecStart=/usr/local/bin/etcd --name {{ node1_hostname }} --initial-advertise-peer-urls http://{{ node1_ip }}:2380
{% endif %}
使用if进行判断,如果ansible_hostname变量与定义的master_hostname变量值相等,那么将此文件copy到节点上就使用条件1,不满足条件1那么执行条件2。
ansible_hostname这个变量是setup模块中的值,是节点的固定值。
- template模块调用j2文件使用for循环:
创建jinja关于for的文件:
[root@master ansible]# cat roles/temp/templates/test_for.j2
{% for i in range(1,10) %}
test{{ i }}
{% endfor %}
[root@master ansible]# cat roles/temp/tasks/main.yaml
- name: copy configfile to nodes
  template:
    src: test_for.j2
    dest: /tmp/test.conf
[root@master ansible]# ansible-playbook work_dir/copy_configfile.yaml
[root@master ~]# cat /tmp/test.conf
test1
test2
test3
test4
test5
test6
test7
test8
test9
[root@master ansible]# - 使用default()默认值
定义了变量的值时,采用变量的值,当没有定义变量的值时,那么使用默认给定的值:
jinja2的文件:
[root@master ansible]# cat roles/temp/templates/test_default.j2
Listen: {{ server_port|default(80) }}
[root@master ansible]#
定义的变量:
[root@master ansible]# cat roles/temp/vars/main.yml
master_ip: 10.15.43.18
master_hostname: master
node1_ip: 10.15.43.19
node1_hostname: node1
[root@master ansible]#
这里没有定义server_port这个变量,执行playbook后,listen:后面的值就是80,如果vars/main.yml
- template模块常用参数:
参数名 是否必须 默认值 选项 说明
backup no no yes/no 建立个包括timestamp在内的文件备份,以备不时之需.
dest yes 远程节点上的绝对路径,用于放置template文件。
group no 设置远程节点上的的template文件的所属用户组
mode no 设置远程节点上的template文件权限。类似Linux中chmod的用法
owner no 设置远程节点上的template文件所属用户
src yes 本地Jinjia2模版的template文件位置。
* Tags
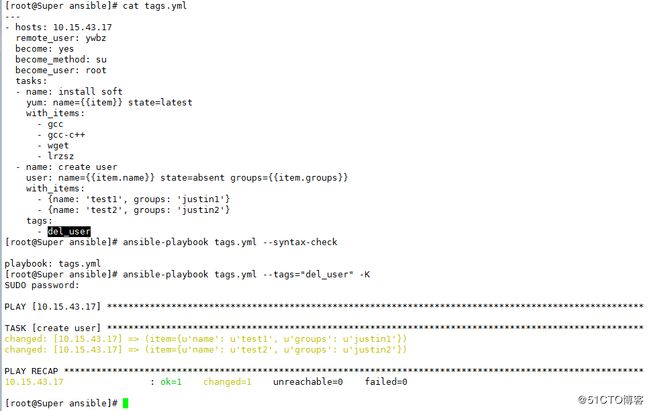
在一个playbook中,我们一般会定义很多个task,如果我们只想执行其中的某一个task或多个task时就可以使用tags标签功能。
[root@Super ansible]# cat tags.yml
---
- hosts: 10.15.43.17
  remote_user: ywbz
  become: yes
  become_method: su
  become_user: root
  tasks:
  - name: install soft
    yum: name={{item}} state=latest
    with_items:
      - gcc
      - gcc-c++
      - wget
      - lrzsz
  - name: create user
    user: name={{item.name}} state=absent groups={{item.groups}}
    with_items:
      - {name: 'test1', groups: 'justin1'}
      - {name: 'test2', groups: 'justin2'}
    tags:
      - del_user
[root@Super ansible]# ansible-playbook tags.yml --syntax-check

playbook: tags.yml
[root@Super ansible]# ansible-playbook tags.yml --tags="del_user" -K    //-t del_user
SUDO password:

PLAY [10.15.43.17] ****************************************************************************************************

TASK [create user] ****************************************************************************************************
changed: [10.15.43.17] => (item={u'name': u'test1', u'groups': u'justin1'})
changed: [10.15.43.17] => (item={u'name': u'test2', u'groups': u'justin2'})

PLAY RECAP ************************************************************************************************************
10.15.43.17                : ok=1    changed=1    unreachable=0    failed=0

[root@Super ansible]#
如果想跳过某个task,将参数--tags替换成--skip-tags,从某个tag开始使用–start-at-task=START_AT,可以为单个或多个task指定同一个tags。
- 系统中内置的特殊tags:
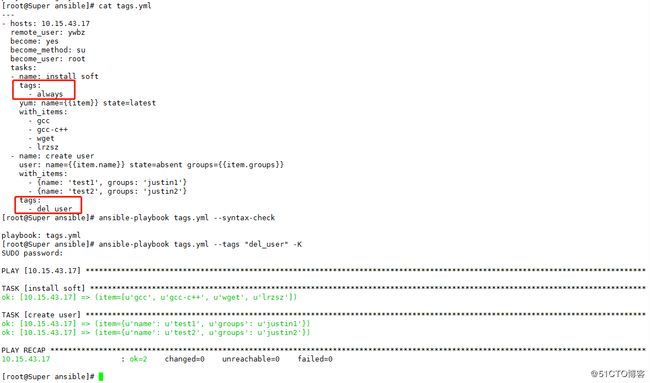
always: 指定这个tag 后,无论执行哪一个tags时,该tags标记的task任务将永远被执行,而不用去考虑是否使用了--skip-tags标记,
tagged: 当 --tags 指定为它时,则只要有tags标记的task都将被执行,--skip-tags效果相反
untagged: 当 --tags 指定为它时,则所有没有tag标记的task 将被执行,--skip-tags效果相反
all: 这个标记无需指定,ansible-playbook 默认执行的时候就是这个标记.所有task都被执行
[root@Super ansible]# cat tags.yml
---
- hosts: 10.15.43.17
  remote_user: ywbz
  become: yes
  become_method: su
  become_user: root
  tasks:
  - name: install soft
    tags:
      - always
    yum: name={{item}} state=latest
    with_items:
      - gcc
      - gcc-c++
      - wget
      - lrzsz
  - name: create user
    user: name={{item.name}} state=absent groups={{item.groups}}
    with_items:
      - {name: 'test1', groups: 'justin1'}
      - {name: 'test2', groups: 'justin2'}
    tags:
      - del_user
[root@Super ansible]#
* roles
ansilbe自1.2版本引入的新特性,roles用于实现“代码复用”,roles以特定的层次型格式组织起来的playbook元素(variables, tasks, templates,handlers),roles能够根据层次型结构自动装载变量文件、tasks以及handlers等。要使用roles只需要在playbook中使用include指令即可。简单来讲,roles就是通过分别将变量、文件、任务、模块及处理器放置于单独的目录中,并可以便捷地include它们的一种机制。角色一般用于基于主机构建服务的场景中,但也可以是用于构建守护进程等场景中。
- roles的文件结构:
files/:此角色中用到的所有文件均放置于此目录中
templates/: Jinja2模板文件存放位置
tasks/:任务列表文件;可以有多个,但至少有一个叫做main.yml的文件
handlers/:处理器列表文件;可以有多个,但至少有一个叫做main.yml的文件
vars/:变量字典文件;可以有多个,但至少有一个叫做main.yml的文件
meta/:此角色的特殊设定及依赖关系
roles的目录结构示例:
[root@Super ansible]# tree roles/
roles/
├── dbservers
│   ├── files
│   ├── handlers
│   │   └── main.yml
│   ├── tasks
│   │   └── main.yml
│   ├── templates
│   └── vars
│       └── main.yml
└── webservers
    ├── default             为当前角色设定默认变量时使用此目录;应当包含一个main.yml文件;
    │   └── main.yml
    ├── files               存放由copy或script等模块调用的静态文件;
    ├── handlers            此目录中应当包含一个main.yml文件,用于定义此角色用到的各handler;此文件可以使用include包含其它的位于此目录中的handler文件;
    │   └── main.yml
    ├── meta                至少有一个main.yml文件,用于定义此角色的特殊设定及其依赖关系;ansible 1.3及其以后的版本才支持;
    │   └── main.yml
    ├── tasks               至少应该包含一个名为main.yml的文件,其定义了此角色的任务列表;此文件可以使用include包含其它的位于此目录中的task文件;
    │   └── main.yml
    ├── templates           template模块会自动在此目录中寻找Jinja2模板文件;
    └── vars                至少有一个main.yml文件,用于定义此角色用到的变量;
        └── main.yml

14 directories, 8 files
[root@Super ansible]#
在playbook中,可以这样使用roles:
[root@Super ansible]# cat roles.yml
---
- hosts: 10.10.15.165:10.10.15.192
  remote_user: ywbz
  become: yes
  become_method: su
  become_user: root
  roles:
  - common
  - webserver
  - dbserver
[root@Super ansible]#
