AndroidCamera学习笔记三 分别实现API1和API2的预览拍照录像
APP层实现
在前面先基本了解了下Camera从顶到底的基本框架结构,在Framework层(我这里将Runtime,Nativelibrary,JNI等部分统一归入了Framework)时仅介绍了java提供的方法部分,未对JNI,Runtime,C++Libraries展开介绍,这部分有些复杂且是由Android框架决定,故在后面也仅宏观介绍一下结构,代码就不追了。在本节中主要是将APP以下的部分当作黑盒,利用Framework提供的方法实现相机APP,分别利用API1和API2实现,尽量将代码整理的比较独立,利于理解。这里的平台使用的是AndroidStudio,可以使用真机调试也可以安装虚拟机测试。
界面及权限
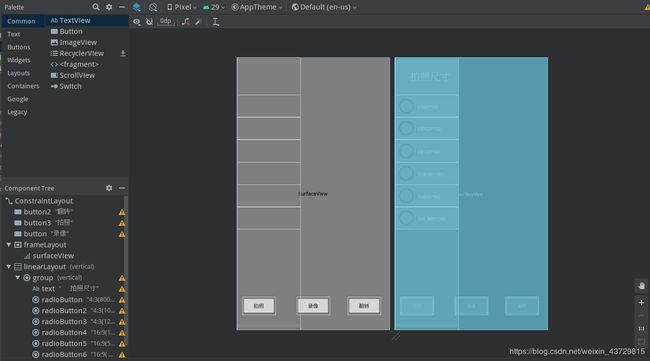
这部分就是为后面功能实现做的一些界面支持工作,首先在项目中创建APP窗口及画布按钮等,我这里使用的是Android中的一个SurfaceView,这是一个缓冲区画布以供预览显示,按钮则是拍照录像及前后摄像头切换。在这里左侧滑动侧边框添加了一个控制画面尺寸的面板,为了实现简单这个面板使用Visibility属性控制显示而不是滑动拉出。需要注意的是要实现Camera需要向系统获取权限,这部分是在AndroidManifest.xml中标明的。
API1的实现
首先先挂上参数表,又想到当初自己写APP时的坑,网上资料挺多但是不知道参数是哪个,可太惨了
	public Button mButton;
    public Button switchBtn;
    private Camera mCamera;
    private SurfaceView surfaceView;
    private SurfaceHolder mSurfaceHolder;
    private int cameraId = 0;
    private ToneGenerator tone;
    private Button videoBtn;
    private int time;
    private TextView time_tv;
    private Handler handler;
    private MediaRecorder mRecorder;
    private File videoFile;
    private LinearLayout linearLayout;
    private static final int FLING_MIN_DISTANCE = 20;// 移动最小距离
    private GestureDetector mygesture;
    private RadioGroup myRadio;
    private int previewW=1920,previewH=1080,pictureW=1920,pictureH=1080;
    private FrameLayout frameLayout;
在代码中需要将对象与组件绑定
        time_tv=findViewById(R.id.textView);
        mButton = findViewById(R.id.button3);
        mButton.setBackgroundColor(Color.GREEN);
        switchBtn = findViewById(R.id.button2);
        switchBtn.setBackgroundColor(Color.GREEN);
        videoBtn =findViewById(R.id.button);
        videoBtn.setBackgroundColor(Color.GREEN);
        linearLayout=findViewById(R.id.linearLayout);
        linearLayout.setVisibility(View.GONE);
        myRadio=findViewById(R.id.group);
对界面进行初始化,在这里实现了一个对右划显示左划消失的侧边栏控制功能
private void initView() {
        LayoutInflater inflater = (LayoutInflater)getSystemService(Context.LAYOUT_INFLATER_SERVICE);
        frameLayout=findViewById(R.id.frameLayout);
        surfaceView = frameLayout.findViewById(R.id.surfaceView);//绑定图像显示区的实例
        mSurfaceHolder = surfaceView.getHolder();//获得SurfaceView的Holder
        mSurfaceHolder.addCallback(this);//设置Holder的回调
        handler=new Handler();
        mRecorder = new MediaRecorder();
        mygesture = new GestureDetector(this,new GestureDetector.OnGestureListener() {
            @Override
            public boolean onDown(MotionEvent e) {
                return false;
            }

            @Override
            public void onShowPress(MotionEvent e) {

            }

            @Override
            public boolean onSingleTapUp(MotionEvent e) {
                return false;
            }

            @Override
            public boolean onScroll(MotionEvent e1, MotionEvent e2, float distanceX, float distanceY) {
                return false;
            }

            @Override
            public void onLongPress(MotionEvent e) {

            }

            @Override
            public boolean onFling(MotionEvent e1, MotionEvent e2, float velocityX, float velocityY) {
                if (e1.getX() - e2.getX() > FLING_MIN_DISTANCE) {
                    linearLayout.setVisibility(View.GONE);
                    Log.i("MYTAG", "向左滑...");
                    return true;
                }
                if (e2.getX() - e1.getX() > FLING_MIN_DISTANCE) {
                    linearLayout.setVisibility(View.VISIBLE);
                    Log.i("MYTAG", "向右滑...");
                    return true;
                }
                if (e1.getY() - e2.getY() > FLING_MIN_DISTANCE) {
                    Log.i("MYTAG", "向上滑...");
                    return true;
                }
                if (e2.getY() - e1.getY() > FLING_MIN_DISTANCE) {
                    Log.i("MYTAG", "向下滑...");
                    return true;
                }

                Log.d("TAG", e2.getX() + " " + e2.getY());

                return false;
            }
        });
    }
对Button添加点击或者按住事件,拍照和前后翻转为点击,录像为类似微信的按住开始放开就结束
private void initButton() {
        //拍照的按钮
        mButton.setOnClickListener(new View.OnClickListener() {
            @Override
            public void onClick(final View view) {
                mCamera.takePicture(shutterCallback,null,jpegCallBack);
            }
        });
        //翻转摄像机的按钮
        switchBtn.setOnClickListener(new View.OnClickListener() {
            @Override
            public void onClick(View view) {
                CameraSwitch();
            }
        });
        videoBtn.setOnTouchListener(new View.OnTouchListener() {
            @Override
            public boolean onTouch(View v, MotionEvent event) {
                switch (event.getAction()) {
                    case MotionEvent.ACTION_DOWN: {
                        videoBtn.setBackgroundColor(Color.RED);
                        System.out.println("开始录像");
                        try {
                            videoFile = new File("/storage/emulated/0/Movies/" + System.currentTimeMillis() + ".mp4");
                            mCamera.unlock();
                            mRecorder.setCamera(mCamera);
                            mRecorder.setPreviewDisplay(surfaceView.getHolder().getSurface());
                            mRecorder.setVideoSource(MediaRecorder.VideoSource.CAMERA);
                            mRecorder.setAudioSource(MediaRecorder.AudioSource.MIC);
                            mRecorder.setOutputFormat(MediaRecorder.OutputFormat.MPEG_4);
                            mRecorder.setVideoEncodingBitRate(2 * 1280 * 720);
                            mRecorder.setVideoEncoder(MediaRecorder.VideoEncoder.MPEG_4_SP);
                            mRecorder.setAudioEncoder(MediaRecorder.AudioEncoder.AMR_NB);
                            mRecorder.setMaxDuration(1800000);
                            videoFile.createNewFile();
                            mRecorder.setOutputFile(videoFile.getAbsolutePath());
                            mRecorder.prepare();
                            mRecorder.start();
                            time_tv.setVisibility(View.VISIBLE);
                            handler.post(timeRun);
                        } catch (IOException e) {
                            e.printStackTrace();
                        }
                        break;
                    }
                    case MotionEvent.ACTION_UP:{
                        System.out.println("结束录制");
                        mRecorder.stop();
                        mRecorder.release();
                        handler.removeCallbacks(timeRun);
                        time_tv.setVisibility(View.GONE);
                        int videoTimeLength = time;
                        time = 0;
                        Toast.makeText(TestActivity.this, videoFile.getAbsolutePath() + " " + videoTimeLength + "秒", Toast.LENGTH_LONG).show();
                        videoBtn.setBackgroundColor(Color.GREEN);
                        if (mCamera == null) {
                            mCamera = Camera.open();
                        }
                        break;
                    }
                }
                return false;
            }
        });

        myRadio.setOnCheckedChangeListener(new RadioGroup.OnCheckedChangeListener() {
            @Override
            public void onCheckedChanged(RadioGroup group, int checkedId) {
                switch (group.getCheckedRadioButtonId()){
                    case R.id.radioButton:
                        previewW=1440;
                        previewH=1080;
                        pictureW=800;
                        pictureH=600;
                        surfaceView.setLayoutParams(new FrameLayout.LayoutParams(previewH,previewW));
                        break;
                    case R.id.radioButton2:
                        previewW=1440;
                        previewH=1080;
                        pictureW=1024;
                        pictureH=768;
                        surfaceView.setLayoutParams(new FrameLayout.LayoutParams(previewH,previewW));
                        break;
                    case R.id.radioButton3:
                        previewW=1440;
                        previewH=1080;
                        pictureW=1280;
                        pictureH=960;
                        surfaceView.setLayoutParams(new FrameLayout.LayoutParams(previewH,previewW));
                        break;
                    case R.id.radioButton4:
                        previewW=1920;
                        previewH=1080;
                        pictureW=1920;
                        pictureH=1080;
                        surfaceView.setLayoutParams(new FrameLayout.LayoutParams(previewH,previewW));
                        break;
                    case R.id.radioButton5:
                        previewW=1920;
                        previewH=1080;
                        pictureW=960;
                        pictureH=560;
                        surfaceView.setLayoutParams(new FrameLayout.LayoutParams(previewH,previewW));
                        break;
                    case R.id.radioButton6:
                        previewW=1920;
                        previewH=1080;
                        pictureW=3840;
                        pictureH=2160;
                        surfaceView.setLayoutParams(new FrameLayout.LayoutParams(previewH,previewW));
                        break;
                }
            }
        });
    }
对Surface的方法重写
@Override
    public void surfaceChanged(SurfaceHolder surfaceHolder, int i, int i1, int i2) {
        System.out.println("调用");
        if (ContextCompat.checkSelfPermission(TestActivity.this, Manifest.permission.CAMERA) != PackageManager.PERMISSION_GRANTED) {
        } else {
            CameraOpen();
        }
        Camera.Parameters parameters = mCamera.getParameters();
        parameters.setFocusMode(Camera.Parameters.FOCUS_MODE_AUTO);
        List sizes=parameters.getSupportedPictureSizes();
        parameters.setPreviewSize(previewW,previewH);
        System.out.println("PreviewW:"+previewW+"  PreviewH:"+previewH);
        parameters.setPictureSize(pictureW,pictureH);
        System.out.println("PictureW:"+pictureW+"  PictureH"+pictureH);
        mCamera.setParameters(parameters);
        mCamera.startPreview();
    }

    @Override
    public void surfaceDestroyed(SurfaceHolder surfaceHolder) {
        mCamera.stopPreview();
        mCamera.release();
        mCamera = null;
        handler.removeCallbacks(timeRun);
        mRecorder.release();
    }
回调初始化,指定拍照存储位置,设置录像计时函数
 private Camera.PictureCallback jpegCallBack=new Camera.PictureCallback() {
        @Override
        public void onPictureTaken(byte[] data, Camera camera) {
            File pictureFile=new File("/storage/emulated/0/Pictures/"+System.currentTimeMillis()+".jpg");
            try{
                FileOutputStream fos =new FileOutputStream(pictureFile);
                fos.write(data);
                fos.close();
                Toast.makeText(getApplicationContext(), "Image has been saved to " + pictureFile.getAbsolutePath(), Toast.LENGTH_SHORT).show();
            } catch (FileNotFoundException e) {
                e.printStackTrace();
            } catch (IOException e) {
                e.printStackTrace();
            }

        }
    };

    private Camera.ShutterCallback shutterCallback=new Camera.ShutterCallback() {
        @Override
        public void onShutter() {
            if(tone==null)
                tone=new ToneGenerator(AudioManager.STREAM_MUSIC,ToneGenerator.MAX_VOLUME);
            tone.startTone(ToneGenerator.TONE_PROP_BEEP2);
        }
    };

    private Runnable timeRun =new Runnable() {
        @Override
        public void run() {
            time++;
            time_tv.setText(time+"s");
            handler.postDelayed(timeRun,1000);
        }
    };
接下来就是对API的方法的调用,以实现功能。API1的实现方式主要是通过Framework提供的Camera类中的方法来实现在前面分析过这个类中的各个方法及作用,可以对照上文中的Camera类方法图使用。首先添加头文件并创建Camera对象。
opencamera():
public void CameraOpen() {
        try
        {
            if(mCamera!=null)
                return;
            System.out.println("拍完照再次进来");
            //打开摄像机
            mCamera = Camera.open(cameraId);
            setCameraDisplayOrientation(this,cameraId,mCamera);
            mCamera.setPreviewDisplay(mSurfaceHolder);
        } catch (IOException e) {
            mCamera.release();
            mCamera = null;
            Toast.makeText(TestActivity.this, "surface created failed", Toast.LENGTH_SHORT).show();
        }
    }
这里的cameraid可以先获取cameraidlist之后再选择具体的id,为了简单这里直接默认后置id
前后置相机翻转:
public void CameraSwitch()
    {
        cameraId = cameraId == 1 ? 0 : 1;
        mCamera.stopPreview();
        mCamera.release();
        mCamera = null;
        CameraOpen();
    }
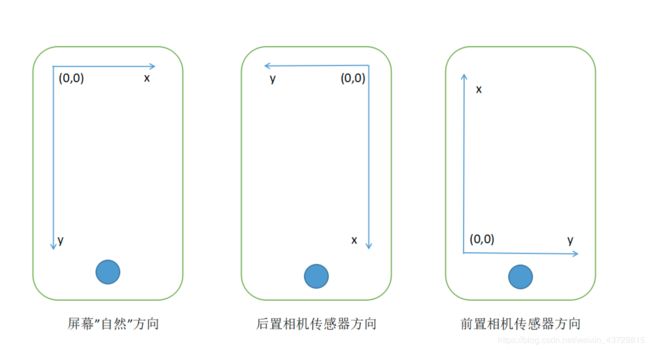
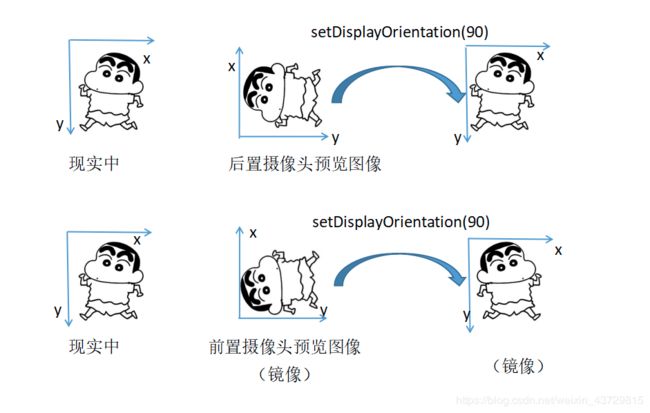
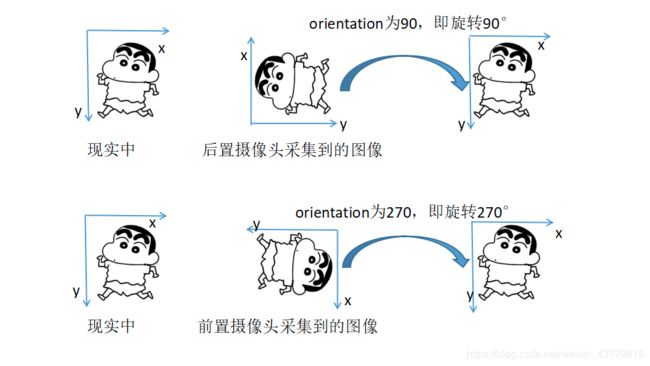
可以很明显地看出,API1的拍照方式直接调用mCamera.takePicture(shutterCallback,null,jpegCallBack);即可完成拍照,因为只有一行即可控制就直接写在了按钮的点击监听事件中,video的录制则是MediaRecorder对象完全控制,也写在了按钮点击监听中。到这里一个API1的相机app就完成了,但是有一个点需要注意一下,就是拍照方向。理解拍照方向之前应该知道手机相机的传感器方向及手机方向和照片方向之间的区别


万能的社区大佬们给出的图很好的解释了这三者的关系,我就直接拿来用了(盗图勿怪),看图就可以理解这三个方向,实际设置时应该通过手机传感器识别手机方向,根据手机方向设置照片方向,建议多次调试,根据实际效果去设置。(发现不同手机厂商对图片方向都不同,有的手机横置拍摄的照片在图库打开时会进行翻转有的不会)所以因根据实际想要的效果结合传感器设置。侧边栏的尺寸控制是多选框,实际尺寸分为预览尺寸和拍照尺寸,所以对比例进行了控制,如同为1:1的尺寸那么使用的是同一个预览尺寸,切换时只对拍照尺寸进行修改。当修改的尺寸涉及比例修改时才会对预览尺寸进行修改以保证预览效果与拍照效果一致。至此API1的基本方法就结束了,至于camera提供的其他方法可以多试试多玩玩,建议对照上一篇中的Camera方法图使用。
API2的实现
有了API1的基础,API2就直接开始了,利用和API1相同的界面及权限设置,API2中不同的就是Session及Request机制,和参数控制这三者是独立实现的。
老规矩,先挂参数表
	private SurfaceView surfaceView;
    private CameraDevice mCameraDevice;
    private CameraManager mCameraManager;
    private SurfaceHolder surfaceHolder;
    private CameraCharacteristics cameraCharacteristics;
    private CameraCaptureSession cameraCaptureSession;
    private ImageReader imageReader;
    private Button take;
    private Button swich;
    private Button record;
    private TextView time_tv;
    private Handler handler=new Handler();
    private int time;
    private String videopath;
    public static final String CAMERA_FRONT ="1";
    public static final String CAMERA_BACK ="0";
    private String cameraId = CAMERA_BACK;
    private static final SparseIntArray ORIENTATIONS = new SparseIntArray();
    private MediaRecorder mediaRecorder;
    private int previewW=1920,previewH=1080,pictureW=1920,pictureH=1080;
    private LinearLayout linearLayout;
    private static final int FLING_MIN_DISTANCE = 20;// 移动最小距离
    private GestureDetector mygesture;
    private RadioGroup myRadio;
    private int flag=0;
    private CaptureRequest.Builder captureBuilder;
    private CaptureRequest.Builder previewbuilder;
    private CaptureRequest.Builder videoBilder;
    static {
        ORIENTATIONS.append(Surface.ROTATION_0, 90);
        ORIENTATIONS.append(Surface.ROTATION_90, 0);
        ORIENTATIONS.append(Surface.ROTATION_180, 270);
        ORIENTATIONS.append(Surface.ROTATION_270, 180);
    }
好像有的同学不知道入口怎么写,其实就很简单
protected void onCreate(Bundle savedInstanceState) {
        super.onCreate(savedInstanceState);
        requestWindowFeature(Window.FEATURE_NO_TITLE);
        setContentView(R.layout.layout);
        initView();
        setAttribute();
        initButton();
    }//主函数
初始化界面,就不多做解释了,代码很清晰了
private void initView()
    {
        surfaceView = findViewById(R.id.surfaceView);
        time_tv=findViewById(R.id.textView);
        take = findViewById(R.id.button3);
        take.setBackgroundColor(Color.GREEN);
        swich = findViewById(R.id.button2);
        swich.setBackgroundColor(Color.GREEN);
        record = findViewById(R.id.button);
        record.setBackgroundColor(Color.GREEN);
        linearLayout=findViewById(R.id.linearLayout);
        linearLayout.setVisibility(View.GONE);
        myRadio=findViewById(R.id.group);
        frameLayout=findViewById(R.id.frameLayout);
        mygesture=new GestureDetector(this, new GestureDetector.OnGestureListener() {
            @Override
            public boolean onDown(MotionEvent e) {
                return false;
            }

            @Override
            public void onShowPress(MotionEvent e) {

            }

            @Override
            public boolean onSingleTapUp(MotionEvent e) {
                return false;
            }

            @Override
            public boolean onScroll(MotionEvent e1, MotionEvent e2, float distanceX, float distanceY) {
                return false;
            }

            @Override
            public void onLongPress(MotionEvent e) {

            }

            @Override
            public boolean onFling(MotionEvent e1, MotionEvent e2, float velocityX, float velocityY) {
                if (e1.getX() - e2.getX() > FLING_MIN_DISTANCE) {
                    linearLayout.setVisibility(View.GONE);
                    Log.i("MYTAG", "向左滑...");
                    return true;
                }
                if (e2.getX() - e1.getX() > FLING_MIN_DISTANCE) {
                    linearLayout.setVisibility(View.VISIBLE);
                    Log.i("MYTAG", "向右滑...");
                    return true;
                }
                if (e1.getY() - e2.getY() > FLING_MIN_DISTANCE) {
                    Log.i("MYTAG", "向上滑...");
                    return true;
                }
                if (e2.getY() - e1.getY() > FLING_MIN_DISTANCE) {
                    Log.i("MYTAG", "向下滑...");
                    return true;
                }

                Log.d("TAG", e2.getX() + " " + e2.getY());
                return false;
            }
        });
    }
按照函数入口中的顺序接下来就是setAttribute(),为了代码结构清晰就写了方法在这里设置参数其实就是屏幕显示的回调
private void setAttribute(){
        mCameraManager = (CameraManager) getSystemService(Context.CAMERA_SERVICE);
        try {
            String[] idList=mCameraManager.getCameraIdList();
            for(int i=0;i2&&mCameraDevice!=null)
        {
            mCameraDevice.close();
            mCameraDevice=null;
            openCamera();
        }
        else
            return;;
    }

    @Override
    public void surfaceDestroyed(SurfaceHolder holder) {

    }
按照调用顺序接下来就是初始化Button,这里是对button的事件监听器的设置
private void initButton() {

        take.setOnClickListener(new View.OnClickListener() {
            @Override
            public void onClick(View v) {
                takePicture();
                setImageReader();
                openPreview();
            }
        });
        swich.setOnClickListener(new View.OnClickListener() {
            @Override
            public void onClick(View v) {
                takeswich();
            }
        });
        record.setOnTouchListener(new View.OnTouchListener() {
            @Override
            public boolean onTouch(View v, MotionEvent event) {
                switch(event.getAction()){
                    case MotionEvent.ACTION_DOWN:{
                        mediaRecorder=takevideo();
                        record.setBackgroundColor(Color.RED);
                        mediaRecorder.start();
                        time_tv.setVisibility(View.VISIBLE);
                        handler.post(timeRun);
                        break;
                    }
                    case MotionEvent.ACTION_UP:{
                        mediaRecorder.stop();
                        mediaRecorder.release();
                        handler.removeCallbacks(timeRun);
                        time_tv.setVisibility(View.GONE);
                        int videoTimeLength=time;
                        time=0;
                        Toast.makeText(MainActivity.this,  videopath+ " " + videoTimeLength + "秒", Toast.LENGTH_LONG).show();
                        record.setBackgroundColor(Color.GREEN);
                        mCameraDevice.close();
                        mCameraDevice=null;
                        openCamera();
                        break;
                    }
                }
                return false;
            }
        });

        myRadio.setOnCheckedChangeListener(new RadioGroup.OnCheckedChangeListener() {
            @Override
            public void onCheckedChanged(RadioGroup group, int checkedId) {
                switch (group.getCheckedRadioButtonId()){
                    case R.id.radioButton:
                        previewW=1440;
                        previewH=1080;
                        pictureW=800;
                        pictureH=600;
                        surfaceView.setLayoutParams(new FrameLayout.LayoutParams(previewH,previewW));
                        surfaceHolder.setFixedSize(previewW,previewH);
                        break;
                    case R.id.radioButton2:
                        previewW=1440;
                        previewH=1080;
                        pictureW=1024;
                        pictureH=768;
                        surfaceView.setLayoutParams(new FrameLayout.LayoutParams(previewH,previewW));
                        surfaceHolder.setFixedSize(previewW,previewH);
                        break;
                    case R.id.radioButton3:
                        previewW=1440;
                        previewH=1080;
                        pictureW=1280;
                        pictureH=960;
                        surfaceView.setLayoutParams(new FrameLayout.LayoutParams(previewH,previewW));
                        surfaceHolder.setFixedSize(previewW,previewH);
                        break;
                    case R.id.radioButton4:
                        previewW=1920;
                        previewH=1080;
                        pictureW=1920;
                        pictureH=1080;
                        surfaceView.setLayoutParams(new FrameLayout.LayoutParams(previewH,previewW));
                        surfaceHolder.setFixedSize(previewW,previewH);
                        break;
                    case R.id.radioButton5:
                        previewW=1920;
                        previewH=1080;
                        pictureW=960;
                        pictureH=560;
                        surfaceView.setLayoutParams(new FrameLayout.LayoutParams(previewH,previewW));
                        surfaceHolder.setFixedSize(previewW,previewH);
                        break;
                    case R.id.radioButton6:
                        previewW=1920;
                        previewH=1080;
                        pictureW=3840;
                        pictureH=2160;
                        surfaceView.setLayoutParams(new FrameLayout.LayoutParams(previewH,previewW));
                        surfaceHolder.setFixedSize(previewW,previewH);
                        break;
                }
            }
        });
    }
设置状态回调及设置图像
protected final CameraDevice.StateCallback stateCallback = new CameraDevice.StateCallback() {
        @Override
        public void onOpened(@NonNull CameraDevice camera) {
            System.out.println("进到了Onopened");
            mCameraDevice = camera;
            openPreview();
        }

        @Override
        public void onDisconnected(@NonNull CameraDevice camera) {
            System.out.println("在onDisconnected被销毁");
            mCameraDevice.close();
            mCameraDevice = null;
        }

        @Override
        public void onError(@NonNull CameraDevice camera, int error) {
            System.out.println("在onError被销毁");
            mCameraDevice.close();
            mCameraDevice = null;
        }
    };
    private void setImageReader(){
        imageReader=ImageReader.newInstance(pictureW,pictureH,ImageFormat.JPEG,2);
        imageReader.setOnImageAvailableListener(new ImageReader.OnImageAvailableListener() {
            @Override
            public void onImageAvailable(ImageReader reader) {
                Image image=reader.acquireLatestImage();
                ByteBuffer buffer = image.getPlanes()[0].getBuffer();
                byte[] bytes = new byte[buffer.remaining()];
                buffer.get(bytes);
                Bitmap bitmap= BitmapFactory.decodeByteArray(bytes,0,bytes.length);
                int rotation = getWindowManager().getDefaultDisplay().getRotation();
                if(rotation==0||rotation==180)
                    rotation+=90;
                bitmap=rotateBitmap(bitmap,rotation);
                File pictureFile=new File("/storage/emulated/0/Pictures/"+System.currentTimeMillis()+".jpg");
                try {
                    BufferedOutputStream fos =new BufferedOutputStream(new FileOutputStream(pictureFile));
                    bitmap.compress(Bitmap.CompressFormat.JPEG, 80,fos);
                    fos.flush();
                    fos.close();
                    Toast.makeText(getApplicationContext(), "Image has been saved to " + pictureFile.getAbsolutePath(), Toast.LENGTH_SHORT).show();
                    reader.close();
                } catch (FileNotFoundException e) {
                    e.printStackTrace();
                } catch (IOException e) {
                    e.printStackTrace();
                }
            }
        },null);
    }
打开相机
private void openCamera() {
        System.out.println("openCamera被调用");
        if(mCameraDevice!=null)
            return;
        Handler mainHandle = new Handler(getMainLooper());
        if (ActivityCompat.checkSelfPermission(this, Manifest.permission.CAMERA) != PackageManager.PERMISSION_GRANTED) {
            // TODO: Consider calling
            //    ActivityCompat#requestPermissions
            // here to request the missing permissions, and then overriding
            //   public void onRequestPermissionsResult(int requestCode, String[] permissions,
            //                                          int[] grantResults)
            // to handle the case where the user grants the permission. See the documentation
            // for ActivityCompat#requestPermissions for more details.
            return;
        }
        try {
            mCameraManager.openCamera(cameraId, stateCallback, mainHandle);
        } catch (CameraAccessException e) {
            e.printStackTrace();
        }
    }
翻转:
private void takeswich(){
       if(cameraId.equals(CAMERA_FRONT))
       {
           cameraId=CAMERA_BACK;
       }
       else if(cameraId.equals(CAMERA_BACK)) {
           cameraId = CAMERA_FRONT;
       }
       mCameraDevice.close();
       mCameraDevice=null;
       openCamera();
    }
预览:
private void openPreview()
    {
        try {
            previewbuilder=mCameraDevice.createCaptureRequest(CameraDevice.TEMPLATE_PREVIEW);
            previewbuilder.addTarget(surfaceHolder.getSurface());
            mCameraDevice.createCaptureSession(Arrays.asList(surfaceHolder.getSurface(),imageReader.getSurface()),new CameraCaptureSession.StateCallback() {
                @Override
                public void onConfigured(@NonNull CameraCaptureSession session) {
                    if(mCameraDevice==null)return;
                    cameraCaptureSession=session;
                    previewbuilder.set(CaptureRequest.CONTROL_AF_MODE,CaptureRequest.CONTROL_AF_MODE_CONTINUOUS_PICTURE);
                    previewbuilder.set(CaptureRequest.CONTROL_AE_MODE, CaptureRequest.CONTROL_AE_MODE_ON_AUTO_FLASH);
                    previewbuilder.set(CaptureRequest.JPEG_ORIENTATION, ORIENTATIONS.get(90));
                    CaptureRequest previewRequest = previewbuilder.build();
                    try {
                        cameraCaptureSession.setRepeatingRequest(previewRequest,null,null);
                    } catch (CameraAccessException e) {
                        e.printStackTrace(); } }
                @Override
                public void onConfigureFailed(@NonNull CameraCaptureSession session) {
                }
            },null);

        } catch (CameraAccessException e) {
            e.printStackTrace(); }
    }
拍照:
private void takePicture(){
        try {
            captureBuilder = mCameraDevice.createCaptureRequest(CameraDevice.TEMPLATE_STILL_CAPTURE);
            captureBuilder.addTarget(imageReader.getSurface());
            cameraCaptureSession.stopRepeating();
            cameraCaptureSession.abortCaptures();
            int rotation = getWindowManager().getDefaultDisplay().getRotation();
            captureBuilder.set(CaptureRequest.JPEG_ORIENTATION, ORIENTATIONS.get(rotation)+90);
            cameraCaptureSession.capture(captureBuilder.build(), null, null);
        } catch (CameraAccessException e) {
            e.printStackTrace(); }
    }
录像:
private MediaRecorder takevideo(){
        MediaRecorder mediaRecorders=setUpMeaiaRecorder();
        try {
            videoBilder=mCameraDevice.createCaptureRequest(CameraDevice.TEMPLATE_RECORD);
            videoBilder.set(CaptureRequest.CONTROL_AF_MODE,CaptureRequest.CONTROL_AF_MODE_CONTINUOUS_VIDEO);
            videoBilder.set(CaptureRequest.CONTROL_AE_MODE, CaptureRequest.CONTROL_AE_MODE_ON_AUTO_FLASH);
            mediaRecorders.prepare();
            videoBilder.addTarget(surfaceHolder.getSurface());
            videoBilder.addTarget(mediaRecorders.getSurface());
            cameraCaptureSession.stopRepeating();
            cameraCaptureSession.abortCaptures();
            mCameraDevice.createCaptureSession(Arrays.asList(surfaceHolder.getSurface(),mediaRecorders.getSurface()), new CameraCaptureSession.StateCallback() {
                @Override
                public void onConfigured(@NonNull CameraCaptureSession session) {
                    cameraCaptureSession=session;
                    try {
                        cameraCaptureSession.setRepeatingRequest(videoBilder.build(),null,null);
                    } catch (CameraAccessException e) {
                        e.printStackTrace(); }
                }
                @Override
                public void onConfigureFailed(@NonNull CameraCaptureSession session) { }
            },null);
        } catch (CameraAccessException e) {
            e.printStackTrace(); } catch (IOException e) {
            e.printStackTrace(); }
        return mediaRecorders; }


    private MediaRecorder setUpMeaiaRecorder(){
        MediaRecorder mediaRecorders=new MediaRecorder();
        File videoFile = new File("/storage/emulated/0/Movies/" + System.currentTimeMillis() + ".mp4");
        videopath=videoFile.getAbsolutePath();
        mediaRecorders.setOutputFile(videopath);
        mediaRecorders.setAudioSource(MediaRecorder.AudioSource.MIC);
        mediaRecorders.setVideoSource(MediaRecorder.VideoSource.SURFACE);
        mediaRecorders.setOutputFormat(MediaRecorder.OutputFormat.MPEG_4);
        mediaRecorders.setVideoEncodingBitRate(2 * 1280 * 720);
        mediaRecorders.setVideoEncoder(MediaRecorder.VideoEncoder.MPEG_4_SP);
        mediaRecorders.setAudioEncoder(MediaRecorder.AudioEncoder.AMR_NB);
        mediaRecorders.setMaxDuration(1800000);
        return mediaRecorders; }
录像时间记录方法及图像旋转方法:在独立线程中记录时间,根据输入角度旋转图像
public void run() {
        time++;
        time_tv.setText(time + "秒");
        handler.postDelayed(timeRun, 1000);
    }
    private Bitmap rotateBitmap(Bitmap origin, float alpha) {
        if (origin == null) {
            return null;
        }
        int width = origin.getWidth();
        int height = origin.getHeight();
        Matrix matrix = new Matrix();
        matrix.setRotate(alpha);
        // 围绕原地进行旋转
        Bitmap newBM = Bitmap.createBitmap(origin, 0, 0, width, height, matrix, false);
        if (newBM.equals(origin)) {
            return newBM;
        }
        origin.recycle();
        return newBM;
    }

    private Runnable timeRun=new Runnable() {
        @Override
        public void run() {
            time++;
            time_tv.setText(time+"s");
            handler.postDelayed(timeRun,1000);
        }
    };
Over,至此API2实现的相机APP代码粘贴完毕,嘿嘿,就是纯粘贴,当理解了API2的管道通信机制之后就一切都简单的很多。
总结
明明是只关注底层,负责底层实现为什么要大费周张跑到这里来实现APP,简单说就一个函数调用又何必非要搞明白。因为看了API2和HAL3之后才发现各层之间的解耦合真的做的很好了,各层之间都如同客户端与服务器一般只进行数据交互,我只关注传入和传出不就好了吗,何必知道APP如何实现。直到开始追HAL的代码,才明白上层的操作和下层的操作相互对应的关系,明白了APP中的每一步你才能对HAL的对应的操作及传入的参数有了解。更有趣的是对于Camera来说你更要明白APP界面中的每个动作(变焦、调参、滤镜)底层应该如何响应,如何支撑起目前的双摄、三摄、四摄以及未来更丰富多元的相机使用需求。当然,多余的这些废话仅仅是适用于相机厂商的开发者,对于第三方APP来说,厂商不会提供原生相机那样强大的功能支持,仅仅是前置和后置主摄的基本功能而已。代码可能会有遗漏的部分,可以评论或者留言,在收到后进行改进。
