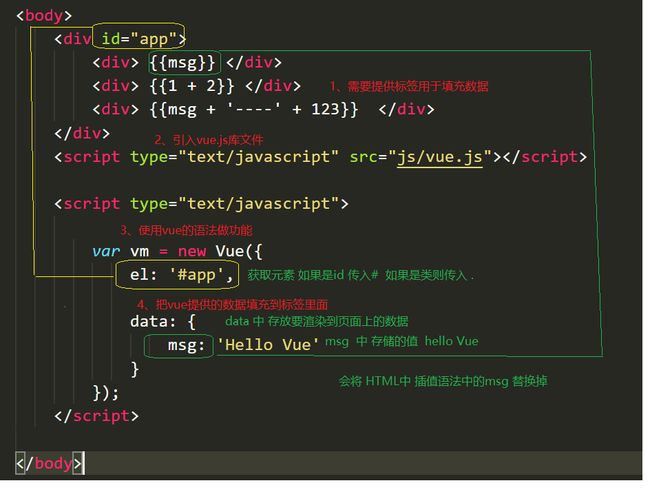
防止页面加载时出现闪烁问题
<style type="text/css">
/*
1、通过属性选择器 选择到 带有属性 v-cloak的标签 让他隐藏
*/
[v-cloak]{
/* 元素隐藏 */
display: none;
}
style>
<body>
<div id="app">
<div v-cloak >{{msg}}div>
div>
<script type="text/javascript" src="js/vue.js">script>
<script type="text/javascript">
var vm = new Vue({
// el 指定元素 id 是 app 的元素
el: '#app',
// data 里面存储的是数据
data: {
msg: 'Hello Vue'
}
});
script>
body>
html>
<div id="app">
<p v-text="msg">p>
<p>
{{msg}}
p>
div>
<script>
new Vue({
el: '#app',
data: {
msg: 'Hello Vue.js'
}
});
script>
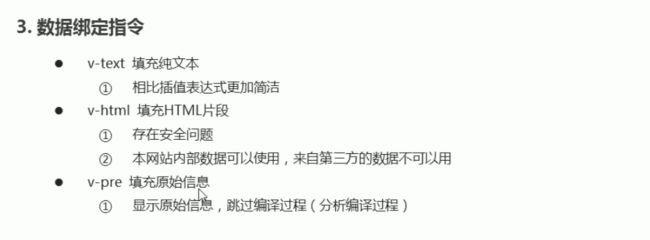
用法和v-text 相似 但是他可以将HTML片段填充到标签中
可能有安全问题, 一般只在可信任内容上使用 v-html
,永不用在用户提交的内容上
它与v-text区别在于v-text输出的是纯文本,浏览器不会对其再进行html解析,但v-html会将其当html标签解析后输出。
<div id="app">
<p v-html="html">p>
<p>{{message}}p>
<p v-text="text">p>
div>
<script>
let app = new Vue({
el: "#app",
data: {
message: "通过双括号绑定",
html: "html标签在渲染的时候被解析",
text: "html标签在渲染的时候被源码输出",
}
});
script>
<span v-pre>{{ this will not be compiled }}span>
<span v-pre>{{msg}}span>
<script>
new Vue({
el: '#app',
data: {
msg: 'Hello Vue.js'
}
});
script>
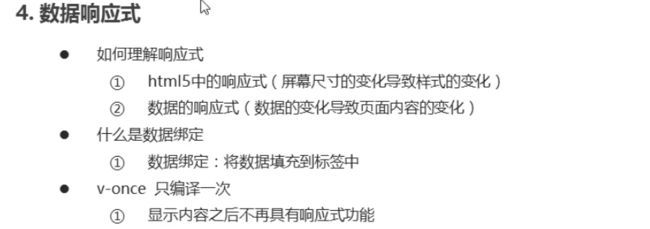
<span v-once>{{ msg}}span>
<script>
new Vue({
el: '#app',
data: {
msg: 'Hello Vue.js'
}
});
script>
、
中使用 <div id="app">
<div>{{msg}}div>
<div>
当输入框中内容改变的时候, 页面上的msg 会自动更新
<input type="text" v-model='msg'>
div>
div>
<body>
<div id="app">
<div>{{num}}div>
<div>
<button v-on:click='handle1'>点击1button>
<button v-on:click='handle2(123, 456, $event)'>点击2button>
div>
div>
<script type="text/javascript" src="js/vue.js">script>
<script type="text/javascript">
var vm = new Vue({
el: '#app',
data: {
num: 0
},
methods: {
handle1: function(event) {
console.log(event.target.innerHTML)
},
handle2: function(p, p1, event) {
console.log(p, p1)
console.log(event.target.innerHTML)
this.num++;
}
}
});
script>
event.preventDefault()
或 event.stopPropagation()
是非常常见的需求。v-on
提供了事件修饰符
<a v-on:click.stop="doThis">a>
<form v-on:submit.prevent="onSubmit">form>
<a v-on:click.stop.prevent="doThat">a>
<div v-on:click.self="doThat">...div>
使用修饰符时,顺序很重要;相应的代码会以同样的顺序产生。因此,用 v-on:click.prevent.self 会阻止所有的点击,而 v-on:click.self.prevent 只会阻止对元素自身的点击。
v-on
在监听键盘事件时添加按键修饰符
<input v-on:keyup.13="submit">
<input v-on:keyup.enter="submit">
<input type="text" v-on:keyup.enter.space="alertMe" >
常用的按键修饰符
.enter => enter键
.tab => tab键
.delete (捕获“删除”和“退格”按键) => 删除键
.esc => 取消键
.space => 空格键
.up => 上
.down => 下
.left => 左
.right => 右
<script>
var vm = new Vue({
el:"#app",
methods: {
submit:function(){},
alertMe:function(){},
}
})
script>
config.keyCodes
自定义按键修饰符别名<div id="app">
预先定义了keycode 116(即F5)的别名为f5,因此在文字输入框中按下F5,会触发prompt方法
<input type="text" v-on:keydown.f5="prompt()">
div>
<script>
Vue.config.keyCodes.f5 = 116;
let app = new Vue({
el: '#app',
methods: {
prompt: function() {
alert('我是 F5!');
}
}
});
script>
<html lang="en">
<head>
<meta charset="UTF-8">
<title>Documenttitle>
head>
<body>
<div id="app">
<h1>简单计算器h1>
<div>
<span>数值A:span>
<span>
<input type="text" v-model='a'>
span>
div>
<div>
<span>数值B:span>
<span>
<input type="text" v-model='b'>
span>
div>
<div>
<button v-on:click='handle'>计算button>
div>
<div>
<span>计算结果:span>
<span v-text='result'>span>
div>
div>
<script type="text/javascript" src="js/vue.js">script>
<script type="text/javascript">
/*
简单计算器案例
*/
var vm = new Vue({
el: '#app',
data: {
a: '',
b: '',
result: ''
},
methods: {
handle: function(){
// 实现计算逻辑
this.result = parseInt(this.a) + parseInt(this.b);
}
}
});
script>
body>
html>
v-bind和v-model的区别
https://www.cnblogs.com/LFxanla/p/11601420.html
https://www.cnblogs.com/xuzhudong/p/8617487.html
<img v-bind:src="imageSrc">
<img :src="imageSrc">
1、 v-bind 中支持绑定一个对象
如果绑定的是一个对象 则 键为 对应的类名 值 为对应data中的数据
<ul class="box" v-bind:class="{textColor:isColor, textSize:isSize}">
<li>学习Vueli>
<li>学习Nodeli>
<li>学习Reactli>
ul>
<div v-bind:style="{color:activeColor,fontSize:activeSize}">对象语法div>
<sript>
var vm= new Vue({
el:'.box',
data:{
isColor:true,
isSize:true,
activeColor:"red",
activeSize:"25px",
}
})
sript>
<style>
.box{
border:1px dashed #f0f;
}
.textColor{
color:#f00;
background-color:#eef;
}
.textSize{
font-size:30px;
font-weight:bold;
}
style>
2、 v-bind 中支持绑定一个数组 数组中classA和 classB 对应为data中的数据
这里的classA 对用data 中的 classA
这里的classB 对用data 中的 classB
<ul class="box" :class="[classA, classB]">
<li>学习Vueli>
<li>学习Nodeli>
<li>学习Reactli>
ul>
<script>
var vm= new Vue({
el:'.box',
data:{
classA:‘textColor‘,
classB:‘textSize‘
}
})
script>
<style>
.box{
border:1px dashed #f0f;
}
.textColor{
color:#f00;
background-color:#eef;
}
.textSize{
font-size:30px;
font-weight:bold;
}
style>
<div v-bind:style="styleObject">绑定样式对象div>'
<div v-bind:style="{ color: activeColor, fontSize: fontSize,background:'red' }">内联样式div>
<div v-bind:style="[styleObj1, styleObj2]">div>
<script>
new Vue({
el: '#app',
data: {
styleObject: {
color: 'green',
fontSize: '30px',
background:'red'
},
activeColor: 'green',
fontSize: "30px"
},
styleObj1: {
color: 'red'
},
styleObj2: {
fontSize: '30px'
}
script>
<div id="app">
<span v-if="flag">
如果flag为true则显示,false不显示!
span>
div>
<script>
var vm = new Vue({
el:"#app",
data:{
flag:true
}
})
script>
----------------------------------------------------------
<div v-if="type === 'A'">
A
div>
<div v-else-if="type === 'B'">
B
div>
<div v-else-if="type === 'C'">
C
div>
<div v-else>
Not A/B/C
div>
<script>
new Vue({
el: '#app',
data: {
type: 'C'
}
})
script>
<ul id="example-1">
<li v-for="item in items">
{{ item.message }}
li>
ul>
<script>
new Vue({
el: '#example-1',
data: {
items: [
{ message: 'Foo' },
{ message: 'Bar' }
],
}
})
script>
v-if
和 v-for
v-if
与 v-for
一起使用时,v-for
具有比 v-if
更高的优先级。
<div v-if='v==13' v-for='(v,k,i) in obj'>{{v + '---' + k + '---' + i}}div>
<script>
new Vue({
el: '#example-1',
data: {
items: [
{ message: 'Foo' },
{ message: 'Bar' }
],
obj: {
uname: 'zhangsan',
age: 13,
gender: 'female'
}
}
})
script>
<ul>
<li v-for="item in items" :key="item.id">...li>
ul>
`
<div id="app">
<div class="tab">
<ul>
<li class="active">appleli>
<li class="">orangeli>
<li class="">lemonli>
ul>
<div class="current"><img src="img/apple.png">div>
<div class=""><img src="img/orange.png">div>
<div class=""><img src="img/lemon.png">div>
div>
div>
`
list: [{
id: 1,
title: 'apple',
path: 'img/apple.png'
}, {
id: 2,
title: 'orange',
path: 'img/orange.png'
}, {
id: 3,
title: 'lemon',
path: 'img/lemon.png'
}]
把tab栏 中的数替换到页面上
<div id="app">
<div class="tab">
<ul>
<li :key='item.id' v-for='(item,index) in list'>{{item.title}}li>
ul>
<div :key='item.id' v-for='(item, index) in list'>
<img :src="item.path">
div>
div>
div>
<script>
new Vue({
// 指定 操作元素 是 id 为app 的
el: '#app',
data: {
list: [{
id: 1,
title: 'apple',
path: 'img/apple.png'
}, {
id: 2,
title: 'orange',
path: 'img/orange.png'
}, {
id: 3,
title: 'lemon',
path: 'img/lemon.png'
}]
}
})
script>
4.1 、让默认的第一项tab栏高亮
4.2 、让默认的第一项tab栏对应的div 显示
<ul>
<li :class='currentIndex==index?"active":""'
:key='item.id' v-for='(item,index) in list'
>{{item.title}}li>
ul>
<div :class='currentIndex==index?"current":""'
:key='item.id' v-for='(item, index) in list'>
<img :src="item.path">
div>
<script>
new Vue({
el: '#app',
data: {
currentIndex: 0, // 选项卡当前的索引 默认为 0
list: [{
id: 1,
title: 'apple',
path: 'img/apple.png'
}, {
id: 2,
title: 'orange',
path: 'img/orange.png'
}, {
id: 3,
title: 'lemon',
path: 'img/lemon.png'
}]
}
})
script>
4.3 、点击每一个tab栏 当前的高亮 其他的取消高亮
给每一个li添加点击事件
让当前的索引 index 和 当前 currentIndex 的 值 进项比较
如果相等 则当前li 添加active 类名 当前的 li 高亮 当前对应索引的 div 添加 current 当前div 显示 其他隐藏
<div id="app">
<div class="tab">
<ul>
<li v-on:click='change(index)'
:class='currentIndex==index?"active":""'
:key='item.id'
v-for='(item,index) in list'>{{item.title}}li>
ul>
<div :class='currentIndex==index?"current":""'
:key='item.id' v-for='(item, index) in list'>
<img :src="item.path">
div>
div>
div>
<script>
new Vue({
el: '#app',
data: {
currentIndex: 0, // 选项卡当前的索引 默认为 0
list: [{
id: 1,
title: 'apple',
path: 'img/apple.png'
}, {
id: 2,
title: 'orange',
path: 'img/orange.png'
}, {
id: 3,
title: 'lemon',
path: 'img/lemon.png'
}]
},
methods: {
change: function(index) {
// 通过传入过来的索引来让当前的 currentIndex 和点击的index 值 相等
// 从而实现 控制类名
this.currentIndex = index;
}
}
})
script>