将keras或tensorflow模型迁移到android端(AndroidStudio)
经历了多次采坑,终于是现实了将keras模型迁移到android端上。
网上的一些教程实在太少,而且我也是走了很多弯路,有很多是使用Bazel工具把TensoFlow编译成.so库文件和jar包,再进行Android配置,实现模型移植。但是。。。我可能太笨了没成功。。放弃了。
后来发现了机器之心翻译后的博客:https://blog.csdn.net/Uwr44UOuQcNsUQb60zk2/article/details/81108374
非常激动,终于实现了迁移。但是原文中也是存在着一些小陷阱,所以我在此基础上完善了一下教程。
本人的环境如下:
- Windows 10
- Python3.6
- TensoFlow 1.6.0(2018年3月)
- Android Studio 3.2(2018年10月)
- AndroidSDK android9.0 API28
总之把模型部署到安卓设备上总体的步骤如下:
-
将训练好的模型转换成 TensorFlow 格式;
-
向安卓应用添加 TensorFlow Mobile 依赖项;
-
编写相关的 Java 代码,在你的应用中使用 TensorFlow 模型执行推断。
一、将训练好的模型转换成 TensorFlow 格式
如果本来就是tensorflow训练出的模型的话,可以跳过这一步直接进行AndroidStudio的配置就好啦。
假设有了keras保存的h5模型文件,则需要以下转换:
新建python脚本文件:(本代码实现了keras的h5模型转换到tensorflow的pd模型格式,对应着keras_to_tensorflow的函数)
转化自己已经训练好的模型,直接把第100行的load_weights("squeezenet.h5")改成load_model("squeezenet.h5")就行了。
from keras.models import Model
from keras.layers import *
import os
import tensorflow as tf


def keras_to_tensorflow(keras_model, output_dir, model_name,out_prefix="output_", log_tensorboard=True):

    if os.path.exists(output_dir) == False:
        os.mkdir(output_dir)

    out_nodes = []

    for i in range(len(keras_model.outputs)):
        out_nodes.append(out_prefix + str(i + 1))
        tf.identity(keras_model.output[i], out_prefix + str(i + 1))

    sess = K.get_session()

    from tensorflow.python.framework import graph_util, graph_io

    init_graph = sess.graph.as_graph_def()

    main_graph = graph_util.convert_variables_to_constants(sess, init_graph, out_nodes)

    graph_io.write_graph(main_graph, output_dir, name=model_name, as_text=False)

    if log_tensorboard:
        from tensorflow.python.tools import import_pb_to_tensorboard

        import_pb_to_tensorboard.import_to_tensorboard(
            os.path.join(output_dir, model_name),
            output_dir)


"""
We explicitly redefine the Squeezent architecture since Keras has no predefined Squeezenet
"""

def squeezenet_fire_module(input, input_channel_small=16, input_channel_large=64):

    channel_axis = 3

    input = Conv2D(input_channel_small, (1,1), padding="valid" )(input)
    input = Activation("relu")(input)

    input_branch_1 = Conv2D(input_channel_large, (1,1), padding="valid" )(input)
    input_branch_1 = Activation("relu")(input_branch_1)

    input_branch_2 = Conv2D(input_channel_large, (3, 3), padding="same")(input)
    input_branch_2 = Activation("relu")(input_branch_2)

    input = concatenate([input_branch_1, input_branch_2], axis=channel_axis)

    return input


def SqueezeNet(input_shape=(224,224,3)):


    image_input = Input(shape=input_shape)


    network = Conv2D(64, (3,3), strides=(2,2), padding="valid")(image_input)
    network = Activation("relu")(network)
    network = MaxPool2D( pool_size=(3,3) , strides=(2,2))(network)

    network = squeezenet_fire_module(input=network, input_channel_small=16, input_channel_large=64)
    network = squeezenet_fire_module(input=network, input_channel_small=16, input_channel_large=64)
    network = MaxPool2D(pool_size=(3,3), strides=(2,2))(network)

    network = squeezenet_fire_module(input=network, input_channel_small=32, input_channel_large=128)
    network = squeezenet_fire_module(input=network, input_channel_small=32, input_channel_large=128)
    network = MaxPool2D(pool_size=(3, 3), strides=(2, 2))(network)

    network = squeezenet_fire_module(input=network, input_channel_small=48, input_channel_large=192)
    network = squeezenet_fire_module(input=network, input_channel_small=48, input_channel_large=192)
    network = squeezenet_fire_module(input=network, input_channel_small=64, input_channel_large=256)
    network = squeezenet_fire_module(input=network, input_channel_small=64, input_channel_large=256)

    #Remove layers like Dropout and BatchNormalization, they are only needed in training
    #network = Dropout(0.5)(network)

    network = Conv2D(1000, kernel_size=(1,1), padding="valid", name="last_conv")(network)
    network = Activation("relu")(network)

    network = GlobalAvgPool2D()(network)
    network = Activation("softmax",name="output")(network)


    input_image = image_input
    model = Model(inputs=input_image, outputs=network)

    return model


keras_model = SqueezeNet()

keras_model.load_weights("squeezenet.h5")


output_dir = os.path.join(os.getcwd(),"checkpoint")

keras_to_tensorflow(keras_model,output_dir=output_dir,model_name="squeezenet.pb")

print("MODEL SAVED")
二、配置AndroidStudio依赖:
请在 Android Studio 中创建一个新的工程。在你的 app:build.gradle 文件中添加 TensorFlow Mobile 依赖
implementation 'org.tensorflow:tensorflow-android:+'笔者在此遇到过一些坑,不能下载tensorflow-android-1.11.0-rc1.aar文件导致sync时失败。但是不知为何过了几天就突然好了。。(笔者尝试过从网上直接下载tensorflow-android-1.11.0-rc1.aar这个文件,然后放入lib文件中,再进行添加依赖。但是AS突然不报错了,所以我并没有尝试。遇到这个问题的小伙伴们可以尝试一下这个解决方案)
三、android端代码编写:
此时走到这步的话,你的环境就已经完全设置好了。剩下的就是java代码的书写了,我是借用了上文提到的博客里的代码,但是原博客代码中有Snackbar等控件导致编译老是出错,在安卓领域我还是刚入门能力还是不够看不太懂。所以我就修改了下代码,只使用了最简单的Button、TextView、ImageVIew控件。
1、在编写代码进行实际推断之前,你需要将转换后的模型(squeezenet.pb)添加到应用程序的资源文件夹中。在 Android Studio 中,右键点击你的项目,跳转至「Add Folder」(添加文件夹)部分,并选择「Assets Folder」(资源文件夹)。这将在你的应用程序目录中创建一个资源文件夹。接下来,你需要将模型复制到资源文件夹中。如下:
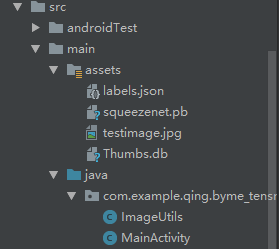
其中squeezenet.pb为tensorflow的模型文件,testimage.jpg为要预测的图片,labels.json为模型输出数值后对应的label具体含义。
2、将一个新的 Java 类添加到项目的主程序包中,并将其命名为 ImageUtils,把下面的代码复制到其中。
package com.example.qing.byme_tensroflow;
import android.content.res.AssetManager;
import android.graphics.Bitmap;
import android.graphics.Canvas;
import android.graphics.Matrix;
import android.os.Environment;
import java.io.File;
import java.io.FileOutputStream;
import java.io.InputStream;
import org.json.*;

/**
 * Utility class for manipulating images.
 **/
public class ImageUtils {
    /**
     * Returns a transformation matrix from one reference frame into another.
     * Handles cropping (if maintaining aspect ratio is desired) and rotation.
     *
     * @param srcWidth Width of source frame.
     * @param srcHeight Height of source frame.
     * @param dstWidth Width of destination frame.
     * @param dstHeight Height of destination frame.
     * @param applyRotation Amount of rotation to apply from one frame to another.
     *  Must be a multiple of 90.
     * @param maintainAspectRatio If true, will ensure that scaling in x and y remains constant,
     * cropping the image if necessary.
     * @return The transformation fulfilling the desired requirements.
     */
    public static Matrix getTransformationMatrix(
            final int srcWidth,
            final int srcHeight,
            final int dstWidth,
            final int dstHeight,
            final int applyRotation,
            final boolean maintainAspectRatio) {
        final Matrix matrix = new Matrix();

        if (applyRotation != 0) {
            // Translate so center of image is at origin.
            matrix.postTranslate(-srcWidth / 2.0f, -srcHeight / 2.0f);

            // Rotate around origin.
            matrix.postRotate(applyRotation);
        }

        // Account for the already applied rotation, if any, and then determine how
        // much scaling is needed for each axis.
        final boolean transpose = (Math.abs(applyRotation) + 90) % 180 == 0;

        final int inWidth = transpose ? srcHeight : srcWidth;
        final int inHeight = transpose ? srcWidth : srcHeight;

        // Apply scaling if necessary.
        if (inWidth != dstWidth || inHeight != dstHeight) {
            final float scaleFactorX = dstWidth / (float) inWidth;
            final float scaleFactorY = dstHeight / (float) inHeight;

            if (maintainAspectRatio) {
                // Scale by minimum factor so that dst is filled completely while
                // maintaining the aspect ratio. Some image may fall off the edge.
                final float scaleFactor = Math.max(scaleFactorX, scaleFactorY);
                matrix.postScale(scaleFactor, scaleFactor);
            } else {
                // Scale exactly to fill dst from src.
                matrix.postScale(scaleFactorX, scaleFactorY);
            }
        }

        if (applyRotation != 0) {
            // Translate back from origin centered reference to destination frame.
            matrix.postTranslate(dstWidth / 2.0f, dstHeight / 2.0f);
        }

        return matrix;
    }


    public static Bitmap processBitmap(Bitmap source,int size){

        int image_height = source.getHeight();
        int image_width = source.getWidth();

        Bitmap croppedBitmap = Bitmap.createBitmap(size, size, Bitmap.Config.ARGB_8888);

        Matrix frameToCropTransformations = getTransformationMatrix(image_width,image_height,size,size,0,false);
        Matrix cropToFrameTransformations = new Matrix();
        frameToCropTransformations.invert(cropToFrameTransformations);

        final Canvas canvas = new Canvas(croppedBitmap);
        canvas.drawBitmap(source, frameToCropTransformations, null);

        return croppedBitmap;


    }

    public static float[] normalizeBitmap(Bitmap source,int size,float mean,float std){

        float[] output = new float[size * size * 3];

        int[] intValues = new int[source.getHeight() * source.getWidth()];

        source.getPixels(intValues, 0, source.getWidth(), 0, 0, source.getWidth(), source.getHeight());
        for (int i = 0; i < intValues.length; ++i) {
            final int val = intValues[i];
            output[i * 3] = (((val >> 16) & 0xFF) - mean)/std;
            output[i * 3 + 1] = (((val >> 8) & 0xFF) - mean)/std;
            output[i * 3 + 2] = ((val & 0xFF) - mean)/std;
        }

        return output;

    }

    public static Object[] argmax(float[] array){


        int best = -1;
        float best_confidence = 0.0f;

        for(int i = 0;i < array.length;i++){

            float value = array[i];

            if (value > best_confidence){

                best_confidence = value;
                best = i;
            }
        }


        return new Object[]{best,best_confidence};


    }


    public static String getLabel( InputStream jsonStream,int index){
        String label = "";
        try {

            byte[] jsonData = new byte[jsonStream.available()];
            jsonStream.read(jsonData);
            jsonStream.close();

            String jsonString = new String(jsonData,"utf-8");

            JSONObject object = new JSONObject(jsonString);

            label = object.getString(String.valueOf(index));


        }
        catch (Exception e){


        }
        return label;
    }
}
假如只是用来开发的话对于ImageUtils这个类不需要理解代码实现,会用就好啦。
2、在你的主活动(main activity)添加代码。它们将被用于显示图像和预测结果。
package com.example.qing.byme_tensroflow;

import android.graphics.Bitmap;
import android.graphics.BitmapFactory;
import android.os.AsyncTask;
import android.support.v7.app.AppCompatActivity;
import android.os.Bundle;
import android.view.View;
import android.widget.Button;
import android.widget.ImageView;
import android.widget.TextView;
import android.widget.Toast;
import android.graphics.Bitmap;
import android.graphics.BitmapFactory;
import android.os.AsyncTask;
import android.os.Bundle;
import android.renderscript.ScriptGroup;
import android.support.v7.app.AppCompatActivity;
import android.support.v7.widget.Toolbar;
import android.util.JsonReader;
import android.view.View;
import android.widget.ImageView;
import android.widget.TextView;
import android.widget.Toast;
import org.json.*;

import org.tensorflow.contrib.android.TensorFlowInferenceInterface;

import java.io.FileInputStream;
import java.io.InputStream;
import org.tensorflow.contrib.android.TensorFlowInferenceInterface;

import java.io.InputStream;

public class MainActivity extends AppCompatActivity {
    /*
     * 在需要调用TensoFlow的地方,加载so库“System.loadLibrary("tensorflow_inference");
     * 并”import org.tensorflow.contrib.android.TensorFlowInferenceInterface;就可以使用了
     * */
    //Load the tensorflow inference library
    //static{}(即static块),会在类被加载的时候执行且仅会被执行一次,一般用来初始化静态变量和调用静态方法。
    static {
        System.loadLibrary("tensorflow_inference");
    }

    //PATH TO OUR MODEL FILE AND NAMES OF THE INPUT AND OUTPUT NODES
    //各节点名称
    private String MODEL_PATH = "file:///android_asset/squeezenet.pb";
    private String INPUT_NAME = "input_1";
    private String OUTPUT_NAME = "output_1";
    private TensorFlowInferenceInterface tf;

    //ARRAY TO HOLD THE PREDICTIONS AND FLOAT VALUES TO HOLD THE IMAGE DATA
    //保存图片和图片尺寸的
    float[] PREDICTIONS = new float[1000];
    private float[] floatValues;
    private int[] INPUT_SIZE = {224,224,3};

    ImageView imageView;
    TextView resultView;
    Button buttonSub;

    @Override
    protected void onCreate(Bundle savedInstanceState) {
        super.onCreate(savedInstanceState);
        setContentView(R.layout.activity_main);

        tf = new TensorFlowInferenceInterface(getAssets(),MODEL_PATH);

        imageView=(ImageView)findViewById(R.id.imageView1);
        resultView=(TextView)findViewById(R.id.text_show);
        buttonSub=(Button)findViewById(R.id.button1);

        buttonSub.setOnClickListener(new View.OnClickListener() {
            @Override
            public void onClick(View view) {
                try{
                    InputStream imageStream = getAssets().open("testimage.jpg");
                    Bitmap bitmap = BitmapFactory.decodeStream(imageStream);
                    imageView.setImageBitmap(bitmap);

                    predict1(bitmap);

                }catch(Exception e){

                }


            }
        });

    }

    //FUNCTION TO COMPUTE THE MAXIMUM PREDICTION AND ITS CONFIDENCE
    public Object[] argmax(float[] array){

        int best = -1;
        float best_confidence = 0.0f;
        for(int i = 0;i < array.length;i++){
            float value = array[i];
            if (value > best_confidence){
                best_confidence = value;
                best = i;
            }
        }
        return new Object[]{best,best_confidence};
    }


    public void predict(final Bitmap bitmap){

        //Runs inference in background thread
        new AsyncTask(){

            @Override
            protected Integer doInBackground(Integer ...params){
                //Resize the image into 224 x 224
                Bitmap resized_image = ImageUtils.processBitmap(bitmap,224);

                //Normalize the pixels
                floatValues = ImageUtils.normalizeBitmap(resized_image,224,127.5f,1.0f);

                //Pass input into the tensorflow
                tf.feed(INPUT_NAME,floatValues,1,224,224,3);

                //compute predictions
                tf.run(new String[]{OUTPUT_NAME});

                //copy the output into the PREDICTIONS array
                tf.fetch(OUTPUT_NAME,PREDICTIONS);

                //Obtained highest prediction
                Object[] results = argmax(PREDICTIONS);

                int class_index = (Integer) results[0];
                float confidence = (Float) results[1];

                try{
                    final String conf = String.valueOf(confidence * 100).substring(0,5);
                    //Convert predicted class index into actual label name
                    final String label = ImageUtils.getLabel(getAssets().open("labels.json"),class_index);
                    //Display result on UI
                    runOnUiThread(new Runnable() {
                        @Override
                        public void run() {
                            resultView.setText(label + " : " + conf + "%");
                        }
                    });
                } catch (Exception e){
                }

                return 0;
            }

        }.execute(0);

    }
}
其中模型的推理部分放入到了predic函数中,并且将其耗时操作加入到了子线程中。
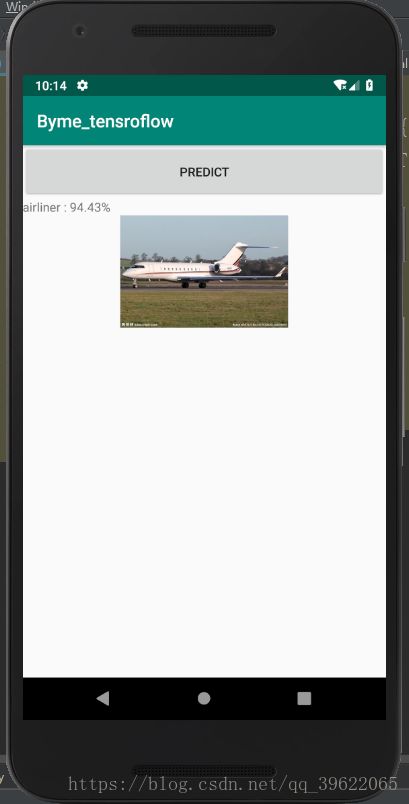
4、如果以上都进展顺利,点击Run,基本就大功告成啦!
package com.example.jinquan.pan.mnist_ensorflow_androiddemo;

import android.content.res.AssetManager;
import android.graphics.Bitmap;
import android.graphics.Color;
import android.graphics.Matrix;
import android.util.Log;

import org.tensorflow.contrib.android.TensorFlowInferenceInterface;


public class PredictionTF {
    private static final String TAG = "PredictionTF";
    //设置模型输入/输出节点的数据维度
    private static final int IN_COL = 1;
    private static final int IN_ROW = 28*28;
    private static final int OUT_COL = 1;
    private static final int OUT_ROW = 1;
    //模型中输入变量的名称
    private static final String inputName = "input/x_input";
    //模型中输出变量的名称
    private static final String outputName = "output";

    TensorFlowInferenceInterface inferenceInterface;
    static {
        //加载libtensorflow_inference.so库文件
        System.loadLibrary("tensorflow_inference");
        Log.e(TAG,"libtensorflow_inference.so库加载成功");
    }

    PredictionTF(AssetManager assetManager, String modePath) {
        //初始化TensorFlowInferenceInterface对象
        inferenceInterface = new TensorFlowInferenceInterface(assetManager,modePath);
        Log.e(TAG,"TensoFlow模型文件加载成功");
    }

    /**
     *  利用训练好的TensoFlow模型预测结果
     * @param bitmap 输入被测试的bitmap图
     * @return 返回预测结果,int数组
     */
    public int[] getPredict(Bitmap bitmap) {
        float[] inputdata = bitmapToFloatArray(bitmap,28,28);//需要将图片缩放带28*28
        //将数据feed给tensorflow的输入节点
        inferenceInterface.feed(inputName, inputdata, IN_COL, IN_ROW);
        //运行tensorflow
        String[] outputNames = new String[] {outputName};
        inferenceInterface.run(outputNames);
        ///获取输出节点的输出信息
        int[] outputs = new int[OUT_COL*OUT_ROW]; //用于存储模型的输出数据
        inferenceInterface.fetch(outputName, outputs);
        return outputs;
    }

    /**
     * 将bitmap转为(按行优先)一个float数组,并且每个像素点都归一化到0~1之间。
     * @param bitmap 输入被测试的bitmap图片
     * @param rx 将图片缩放到指定的大小(列)->28
     * @param ry 将图片缩放到指定的大小(行)->28
     * @return   返回归一化后的一维float数组 ->28*28
     */
    public static float[] bitmapToFloatArray(Bitmap bitmap, int rx, int ry){
        int height = bitmap.getHeight();
        int width = bitmap.getWidth();
        // 计算缩放比例
        float scaleWidth = ((float) rx) / width;
        float scaleHeight = ((float) ry) / height;
        Matrix matrix = new Matrix();
        matrix.postScale(scaleWidth, scaleHeight);
        bitmap = Bitmap.createBitmap(bitmap, 0, 0, width, height, matrix, true);
        Log.i(TAG,"bitmap width:"+bitmap.getWidth()+",height:"+bitmap.getHeight());
        Log.i(TAG,"bitmap.getConfig():"+bitmap.getConfig());
        height = bitmap.getHeight();
        width = bitmap.getWidth();
        float[] result = new float[height*width];
        int k = 0;
        //行优先
        for(int j = 0;j < height;j++){
            for (int i = 0;i < width;i++){
                int argb = bitmap.getPixel(i,j);
                int r = Color.red(argb);
                int g = Color.green(argb);
                int b = Color.blue(argb);
                int a = Color.alpha(argb);
                //由于是灰度图,所以r,g,b分量是相等的。
                assert(r==g && g==b);
//                Log.i(TAG,i+","+j+" : argb = "+argb+", a="+a+", r="+r+", g="+g+", b="+b);
                result[k++] = r / 255.0f;
            }
        }
        return result;
    }
}
package com.example.jinquan.pan.mnist_ensorflow_androiddemo;

import android.graphics.Bitmap;
import android.graphics.BitmapFactory;
import android.support.v7.app.AppCompatActivity;
import android.os.Bundle;
import android.util.Log;
import android.view.View;
import android.widget.ImageView;
import android.widget.TextView;

public class MainActivity extends AppCompatActivity {

    // Used to load the 'native-lib' library on application startup.
    static {
        System.loadLibrary("native-lib");
    }

    private static final String TAG = "MainActivity";
    private static final String MODEL_FILE = "file:///android_asset/mnist.pb"; //模型存放路径
    TextView txt;
    TextView tv;
    ImageView imageView;
    Bitmap bitmap;
    PredictionTF preTF;
    @Override
    protected void onCreate(Bundle savedInstanceState) {
        super.onCreate(savedInstanceState);
        setContentView(R.layout.activity_main);

        // Example of a call to a native method
        tv = (TextView) findViewById(R.id.sample_text);
        txt=(TextView)findViewById(R.id.txt_id);
        imageView =(ImageView)findViewById(R.id.imageView1);
        bitmap = BitmapFactory.decodeResource(getResources(), R.drawable.test_image);
        imageView.setImageBitmap(bitmap);
        preTF =new PredictionTF(getAssets(),MODEL_FILE);//输入模型存放路径,并加载TensoFlow模型
    }

    public void click01(View v){
        String res="预测结果为:";
        int[] result= preTF.getPredict(bitmap);
        for (int i=0;i