PS:这是6月份时的一个结课项目,当时的想法就是把之前在Coursera ML课上实现过的对手写数字识别的方法迁移过来,但是最后的效果不太好…
2014年 6 月
一、实验概述
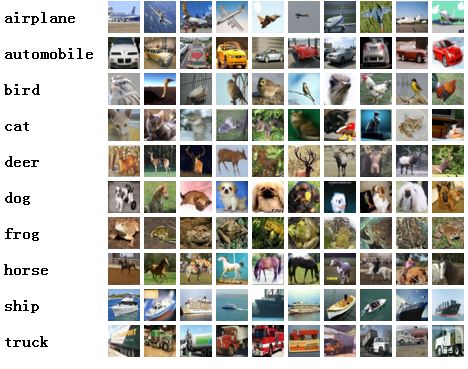
实验采用的是CIFAR-10 图像数据库,一共包括60000幅32x32 彩色图像。这些图像分为10类,每类6000幅。整个数据库分为五个训练包和一个测试包,每个包一万幅图像,所以一共5万幅训练图像,1万幅测试图像。
测试包中,每个类包括1000幅图像,随机排序。而5个训练包合在一起,每类包括5000幅图像。类的标记为:airplane、automobile、bird、cat、deer、dog、frog、horse、ship、truck这些类是完全互斥的,相互之间没有重叠。汽车包括小轿车,SUV,等等。卡车只包括大型车辆。两者都不包括皮卡。
-
实验要求
设计分类方法,区分一类图像与其他类图像。
- 给出构建训练集与测试集的代码,以正确率百分比形式给出结果(5分),以列表形式给出测试数据的结果并保存为电子表格。(5分)
- 写出设计思路(10分)
- 详细介绍采用的方法(10分)并给出实现代码(训练与预测部分)及解释(10分)
三、实验细节
3.1.给出构建训练集与测试集的代码,以正确率百分比形式给出结果
CIFAR-10原始数据分为5个训练包,以unint格式存储在.mat格式文件中。在本实验中,先5个训练包合并,并用double()函数将其转换double型,以便后续处理。
本实验先用PCA(主成分分析)对训练集与测试集进行降维与白化处理,然后使用带有一个隐藏层的3层神经网络进行有监督学习,对CIFAR-10图像数据库进行十个类别的分类。
最后得到的最佳结果是训练集准确率为99.944%,测试集准确为52.28%。
具体构建训练集与测试集的代码如下:
%% take 6 batches data into one unite set
load('data_batch_1.mat');
data1 = double(data);
labels1 = double(labels);
load('data_batch_2.mat');
data2 = double(data);
labels2 = double(labels);
load('data_batch_3.mat');
data3 = double(data);
labels3 = double(labels);
load('data_batch_4.mat');
data4 = double(data);
labels4 = double(labels);
load('data_batch_5.mat');
data5 = double(data);
labels5 = double(labels);
load('test_batch.mat');
testData = double(data);
testLabels = double(labels);
data = [data1; data2; data3; data4; data5; testData];
labels = [labels1; labels2; labels3; labels4; labels5; testLabels];
fprintf('\nthe size of dataset is ');
fprintf('%d ', size(data));
fprintf('\nthe size of labels is ');
fprintf('%d ', size(labels));
save('data_batch_1to6_double.mat','data','labels');
3.2 以列表形式给出测试数据的结果并保存为电子表格
各次测试数据结果如下,具体电子表格文件cifar_results.xls已附在文件中。
No.
representation model
whitening
size of training set(m)
#features n
iteration of training
weight decay
#unit in hidden layer
final cost
training set accurancy(%)
test set accuracy
time(s)
1
softmax
Y
50000
400
27
1.00E-04
400
1.69
42.8
39.25
16
2
softmax
Y
50000
400
4
1
400
2.24
41.386
38.5
12.47
3
softmax
Y
50000
400
4
0
400
1.688
42.87
39.28
11.92
4
neural network
N
1000
500
30
1
400
2.42
92.6
23.8
15
5
neural network
N
10000
500
300
1
400
8.33E-01
99.9
22.59
968.768
6
neural network
Y
1000
400
300
1
400
1.83
98.3
18.7
540
7
neural network
Y
50000
400
300
1
400
8.63E-01
99.8
43.9
2906.7
8
neural network
Y
10000
400
300
10
400
1.30165
99.79
40.72
1529.14
9
neural network
Y
2000
400
200
100
400
3.23485
31.15
21.21
276.9273
10
neural network
Y
2000
400
200
10
400
1.73997
98.6
27
280.447584
11
neural network
Y
2000
400
200
3
400
8.18E-01
100
26.84
279.236
12
neural network
Y
2000
400
200
1
400
3.53E-01
100
26.66
280.02
13
neural network
Y
2000
400
200
50
400
2.96523
67.75
28.86
283.637024
14
neural network
Y
2000
400
200
25
400
2.50458
75.9
27.67
274.069
15
neural network
Y
2000
400
200
20
400
2.34985
80.95
27.47
278.315288
16
neural network
Y
2000
400
200
20
800
2.35565
78.75
27.46
546.189679
17
neural network
Y
2000
400
200
20
200
2.3464
83
27.81
152.853709
18
neural network
Y
50000
400
500
1.00E+01
800
7.67E-01
99.944
52.28
16291.53784
19
neural network
Y
50000
400
500
10
400
7.98E-01
99.926
46.27
4580.601653
20
neural network
Y
50000
400
500
10
250
8.94E-01
99.824
42.67
3031.253023
3.3 设计思路
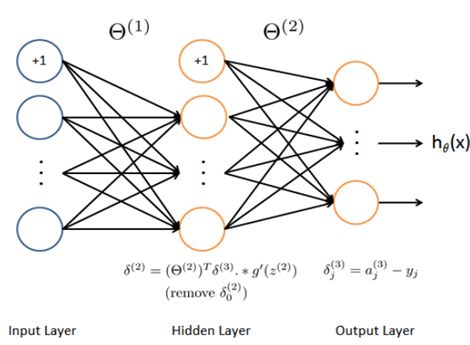
本实验先用PCA(主成分分析)对训练集与测试集进行降维与白化预处理,然后对预处理后的数据使用带有一个隐藏层的3层神经网络进行有监督学习,实现对CIFAR-10图像数据库十个类别的分类。
刚开始较自然地想到利用softmax模型进行十类预测,但实现后发现对训练集与测试集的预测准确率均不高。原因是输入参数特征较多,只有输入输出两层的softmax模型表达能力较弱。
后来便采用带有一个隐藏层的三层神经网络的有监督学习算法,一开始没有对数据进行白化和降维处理。算法训练时间很长,预测的效果也不好。
于是利用PCA对原有的数据进行降维与白化预处理。选择保持主成分97%,及保留了数据的主要特征,同时将数据的特征维度从3072降到了400。大大提高了算法的训练时间,减少了内存消耗。同时再对降维后的数据进行白化处理,去掉数据之间的关联度,减少冗余信息量,有助于提升训练及预测准确率。
对数据利用PCA进行白化降维预处理后,训练集的预测正确率已经达到相当高(99%),但测试集的预测正确率仍停留在40%左右。推测是发生了过拟合现象,故我增加了隐藏层的单元数到800个,同时调大权重衰减参数lambda,加大训练迭代次数。得到了最后的结果:测试集预测正确率52.28%。
由于电脑运行速度和内存限制,无法在有限时间内做出更多调试。理论上若有更多数据,同时利用交叉验证集进行模型选择,得到最优模型参数,增大训练迭代次数,可以得到更好的预测结果,消除过拟合现象。
3.4 详细介绍采用的方法,并给出实现代码(训练与预测部分)及解释
主要运行文件为cifarNN.m
3.4.1 PCA和白化(whitening)
实验中先采用PCA(主成分分析)对训练集与测试集进行降维与白化处理。
PCA是Principal Component Analysis主成分分析的缩写。它具有2个功能,一是维数约简,一是数据的可视化。在这里利用的是它的第一个功能维数约简,以加快算法训练速度,减少内存消耗。在本实验中,利用PCA将每个图像由32*32*3=3072维降低到400维,保留了97%的主要成分,同时大大加快训练速度。
PCA并不是线性回归,因为线性回归是保证得到的函数是y值方面误差最小,而PCA是保证得到的函数到所降的维度上的误差最小。另外线性回归是通过x值来预测y值,而PCA中是将所有的x样本都同等对待。
在使用PCA前需要对数据进行预处理,首先是均值化,即对每个特征维,都减掉该维的平均值,然后就是将不同维的数据范围归一化到同一范围,方法一般都是除以最大值。但是在对自然图像进行均值处理时并不是不是减去该维的平均值,而是减去这张图片本身的平均值。因为PCA的预处理是按照不同应用场合来定的。
自然图像指的是人眼经常看见的图像,其符合某些统计特征。在对自然图像进行学习时,其实不需要太关注对图像做方差归一化,因为自然图像每一部分的统计特征都相似,只需做均值为0化就行了。不过对其它的图片进行训练时,比如手写字识别等,就需要进行方差归一化了。
PCA的计算过程主要是要求2个东西,一个是降维后的各个向量的方向,另一个是原先的样本在新的方向上投影后的值。
首先需求出训练样本的协方差矩阵,如公式所示(输入数据已经均值化过):
求出训练样本的协方差矩阵后,将其进行SVD分解,得出的U向量中的每一列就是这些数据样本的新的方向向量了,排在前面的向量代表的是主方向,依次类推。用U'*X得到的就是降维后的样本值z了,即:
这个z值的几何意义是原先点到该方向上的距离值,但是这个距离有正负之分,这样PCA的2个主要计算任务已经完成了。用U*z就可以将原先的数据样本x给还原出来。
在使用有监督学习时,要采用PCA降维,只需将训练样本的x值抽取出来,计算出主成分矩阵U以及降维后的值z,然后让z和原先样本的y值组合构成新的训练样本来训练分类器。在测试过程中,同样可以用原先的U来对新的测试样本降维,然后输入到训练好的分类器中即可。
白化(Whitening)的目的是去掉数据之间的相关联度,是很多算法进行预处理的步骤。比如说当训练图片数据时,由于图片中相邻像素值有一定的关联,所以很多信息是冗余的。这时候去相关的操作就可以采用白化操作。数据的白化必须满足两个条件:一是不同特征间相关性最小,接近0;二是所有特征的方差相等(不一定为1)。常见的白化操作有PCA whitening和ZCA whitening。在本实验中采用的是PCA whitening.
PCA whitening是指将数据x经过PCA降维为z后,可以看出z中每一维是独立的,满足whitening白化的第一个条件,这是只需要将z中的每一维都除以标准差就得到了每一维的方差为1,也就是说方差相等。公式为:
本实验中具体实现文件为pcaWhitening.m和pcaWhitening2.m,因为电脑内存的限制,如果对训练集与测试集60000个数据同时进行处理会导致内存溢出,故分为两部分分别处理。
具体实现代码如下:
%% pca whitening
clear all; close all;
load('data_batch_1to6_double.mat');
data = data(1:30000,:);
% data: [60000x3072 double]
% labels: [40000x3072 double]
% batch_label: 'training batch 1 to 4'
x = data';
% x : 1000x3072
%% Step 0: Zero-mean the data (by row)
% make use of the mean and repmat/bsxfun functions.
x = x - repmat(mean(x,1), size(x,1),1); % compute the mean value of each column
%% Step 1: Implement PCA to obtain xRot
% Implement PCA to obtain xRot, the matrix in which the data is expressed
% with respect to the eigenbasis of sigma, which is the matrix U.
xRot = zeros(size(x));
[n,m] = size(x);
sigma = 1/m*x*x';
[u,s,v] = svd(sigma);
xRot = u' * x; % 数据旋转后的结果。
%% Step 2: Find k, the number of components to retain
% Write code to determine k, the number of components to retain in order
% to retain at least 97% of the variance.
k = 0; % Set k accordingly
ss = diag(s);
%其中cumsum(ss)求出的是一个累积向量,也就是说ss向量值的累加值
%并且(cumsum(ss)/sum(ss))<=0.97是一个向量,值为0或者1的向量,为1表示满足那个条件
k = length(ss((cumsum(ss)/sum(ss))<=0.97));
save('u_k','u','k');
%% Step 3: Implement PCA with whitening and regularisation
% Implement PCA with whitening and regularisation to produce the matrix
% xPCAWhite.
epsilon = 0.1;
xTilde = u(:,1:k)' * x; % 数据降维后的结果,这里k希望保留的特征向量的数目。
xPCAwhite = diag(1./sqrt(diag(s(1:k,1:k)) + epsilon)) * xTilde; % xPCAwhite
data = xPCAwhite';
save('data_batch_1to3_PCAwhite.mat','data','labels');
fprintf('the size of data is');
fprintf('%d', size(data));
3.4.2 利用含一个隐藏层的神经网络进行有监督学习,实现对CIFAR10-图像数据库的十类别分类
具体实现步骤:
-
载入数据
具体步骤在报告前半部分已描述。
-
随机初始化参数
利用randInitializeWeights.m进行参数的随机初始化,具体实现代码如下
function W = randInitializeWeights(L_in, L_out)
%RANDINITIALIZEWEIGHTS Randomly initialize the weights of a layer with L_in
%incoming connections and L_out outgoing connections
% W = RANDINITIALIZEWEIGHTS(L_in, L_out) randomly initializes the weights
% of a layer with L_in incoming connections and L_out outgoing
% connections.
W = zeros(L_out, 1 + L_in);
epsilon_init = 0.086;
W = rand(L_out, 1 + L_in) * 2 * epsilon_init - epsilon_init;
end
-
实现前向传播算法,计算成本函数
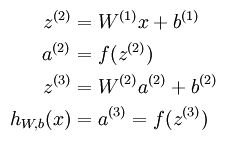
隐藏层单元输出(activation)的表达式如下:
也可以表示为
矢量化表达式如下:
这个步骤称为前向传播forward propagation,更一般的,对神经网络中的l层和l+1层,有:
成本函数的表达式形式如下
-
利用成本函数与成本函数的梯度,实现反向传播算法,更新参数。
用反向传播(Backward propagation)算法计算预测误差,需要用到成本函数的梯度,其表达式如下:
具体代码如下:
% cost function
%add the column of 1's to the X matrix.
X = [ones(m, 1) X];
a1 = X;
% forward propagation
% compute the activation 'a2' and output of prediction 'h'
a2 = sigmoid(X * Theta1');
a2 = [ ones(size(a2,1), 1) a2];
h = sigmoid(a2 * Theta2');
a3 = h;
% create a 10*10 unit matrices
Y = eye(num_labels);
% conver y to binary matrix y_bin,size(y_bin)=[5000,10]
y_bin = y * ones(1,num_labels);
for i = 1:m
num_digit = y_bin(i,1);
y_bin(i,:) = Y(num_digit,:);
end
%J = sum(1/m*sum(-y_bin.*log(h)-(1-y_bin).*log(1-h)));
J = sum(1/m*sum(-y_bin.*log(h)-(1-y_bin).*log(1-h))) + ...
lambda/(2*m)*(sum(sum(Theta1(:,2:end).^2))+sum(sum(Theta2(:,2:end).^2)));
% comput delta 3
d3 = h - y_bin ; % Delta3: 5000*10
% comput delta 2
% feedforward
z2 = a1 * Theta1';
a2 = sigmoid(z2);
a2 = [ ones(size(a2,1), 1) a2]; h = sigmoid(a2 * Theta2'); a3 = h;
d2 = (d3*Theta2(:,2:end)).*sigmoidGradient(z2) ;
% compute Delta 2
Delta2 = d3' * a2;
% compute gradient of Theta2
Theta2_grad = 1/m*Delta2;
% compute Delta 1
Delta1 = d2' * a1; % compute gradient of Theta1
Theta1_grad = 1/m*Delta1;
% Part 3: Implement regularization with the cost function and gradients.
Theta1_reg_ad = zeros(size(Theta1)); % the additional part of regularization
Theta1_reg_ad(:,2:end) = lambda/m * Theta1(:,2:end) ;
Theta1_grad = Theta1_grad + Theta1_reg_ad;
Theta2_reg_ad = zeros(size(Theta2)); % the additional part of regularization
Theta2_reg_ad(:,2:end) = lambda/m * Theta2(:,2:end) ;
Theta2_grad = Theta2_grad + Theta2_reg_ad;
% Unroll gradients
grad = [Theta1_grad(:) ; Theta2_grad(:)];
end
-
进行梯度检查,若梯度检查结果差距过大,返回第3.4步
具体matlab代码如下:
%% Gradient checking
% close gradient checking when training NN
debug2 = false;
if debug2
[J grad] = nnCostFunction(p, input_layer_size, hidden_layer_size, ...
num_labels, X, y, lambda);
numGrad = computeNumericalGradient( @(x) nnCostFunction(p, input_layer_size, hidden_layer_size, ...
num_labels, x, y, lambda), initial_nn_params);
disp([numGrad grad]);
diff = norm(numGrad-grad)/norm(numGrad+grad);
disp(diff);
end
-
训练神经网络,得到最佳预测参数
算法调用minFunc()更新参数W,b,以便得到更好的预测模型。
具体实现代码如下:
% choose lambda to avoid overfit
lambda = 10;
% Create "short hand" for the cost function to be minimized
costFunction = @(p) nnCostFunction(p, ...
input_layer_size, ...
hidden_layer_size, ...
num_labels, X, y, lambda);
% Now, costFunction is a function that takes in only one argument (the
% neural network parameters)
% use minFunc to improve running speed
addpath minFunc/
options.maxIter = 500;
options.Method = 'lbfgs';
minFuncOptions.display = 'on';
[nn_params, cost] = minFunc(costFunction, initial_nn_params, options);
% Obtain Theta1 and Theta2 back from nn_params
Theta1 = reshape(nn_params(1:hidden_layer_size * (input_layer_size + 1)), ...
hidden_layer_size, (input_layer_size + 1));
Theta2 = reshape(nn_params((1 + (hidden_layer_size * (input_layer_size + 1))):end), ...
num_labels, (hidden_layer_size + 1));
7.利用训练得到的参数对测试集进行预测,与测试集标签进行比对,计算预测正确率
具体实现代码如下:
%% Implement Predict
% After training the neural network, then we use it to predict
% the labels. The "predict" function use the
% neural network to predict the labels of the training set and test set.
pred = predict(Theta1, Theta2, X);
fprintf('\nTraining Set Accuracy: %f\n', mean(double(pred == y)) * 100);
pred2 = predict(Theta1, Theta2, testData);
fprintf('\nTesting Set Accuracy: %f\n', mean(double(pred2 == testLabels)) * 100);


