HLS学习(二)Using AXI4 Interfaces
第一部分 AXI4-Stream Interfaces 暂时不细看。
第二部分
AXI4-Lite Interface
作用:use an AXI4-Lite interface to allow the design to be controlled by a CPU or microcontroller。
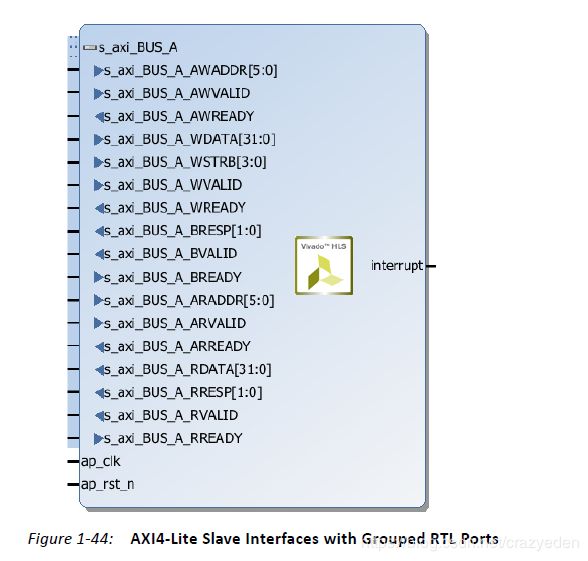
HLS会自动给各个使用axilite接口的port分配地址,会在驱动文件里提供地址。
如果想自己显式的指明地址,可以使用offset选项。如上图。注意:hls会保留0x0000 到0x000C的地址给block-level I/O protocol signals and interrupt controls。
这是综合之后的模块,都会产生一个中断端口。当函数返回的时候,会产生一个中断信号。也可以使用block-level protocols的信号:ap_done(函数完成所有操作), ap_ready(模块准备好等待新的输入)。 这两个信号都可以触发中断。
C Driver Files
AXI4-Lite slave interface综合完成之后,会自动生成驱动文件。C 驱动文件提供了所有通过该AXI4-Lite slave interface 控制模块的操作。驱动包括standalone模式和linux模式。
P116对生成的驱动文件进行了详细的解释。
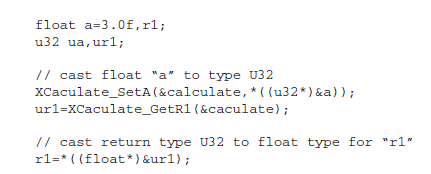
注意生成的驱动文件使用的参数都是U32,使用的时候要注意一下类型转换,以下为类型转换示例:
P503对驱动API进行了详细的解释。这里的Example 和 DUT就是你所综合出的IP的名称。
如何控制硬件?
xexample_hw.h 文件provides a complete list of the memory mapped locations for the ports grouped into the AXI4-Lite slave interface.以下为各个端口的地址分布。
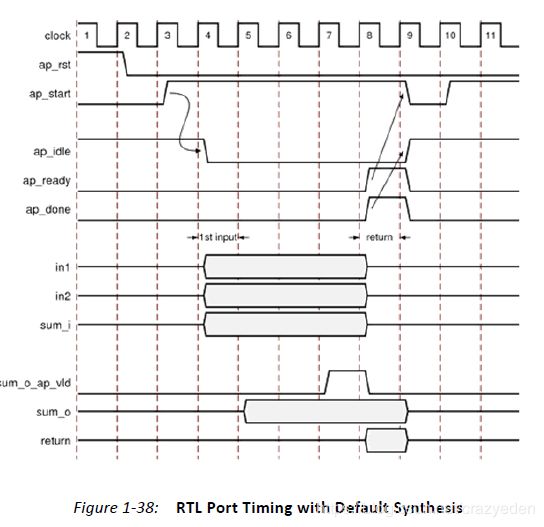
如何使用呢,举个例子:ap_start 寄存器设为1,则启动了模块计算,完成之后,ap_done, ap_idle and ap_ready registers会被设置,过程可以用下图描述:
推荐使用方法一:让硬件模块执行一次
推荐使用方法二:让硬件模块连续执行
P122,针对以上两种情况,分别解释了如何使用驱动API,包括XExample_Set_a, XExample_Set_b,XExample_Set_c_i,ap_start=1 then XExample_Start开始,XExample_Get_c_o_vld来确认输出数据有效,然后得到数据XExample_Get_c_o.
如何构建SDK程序
- Create an instance of the HW instance
- Look Up the device configuration
- Initialize the Device
- Set the input parameters of the HLS block
- Start the device and read the results
示例程序:
#include "xexample.h" // Device driver for HLS HW block
#include "xparameters.h"
// HLS HW instance
XExample HlsExample;
XExample_Config *ExamplePtr
int main() {
int res_hw;
// Look Up the device configuration
ExamplePtr = XExample_LookupConfig(XPAR_XEXAMPLE_0_DEVICE_ID);
if (!ExamplePtr) {
print("ERROR: Lookup of accelerator configuration failed.\n\r");
return XST_FAILURE;
}
// Initialize the Device
status = XExample_CfgInitialize(&HlsExample, ExamplePtr);
if (status != XST_SUCCESS) {
print("ERROR: Could not initialize accelerator.\n\r");
exit(-1);
}
//Set the input parameters of the HLS block
XExample_Set_a(&HlsExample, 42);
XExample_Set_b(&HlsExample, 12);
XExample_Set_c_i(&HlsExample, 1);
// Start the device and read the results
XExample_Start(&HlsExample);
do {
res_hw = XExample_Get_c_o(&HlsExample);
} while (XExample_Get_c_o(&HlsExample) == 0); // wait for valid data output
print("Detected HLS peripheral complete. Result received.\n\r");
}
第三部分
AXI4 Master Interface
作用:支持HLS模块单个数据传输和Burst mode data transfers(一次可以传输多个数据,增大吞吐量。比如像memcpy或者pipeline loop循环的时候非常合适)
示例程序解释:使用memcpy函数,顶层函数参数a指定为AXI4 master interface.
void example(volatile int *a){
#pragma HLS INTERFACE m_axi depth=50 port=a
#pragma HLS INTERFACE s_axilite port=return
//Port a is assigned to an AXI4 master interface
int i;
int buff[50];
//memcpy creates a burst access to memory
memcpy(buff,(const int*)a,50*sizeof(int));
for(i=0; i < 50; i++){
buff[i] = buff[i] + 100;
}
memcpy((int *)a,buff,50*sizeof(int));
}
Controlling the Address Offset in an AXI4 Interface
AXI4 master interface默认开始所有的读写操作都是从0x0地址开始的。如果想设置读写地址偏移,需要用到offset选项。主要解释一下offset = slave的时候,表示在接口处添加一个32位寄存器表示offset的值。设置了offset之后,HLS模块读取或者写出数据的时候会直接添加上偏移,来读取任意位置的数据。
如果使用了slave选项,要确保对应的master port offset register 被捆绑在正确的AXI4-Lite接口上。比如:
#pragma HLS INTERFACE m_axi port=a depth=50 offset=slave
#pragma HLS INTERFACE s_axilite port=return bundle=AXI_Lite_1
#pragma HLS INTERFACE s_axilite port=b bundle=AXI_Lite_2
还需要一句:
#pragma HLS INTERFACE s_axilite port=a bundle=AXI_Lite_1则把端口绑定在名字为AXI_Lite_1的AXI4-Lite interface上。


