【腾讯Bugly干货分享】Android动态布局入门及NinePatchChunk解密
本文来自于腾讯bugly开发者社区,非经作者同意,请勿转载,原文地址:http://dev.qq.com/topic/57c7ff5d53bbcffd68c64411
作者:黄进——QQ音乐团队
摆脱XML布局文件
相信每一个Android开发者,在接触“Hello World”的时候,就形成了一个观念:Android UI布局是通过layout目录下的XML文件定义的。使用XML定义布局的方式,有着结构清晰、可预览等优势,因而极为通用。可是,偏偏在某些场景下,布局是需要根据运行时的状态变化的,无法使用XML预先定义。这时候,我们只能通过JavaCode控制,在程序运行时,动态的实现对应的布局。
所以,作为入门,将从给三个方面给大家介绍一些动态布局相关的基础知识和经验。
- 动态添加view到界面上,摆脱layout文件夹下的XML文件。
- 熟悉Drawable子类,摆脱drawable文件夹下的XML文件。
- 解密
NinePatchChunk,解析如何实现后台下发.9图片给客户端使用。
动态添加View
这一步,顾名思义,就是把我们要的View添加到界面上去。这是动态布局中最基础最常用的步骤。
Android开发中,我们用到的Button、ImageView、RelativeLayout、LinearLayout等等元素最终都是继承于View这个类的。按照我自己的理解,可以将它们分为两类,控件和容器(这两个名字纯属作者自己编的,并非官方定义)。Button、ImageView这类直接继承于View的就是控件,控件一般是用来呈现内容和与用户交互的;RelativeLayout、LinearLayout这类继承于ViewGroup的就是容器,容器就是用来装东西的。Android是嵌套式布局的设计,因此,容器装的既可以是容器,也可以是控件。
更直接的,还是通过一段demo代码来看吧。
首先,因为不能setContentView(R.layout.xxx)了,我们需要先添加一个root作为整个的容器,
RelativeLayout root = new RelativeLayout(this);
root.setBackgroundColor(Color.WHITE);
setContentView(root, new FrameLayout.LayoutParams(ViewGroup.LayoutParams.MATCH_PARENT, ViewGroup.LayoutParams.MATCH_PARENT));
然后,我们尝试在屏幕正中间添加一个按钮,
Button button1 = new Button(this);
button1.setId(View.generateViewId());
button1.setText("Button1");
button1.setBackgroundColor(Color.RED);
LayoutParams btnParams = new RelativeLayout.LayoutParams(ViewGroup.LayoutParams.WRAP_CONTENT, ViewGroup.LayoutParams.WRAP_CONTENT);
btnParams.addRule(RelativeLayout.CENTER_IN_PARENT, 1);
root.addView(button1, btnParams);
到这里可以发现,只需要三步,就可以添加一个view(以按钮为例)到相应的容器root里面了,
new Button(this),并初始化控件相关的属性。- 根据
root的类型,new LayoutParams,这个参数主要用来描述要添加的view在容器中的定位信息,包括高宽,居中对齐,margin等等属性。特别地,对于上面的例子,相对于父容器居中的实现是,btnParams.addRule(RelativeLayout.CENTER_IN_PARENT, 1),这里对应XML的代码则是android:centerInParent='true'。 - 最后一步,添加到容器中,
root.addView(button1, btnParams)就行了。
接下来,搞的稍微复杂点,继续在按钮的右下方添加一个线性布局,向其中添加一个TextView和Button,而且各自占的宽度比例为2:3(对于android:layout_weight属性),demo代码如下,
// 在按钮右下方添加一个线性布局
LinearLayout linearLayout = new LinearLayout(this);
linearLayout.setOrientation(LinearLayout.HORIZONTAL);
LayoutParams lParams = new LayoutParams(ViewGroup.LayoutParams.WRAP_CONTENT, ViewGroup.LayoutParams.MATCH_PARENT);
lParams.addRule(RelativeLayout.BELOW, button1.getId());
lParams.addRule(RelativeLayout.RIGHT_OF, button1.getId());
root.addView(linearLayout, lParams);

// 在线性布局中,添加一个TextView和一个Button,宽度按2:3的比例
TextView textView = new TextView(this);
textView.setText("TextView");
textView.setTextSize(28);
textView.setBackgroundColor(Color.BLUE);
LinearLayout.LayoutParams tParams = new LinearLayout.LayoutParams(0, ViewGroup.LayoutParams.WRAP_CONTENT);
tParams.weight = 2; // 定义宽度的比例
linearLayout.addView(textView, tParams);

Button button2 = new Button(this);
button2.setText("Button2");
button2.setBackgroundColor(Color.RED);
LinearLayout.LayoutParams bParams = new LinearLayout.LayoutParams(0, ViewGroup.LayoutParams.WRAP_CONTENT);
bParams.weight = 3; // 定义宽度的比例
linearLayout.addView(button2, bParams);
需要注意的是,上面代码中的lParams.addRule(RelativeLayout.BELOW, button1.getId())(XML对应android:layout_below)
规则如果定义的是一个view相对于另一个view的,一定要初始化另一个view(button1)的id不为0,否则规则会失效。通常,为了防止id重复,建议使用系统方法来生成id,也就是第二段代码中的button1.setId(View.generateViewId())。
最终,这一段代码执行下来,我们得到的效果就是,
但是,添加view作者也遇到过一个小小坑。
如下图左边部分,作者曾经遇到一个场景,需要在RelativeLayout右边添加一个ImageView,同时,这个ImageView的右边部分在RelativeLayout的外面。
一开始,作者的代码如下,却只能得到上图右边的效果,
ImageView imageView = new ImageView(this);
RelativeLayout.LayoutParams params = new RelativeLayout.LayoutParams(width, height);
params.leftMargin = x;  // 到左边的距离
params.topMargin = y;   // 到上边的距离
parent.addView(imageView, params);
后来本人猜测,这是因为onMeasure和onLayout的时候,受到了rightMargin 默认为0的限制。
后来,经过本人验证,要跳过这个坑,加一行params.rightMargin = -1*width就可以了。(有兴趣的同学可以去看看源码,这里就不详解了)
Drawable子类
上一节,我们只是摆脱了layout目录的XML文件。可是还有一类XML文件,频繁的被layout目录的XML文件引用,那就是drawable目录的XML文件。drawable目录的下文件,通常是定义了一些,selector,shape等等。可是,考虑到一个场景:selector里面引用的图片,不是打包时res目录的资源,而是后台下发的图片呢?类似场景下,我们能不能摆脱这类XML文件呢?
根据上一节的经验,要相信,XML定义能实现的,Java代码一定能够实现。从drawable的目录名就可以看出,不管是selector,shape或是其他,总归都应该是drawable。因此,在Java代码中,总应该有一个Drawable的子类来对应他们。下面,就介绍几个常用的Drawable的子类给大家。
StateListDrawable:对应selector,主要用来描述按钮等的点击态。
StateListDrawable selector = new StateListDrawable();
btnSelectorDrawable.addState(new int[]{android.R.attr.state_pressed}, drawablePress);
btnSelectorDrawable.addState(new int[]{android.R.attr.state_enabled}, drawableEnabel);
btnSelectorDrawable.addState(new int[]{android.R.attr.state_selected}, drawableSelected);
btnSelectorDrawable.addState(new int[]{android.R.attr.state_focused}, drawableFocused);
btnSelectorDrawable.addState(new int[]{}, drawableNormal);
GradientDrawable:对应渐变色。
GradientDrawable drawable = new GradientDrawable();
drawable.setOrientation(Orientation.TOP_BOTTOM); //定义渐变的方向
drawable.setColors(colors); //colors为int[],支持2个以上的颜色
最后,说一个比较复杂的Drawable,是进度条相关的。
LayerDrawable:对应Seekbar android:progressDrawable
通常,我们用XML定义一个进度条的ProgressDrawable是这样的,
而对于其中的,@drawable/progress和@drawable/secondary_progress也不是普通的drawable,
也就是说,通过XML要定义进度条的ProgressDrawable,我们需要定义多个XML文件的,还是比较复杂的。那么JavaCode实现呢?
其实,理解了XML实现的方式,下面的JavaCode就很好理解了。
LayerDrawable layerDrawable = (LayerDrawable) getProgressDrawable();

//背景
layerDrawable.setDrawableByLayerId(android.R.id.background, backgroundDrawable);

//进度条
ClipDrawable clipProgressDrawable = new ClipDrawable(progressDrawable, Gravity.LEFT, ClipDrawable.HORIZONTAL);
layerDrawable.setDrawableByLayerId(android.R.id.progress, clipProgressDrawable);

//缓冲进度条
ClipDrawable clipSecondaryProgressDrawable = new ClipDrawable(secondaryProgressDrawable, Gravity.LEFT, ClipDrawable.HORIZONTAL);
layerDrawable.setDrawableByLayerId(android.R.id.secondaryProgress, clipSecondaryProgressDrawable);
更多的Drawable的子类,大家可以根据自己需求去官方文档上查询就行了。
“蛋疼.9.PNG”
.9.png图片对Android开发来说,都不陌生。通常情况下,我们对于.9.png图片的使用,只需要简单的放到resource目录下,然后,当做普通图片来用就可以了。然而,以本人的经验,如果要动态下发’.9.png’图片给客户端使用就很蛋疼了。
一开始,当我想当然以为可以直接加载本地.9.png图片,用的飞起的时候,发现了Android Nine Patch的一个大坑!!!
“说好的自动拉升了???”(隐隐约约感觉到某需求的工作量又少评估了一天。。。。。。。)
通过查阅资料发现,原来,工程里面用的.9.png在打包的时候,经过了aapt的处理,成为了一张包含有特殊信息的.png图片。而不是直接加载的.9.png这种图片。
那么第一个思路就来了(参考引用),首先,我们先对.9.png执行一个aapt命令。
aapt.exe s -i xx.9.png -o xx.png
然后,后台下发这种处理过的.png,客户端通过如下代码,就可以加载这张图片,得到一个有局部拉伸效果的NinePatchDrawable了。
Bitmap bitmap = BitmapFactory.decodeFile(filePath);
NinePatchDrawable npd = new NinePatchDrawable(context.getResource(), bitmap, bitmap.getNinePatchChunk(), new Rect(), null);
可是,这个初级方式并不是太完美,每次后台配置新的图片,都需要aapt处理一遍,后台需要针对iOS和Android区分平台下发不同图片。总之,不太科学!那么有没有更加彻底的方式呢?
彻底理解.9.png
回顾NinePatchDrawable的构造方法第三个参数bitmap.getNinePatchChunk(),作者猜想,aapt命令其实就是在bitmap图片中,加入了NinePatchChunk的信息,那么我们是不是只要能自己构造出这个东西,就可以让任何图片按照我们想要的方式拉升了呢?
可是查了一堆官方文档,似乎并找不到相应的方法来获得这个byte[]类型的chunk参数。
既然无法知道这个chunk如何生成,那么能不能从解析的角度逆向得出这个NinePatchChunk的生成方法呢?
下面就需要从源码入手了。
NinePatchChunk.java
public static NinePatchChunk deserialize(byte[] data) {
    ByteBuffer byteBuffer =
            ByteBuffer.wrap(data).order(ByteOrder.nativeOrder());
    byte wasSerialized = byteBuffer.get();
    if (wasSerialized == 0) return null;
    NinePatchChunk chunk = new NinePatchChunk();
    chunk.mDivX = new int[byteBuffer.get()];
    chunk.mDivY = new int[byteBuffer.get()];
    chunk.mColor = new int[byteBuffer.get()];
    checkDivCount(chunk.mDivX.length);
    checkDivCount(chunk.mDivY.length);
    // skip 8 bytes
    byteBuffer.getInt();
    byteBuffer.getInt();
    chunk.mPaddings.left = byteBuffer.getInt();
    chunk.mPaddings.right = byteBuffer.getInt();
    chunk.mPaddings.top = byteBuffer.getInt();
    chunk.mPaddings.bottom = byteBuffer.getInt();
    // skip 4 bytes
    byteBuffer.getInt();
    readIntArray(chunk.mDivX, byteBuffer);
    readIntArray(chunk.mDivY, byteBuffer);
    readIntArray(chunk.mColor, byteBuffer);
    return chunk;
}
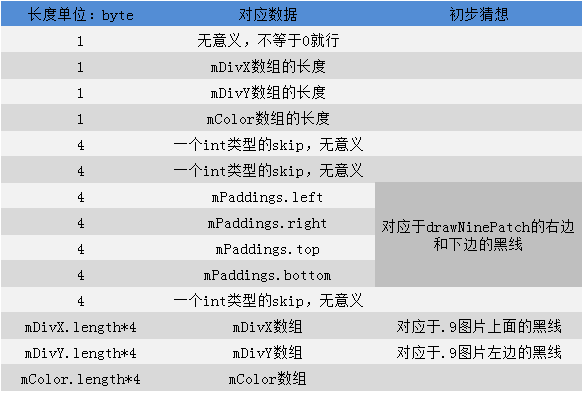
其实从这部分解析byte[] chunk的源码,我们已经可以反推出来大概的结构了。如下图,
按照上图中的猜想以及对.9.png的认识,直觉感受到,mDivX,mDivY,mColor这三个数组是最关键的,但是具体是什么,就要继续看源码了。
ResourceTypes.h
/**
 * This chunk specifies how to split an image into segments for
 * scaling.
 *
 * There are J horizontal and K vertical segments.  These segments divide
 * the image into J*K regions as follows (where J=4 and K=3):
 *
 *      F0   S0    F1     S1
 *   +-----+----+------+-------+
 * S2|  0  |  1 |  2   |   3   |
 *   +-----+----+------+-------+
 *   |     |    |      |       |
 *   |     |    |      |       |
 * F2|  4  |  5 |  6   |   7   |
 *   |     |    |      |       |
 *   |     |    |      |       |
 *   +-----+----+------+-------+
 * S3|  8  |  9 |  10  |   11  |
 *   +-----+----+------+-------+
 *
 * Each horizontal and vertical segment is considered to by either
 * stretchable (marked by the Sx labels) or fixed (marked by the Fy
 * labels), in the horizontal or vertical axis, respectively. In the
 * above example, the first is horizontal segment (F0) is fixed, the
 * next is stretchable and then they continue to alternate. Note that
 * the segment list for each axis can begin or end with a stretchable
 * or fixed segment.
 * /
正如源码中,注释的一样,这个NinePatch Chunk把图片从x轴和y轴分成若干个区域,F区域代表了固定,S区域代表了拉伸。mDivX,mDivY描述了所有S区域的位置起始,而mColor描述了,各个Segment的颜色,通常情况下,赋值为源码中定义的NO_COLOR = 0x00000001就行了。就以源码注释中的例子来说,mDivX,mDivY,mColor如下:
mDivX = [ S0.start, S0.end, S1.start, S1.end];
mDivY = [ S2.start, S2.end, S3.start, S3.end];
mColor = [c[0],c[1],...,c[11]]
对于mColor这个数组,长度等于划分的区域数,是用来描述各个区域的颜色的,而如果我们这个只是描述了一个bitmap的拉伸方式的话,是不需要颜色的,即源码中NO_COLOR = 0x00000001
说了这么多,我们还是通过一个简单例子来说明如何构造一个按中心点拉伸的NinePatchDrawable吧,
Bitmap bitmap = BitmapFactory.decodeFile(filepath);
int[] xRegions = new int[]{bitmap.getWidth() / 2, bitmap.getWidth() / 2 + 1};
int[] yRegions = new int[]{bitmap.getWidth() / 2, bitmap.getWidth() / 2 + 1};
int NO_COLOR = 0x00000001;
int colorSize = 9;
int bufferSize = xRegions.length * 4 + yRegions.length * 4 + colorSize * 4 + 32;

ByteBuffer byteBuffer = ByteBuffer.allocate(bufferSize).order(ByteOrder.nativeOrder());
// 第一个byte,要不等于0
byteBuffer.put((byte) 1);

//mDivX length
byteBuffer.put((byte) 2);
//mDivY length
byteBuffer.put((byte) 2);
//mColors length
byteBuffer.put((byte) colorSize);

//skip
byteBuffer.putInt(0);
byteBuffer.putInt(0);

//padding 先设为0
byteBuffer.putInt(0);
byteBuffer.putInt(0);
byteBuffer.putInt(0);
byteBuffer.putInt(0);

//skip
byteBuffer.putInt(0);

// mDivX
byteBuffer.putInt(xRegions[0]);
byteBuffer.putInt(xRegions[1]);

// mDivY
byteBuffer.putInt(yRegions[0]);
byteBuffer.putInt(yRegions[1]);

// mColors
for (int i = 0; i < colorSize; i++) {
    byteBuffer.putInt(NO_COLOR);
}

return byteBuffer.array();
后来也在github上找到了一个现成的Library,有兴趣的同学可以直接去学习和使用。
参考资料:
http://blog.csdn.net/darkinger/article/details/22801215
https://android.googlesource.com/platform/pac
kages/apps/Gallery2/+/jb-dev/src/com/android/gallery3d/ui/NinePatchChunk.javahttps://android.googlesource.com/platform/frameworks/base/+/master/include/androidfw/ResourceTypes.h
https://github.com/Anatolii/NinePatchChunk.
http://stackoverflow.com/questions/5079868/create-a-ninepatch-ninepatchdrawable-in-runtime
更多精彩内容欢迎关注bugly的微信公众账号:
腾讯 Bugly是一款专为移动开发者打造的质量监控工具,帮助开发者快速,便捷的定位线上应用崩溃的情况以及解决方案。智能合并功能帮助开发同学把每天上报的数千条 Crash 根据根因合并分类,每日日报会列出影响用户数最多的崩溃,精准定位功能帮助开发同学定位到出问题的代码行,实时上报可以在发布后快速的了解应用的质量情况,适配最新的 iOS, Android 官方操作系统,鹅厂的工程师都在使用,快来加入我们吧!


