分析nginx源码,谈到模块module是必然的。纵观nginx源码,可以说模块module机制是整个nginx的骨架。因此,对nginx的源码进行分析,那么对模块module就需要有一个基本的认知。在浅谈开始,我们要明确nginx 模块构架是从编译阶段开始的,不像apache那样可以动态的添加模块,nginx使用的是静态模块。这应该也是nginx 为何效率高的原因之一。对nginx的模块认知,必须要提到一篇大大有名的文章,我想也是每个分析nginx源码的人都拜读过的文章《Emiller's Guide To Nginx Module Development 》里面的内容虽然少了点,但讲得非常经典,因此特别在这里推荐一个。
对模块module的认知,先来看三个数据结构。模块指令数据结构(ngx_command_t)、模块定义数据结构(ngx_module_t)、模块核心数据结构。模块核心数据结构具体来说可以分为4大类:
NGX_CORE_MODULE、NGX_CONF_MODULE、NGX_EVENT_MODULE 和 NGX_HTTP_MODULE。对于这个数据结构本文选取其中的NGX_CORE_MODULE进行说明。
1、模块指令数据结构(ngx_command_t)
定义如下:
struct ngx_command_s {
    ngx_str_t             name;
    ngx_uint_t            type;
    char               *(*set)(ngx_conf_t *cf, ngx_command_t *cmd, void *conf);
    ngx_uint_t            conf;
    ngx_uint_t            offset;
    void                 *post;
};
name指代命令的类型,具体来说就是配置文件中的配置的参数名。type 为命令的类型如:在主配置文件中配置该命令参数为NGX_HTTP_MAIN_CONF。参数*(*set)(ngx_conf_t *cf, ngx_command_t *cmd, void *conf) 为执行该命令的函数。conf 为配置信息,offset偏移量,最后一个基本上都是NULL。
2、模块定义数据结构(ngx_module_t)
struct ngx_module_s {
    ngx_uint_t            ctx_index;
    ngx_uint_t            index;

    ngx_uint_t            spare0;
    ngx_uint_t            spare1;
    ngx_uint_t            spare2;
    ngx_uint_t            spare3;

    ngx_uint_t            version;

    void                 *ctx;
    ngx_command_t        *commands;
    ngx_uint_t            type;

    ngx_int_t           (*init_master)(ngx_log_t *log);

    ngx_int_t           (*init_module)(ngx_cycle_t *cycle);

    ngx_int_t           (*init_process)(ngx_cycle_t *cycle);
    ngx_int_t           (*init_thread)(ngx_cycle_t *cycle);
    void                (*exit_thread)(ngx_cycle_t *cycle);
    void                (*exit_process)(ngx_cycle_t *cycle);

    void                (*exit_master)(ngx_cycle_t *cycle);

    uintptr_t             spare_hook0;
    uintptr_t             spare_hook1;
    uintptr_t             spare_hook2;
    uintptr_t             spare_hook3;
    uintptr_t             spare_hook4;
    uintptr_t             spare_hook5;
    uintptr_t             spare_hook6;
    uintptr_t             spare_hook7;
};
这个结构体参数比较多,但似乎其中的很多都没什么太大用。这里说明几个常用的参数基本认识一下,index 在所有模块中的位置,可以说是游标,因为nginx所有的模块都放在了一个模块数组中ngx_modules[]中(详情见后文)不需要自己设置,自动生成的。*ctx 指向模块核心数据结构的指针(每个模块必备),*commands指向模块指令数据结构的指针。type模块的类型,接下来几个函数指针就是,在某些特定时候需要调用该模块完成些功能,如(*init_master)(ngx_log_t *log) 即在master初始化时调用,其他类是。
3、模块核心数据结构
前面已经说明了,这种数据结构有4大类,这里选取 ngx_core_module_t 来进行简单认知。
    typedef struct {

        ngx_str_t             name;  /*名字*/
        void               *(*create_conf)(ngx_cycle_t *cycle);  /*创建时调用*/
        char               *(*init_conf)(ngx_cycle_t *cycle, void *conf);    /*初始化时调用*/
    } ngx_core_module_t;
认识完以上三种数据结构,那么我们开始好奇这三种数据结构是怎样嵌入到源码中工作的呢?如果有记得的在前文中提到了ngx_modules[]这样的一个数组,但是在源码中却没有?不错,源码中确实没有ngx_modules[]这样的一个数组,但请不要忘了nginx的软件构建是从编译开始的。怎么理解?简单的理解,就是部分源码结构体是需要在configure 执行后生成的。那么把模块嵌入nginx中的工作就交给configure吧!在执行完configure后,打开objs文件夹看到一个ngx_modules.c的文件,好奇的,赶紧打开看看,里面就有你想知道的内容!
ngx_module_t *ngx_modules[] = {
&ngx_core_module,
&ngx_errlog_module,
…
}
明白了吧!模块的编译后的地址都在这里,是不是感慨nginx精妙的构建!说到这里,你可能还是似懂非懂,那么我自己来写一个模块module 来对介绍的基本认知进行理性的看待,也加深对前面所说的理解,学以致用!这里写的是ngx_core_module_t 类型模块,核心模块。为了突出主干,并没有写什么功能仅演示下而已。首先,在src文件夹下建立test文件夹,后添加test.c源文件,代码如下:
#include#include static void *ngx_test_module_create_conf(ngx_cycle_t *cycle); char * ngx_test(ngx_conf_t *cf, ngx_command_t *cmd, void *conf); static ngx_command_t ngx_test_commands[] = { { ngx_string("commands"), NGX_MAIN_CONF|NGX_DIRECT_CONF|NGX_CONF_NOARGS,
/*
第一参数,模块中没有初始化函数;
第二参数,nginx.conf配置文件的指令配置类型,就像worker_processes;
第三个参数,该指令后面没有参数
*/ ngx_test, 0, 0, NULL }, ngx_null_command /*命令集结束*/ }; static ngx_core_module_t ngx_test_module_ctx = { ngx_string("test"), ngx_test_module_create_conf, NULL }; ngx_module_t ngx_test_module = { NGX_MODULE_V1, &ngx_test_module_ctx, ngx_test_commands, NGX_CORE_MODULE, NULL, NULL, NULL, NULL, NULL, NULL, NULL, NGX_MODULE_V1_PADDING }; char * ngx_test(ngx_conf_t *cf, ngx_command_t *cmd, void *conf) { FILE *fp = fopen("test", "w"); fprintf(fp,"call ngx_test\n"); fclose(fp); return NGX_CONF_OK; } static void *ngx_test_module_create_conf(ngx_cycle_t *cycle){ printf("call ngx_test_module_create_conf\n"); }
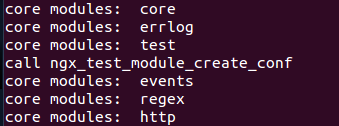
对代码进行简单说明下,三大结构体前文已经说了,代码功能为:显示模块创建是调用了 ngx_test_module_create_conf,若配置文件中有 commands 指令就会在nginx所在目录下创建test文件,并向其中写入call ngx_test这个字符串。
建立 config 文件,主要用于configure时将我们写的test模块包括进去。内容如下:
ngx_addon_name=ngx_test_module
CORE_MODULES="$CORE_MODULES ngx_test_module"
NGX_ADDON_SRCS="$NGX_ADDON_SRCS $ngx_addon_dir/test.c"
三条语句,三个功能:指定添加模块名,指定模块类型,指定模块源文件路径
然后,我们执行configure 注意添加参数,加入我们编写的test模块:
./configure --add-module=src/test
执行过程中,可以发现
configuring additional modules
adding module in src/test
+ ngx_test_module was configured
这条信息即可表示我们编写的test模块已经添加进编译过程了。如果比较好奇,nginx中有多少默认(直接configure不添加其他参数)的核心模块,我们不妨找到源码中的 ngx_cycle.c (本人用的是 nginx 1.3.0版本代码)文件,将其中添加上一条printf语句,详细如下:
    for (i = 0; ngx_modules[i]; i++) {
        if (ngx_modules[i]->type != NGX_CORE_MODULE) {
            continue;
        }

        module = ngx_modules[i]->ctx;
        printf("core modules:  %s \n",module->name.data);
        if (module->create_conf) {
            rv = module->create_conf(cycle);
            if (rv == NULL) {
                ngx_destroy_pool(pool);
                return NULL;
            }
            cycle->conf_ctx[ngx_modules[i]->index] = rv;
        }
    }
好了,工作基本完成了,make一下,然后sudo make install。哦,对了,别忘记了在nginx.conf 中 加上 “ commands; ”,要不然我们写的 ngx_command_t 不会执行了。运行nginx后,运行结果如下:
![]()
图1 自定义nginx核心模块运行结果
阅读到这里,我想大家应该对nginx 中的 module 有了一个基本的认知,要想了解nginx的运行机制这点应该很重要的。如果要对源码进行分析,本文提到的几个结构体就应该更加要熟悉了。nginx 中的功能都是以模块的形式进行开发的,如events、http等,就是日志系统(errlog)也是用模块实现,即使并不想分析源码有了这些基本的认知对于理解配置nginx也应有很大的帮助!
