ViewFlipper实现垂直轮播广告效果
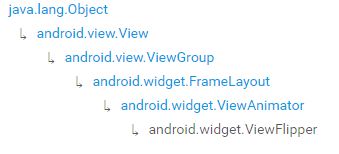
前言:在我还在zz做炒股软件的时候,有个需求是垂直滚动显示3指数,当时我使用了ListView的自动滚动来实现,现在一想当时做的可真费劲,又是屏蔽手势传递又是处理自动滚动,其实这种效果用ViewFlipper实现真是太简单不过了,ViewFlipper的继承关系

效果图
实现代码
java代码
public class MainActivity extends AppCompatActivity {

    @Override
    protected void onCreate(Bundle savedInstanceState) {
        super.onCreate(savedInstanceState);
        setContentView(R.layout.activity_main);

        ViewFlipper mViewFlipper = (ViewFlipper) findViewById(R.id.marquee_viewFlipper);
        LinearLayout shenzhenIndexLayout = (LinearLayout) View.inflate(this, R.layout.marquee_item_layout1, null);
        LinearLayout shangzhenIndexLayout = (LinearLayout) View.inflate(this, R.layout.marquee_item_layout2, null);
        LinearLayout cyIndexLayout = (LinearLayout) View.inflate(this, R.layout.marquee_item_layout3, null);
        mViewFlipper.addView(shenzhenIndexLayout);
        mViewFlipper.addView(shangzhenIndexLayout);
        mViewFlipper.addView(cyIndexLayout);

    }

}
XML布局代码
<LinearLayout xmlns:android="http://schemas.android.com/apk/res/android"
    xmlns:tools="http://schemas.android.com/tools"
    android:id="@+id/activity_main"
    android:layout_width="match_parent"
    android:layout_height="match_parent"
    android:orientation="vertical"
    android:gravity="center"
    android:background="@android:color/white"
    tools:context="com.qfxl.android.marqueeView.MainActivity">
    <ViewFlipper
        android:id="@+id/marquee_viewFlipper"
        android:layout_width="match_parent"
        android:layout_height="30dp"
        android:autoStart="true"
        android:background="#e8e8e8"
        android:flipInterval="2000"
        android:inAnimation="@anim/anim_in"
        android:outAnimation="@anim/anim_out"
        />
LinearLayout>
anim代码
- in
- out
<set xmlns:android="http://schemas.android.com/apk/res/android">
    <translate
        android:duration="1000"
        android:fromYDelta="0"
        android:toYDelta="-100%p" />
set>
简单分析
   <ViewFlipper
        android:id="@+id/marquee_viewFlipper"
        android:layout_width="match_parent"
        android:layout_height="30dp"
        android:autoStart="true"
        android:background="#e8e8e8"
        android:flipInterval="2000"
        android:inAnimation="@anim/anim_in"
        android:outAnimation="@anim/anim_out"
        />
- autoStart 是否自动开启轮播,这个方法设置为true的时候在源码中,也可以调用java代码setAutoStart(boolean autoStart)
- flipInterval 轮播时间
- inAnimation ViewFlipper中子View进入时的动画
- outAnimation ViewFlipper中子View离开时的动画
ViewFlipper设置autoStart之后源码分析
首先设置了autoStart之后,在ViewFlipper中的onAttachedToWindow的源码中
  @Override
    protected void onAttachedToWindow() {
        super.onAttachedToWindow();

        // Listen for broadcasts related to user-presence
        final IntentFilter filter = new IntentFilter();
        filter.addAction(Intent.ACTION_SCREEN_OFF);
        filter.addAction(Intent.ACTION_USER_PRESENT);

        // OK, this is gross but needed. This class is supported by the
        // remote views machanism and as a part of that the remote views
        // can be inflated by a context for another user without the app
        // having interact users permission - just for loading resources.
        // For exmaple, when adding widgets from a user profile to the
        // home screen. Therefore, we register the receiver as the current
        // user not the one the context is for.
        getContext().registerReceiverAsUser(mReceiver, android.os.Process.myUserHandle(),
                filter, null, getHandler());

        if (mAutoStart) {//设置autoStart为true
            // Automatically start when requested
            startFlipping();
        }
    }
接下来进入startFlipping,将mStarted状态位变为true
 /**
     * Start a timer to cycle through child views
     */
    public void startFlipping() {
        mStarted = true;
        updateRunning();
    }
updateRunning中调用了updateRuning(true)方法
 /**
     * Internal method to start or stop dispatching flip {@link Message} based
     * on {@link #mRunning} and {@link #mVisible} state.
     */
    private void updateRunning() {
        updateRunning(true);
    }
updateRunning(true)方法比较重要了
/**
     * Internal method to start or stop dispatching flip {@link Message} based
     * on {@link #mRunning} and {@link #mVisible} state.
     *
     * @param flipNow Determines whether or not to execute the animation now, in
     *            addition to queuing future flips. If omitted, defaults to
     *            true.
     */
    private void updateRunning(boolean flipNow) {
    /*
     *mVisible在onWindowVisibilityChanged中赋值可见度一致
     *mStarted在设置autoStart之后变更
     *mUserPresent是监听了系统的广播Intent.ACTION_SCREEN_OFF跟Intent.ACTION_USER_PRESENT
     */
        boolean running = mVisible && mStarted && mUserPresent;
        if (running != mRunning) {//mRunning默认为false,改变的地方只有下面
            if (running) {
                showOnly(mWhichChild, flipNow);//这个是在父类中实现的
                postDelayed(mFlipRunnable, mFlipInterval);//runnable
            } else {
                removeCallbacks(mFlipRunnable);
            }
            mRunning = running;//唯一改变mRunning标志的地方
        }
        if (LOGD) {
            Log.d(TAG, "updateRunning() mVisible=" + mVisible + ", mStarted=" + mStarted
                    + ", mUserPresent=" + mUserPresent + ", mRunning=" + mRunning);
        }
    }
showOnly方法做了什么,点进去看看,源码解释为只显示指定的View其余的View在屏幕上不可见,你可以设置View进入退出的动画
    /**
     * Shows only the specified child. The other displays Views exit the screen,
     * optionally with the with the {@link #getOutAnimation() out animation} and
     * the specified child enters the screen, optionally with the
     * {@link #getInAnimation() in animation}.
     *
     * @param childIndex The index of the child to be shown.
     * @param animate Whether or not to use the in and out animations, defaults
     *            to true.
     */
    void showOnly(int childIndex, boolean animate) {
        final int count = getChildCount();
        for (int i = 0; i < count; i++) {
            final View child = getChildAt(i);
            if (i == childIndex) {
                if (animate && mInAnimation != null) {
                    child.startAnimation(mInAnimation);//View进入ViewFlipper中的动画
                }
                child.setVisibility(View.VISIBLE);//当前View可见
                mFirstTime = false;
            } else {
                if (animate && mOutAnimation != null && child.getVisibility() == View.VISIBLE) {
                    child.startAnimation(mOutAnimation);//View退出ViewFlipper中的动画
                } else if (child.getAnimation() == mInAnimation)
                    child.clearAnimation();
                child.setVisibility(View.GONE);//当前View不可见
            }
        }
    }
showOnly看完看看这个runnable做了什么,直接跳到showNext中去
 private final Runnable mFlipRunnable = new Runnable() {
        @Override
        public void run() {
            if (mRunning) {
                showNext();
                postDelayed(mFlipRunnable, mFlipInterval);
            }
        }
    };
showNext其实就是显示下一个子View了
public void showNext() {
        setDisplayedChild(mWhichChild + 1);
    }
点开setDisplayedChild
public void setDisplayedChild(int whichChild) {
        mWhichChild = whichChild;
        //这两个判断实现了ViewFlipper的循环
        if (whichChild >= getChildCount()) {
            mWhichChild = 0;
        } else if (whichChild < 0) {
            mWhichChild = getChildCount() - 1;
        }
        boolean hasFocus = getFocusedChild() != null;
        // This will clear old focus if we had it
        showOnly(mWhichChild);//继续调用showOnly
        if (hasFocus) {
            // Try to retake focus if we had it
            requestFocus(FOCUS_FORWARD);
        }
    }
总结
ViewFlipper的源码其实不难,这里只是用来实现垂直的翻滚,也可以左右翻滚等,只要动画功底好,很多酷炫的效果可以做出来,写这篇博客的目的是为了提供垂直广告实现的又一种方案。
针对此效果,做了一个封装:MarqueeView
