docker tensorflow 部署多模型 ckpt模型文件转pb文件
- 安装docker
- docker pull tensorflow/serving
- cd /root/software
- 克隆仓库 tensorflow-serviing仓库 git clone https://github.com/tensorflow/serving
将要部署的 多个模型pb文件 放在一个目录下,同时新建models.config
输入 一下内容:
model_config_list {
  config: {
    name: "my_model",
    base_path: "/models/multiModel/my_model",
    model_platform: "tensorflow"
  },
  config: {
    name: "my_model_one",
    base_path: "/models/multiModel/my_model_one",
    model_platform: "tensorflow"
  }
}
name --- 模型名字
base_path --- docker容器中模型文件所在位置
贴出本机的文件目录:
-
运行docker服务
docker run -p 8501:8501 --mount type=bind,source=/root/software/serving/tensorflow_serving/servables/tensorflow/testdata/multiModel/,target=/models/multiModel -t tensorflow/serving --model_config_file=/models/multiModel/models.configsource --- 宿主机 路径(本机模型和models.config 保存路径)
target --- docker容器中路径(上述 base_path模型保存路径)
model_config_file --- docker容器中 多模型配置文件路径
执行上述命令,正常情况下会得到如下输出:
可进入docker容器查看文件是否存在 docker exec -it {容器ID} /bin/bash
参考链接:https://www.cnblogs.com/aidenzdly/p/11847307.html
附:ckpt模型文件转tensorflow-serving所需的pb文件
核心在于找出模型的输入与输出,对应在inputs 和 outputs
# coding:utf-8
import os
import tensorflow as tf


def restore_and_save(input_checkpoint, export_path_base):
    checkpoint_file = tf.train.latest_checkpoint(input_checkpoint)
    graph = tf.Graph()

    with graph.as_default():
        session_conf = tf.ConfigProto(allow_soft_placement=True, log_device_placement=False)
        sess = tf.Session(config=session_conf)

        with sess.as_default():
            # 载入保存好的meta graph,恢复图中变量,通过SavedModelBuilder保存可部署的模型
            saver = tf.train.import_meta_graph("{}.meta".format(checkpoint_file))
            saver.restore(sess, checkpoint_file)
            print(graph.get_name_scope())

            export_path_base = export_path_base
            export_path = os.path.join(
                tf.compat.as_bytes(export_path_base),
                tf.compat.as_bytes(str(count)))
            print('Exporting trained model to', export_path)
            builder = tf.saved_model.builder.SavedModelBuilder(export_path)

            # 建立签名映射,需要包括计算图中的placeholder(ChatInputs, SegInputs, Dropout)和我们需要的结果(project/logits,crf_loss/transitions)
            """
            build_tensor_info:建立一个基于提供的参数构造的TensorInfo protocol buffer,
            输入:tensorflow graph中的tensor;

            输出:基于提供的参数(tensor)构建的包含TensorInfo的protocol buffer
                        get_operation_by_name:通过name获取checkpoint中保存的变量,能够进行这一步的前提是在模型保存的时候给对应的变量赋予name
            """
            bert_input_ids = tf.saved_model.utils.build_tensor_info(graph.get_operation_by_name("bert_input_ids").outputs[0])
            bert_input_mask = tf.saved_model.utils.build_tensor_info(graph.get_operation_by_name("bert_input_mask").outputs[0])
            bert_segment_ids = tf.saved_model.utils.build_tensor_info(graph.get_operation_by_name("bert_segment_ids").outputs[0])
            bert_dropout = tf.saved_model.utils.build_tensor_info(graph.get_operation_by_name("bert_dropout").outputs[0])

            logits = tf.saved_model.utils.build_tensor_info(graph.get_operation_by_name("logits/logits").outputs[0])

            trans = tf.saved_model.utils.build_tensor_info(graph.get_operation_by_name("loss_layer/transitions").outputs[0])

            """
            signature_constants:SavedModel保存和恢复操作的签名常量。
            在序列标注的任务中,这里的method_name是"tensorflow/serving/predict"
            """
            # 定义模型的输入输出,建立调用接口与tensor签名之间的映射
            labeling_signature = (
                tf.saved_model.signature_def_utils.build_signature_def(
                    inputs={
                        "input_ids":
                            bert_input_ids,
                        "segment_ids":
                            bert_segment_ids,
                        "input_mask":
                            bert_input_mask,
                        "dropout":
                            bert_dropout,
                    },
                    outputs={
                        "logits":
                            logits,
                        "trans":
                            trans
                    },
                    method_name=tf.saved_model.signature_constants.PREDICT_METHOD_NAME))

            """
            tf.group : 创建一个将多个操作分组的操作,返回一个可以执行所有输入的操作
            """
            legacy_init_op = tf.group(tf.tables_initializer(), name='legacy_init_op')

            """
            add_meta_graph_and_variables:建立一个Saver来保存session中的变量,
                                          输出对应的原图的定义,这个函数假设保存的变量已经被初始化;
                                          对于一个SavedModelBuilder,这个API必须被调用一次来保存meta graph;
                                          对于后面添加的图结构,可以使用函数 add_meta_graph()来进行添加
            """
            # 建立模型名称与模型签名之间的映射
            builder.add_meta_graph_and_variables(
                sess, [tf.saved_model.tag_constants.SERVING],
                # 保存模型的方法名,与客户端的request.model_spec.signature_name对应
                signature_def_map={
                    tf.saved_model.signature_constants.DEFAULT_SERVING_SIGNATURE_DEF_KEY:
                        labeling_signature},
                legacy_init_op=legacy_init_op)

            builder.save()
            print("Build Done")


if __name__ == '__main__':
    # 测试模型转换
    tf.flags.DEFINE_string("pb_path", "pb", "path of servable models")
    tf.flags.DEFINE_integer("version", 1, "the number of model version")
    FLAGS = tf.flags.FLAGS

    input_checkpoint = './model/ner.org.ckpt'
    pb_path = FLAGS.pb_path + '/'

    # 版本号控制
    count = FLAGS.version
    modify = False
    if not os.path.exists(pb_path):
        os.mkdir(pb_path)
    else:
        for v in os.listdir(pb_path):
            if int(v) >= count:
                count = int(v)
                modify = True
        if modify:
            count += 1

    # 模型格式转换
    restore_and_save(input_checkpoint='./model/', export_path_base=pb_path)
附请求代码截图:
单模型 运行方法:
docker run -p 8501:8501 --mount type=bind,source=/root/software/serving/tensorflow_serving/servables/tensorflow/testdata/saved_model_half_plus_two_cpu,target=/models/half_plus_two -e MODEL_NAME=half_plus_two -t tensorflow/serving &
若为同一模型的不同版本,则可以采用这种配置方式:
model_config_list {
 config:{
    name: "english",
    base_path: "/models/multiModel/english",
    model_platform: "tensorflow",
    model_version_policy:{
        all:{}
      }
 }
}
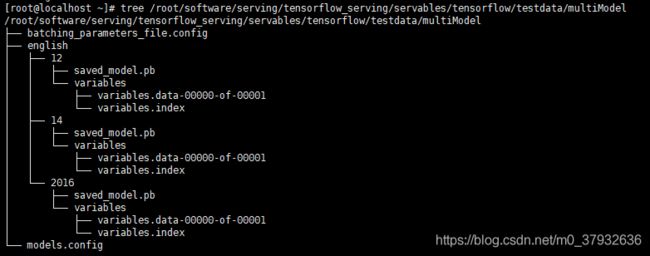
文件路径树:
如上图,包含3个不同的版本,预测时,则可将版本号放在请求地址中,示例:
url = 'http://127.0.0.1:8501/v1/models/english/versions/{0}:predict'.format(str(int(version)))请求的参数,则根据模型输入。


