ECS的世界由许许多多的系统来操控,在进入主世界的时候会创建这些系统,如下图所示:
上一篇中PlayerInputSystem负责处理玩家的操作,与之对应的组件有UserCommand(用户命令),TargetPosition(目标位置)和MoveSpeed(移动速度)。原本想一起看看源码,加一点注释进去,算是走马观花,画蛇添足。不过,这样做实在没有太多营养价值,如果大家有兴趣,自行看下源码吧。这一篇想写一点创造性的东西,例如生动生成地图系统。
灵感来源于Unity Hex Map Tutorial,我觉得自动生成地图这件事情太适合ECS了,为什么?
不管怎样,都值得尝试一下。
说下我的大概需求:
我觉得像MegaCity那样的大地图,太吃资源,如果把地图的所有一切都转换成数据。然后再通过数据来驱动无限地图,这样也许很有意思,但是也不是随机生成所有一切,要利用算法来尽量还原大自然的规则。
大概就是这样,我们先从最简单的开始,一步一步实现我们的需求。就先从六边形开始吧!
国外的大佬解释了六边形有多么神奇和好用,蜜蜂选择六边形来筑巢,足以说明这个东西道法自然,详情点上面的链接了解。
using UnityEngine;
///
/// 六边形常量
///
public static class HexMetrics {
///
/// 总的顶点数,一个六边形有18个顶点
///
public static int totalVertices = 18;
///
/// 六边形外半径=六边形边长
///
public const float outerRadius = 10f;
///
/// 六边形内半径=0.8*外半径
///
public const float innerRadius = outerRadius * 0.866025404f;
///
/// 六边形的六个角组成的数组
///
public readonly static Vector3[] corners = {
new Vector3(0f, 0f, outerRadius),//最顶上那个角作为起点,顺时针画线
new Vector3(innerRadius, 0f, 0.5f * outerRadius),//顺数第二个
new Vector3(innerRadius, 0f, -0.5f * outerRadius),//顺数第三个
new Vector3(0f, 0f, -outerRadius),//依次类推,坐标如下图所示
new Vector3(-innerRadius, 0f, -0.5f * outerRadius),
new Vector3(-innerRadius, 0f, 0.5f * outerRadius),
new Vector3(0f, 0f, outerRadius)
};
}
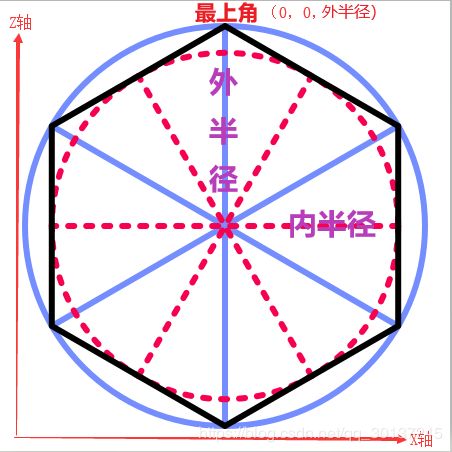
如图,红色虚线代表内半径,蓝色实线代表外半径,而其数值都是相对固定的常量,因此这里直接定义出来。
根据这些常量,设定圆心坐标为(0,0,0),我们以最上角最为起点,就可以得出六个角的顶点坐标了。
接下来创建六边形实体,如下图所示:
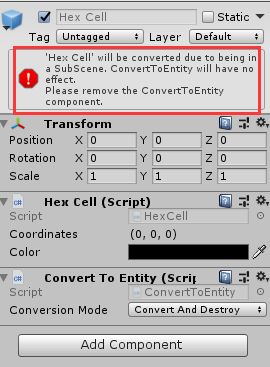
实际上就是个空对象,我本来要通过ConvertToEntity将其转化成实体的,但是出了一个红色警报,只好移除,保留E脚本:
///
/// E:六边形单元
///
[RequiresEntityConversion]
public class HexCellEntity : MonoBehaviour,IConvertGameObjectToEntity {
///
/// 三维坐标
///
public int X;
public int Y;
public int Z;
///
/// 颜色
///
public Color Color;
public void Convert(Entity entity, EntityManager dstManager, GameObjectConversionSystem conversionSystem)
{
//数据交给C保存
dstManager.AddComponentData(entity, new HexCellData
{
X=this.X,
Y=this.Y,
Z=this.Z,
color=Color,
RadiansPerSecond= math.radians(DegreesPerSecond)
});
//添加父组件
dstManager.AddComponent(entity, typeof(Parent));
//添加相对父类的本地位置组件
dstManager.AddComponent(entity, typeof(LocalToParent));
}
}
对应的C组件:
///
/// C:保存六边形的坐标和颜色数据
///
[Serializable]
public struct HexCellData : IComponentData
{
public int X;
public int Y;
public int Z;
public Color color;
public float RadiansPerSecond;
}
暂时设定六边形的功能是旋转,后面再更改成变色:
///
/// S:这里暂时只做旋转,后面会变色等
///
public class HexCellSystem : JobComponentSystem {
EntityQuery m_Group;//查询到特定组件的实体,将其放入这个组中
///
/// 这里根据类型来查询到特定的实体
///
protected override void OnCreate()
{
///typeof(Rotation)=带有Rotation组件的;ComponentType=对应HexCellData组件类型的
/// ReadOnly=只读会加快获取实体的速度,ReadWrite=读写 则相对较慢
m_Group = GetEntityQuery(typeof(Rotation), ComponentType.ReadOnly<HexCellData>());
}
[BurstCompile]//同样使用Burst编译器来加速,区别是使用了块接口:IJobChunk
struct RotationSpeedJob : IJobChunk {
///
/// 时间
///
public float DeltaTime;
///
/// 原型块组件类型=Rotation
///
public ArchetypeChunkComponentType<Rotation> RotationType;
///
/// 只读 原型块组件类型=HexCellData
///
[ReadOnly]
public ArchetypeChunkComponentType<HexCellData> RotationSpeedType;
///
/// 找出满足条件的实体来执行
///
/// <原型块/param>
/// 块索引
/// 第一个实体索引
public void Execute(ArchetypeChunk chunk, int chunkIndex, int firstEntityIndex)
{
var chunkRotations = chunk.GetNativeArray(RotationType);
var chunkRotationSpeeds = chunk.GetNativeArray(RotationSpeedType);
for (var i = 0; i < chunk.Count; i++)
{
var rotation = chunkRotations[i];
var rotationSpeed = chunkRotationSpeeds[i];
chunkRotations[i] = new Rotation
{
Value = math.mul(math.normalize(rotation.Value),
quaternion.AxisAngle(math.up(), rotationSpeed.RadiansPerSecond * DeltaTime))
};
}
}
}
///
/// 这个方法在主线程上每帧运行
///
/// 输入依赖
///
protected override JobHandle OnUpdate(JobHandle inputDependencies)
{
// Explicitly declare: 声明
// - Read-Write access to Rotation 读写的方式访问旋转
// - Read-Only access to HexCellData 只读的方式访问旋转速度
var rotationType = GetArchetypeChunkComponentType<Rotation>();
var rotationSpeedType = GetArchetypeChunkComponentType<HexCellData>(true);
var job = new RotationSpeedJob()
{
RotationType = rotationType,
RotationSpeedType = rotationSpeedType,
DeltaTime = Time.deltaTime
};
return job.Schedule(m_Group, inputDependencies);
}
}
如上代码是六边形单元的基本ECS写法,都是最基础的:
E | C | S |
---|---|---|
HexCellEntity | HexCellData | HexCellSystem |
在游戏对象上添加上一个Mesh显示相应的组件就可以让其旋转起来了,其实很简单。
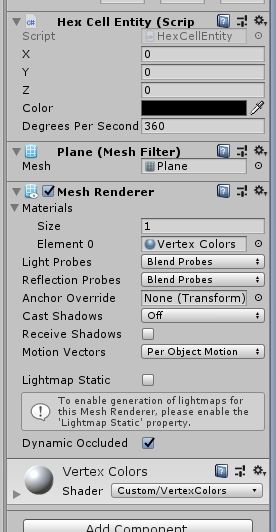
接下来我们把它做成一个预设,然后再大量生成,以后的大地图就建立在这个六边形单元的基础上。
接下来我们新建一个空游戏对象,命名为:MapCreater。为其添加ConvertToEntity脚本组件,使其转化为实体,新建一个C#脚本来描述这个实体,命名为CreaterEntity:
///
/// E:创建者实体
///
[RequiresEntityConversion]
public class CreaterEntity : MonoBehaviour, IDeclareReferencedPrefabs, IConvertGameObjectToEntity
{
///
/// 六边形单元预设
///
public GameObject HexCellPrefab;
///
/// 地图宽度(以六边形为基本单位)
///
public int MapWidth=6;
///
/// 地图长度(以六边形为基本单位)
///
public int MapHeight=6;
///
/// 地图颜色
///
public Color defaultColor = Color.white;
public void Convert(Entity entity, EntityManager dstManager, GameObjectConversionSystem conversionSystem)
{
HexMetrics.totalVertices = MapWidth * MapHeight * 18;
dstManager.AddComponentData(entity, new MapData
{
Width=MapWidth,
Height=MapHeight,
Prefab = conversionSystem.GetPrimaryEntity(HexCellPrefab),
Color=defaultColor,
bIsNewMap=bCreatNewMap
});
}
public void DeclareReferencedPrefabs(List<GameObject> referencedPrefabs)
{
referencedPrefabs.Add(HexCellPrefab);
}
}
数据交给C保存起来:
///
/// C:保存创建者数据
///
[Serializable]
public struct CreaterData : IComponentData {
public int Width;
public int Height;
public Entity Prefab;
public Color Color;
}
S:创建六边形单元系统
///
/// 创建六边形单元系统
///
public class CreateHexCellSystem : JobComponentSystem {
BeginInitializationEntityCommandBufferSystem m_EntityCommandBufferSystem;
///
/// 是否是新地图
///
public bool bIfNewMap = true;
protected override void OnCreate()
{
m_EntityCommandBufferSystem = World.GetOrCreateSystem<BeginInitializationEntityCommandBufferSystem>();
}
///
/// 循环创建六边形单元,使其生成对应长宽的阵列
///
struct SpawnJob : IJobForEachWithEntity<CreaterData> {
public EntityCommandBuffer.Concurrent CommandBuffer;
[BurstCompile]
public void Execute(Entity entity, int index, [ReadOnly]ref CreaterData createrData)
{
for (int z = 0; z < createrData.Height; z++)
{
for (int x = 0; x < createrData.Width; x++)
{
//1.实例化
var instance = CommandBuffer.Instantiate(index, createrData.Prefab);
//2.计算阵列坐标
float _x = (x + z * 0.5f - z / 2) * (HexMetrics.innerRadius * 2f);
float _z = z * (HexMetrics.outerRadius * 1.5f);
//3.设置父组件
CommandBuffer.SetComponent(index, instance, new Parent
{
Value = entity
});
//4.设置每个单元的数据
CommandBuffer.SetComponent(index, instance, new HexCellData
{
X = x - z / 2,
Y = 0,
Z = z,
color = createrData.Color,
});
//5.设置位置
CommandBuffer.SetComponent(index, instance, new Translation
{
Value = new float3(_x, 0F, _z)
});
}
}
}
}
///
/// 如果有新地图,则启动任务
///
/// 依赖
/// 任务句柄
protected override JobHandle OnUpdate(JobHandle inputDeps)
{
if (bIfNewMap)
{
var job = new SpawnJob
{
CommandBuffer = m_EntityCommandBufferSystem.CreateCommandBuffer().ToConcurrent(),
}.Schedule(this, inputDeps);
m_EntityCommandBufferSystem.AddJobHandleForProducer(job);
job.Complete();
var mapSystem = World.GetOrCreateSystem<CreateHexMapSystem>();
mapSystem.bIfNewMap = true;
//新地图创建完成,关闭创建
bIfNewMap = false;
return job;
}
return inputDeps;
}
}
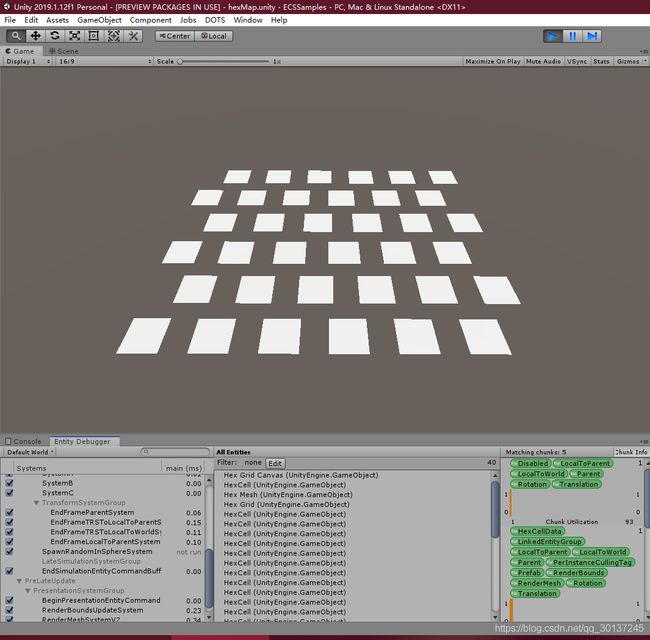
如上图所示,我们创建6*6的单元矩阵,但是它们并没有旋转。我们通过Entity Debugger窗口可以看到对应的实体。
我发现Rotation的数据一直都是0,并没有发生旋转,但是代码并没有问题。到官方论坛反馈时,发现是Rotation的API变了!
ECS还处于过渡时期,所以API会经常变动,开发起来非常尴尬。
我发现以前的写法,在做升级之后,就不起作用了。不仅如此,很多物理组件无法使用。
因此这一篇到这里搁浅了,后面找到正确的API继续写。
已经把项目上传到Github,有兴趣的朋友可以看看:HexMapMadeInUnity2019ECS
如果喜欢我的文章可以点赞支持一下,谢谢鼓励!如果有什么疑问可以给我留言,有错漏的地方请批评指证!
如果有技术难题需要讨论,可以加入开发者联盟:566189328(付费群)为您提供有限的技术支持,以及,心灵鸡汤!
当然,不需要技术支持也欢迎加入进来,随时可以请我喝咖啡、茶和果汁!( ̄┰ ̄*)